logo资料库

爱克发扫描仪-Arcus 1200说明书.pdf

第1页 / 共47页
第2页 / 共47页
第3页 / 共47页
第4页 / 共47页
第5页 / 共47页
第6页 / 共47页
第7页 / 共47页
第8页 / 共47页
资料共47页,剩余部分请下载后查看
Preface
Chapter 1: Preparing the Scanner
Unpacking the Scanner
Unlocking the Scanner
Autolock
Unlocking the Transparency Unit (TPU)
Taking a Closer Look
The Different Parts of Your Scanner
Working with Trays and a Flexible Template
Trays
Flexible Template
Connecting the Transparency Unit (TPU)
Chapter 2: Installing the Scanner
Minimum Hardware and Software Requirements
Environmental Requirements
Precautions
Cleaning Your Scanner
SCSI Devices
Installation for Mac OS
Installation of the Software
Which SCSI Interface Card
Choosing a SCSI ID Number
Connecting the Scanner
If your Arcus 1200 is the only external SCSI device to be connected to your Apple Macintosh:
If your Arcus 1200 will be connected to your Apple Macintosh together with other external SCSI devices:
If your scanner is the first external device of your SCSI chain
If you install the scanner between two other external SCSI devices
Testing the Scanner and the Connection
Installation for Windows
Installation of the Software
Which SCSI Interface Card
Choosing a SCSI ID Number
Connecting the Scanner
If your PC has a high density connector:
If your PC has a 25-pin connector and your Arcus 1200 is the only external SCSI device to be connected to your PC:
If your PC has a 25-pin connector and your Arcus 1200 will be connected to your PC together with other external SCSI devices:
If your scanner is the first external device of your SCSI chain
If you install the scanner between two other external SCSI devices
If your PC has a 50-pin connector and your Arcus 1200 is the only external SCSI device to be connected to your PC:
If your PC has a 50-pin connector and your Arcus 1200 will be connected to your PC together with other external SCSI devices:
If your scanner is the first external device of your SCSI chain
If you install the scanner between two other external SCSI devices
Testing the Scanner and the Connection
Chapter 3: Placing Originals
Changing Removable Trays
Placing Reflective Originals
Placing Transparent Originals
Using the Glass Plate and the Flexible Template
Using the Batch Slide Holders
35 mm framed (6) and 4 x 5 inch (1) batch slide holder
35 mm strip (1) and 6 x 9 cm (2) batch slide holder
Appendix A: Troubleshooting
The power indicator fails to light up.
The power indicator lights up but nothing happens.
The scanner makes a loud knocking noise and the optical carriage does not move under the glass plate.
The progress indicator light on the scanner's operating panel remains blinking after the power-up sequence (= about 25 seconds).
The workstation does not start up. If your workstation is an Apple Macintosh a little floppy disk with a question mark appears on your screen.
The scanner software cannot find the scanner.
Your original fell into the scanner.
An error message appears while you scan transparencies.
The TPU is not working.
The TPU cannot be opened.
The TPU option is not selectable in the software.
Appendix B: Technical Information
Appendix C: Arcus 1200 Regulation Compliance
Safety Regulations
UL Safety Statement
TÜV: Wichtige Sicherheitshinweise
Electromagnetic Compatibility
Federal Communications Commission Radio Frequency Interference Statement.
Canadian Department of Communications
Arcus 1200 Owner's Guide ! Preface This chapter gives you general information about Arcus 1200. ! Chapter 1: Preparing the Scanner This chapter shows you how to prepare your Arcus 1200 for installation. ! Chapter 2: Installing the Scanner This chapter shows you how to set up your Arcus 1200 for the Apple Macintosh and PC. ! Chapter 3: Placing Originals This chapter shows you how to place your originals in your Arcus 1200. ! Appendix A: Troubleshooting This appendix can be helpful when you come across problems that you are unable to solve. ! Appendix B: Technical Information This appendix provides specifications of your Arcus 1200. ! Appendix C: Arcus 1200 Regulation Compliance This appendix gives you information on the safety regulations and on electromagnetic compatibility. ab
Trademarks Agfa, the Agfa rhombus and MultiPlate are trademarks of Agfa-Gevaert AG. Arcus 1200, FotoLook and ColorTune are trademarks of Agfa-Gevaert N.V. Adaptec and ASPI are trademarks of Adaptec. Adobe Acrobat and the Acrobat logo are trademarks of Adobe Systems, Incorporated. Intel is a registered trademark of Intel Corporation. Power Macintosh, System 8 and Mac OS 9 are trademarks and Apple and Macintosh are registered trademarks of Apple Computer, Incorporated. IBM PC is a trademark of the International Business Machines Corporation. Readiris is a registered trademark of I.R.I.S. Corel is a registered trademark of the Corel Corporation Windows, Windows NT and the Windows logo are trademarks or registered trademarks of Microsoft Corporation. Other products or company names are trademarks or registered trademarks of their respective holders. Copyright (c) September 2000 Agfa-Gevaert N.V. All rights reserved. All software and hardware described in this document is subject to change without notice. Trademarks 2
Contents Preface ............................................................................................................................................... 5 Chapter 1: Preparing the Scanner .................................................................................................. 6 Unpacking the Scanner............................................................................................................... 7 Unlocking the Scanner ................................................................................................................ 7 Autolock............................................................................................................................... 7 Unlocking the Transparency Unit (TPU) ............................................................................. 7 Taking a Closer Look .................................................................................................................. 8 The Different Parts of Your Scanner ................................................................................... 9 Working with Trays and a Flexible Template .................................................................... 10 Connecting the Transparency Unit (TPU) ......................................................................... 11 Chapter 2: Installing the Scanner.................................................................................................. 13 Minimum Hardware and Software Requirements ..................................................................... 14 Environmental Requirements.................................................................................................... 15 Precautions ............................................................................................................................... 15 Cleaning Your Scanner ............................................................................................................. 16 SCSI Devices ............................................................................................................................ 16 Installation for Mac OS.............................................................................................................. 16 Installation of the Software ................................................................................................ 16 Which SCSI Interface Card ............................................................................................... 17 Choosing a SCSI ID Number ............................................................................................ 17 Connecting the Scanner.................................................................................................... 18 Testing the Scanner and the Connection.......................................................................... 23 Installation for Windows ............................................................................................................ 24 Installation of the Software ................................................................................................ 24 Which SCSI Interface Card ............................................................................................... 24 Choosing a SCSI ID Number ............................................................................................ 24 Connecting the Scanner.................................................................................................... 25 Testing the Scanner and the Connection.......................................................................... 33 Chapter 3: Placing Originals.......................................................................................................... 35 Changing Removable Trays ..................................................................................................... 36 Placing Reflective Originals ...................................................................................................... 36 Placing Transparent Originals................................................................................................... 38 Using the Glass Plate and the Flexible Template ............................................................. 38 Using the Batch Slide Holders........................................................................................... 38 Contents 3
Appendix A: Troubleshooting ....................................................................................................... 41 Appendix B: Technical Information .............................................................................................. 43 Appendix C: Arcus 1200 Regulation Compliance ....................................................................... 45 Safety Regulations .................................................................................................................... 46 UL Safety Statement ......................................................................................................... 46 TÜV: Wichtige Sicherheitshinweise .................................................................................. 46 Electromagnetic Compatibility................................................................................................... 47 Federal Communications Commission Radio Frequency Interference Statement. .......... 47 Canadian Department of Communications ....................................................................... 47 Contents 4
Preface Arcus 1200 can scan reflective and transparent originals. Because of its MultiPlate™ system, it is possible to prepare transparent originals while scanning reflective originals and vice versa. This means a considerable increase in productivity. Arcus 1200's image quality makes it perfectly suitable for pre-press graphical applications. It is based on flatbed CCD (Charge Coupled Device) scanning technology. Arcus 1200 is characterized by a large input size range. Due to its 10,000 CCD pixels, an impressive output size range can be achieved. This high-precision instrument features exceptional sharpness and color fidelity. The flexible template and a batch slide holder frame with two batch slide holders allow you to scan transparent originals. The batch slide holders allow you to increase the productivity of the scanner. To facilitate the scanning of thick originals like magazines and books, the TPU adjusts automatically to the thickness of the original. If necessary, you can remove the TPU of the Arcus 1200 completely. The originals can be of any type. The FotoLook™ scanning software will optimize the scan result. ColorTune™ software ensures that colors are matched seamlessly throughout the entire prepress and printing process. The bit depths can be either 3 x 12 bit for color (packed into 3 x 16 bit or truncated to 3 x 8 bit), 12 bit for gray scale (packed into 16 bit or truncated to 8 bit) originals, or 1 bit for line-art originals. The scanned data are transferred to the workstation through SCSI-2. The workstation operating system can be either a Mac OS™ or Windows™. Preface 5
Chapter 1: Preparing the Scanner This chapter assists you in preparing your Arcus 1200 for installation. You will find instructions for: ! Unpacking the Scanner ! Unlocking the Scanner ! Autolock ! Unlocking the Transparency Unit (TPU) ! Taking a Closer Look ! The Different Parts of Your Scanner ! Working with Trays and a Flexible Template ! Connecting the Transparency Unit (TPU) Chapter 1: Preparing the Scanner 6
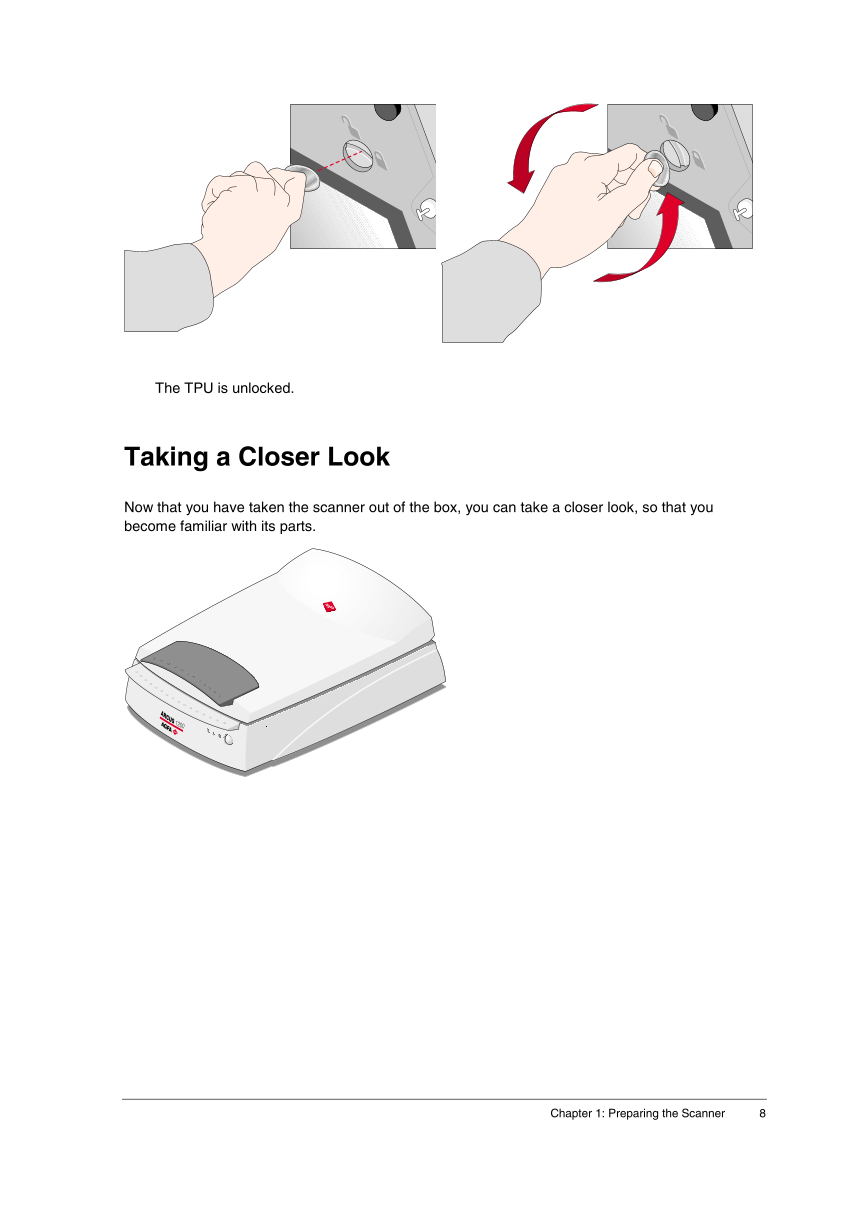
Unpacking the Scanner 1 Open the packing box and take out all the items carefully. 2 Check each item to make sure that there is no visual defect. 3 Check with your packing list if something is missing. If something is missing, contact your dealer or Agfa service representative. 4 Remove the plastic wrapping and the packing materials from the scanner. " Note: Keep the packing materials to protect the scanner for later transport. Unlocking the Scanner Autolock The scanner's optical carriage contains all optical components and rides back and forth during the scan. An unlocking foot at the bottom of your Arcus 1200 holds the carriage in place during shipment. The scanner will automatically be unlocked when you place the scanner on a flat surface. " Note: When you pull the scanner of the table, the scanner will automatically be locked. This will protect the scanner's optical assembly from possible damage. Unlocking the Transparency Unit (TPU) To scan negatives, transparencies or slides you use the transparency unit (TPU) of your Arcus 1200. The TPU of your scanner is locked. You have to unlock this TPU before you can use it. 1 Open the TPU of the scanner. You can see the unlocking screw at the inside of the TPU. 2 Take a coin and turn the screw a quarter counterclockwise. Chapter 1: Preparing the Scanner 7
The TPU is unlocked. Taking a Closer Look Now that you have taken the scanner out of the box, you can take a closer look, so that you become familiar with its parts. Chapter 1: Preparing the Scanner 8
分享到:
收藏