Portable Handy Scanner
with built-in rechargeable battery
Instruction Guide
• Application CD
• Pouch
• Mini USB Cable
• Instruction Guide
Package Contents
• Scanner
• Calibration Sheet
• Cleaning Cloth
Important Safety Instruction
• Keep away from water or moisture and dusty areas.
• Never store in hot and very cold areas.
• The battery and inside of the scanner become hot during large volume scanning operation. Allow few
minutes of cool-down before operating the unit again.
• Ambient temperature ranges from 0°C to +40°C.
• Only use attachments/accessories specifi ed by the manufacturer.
• Avoid using the scanner in a dusty environment. Dust particles and other foreign objects may damage the
unit. Place the scanner in the pouch if not in use.
• Operate the scanner on a level, well-grounded work surface, free of excessive vibration.
• Do not attempt to disassemble the scanner. There is danger of an electrical shock
• The battery is not user-replaceable. Do not attempt to remove battery by yourself.
• Batteries must never be short-circuited.
• Never throw the scanner into a fi re as it will cause the danger of explosion.
• Do not dispose of the scanner with household waste. Dispose of them in accordance with the local
regulations.
• Do not use the battery under high temperature or near heat sources.
• The lifetime of the battery pack is limited. Power is slowly drained when not in use.
• The battery used in this scanner may present a risk of fi re or chemical burn if mistreated.
This symbol on the product or in the instructions means that your electrical and electronic equipment
should be disposed at the end of its life separately from your household waste. There are separate
collection systems for recycling in the EU. For more information, please contact the local authority or
your retailer where you purchased the product.
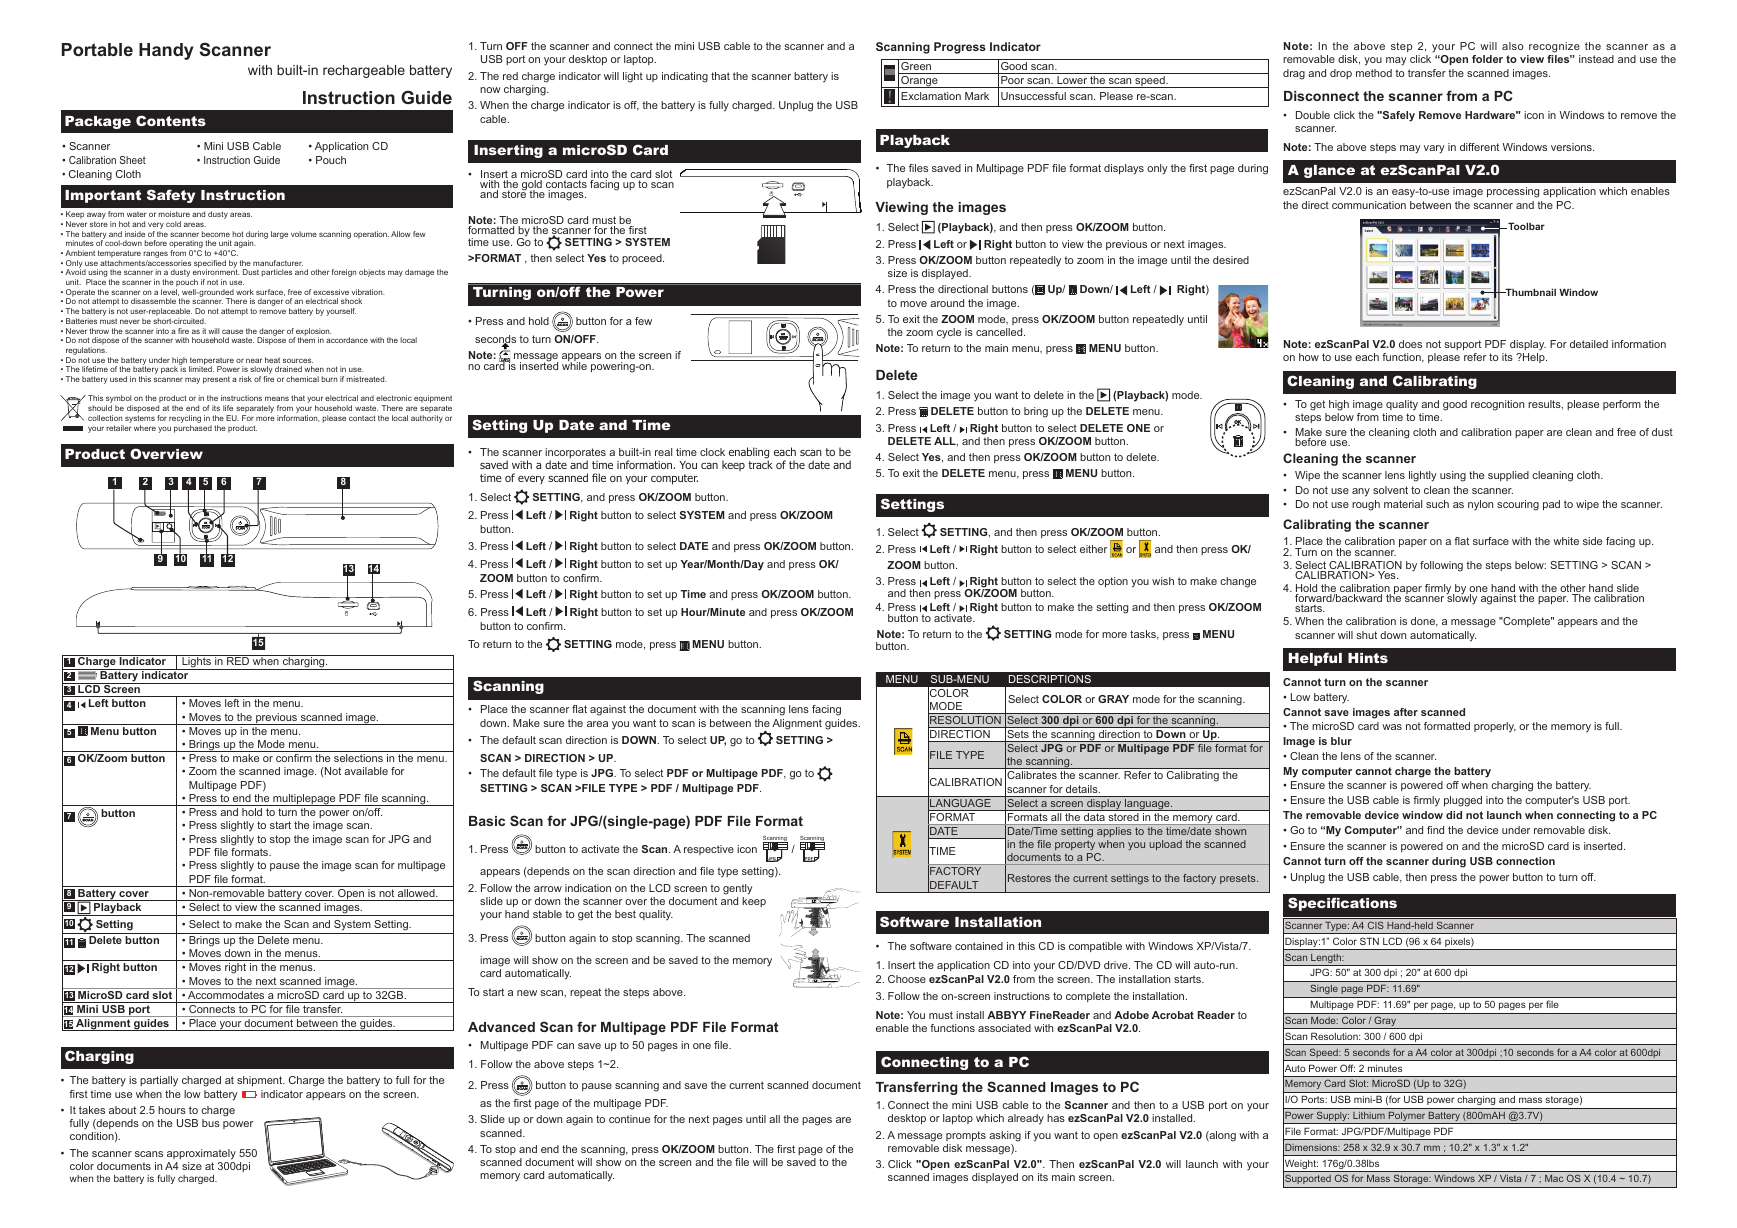
Product Overview
4 5
3
1
2
6
7
8
9
10
11 12
13
14
1. Turn OFF the scanner and connect the mini USB cable to the scanner and a
USB port on your desktop or laptop.
2. The red charge indicator will light up indicating that the scanner battery is
now charging.
3. When the charge indicator is off, the battery is fully charged. Unplug the USB
cable.
Scanning Progress Indicator
Green
Orange
Exclamation Mark Unsuccessful scan. Please re-scan.
Good scan.
Poor scan. Lower the scan speed.
Inserting a microSD Card
• Insert a microSD card into the card slot
with the gold contacts facing up to scan
and store the images.
Note: The microSD card must be
formatted by the scanner for the fi rst
time use. Go to
>FORMAT , then select Yes to proceed.
SETTING > SYSTEM
Turning on/off the Power
button for a few
• Press and hold
seconds to turn ON/OFF.
Note:
no card is inserted while powering-on.
message appears on the screen if
Setting Up Date and Time
• The scanner incorporates a built-in real time clock enabling each scan to be
saved with a date and time information. You can keep track of the date and
time of every scanned fi le on your computer.
Playback
• The fi les saved in Multipage PDF fi le format displays only the fi rst page during
playback.
Viewing the images
1. Select
2. Press
3. Press OK/ZOOM button repeatedly to zoom in the image until the desired
(Playback), and then press OK/ZOOM button.
Left or
Right button to view the previous or next images.
size is displayed.
4. Press the directional buttons (
to move around the image.
Up/
Down/
Left /
Right)
5. To exit the ZOOM mode, press OK/ZOOM button repeatedly until
the zoom cycle is cancelled.
MENU button.
Note: To return to the main menu, press
Delete
1. Select the image you want to delete in the
2. Press
3. Press
DELETE button to bring up the DELETE menu.
Right button to select DELETE ONE or
Left /
DELETE ALL, and then press OK/ZOOM button.
(Playback) mode.
4. Select Yes, and then press OK/ZOOM button to delete.
5. To exit the DELETE menu, press
MENU button.
1. Select
2. Press
button.
3. Press
4. Press
SETTING, and press OK/ZOOM button.
Left /
Right button to select SYSTEM and press OK/ZOOM
Left /
Left /
Right button to select DATE and press OK/ZOOM button.
Right button to set up Year/Month/Day and press OK/
ZOOM button to confi rm.
15
To return to the
SETTING mode, press
MENU button.
5. Press
6. Press
Left /
Left /
Right button to set up Time and press OK/ZOOM button.
Right button to set up Hour/Minute and press OK/ZOOM
button to confi rm.
Lights in RED when charging.
Battery indicator
1 Charge Indicator
2
3 LCD Screen
4
Left button
5
Menu button
6 OK/Zoom button
7
button
8 Battery cover
Playback
9
10
Setting
Delete button
11
12
Right button
13 MicroSD card slot
14 Mini USB port
15 Alignment guides
• Moves left in the menu.
• Moves to the previous scanned image.
• Moves up in the menu.
• Brings up the Mode menu.
• Press to make or confi rm the selections in the menu.
• Zoom the scanned image. (Not available for
Multipage PDF)
• Press to end the multiplepage PDF fi le scanning.
• Press and hold to turn the power on/off.
• Press slightly to start the image scan.
• Press slightly to stop the image scan for JPG and
PDF fi le formats.
• Press slightly to pause the image scan for multipage
PDF fi le format.
• Non-removable battery cover. Open is not allowed.
• Select to view the scanned images.
• Select to make the Scan and System Setting.
• Brings up the Delete menu.
• Moves down in the menus.
• Moves right in the menus.
• Moves to the next scanned image.
• Accommodates a microSD card up to 32GB.
• Connects to PC for fi le transfer.
• Place your document between the guides.
Charging
• The battery is partially charged at shipment. Charge the battery to full for the
indicator appears on the screen.
fi rst time use when the low battery
• It takes about 2.5 hours to charge
fully (depends on the USB bus power
condition).
• The scanner scans approximately 550
color documents in A4 size at 300dpi
when the battery is fully charged.
OK
ZOOM
SCAN
Scanning
• Place the scanner fl at against the document with the scanning lens facing
down. Make sure the area you want to scan is between the Alignment guides.
• The default scan direction is DOWN. To select UP, go to
SETTING >
SCAN > DIRECTION > UP.
• The default fi le type is JPG. To select PDF or Multipage PDF, go to
SETTING > SCAN >FILE TYPE > PDF / Multipage PDF.
Basic Scan for JPG/(single-page) PDF File Format
1. Press
button to activate the Scan. A respective icon
Scanning
Scanning
/
JPG
PDF
appears (depends on the scan direction and fi le type setting).
2. Follow the arrow indication on the LCD screen to gently
slide up or down the scanner over the document and keep
your hand stable to get the best quality.
3. Press
button again to stop scanning. The scanned
image will show on the screen and be saved to the memory
card automatically.
To start a new scan, repeat the steps above.
Advanced Scan for Multipage PDF File Format
• Multipage PDF can save up to 50 pages in one fi le.
1. Follow the above steps 1~2.
2. Press
button to pause scanning and save the current scanned document
as the fi rst page of the multipage PDF.
3. Slide up or down again to continue for the next pages until all the pages are
scanned.
4. To stop and end the scanning, press OK/ZOOM button. The fi rst page of the
scanned document will show on the screen and the fi le will be saved to the
memory card automatically.
Note: In the above step 2, your PC will also recognize the scanner as a
removable disk, you may click “Open folder to view fi les” instead and use the
drag and drop method to transfer the scanned images.
Disconnect the scanner from a PC
• Double click the "Safely Remove Hardware" icon in Windows to remove the
scanner.
Note: The above steps may vary in different Windows versions.
A glance at ezScanPal V2.0
ezScanPal V2.0 is an easy-to-use image processing application which enables
the direct communication between the scanner and the PC.
Toolbar
Thumbnail Window
Note: ezScanPal V2.0 does not support PDF display. For detailed information
on how to use each function, please refer to its ?Help.
Cleaning and Calibrating
• To get high image quality and good recognition results, please perform the
steps below from time to time.
before use.
• Make sure the cleaning cloth and calibration paper are clean and free of dust
Cleaning the scanner
• Wipe the scanner lens lightly using the supplied cleaning cloth.
• Do not use any solvent to clean the scanner.
• Do not use rough material such as nylon scouring pad to wipe the scanner.
Calibrating the scanner
1. Place the calibration paper on a fl at surface with the white side facing up.
2. Turn on the scanner.
3. Select CALIBRATION by following the steps below: SETTING > SCAN >
CALIBRATION> Yes.
4. Hold the calibration paper fi rmly by one hand with the other hand slide
forward/backward the scanner slowly against the paper. The calibration
starts.
5. When the calibration is done, a message "Complete" appears and the
scanner will shut down automatically.
Helpful Hints
Cannot turn on the scanner
• Low battery.
Cannot save images after scanned
• The microSD card was not formatted properly, or the memory is full.
Image is blur
• Clean the lens of the scanner.
My computer cannot charge the battery
• Ensure the scanner is powered off when charging the battery.
• Ensure the USB cable is fi rmly plugged into the computer's USB port.
The removable device window did not launch when connecting to a PC
• Go to “My Computer” and fi nd the device under removable disk.
• Ensure the scanner is powered on and the microSD card is inserted.
Cannot turn off the scanner during USB connection
• Unplug the USB cable, then press the power button to turn off.
Specifi cations
Scanner Type: A4 CIS Hand-held Scanner
Display:1” Color STN LCD (96 x 64 pixels)
Scan Length:
JPG: 50" at 300 dpi ; 20" at 600 dpi
Single page PDF: 11.69"
Multipage PDF: 11.69" per page, up to 50 pages per fi le
Scan Mode: Color / Gray
Scan Resolution: 300 / 600 dpi
Scan Speed: 5 seconds for a A4 color at 300dpi ;10 seconds for a A4 color at 600dpi
Auto Power Off: 2 minutes
Memory Card Slot: MicroSD (Up to 32G)
I/O Ports: USB mini-B (for USB power charging and mass storage)
Power Supply: Lithium Polymer Battery (800mAH @3.7V)
File Format: JPG/PDF/Multipage PDF
Dimensions: 258 x 32.9 x 30.7 mm ; 10.2" x 1.3" x 1.2"
Weight: 176g/0.38lbs
Supported OS for Mass Storage: Windows XP / Vista / 7 ; Mac OS X (10.4 ~ 10.7)
SETTING, and then press OK/ZOOM button.
Right button to select either
or
and then press OK/
and then press OK/ZOOM button.
Right button to select the option you wish to make change
4. Press
Left /
Right button to make the setting and then press OK/ZOOM
Note: To return to the
button.
SETTING mode for more tasks, press
MENU
Settings
1. Select
2. Press
Left /
ZOOM button.
Left /
3. Press
button to activate.
MENU SUB-MENU
DESCRIPTIONS
Select COLOR or GRAY mode for the scanning.
COLOR
MODE
RESOLUTION Select 300 dpi or 600 dpi for the scanning.
Sets the scanning direction to Down or Up.
DIRECTION
Select JPG or PDF or Multipage PDF fi le format for
FILE TYPE
the scanning.
CALIBRATION Calibrates the scanner. Refer to Calibrating the
LANGUAGE
FORMAT
DATE
TIME
FACTORY
DEFAULT
scanner for details.
Select a screen display language.
Formats all the data stored in the memory card.
Date/Time setting applies to the time/date shown
in the fi le property when you upload the scanned
documents to a PC.
Restores the current settings to the factory presets.
Software Installation
• The software contained in this CD is compatible with Windows XP/Vista/7.
1. Insert the application CD into your CD/DVD drive. The CD will auto-run.
2. Choose ezScanPal V2.0 from the screen. The installation starts.
3. Follow the on-screen instructions to complete the installation.
Note: You must install ABBYY FineReader and Adobe Acrobat Reader to
enable the functions associated with ezScanPal V2.0.
Connecting to a PC
Transferring the Scanned Images to PC
1. Connect the mini USB cable to the Scanner and then to a USB port on your
desktop or laptop which already has ezScanPal V2.0 installed.
2. A message prompts asking if you want to open ezScanPal V2.0 (along with a
removable disk message).
3. Click "Open ezScanPal V2.0". Then ezScanPal V2.0 will launch with your
scanned images displayed on its main screen.
�

 V2版本原理图(Capacitive-Fingerprint-Reader-Schematic_V2).pdf
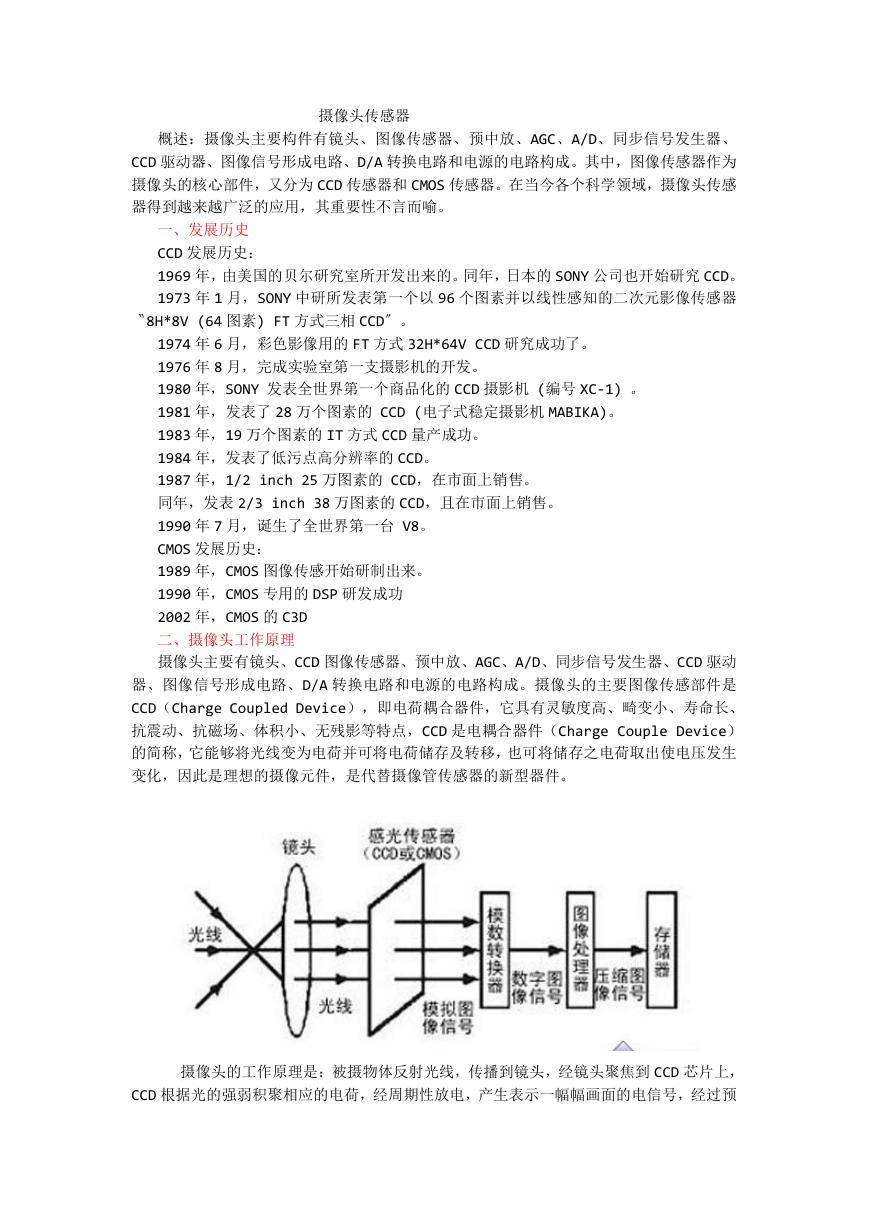 摄像头工作原理.doc
 VL53L0X简要说明(En.FLVL53L00216).pdf
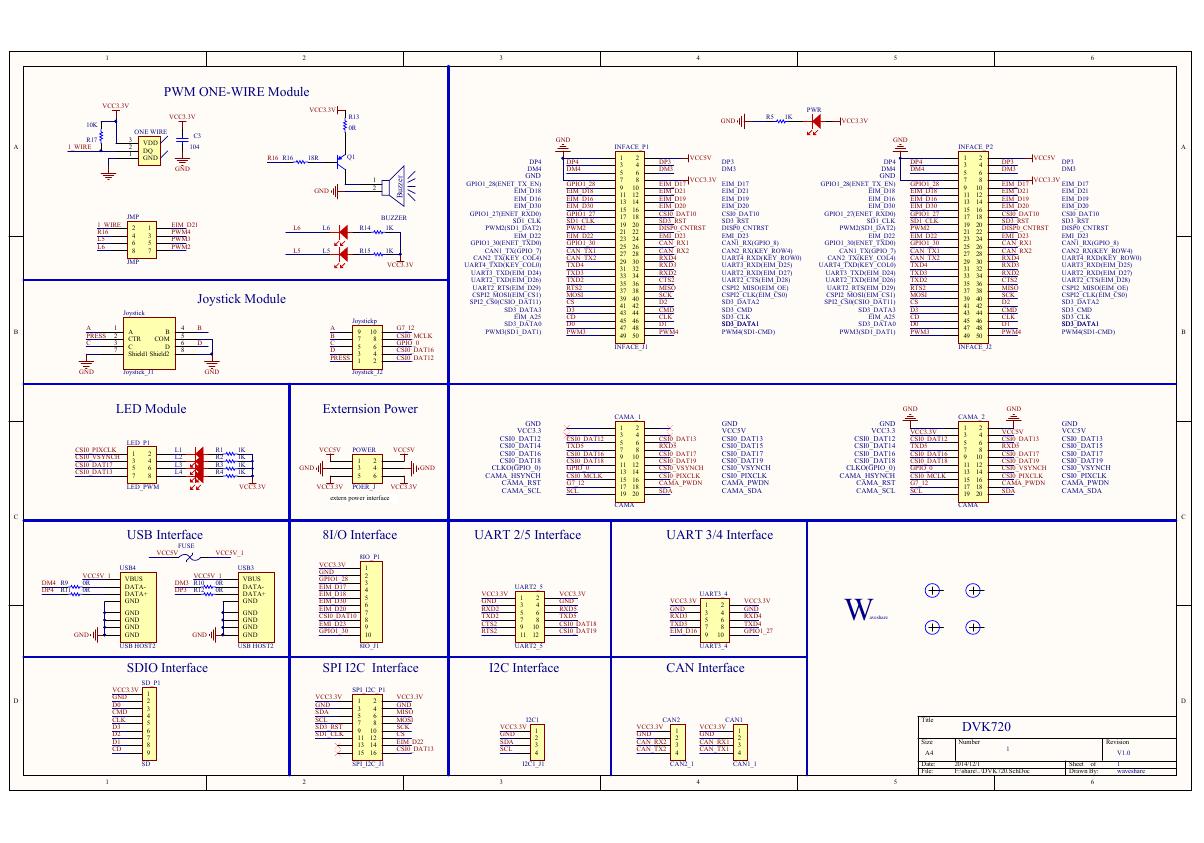 原理图(DVK720-Schematic).pdf
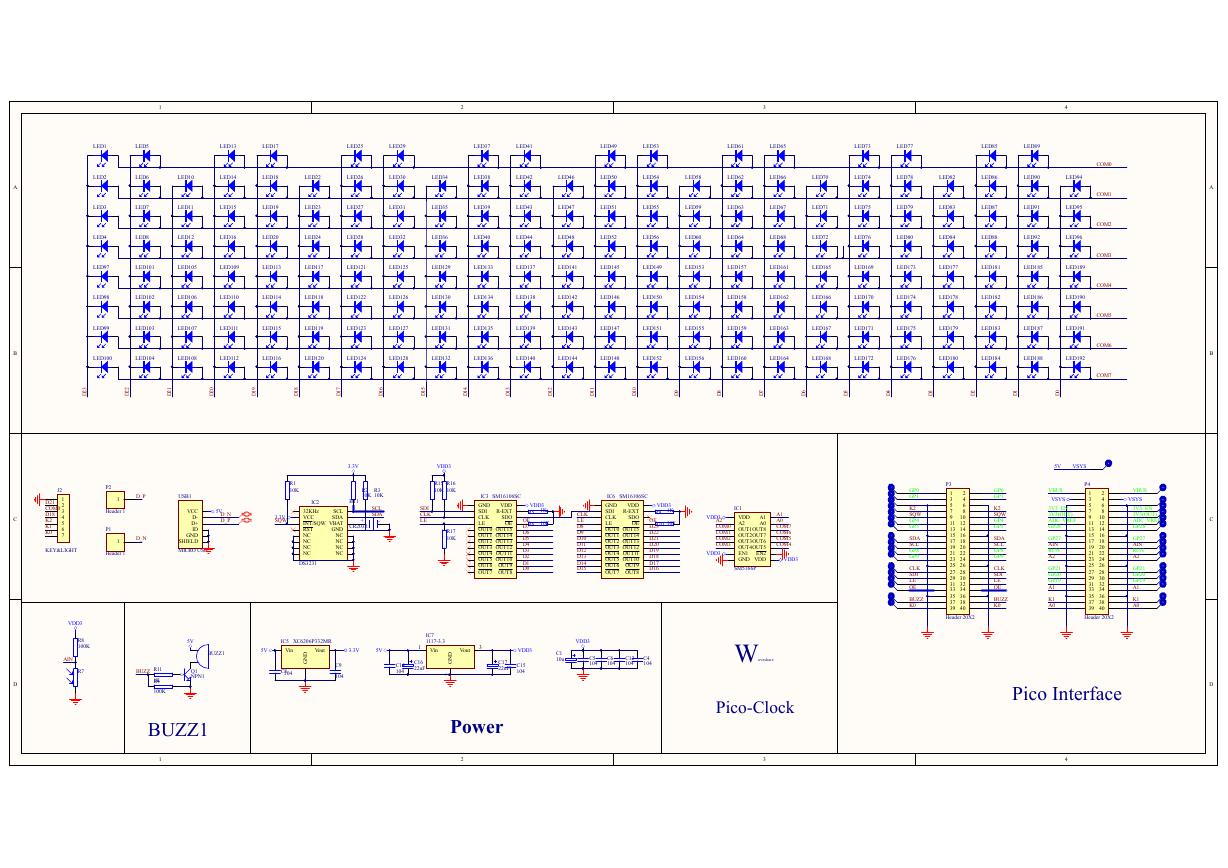 原理图(Pico-Clock-Green-Schdoc).pdf
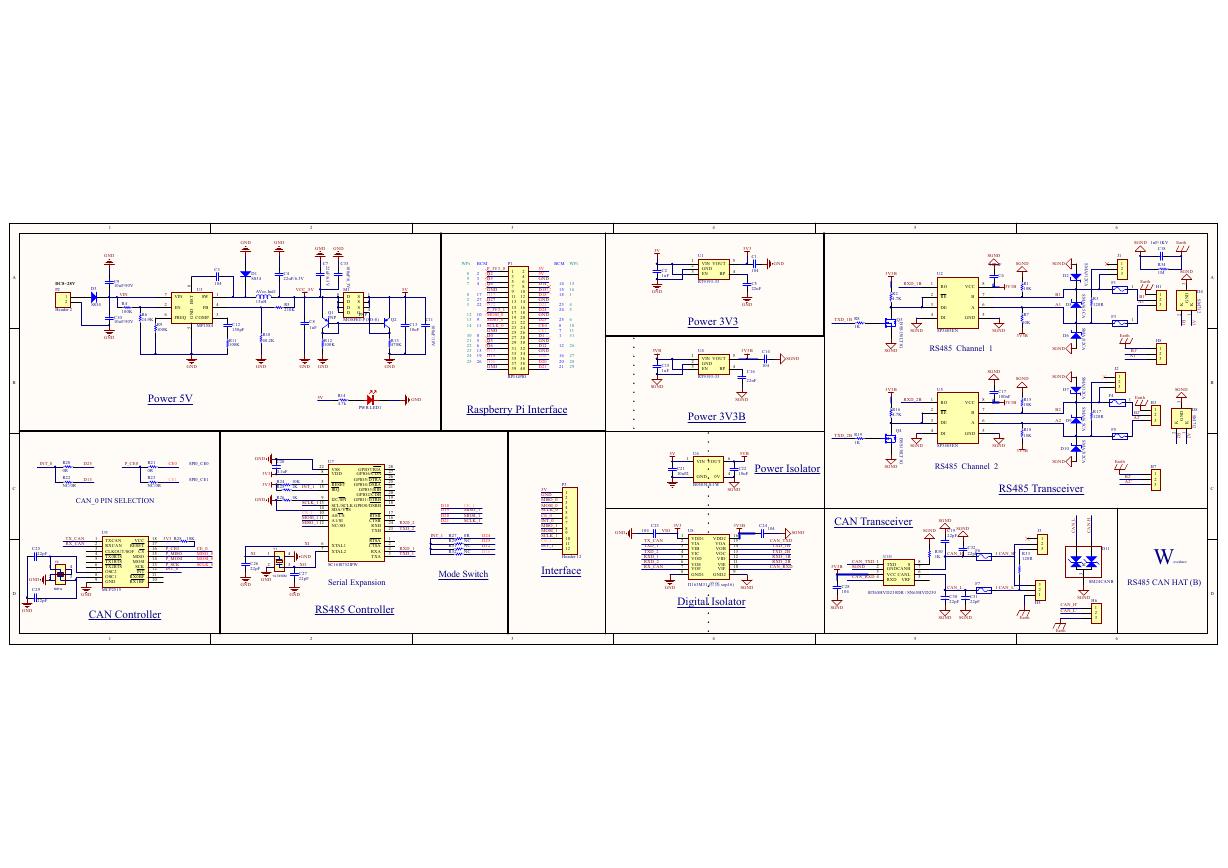 原理图(RS485-CAN-HAT-B-schematic).pdf
 File:SIM7500_SIM7600_SIM7800 Series_SSL_Application Note_V2.00.pdf
 ADS1263(Ads1262).pdf
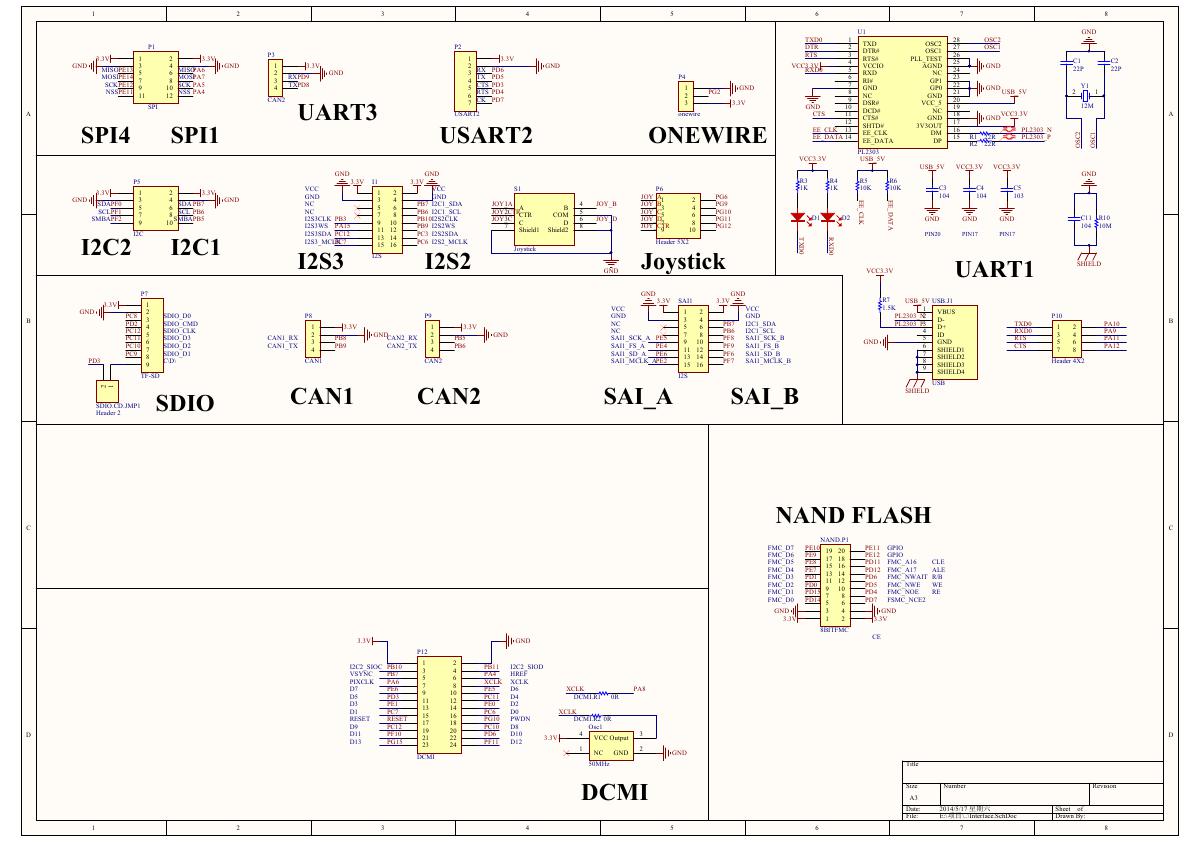 原理图(Open429Z-D-Schematic).pdf
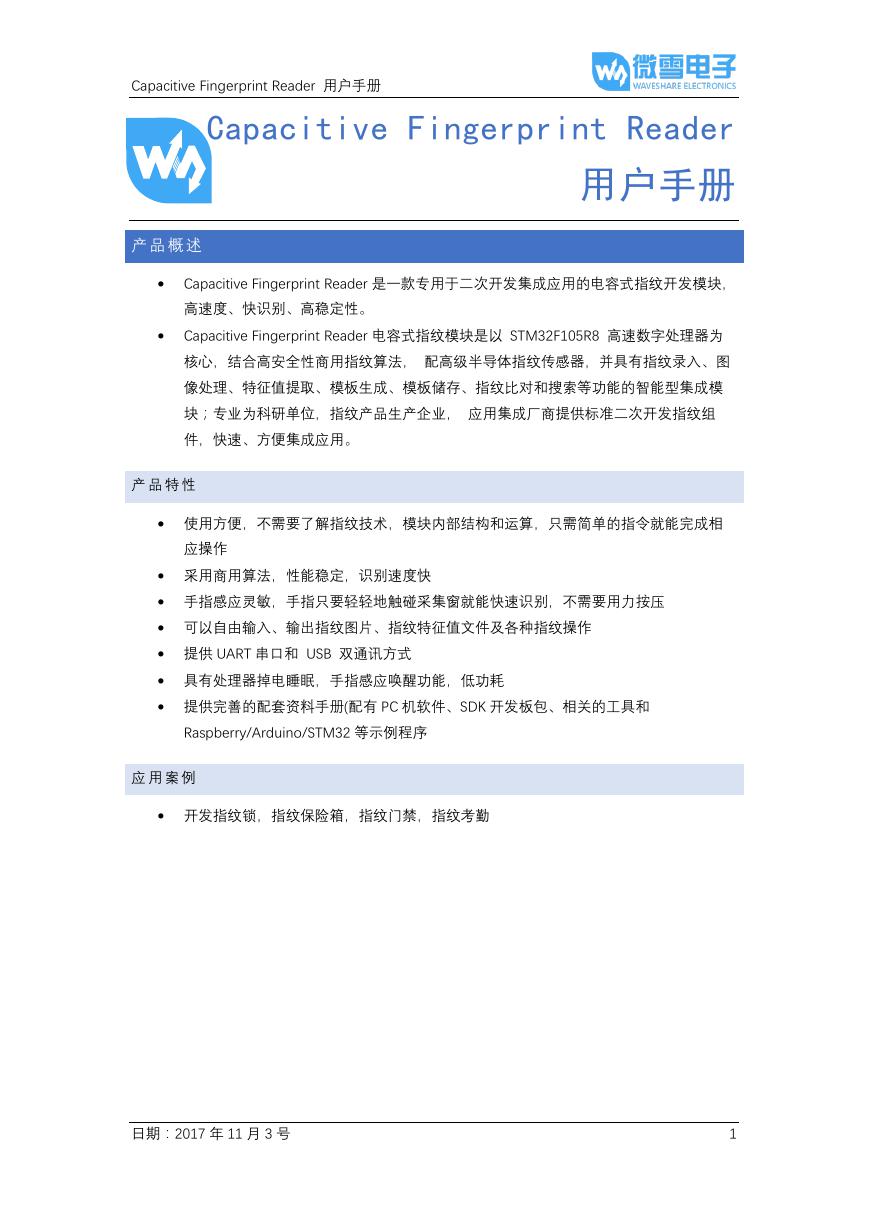 用户手册(Capacitive_Fingerprint_Reader_User_Manual_CN).pdf
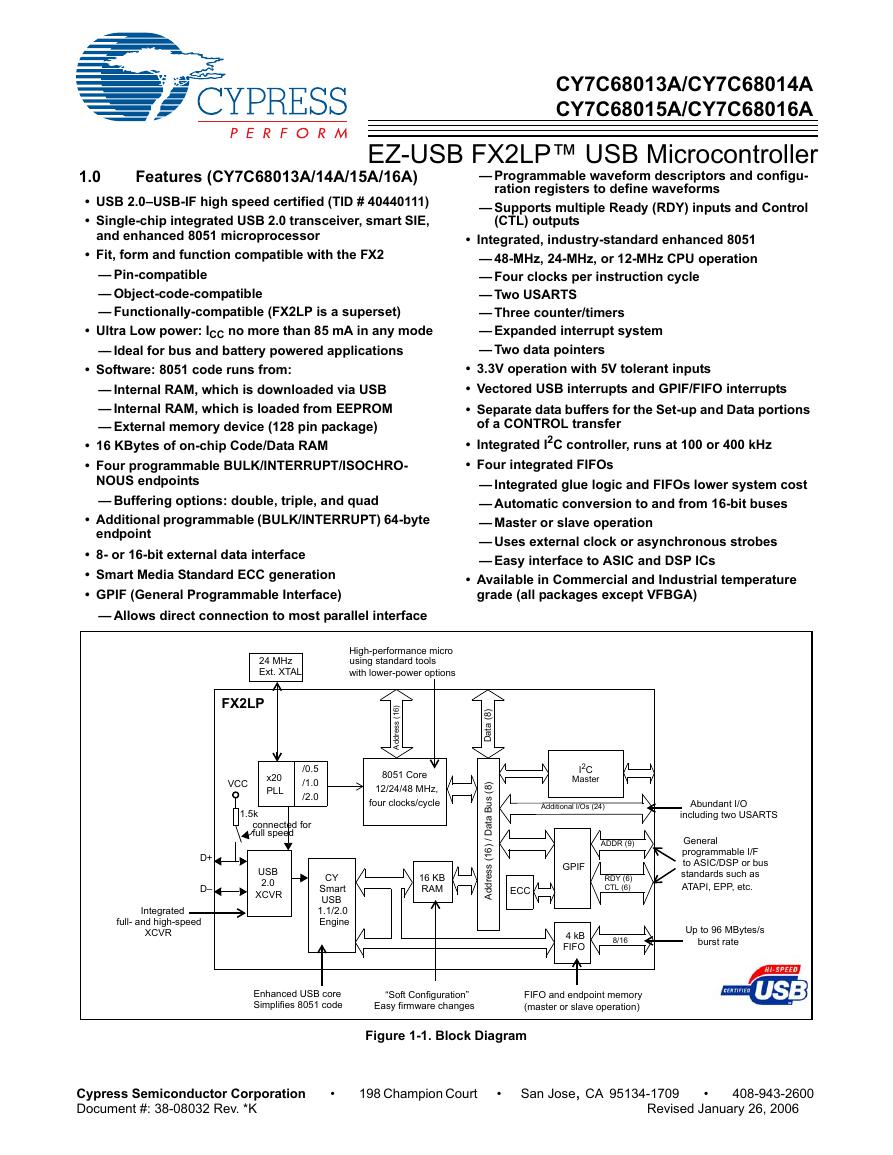 CY7C68013A(英文版)(CY7C68013A).pdf
 TechnicalReference_Dem.pdf