User and installation manual
.
0
0
0
4
4
4
0
.
6
4
.
d
o
c
�
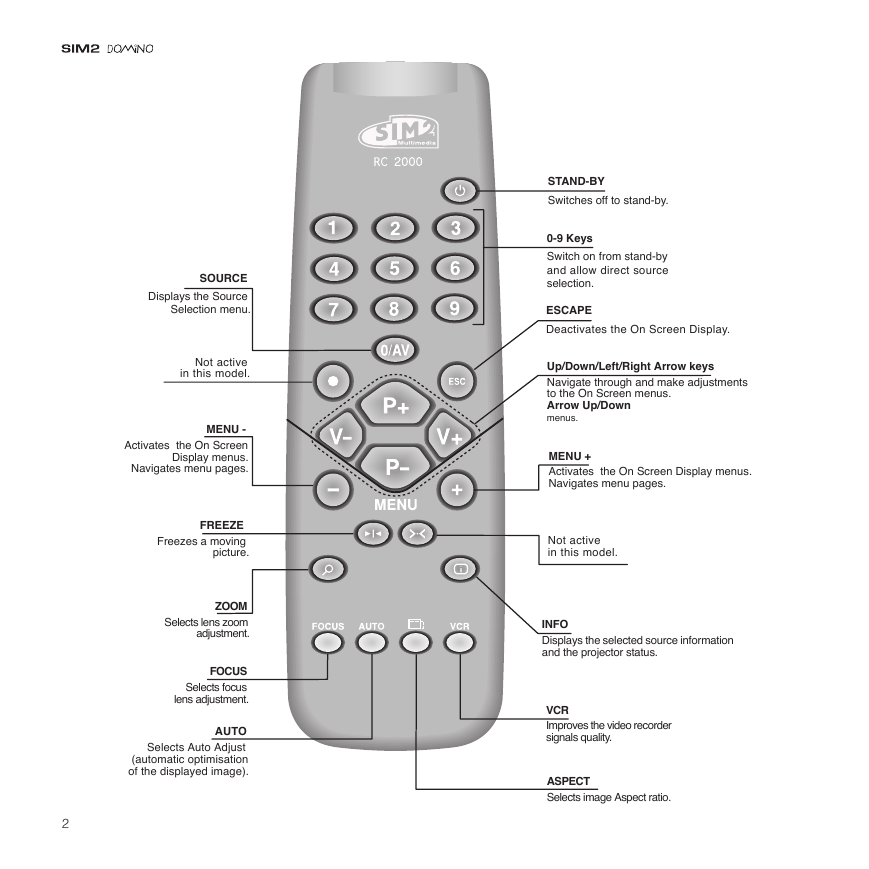
SOURCE
Displays the Source
Selection menu.
Not active
in this model.
MENU -
Activates the On Screen
Display menus.
Navigates menu pages.
FREEZE
Freezes a moving
picture.
ZOOM
Selects lens zoom
adjustment.
FOCUS
Selects focus
lens adjustment.
AUTO
Selects Auto Adjust
(automatic optimisation
of the displayed image).
2
STAND-BY
Switches off to stand-by.
0-9 Keys
Switch on from stand-by
and allow direct source
selection.
ESCAPE
Deactivates the On Screen Display.
Up/Down/Left/Right Arrow keys
Navigate through and make adjustments
to the On Screen menus.
Arrow Up/Down
menus.
MENU +
Activates the On Screen Display menus.
Navigates menu pages.
Not active
in this model.
INFO
Displays the selected source information
and the projector status.
VCR
Improves the video recorder
signals quality.
ASPECT
Selects image Aspect ratio.
�
1 INTRODUCTION
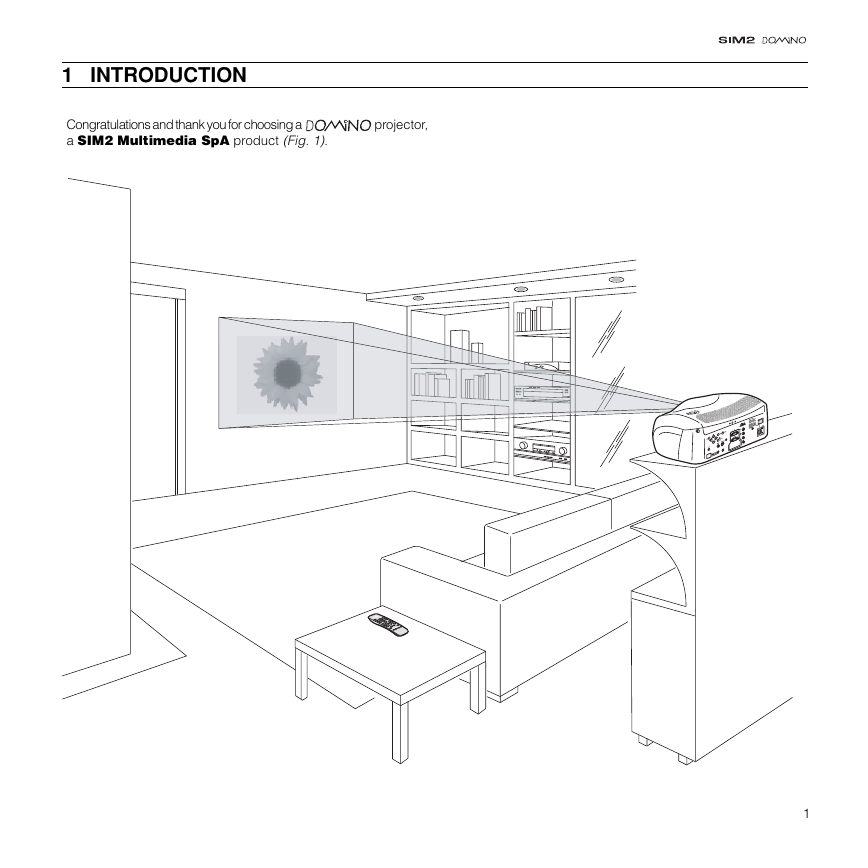
Congratulations and thank you for choosing a
a SIM2 Multimedia SpA product (Fig. 1).
projector,
C-SYNC
1
�
A sophisticated proprietary optical system, coupled with a hight
performance zoom lens ensures hight contrast images, superior
uniformity and edge-to-edge definition.
A new 6-segment colour wheel dramatically reduces the so
called “rainbow effect” and gives a better contrast, better
colorimetry and a lower black level to the image.
The DMD™ chip ensures, on top of the hight definition
1024x576 pixels) an
increased contrast ratio of
>1800:1thus delivering on the screen an even more
realistic image.
The renowned DCDi™ technology is adopted for deinterlacing:
conversion from interlaced to progressive produces a smooth
and natural image, without flickering, loss of vertical resolution
and jaggedness along diagonal lines.
Fig. 1
Using the very latest in DLP™ technology, this projector has
been designed specifically for high quality “Home Cinema”
applications.
Sophisticated digital processing and a wide choice of inputs
enable the connection of a variety of sources such as DVD
players, analogue and digital VCRs, analogue and digital sa-
tellite receivers and personal computers etc.
The long throw zoom lens allows the position of the projector to
be located behind the viewer, thus reproducing a cinema-like
installation (Fig. 2).
C-SYNC
Fig. 2
The low-noise ventilation system – with variable speed fans –
ensures appropriate cooling and maximizes projector reliability.
To fully appreciate your new projector we recommend the use
of a good quality screen and surround-sound system. Contact
your nearest authorized SIM2 Multimedia dealer for further
details.
SIM2 carries out comprehensive functional testing
in order to guarantee the maximum product quality.
For this reason, when you start using the product
lamp operating hours may already be at between
30 and 60.
In addition to the regular tests, the Quality Control
department performs additional statistical tests at
the time of shipment.
In this case the packing may show signs of having
been opened, and the accumulated lamp operating
hours may be slightly higher than the hours associ-
ated with the standard tests.
2
DLP and DMD are registered trademarks of Texas Instruments.
DCDi is a registered trademark of Faroudja, a division of Genesis
Microchip, Inc.
�
1
2
3
5
8
7
4
6
10
9
12 11 13 17
C-SYNC
18
20
16
14
15
19
1
2
3
4
5
6
7
8
9
10
11
12
13
14
15
16
17
18
19
20
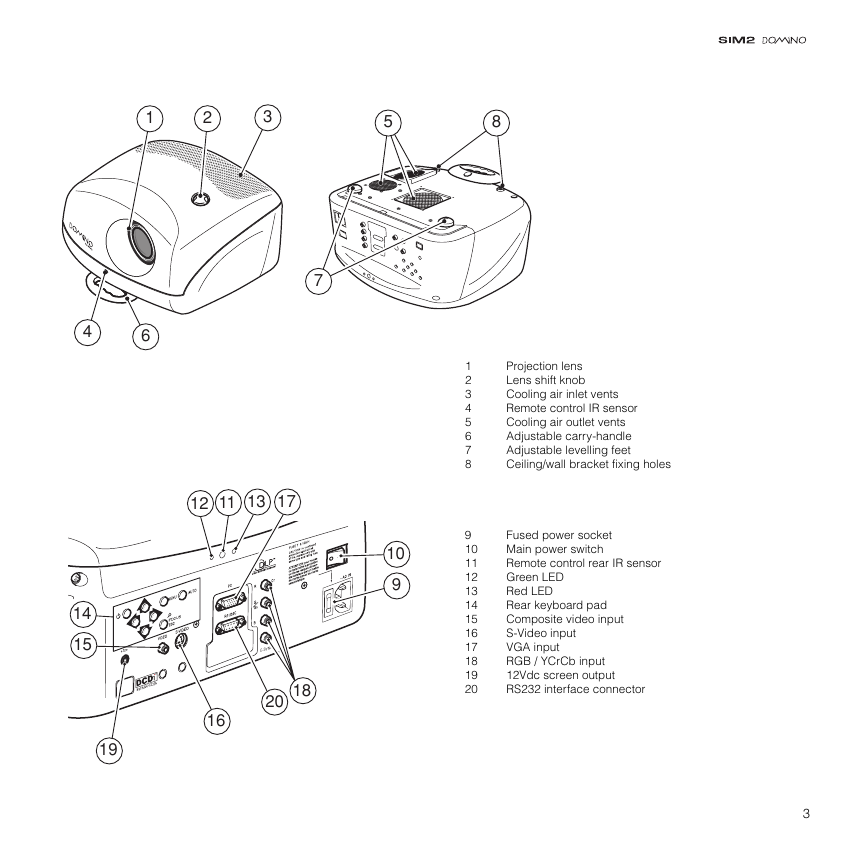
Projection lens
Lens shift knob
Cooling air inlet vents
Remote control IR sensor
Cooling air outlet vents
Adjustable carry-handle
Adjustable levelling feet
Ceiling/wall bracket fixing holes
Fused power socket
Main power switch
Remote control rear IR sensor
Green LED
Red LED
Rear keyboard pad
Composite video input
S-Video input
VGA input
RGB / YCrCb input
12Vdc screen output
RS232 interface connector
3
�
2 IMPORTANT SAFETY INSTRUCTIONS
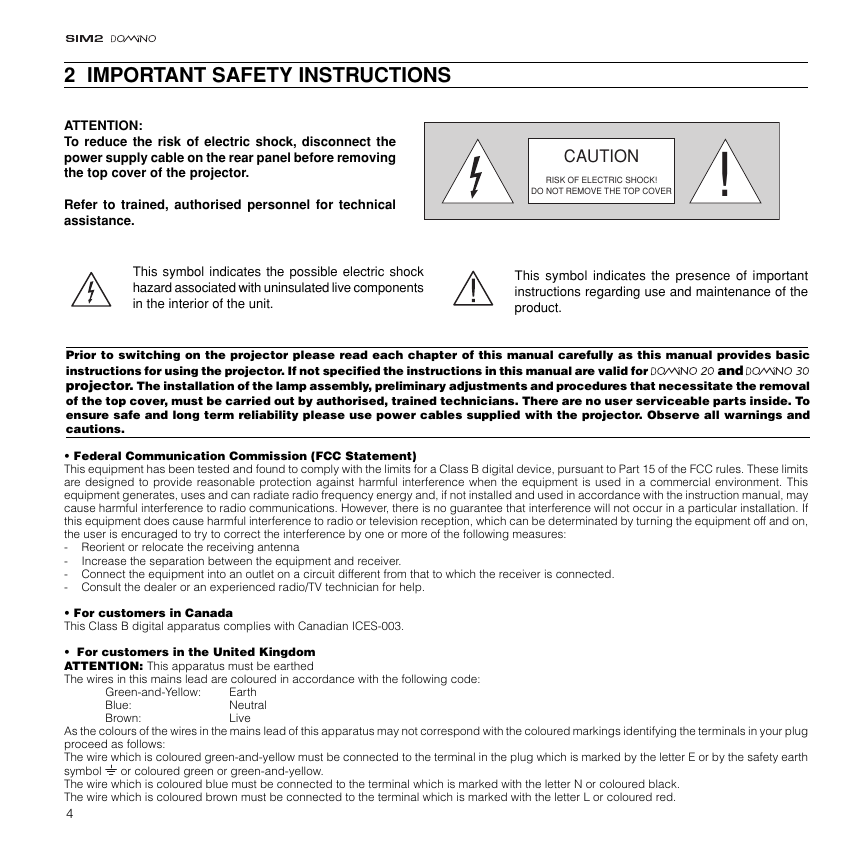
ATTENTION:
To reduce the risk of electric shock, disconnect the
power supply cable on the rear panel before removing
the top cover of the projector.
Refer to trained, authorised personnel for technical
assistance.
CAUTION
RISK OF ELECTRIC SHOCK!
DO NOT REMOVE THE TOP COVER
!
This symbol indicates the possible electric shock
hazard associated with uninsulated live components
in the interior of the unit.
This symbol indicates the presence of important
instructions regarding use and maintenance of the
product.
Prior to switching on the projector please read each chapter of this manual carefully as this manual provides basic
instructions for using the projector. If not specified the instructions in this manual are valid for
projector. The installation of the lamp assembly, preliminary adjustments and procedures that necessitate the removal
of the top cover, must be carried out by authorised, trained technicians. There are no user serviceable parts inside. To
ensure safe and long term reliability please use power cables supplied with the projector. Observe all warnings and
cautions.
and
• Federal Communication Commission (FCC Statement)
This equipment has been tested and found to comply with the limits for a Class B digital device, pursuant to Part 15 of the FCC rules. These limits
are designed to provide reasonable protection against harmful interference when the equipment is used in a commercial environment. This
equipment generates, uses and can radiate radio frequency energy and, if not installed and used in accordance with the instruction manual, may
cause harmful interference to radio communications. However, there is no guarantee that interference will not occur in a particular installation. If
this equipment does cause harmful interference to radio or television reception, which can be determinated by turning the equipment off and on,
the user is encuraged to try to correct the interference by one or more of the following measures:
- Reorient or relocate the receiving antenna
-
- Connect the equipment into an outlet on a circuit different from that to which the receiver is connected.
- Consult the dealer or an experienced radio/TV technician for help.
Increase the separation between the equipment and receiver.
• For customers in Canada
This Class B digital apparatus complies with Canadian ICES-003.
• For customers in the United Kingdom
ATTENTION: This apparatus must be earthed
The wires in this mains lead are coloured in accordance with the following code:
Green-and-Yellow:
Blue:
Brown:
Earth
Neutral
Live
As the colours of the wires in the mains lead of this apparatus may not correspond with the coloured markings identifying the terminals in your plug
proceed as follows:
The wire which is coloured green-and-yellow must be connected to the terminal in the plug which is marked by the letter E or by the safety earth
symbol
The wire which is coloured blue must be connected to the terminal which is marked with the letter N or coloured black.
The wire which is coloured brown must be connected to the terminal which is marked with the letter L or coloured red.
4
or coloured green or green-and-yellow.
�
Please follow carefully the warnings listed below, to ensure safe
and long term performance of your projector.
• Connect the projector to a power supply with a nominal
voltage within the following values: 100-240 Vac, 50/60 Hz,
earthed (Fig. 3).
4
250 V
T 3.15A H
3
1
2
100-240 Vac
50/60 Hz
Fig. 4
• Do not switch on your projector when flammable liquids or
fumes are present. Do not pour or drop fluids in the vents.
Fig. 3
• The mains plug is the disconnect device. Take care, when
installing, that the mains plug and socket outlet are easily
accessible. Never pull on the cable to take it out of the socket.
If the system is unlikely to be used for a number of days,
disconnect the power cable and other apparatus connected
to it.
• To save energy, switch off the projector by using the power
switch at the rear; when in stand-by (red light on) the
projector continues to draw a minimal amount of power.
• Only replace the safety fuse (on the power socket at the
rear of projector) with a fuse identical in type and
characteristics (T 3.15A H) (Fig. 4).
• Do not use the projector when the room temperature is above
35°C (95°F).
• Do not obstruct the cooling air inlets on the top cover, or the
air outlets underneath the projector.
• Do not switch on the projector if it is standing on soft surfaces
such as cushions, pillows, blankets, mattresses and carpets:
the air cooling outlets underneath could become obstructed.
• Do not switch-on the projector if it is standing on surfaces
sensitive to heat, as this may result in damage caused by
the hot air outlets underneath. Should this be unavoidable
take extra precaution of protecting the surfaces with a layer
of heat resistant material.
• Intense Light Source! Do not stare directly into the projection
lens as possible eye damage could result. Be especially
careful that children do not stare directly into the beam.
• Do not open the projector’s cover; no user serviceable parts
are inside. Refer servicing to qualified service personnel.
Opening the projector’s cover will invalidate warranty.
5
�
• Take care not to shake the projector whilst carrying it by the
handle.
• Always position the projector away from direct heat sources.
• For installations using a ceiling or wall-mounted bracket,
carefully follow the installation and safety instructions
provided with the bracket’s literature.
• Please remove batteries from the remote control if not in use
• Do not touch the surface of the projection lens.
for a long period of time.
• The projector must be positioned on a stable, suitable
platform or be installed using a bracket for fixed ceiling or
wall installation. Do not rest the projector on the side panels
or on the rear panel when in operation.
• Take care to position cables safely, especially in dark places,
in order to avoid a trip hazard.
• A special EVC socket on the projector’s rear panel will allow
connection to the optional Remote Input Interface (a special
cable is required).
This is not to be confused with a VESA “Plug & Display”.
Never connect a computer to this socket, as the projector
and the computer may be damaged.
3 PACKAGING AND CONTENTS
The carton should contain the following:
-
-
-
-
-
the projector
the remote control
four 1.5V AAA batteries (for remote control)
three power cables (EU, UK, USA)
the user manual.
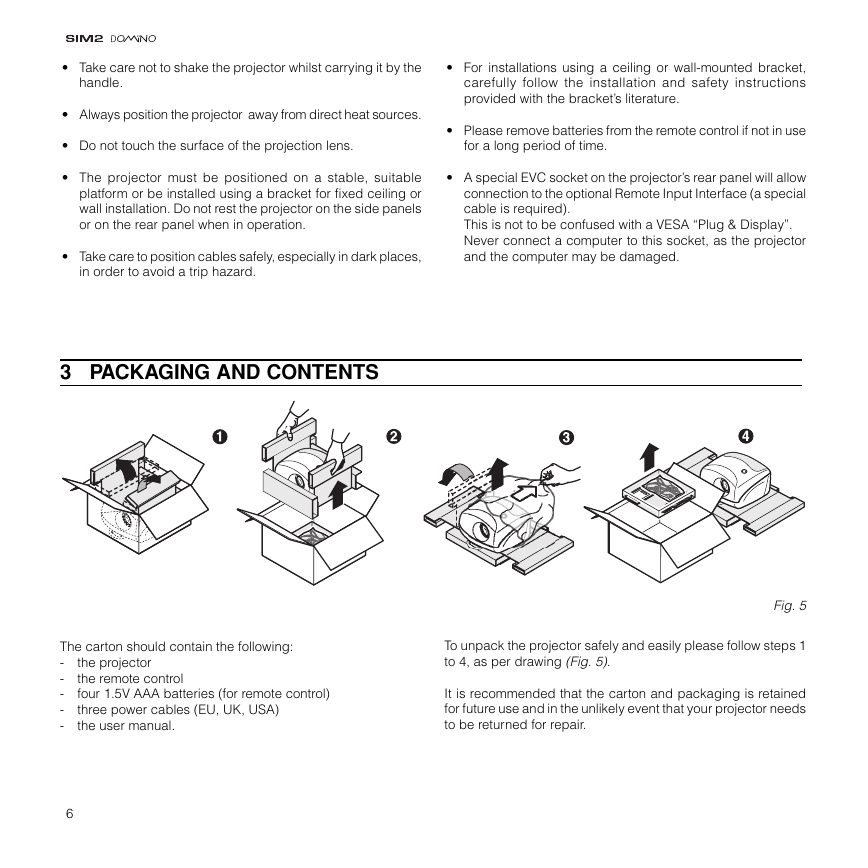
To unpack the projector safely and easily please follow steps 1
to 4, as per drawing (Fig. 5).
It is recommended that the carton and packaging is retained
for future use and in the unlikely event that your projector needs
to be returned for repair.
Fig. 5
6
�




 2023年江西萍乡中考道德与法治真题及答案.doc
 2012年重庆南川中考生物真题及答案.doc
 2013年江西师范大学地理学综合及文艺理论基础考研真题.doc
 2020年四川甘孜小升初语文真题及答案I卷.doc
 2020年注册岩土工程师专业基础考试真题及答案.doc
 2023-2024学年福建省厦门市九年级上学期数学月考试题及答案.doc
 2021-2022学年辽宁省沈阳市大东区九年级上学期语文期末试题及答案.doc
 2022-2023学年北京东城区初三第一学期物理期末试卷及答案.doc
 2018上半年江西教师资格初中地理学科知识与教学能力真题及答案.doc
 2012年河北国家公务员申论考试真题及答案-省级.doc
 2020-2021学年江苏省扬州市江都区邵樊片九年级上学期数学第一次质量检测试题及答案.doc
 2022下半年黑龙江教师资格证中学综合素质真题及答案.doc