DOMINO 55M
User and Installation Manual
.
0
0
0
1
7
4
0
6
4
.
d
o
c
.
�
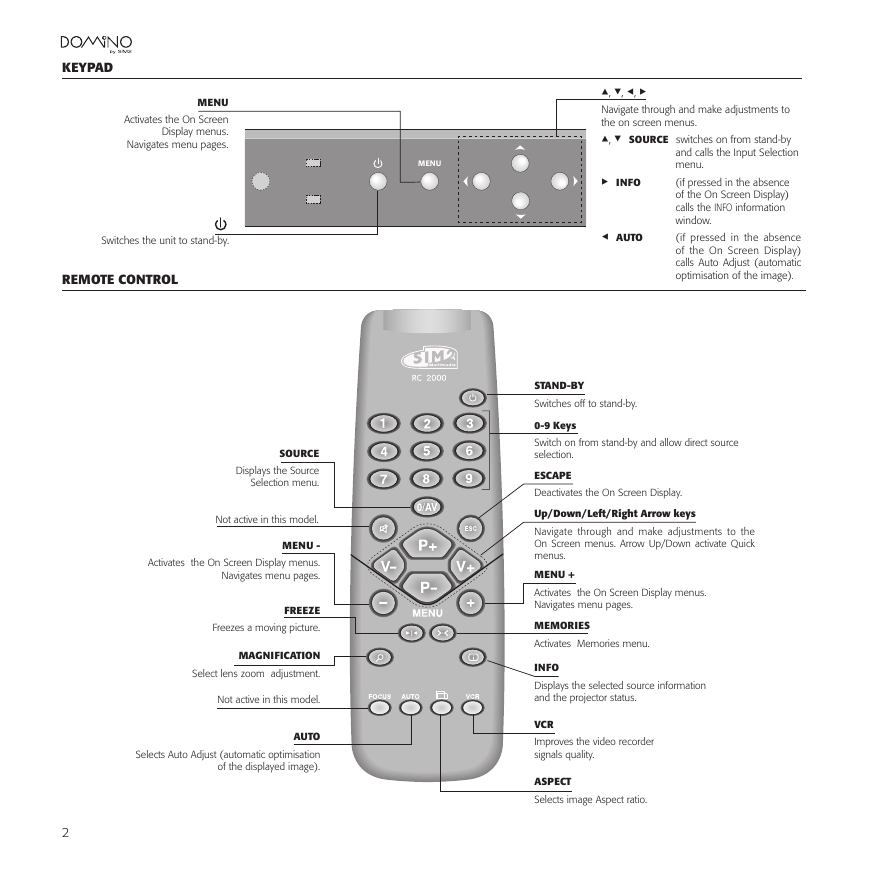
KEYPAD
MENU
Activates the On Screen
Display menus.
Navigates menu pages.
Switches the unit to stand-by.
REMOTE CONTROL
SOURCE
Displays the Source
Selection menu.
Not active in this model.
MENU -
Activates the On Screen Display menus.
Navigates menu pages.
FREEZE
Freezes a moving picture.
MAGNIFICATION
Select lens zoom adjustment.
Not active in this model.
AUTO
Selects Auto Adjust (automatic optimisation
of the displayed image).
2
����
▶ INFO
◀ AUTO
▲, ▼, ◀, ▶
Navigate through and make adjustments to
the on screen menus.
▲, ▼ SOURCE switches on from stand-by
and calls the Input Selection
menu.
(if pressed in the absence
of the On Screen Display)
calls the INFO information
window.
(if pressed in the absence
of the On Screen Display)
calls Auto Adjust (automatic
optimisation of the image).
STAND-BY
Switches off to stand-by.
0-9 Keys
Switch on from stand-by and allow direct source
selection.
ESCAPE
Deactivates the On Screen Display.
Up/Down/Left/Right Arrow keys
Navigate through and make adjustments to the
On Screen menus. Arrow Up/Down activate Quick
menus.
MENU +
Activates the On Screen Display menus.
Navigates menu pages.
MEMORIES
Activates Memories menu.
INFO
Displays the selected source information
and the projector status.
VCR
Improves the video recorder
signals quality.
ASPECT
Selects image Aspect ratio.
�
1 INTRODUCTION
The new DOMINO 55M offers an image without any compromise,
with resolution, sharpness, colorimetry and contrast au par with the
one of renowned SIM2 front projector line.
Conversion of interlaced video signals to progressive signals by
means of prestigious DCDi™ technology produces fluid, natural ima-
ges free of artifacts such as flicker and stairstepping on diagonals.
The very latest Texas Instruments DLP™ technology (1280x720
pixel DMD™ panel with 12° technology), a proprietary dust-sealed
optical system, a new six-segment colour wheel and a new type of
Fresnel lens combine to provide a top quality image.
Faithful reproduction of signals at higher resolutions (such as high
definition video and graphics) occurs without loss of information or
reduction of image sharpness thanks to the processor’s high pixel
rate signal acquisition capabilities.
The large number of inputs (1 Composite Video input, 1 S-Video
input, up to 2 Component or RGB inputs, 1 graphic RGB input, 1
DVI-D input, 1 HDMI™ input), ensures the DOMINO 55M supports
and processes a wide range of video signals from various sources:
DVD players, VCRs, satellite and terrestrial receivers, computers,
game consoles, video cameras, etc.
Signal processing capabilities ensure optimum reproduction of a
broad range of input signals, from interlaced video to high definition
and graphics.
Adaptation of the input signal resolution to the Display resolution
occurs without alterations of image quality, in accordance with an
ample choice of aspect ratios, including several definable by the
user.
All image adjustments can be performed from the remote control
with the aid of the On Screen Display; alternatively, the unit can be
controlled by from a home automation system through the serial
port.
This manual contains important information on how to install and use this equipment correctly. Before using the equipment, read the safety
prescriptions and instructions carefully. Keep the manual for future consultation.
INDEX
Remote control
Audio
Connecting video sources
1 PRESENTATION
2 IMPORTANT SAFETY INSTRUCTIONS
3 INSTALLATION
4 SWITCHING ON AND OFF
5 ON SCREEN MENU
Main menu
Stand-by
Inputs
Picture
3
4
5
6
6
6
9
9
10
10
10
11
Info
Direct-access adjustments
Image
Set up
Menu
Memories
Messages
7 TROUBLESHOOTING
8 GUIDE
A - Additional specification
B - Dimensions
12
14
14
15
17
17
17
18
19
19
20
DLP and DMD are registered trademarks of Texas Instruments.
DCDi is a registered trademark of Faroudja, a division of Genesis Microchip, Inc..
HDMI, the HDMI logo and the expression High-Definition Multimedia Interface
are trade marks or registered marks of HDMI licensing LLC
3
�
2 IMPORTANT SAFETY INSTRUCTIONS
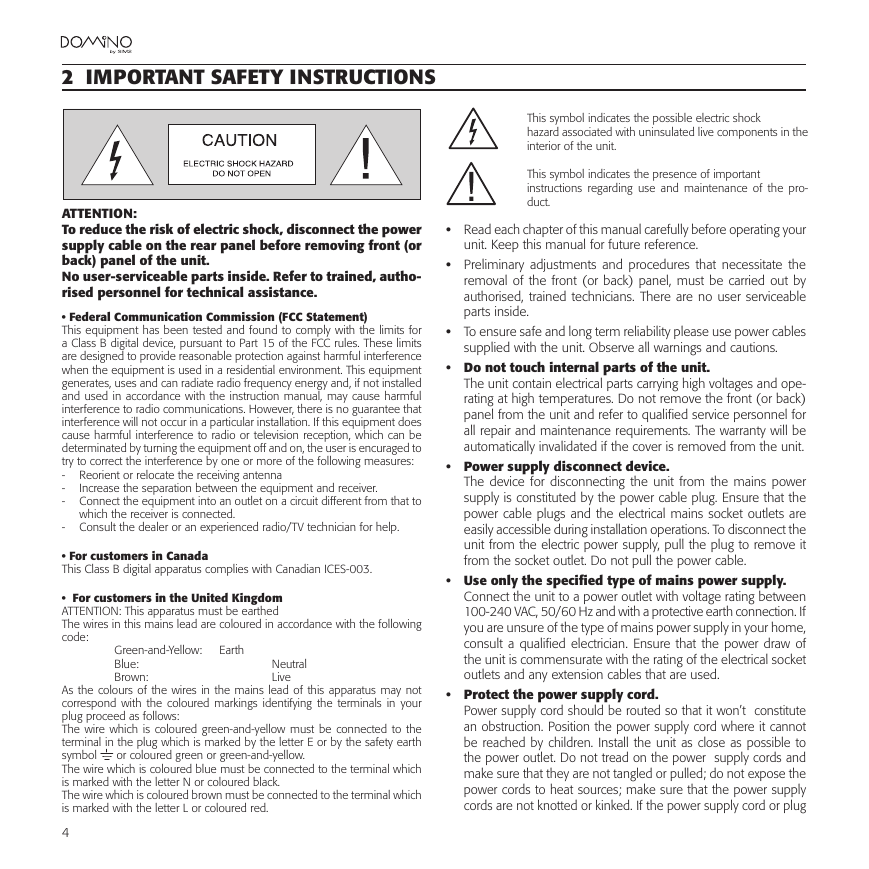
ATTENTION:
To reduce the risk of electric shock, disconnect the power
supply cable on the rear panel before removing front (or
back) panel of the unit.
No user-serviceable parts inside. Refer to trained, autho-
rised personnel for technical assistance.
• Federal Communication Commission (FCC Statement)
This equipment has been tested and found to comply with the limits for
a Class B digital device, pursuant to Part 15 of the FCC rules. These limits
are designed to provide reasonable protection against harmful interference
when the equipment is used in a residential environment. This equipment
generates, uses and can radiate radio frequency energy and, if not installed
and used in accordance with the instruction manual, may cause harmful
interference to radio communications. However, there is no guarantee that
interference will not occur in a particular installation. If this equipment does
cause harmful interference to radio or television reception, which can be
determinated by turning the equipment off and on, the user is encuraged to
try to correct the interference by one or more of the following measures:
- Reorient or relocate the receiving antenna
-
- Connect the equipment into an outlet on a circuit different from that to
Increase the separation between the equipment and receiver.
which the receiver is connected.
- Consult the dealer or an experienced radio/TV technician for help.
• For customers in Canada
This Class B digital apparatus complies with Canadian ICES-003.
Earth
Neutral
Live
Green-and-Yellow:
Blue:
Brown:
• For customers in the United Kingdom
ATTENTION: This apparatus must be earthed
The wires in this mains lead are coloured in accordance with the following
code:
As the colours of the wires in the mains lead of this apparatus may not
correspond with the coloured markings identifying the terminals in your
plug proceed as follows:
The wire which is coloured green-and-yellow must be connected to the
terminal in the plug which is marked by the letter E or by the safety earth
symbol
The wire which is coloured blue must be connected to the terminal which
is marked with the letter N or coloured black.
The wire which is coloured brown must be connected to the terminal which
is marked with the letter L or coloured red.
or coloured green or green-and-yellow.
4
This symbol indicates the possible electric shock
hazard associated with uninsulated live components in the
interior of the unit.
This symbol indicates the presence of important
instructions regarding use and maintenance of the pro-
duct.
• Read each chapter of this manual carefully before operating your
unit. Keep this manual for future reference.
• Preliminary adjustments and procedures that necessitate the
removal of the front (or back) panel, must be carried out by
authorised, trained technicians. There are no user serviceable
parts inside.
• To ensure safe and long term reliability please use power cables
supplied with the unit. Observe all warnings and cautions.
• Do not touch internal parts of the unit.
The unit contain electrical parts carrying high voltages and ope-
rating at high temperatures. Do not remove the front (or back)
panel from the unit and refer to qualified service personnel for
all repair and maintenance requirements. The warranty will be
automatically invalidated if the cover is removed from the unit.
• Power supply disconnect device.
The device for disconnecting the unit from the mains power
supply is constituted by the power cable plug. Ensure that the
power cable plugs and the electrical mains socket outlets are
easily accessible during installation operations. To disconnect the
unit from the electric power supply, pull the plug to remove it
from the socket outlet. Do not pull the power cable.
• Use only the specified type of mains power supply.
Connect the unit to a power outlet with voltage rating between
100-240 VAC, 50/60 Hz and with a protective earth connection. If
you are unsure of the type of mains power supply in your home,
consult a qualified electrician. Ensure that the power draw of
the unit is commensurate with the rating of the electrical socket
outlets and any extension cables that are used.
• Protect the power supply cord.
Power supply cord should be routed so that it won’t constitute
an obstruction. Position the power supply cord where it cannot
be reached by children. Install the unit as close as possible to
the power outlet. Do not tread on the power supply cords and
make sure that they are not tangled or pulled; do not expose the
power cords to heat sources; make sure that the power supply
cords are not knotted or kinked. If the power supply cord or plug
�
is damaged, unplug the unit from the wall outlet and request the
assistance of an authorised technician.
• Unplug the unit from the mains power supply during a
lightning storm and when not in use.
To avoid damage to the unit due to lightning and power-line
surges, unplug the unit in the event of electrical storms or when
the unit is left unused for long periods of time.
• Avoid contact with liquids and exposure to humidity.
Do not use the unit near water (sinks, tanks, etc.); do not place
objects containing liquids on top of or near the unit and do not
expose it to rain, humidity, dripping water or spray; do not use
water or liquid detergents to clean the unit.
in confined, poorly ventilated places (bookcase, shelves, etc.).
• Do not expose the eyes to the intense light emitted by the
lamp.
Never look directly at the lamp through the ventilation opening
when the unit is switched on. Risk of eyesight impairment. Ensure
also that children do not look directly at the lamp.
• Position the unit on a stable surface.
To avoid serious injury to persons and damage to property, make
sure the unit is placed on a level, flat and stable surface from
which it cannot fall, tip over or slide. When a cart is used, use
caution when moving the cart/apparatus combination to avoid
injury from tip-over.
• Prevent the unit from overheating.
Do not block any of the ventilation openings. Do not place the
unit near heat sources such as heaters, radiators or other devices
that generate heat (including amplifiers). Do not position the unit
• Do not insert objects through the unit openings.
Make sure that no objects are inserted through the openings in
the unit. If this should occur, disconnect the unit from the power
supply immediately and call an authorised technician.
3 INSTALLATION
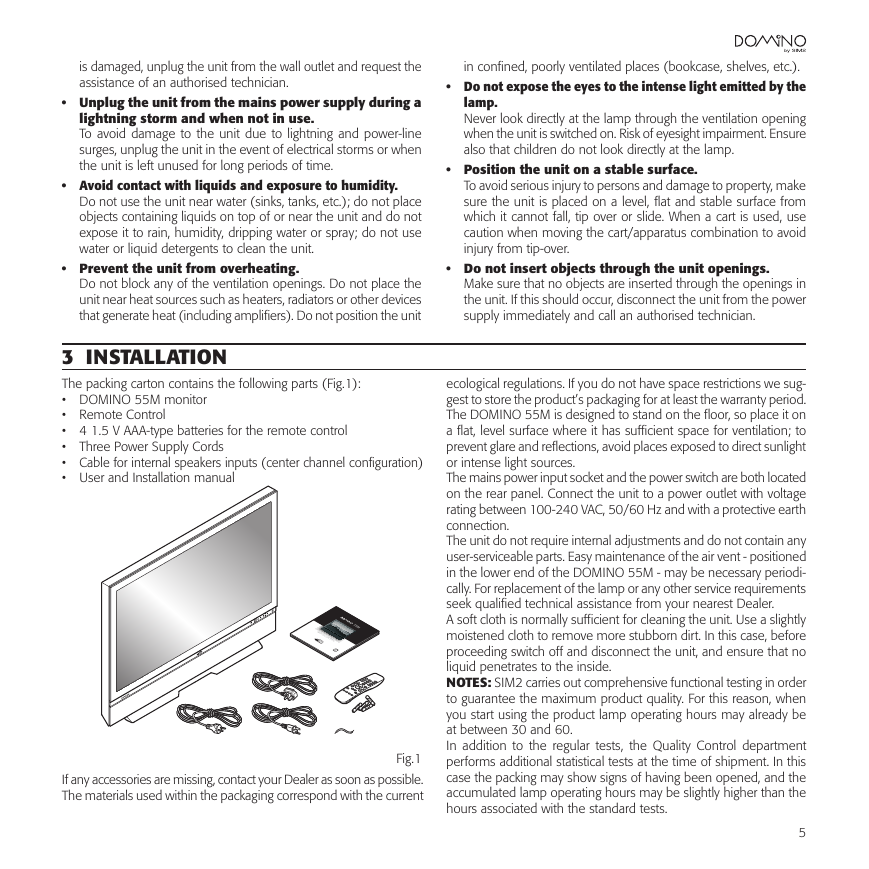
The packing carton contains the following parts (Fig.1):
• DOMINO 55M monitor
• Remote Control
• 4 1.5 V AAA-type batteries for the remote control
• Three Power Supply Cords
• Cable for internal speakers inputs (center channel configuration)
• User and Installation manual
Fig.1
If any accessories are missing, contact your Dealer as soon as possible.
The materials used within the packaging correspond with the current
ecological regulations. If you do not have space restrictions we sug-
gest to store the product’s packaging for at least the warranty period.
The DOMINO 55M is designed to stand on the floor, so place it on
a flat, level surface where it has sufficient space for ventilation; to
prevent glare and reflections, avoid places exposed to direct sunlight
or intense light sources.
The mains power input socket and the power switch are both located
on the rear panel. Connect the unit to a power outlet with voltage
rating between 100-240 VAC, 50/60 Hz and with a protective earth
connection.
The unit do not require internal adjustments and do not contain any
user-serviceable parts. Easy maintenance of the air vent - positioned
in the lower end of the DOMINO 55M - may be necessary periodi-
cally. For replacement of the lamp or any other service requirements
seek qualified technical assistance from your nearest Dealer.
A soft cloth is normally sufficient for cleaning the unit. Use a slightly
moistened cloth to remove more stubborn dirt. In this case, before
proceeding switch off and disconnect the unit, and ensure that no
liquid penetrates to the inside.
NOTES: SIM2 carries out comprehensive functional testing in order
to guarantee the maximum product quality. For this reason, when
you start using the product lamp operating hours may already be
at between 30 and 60.
In addition to the regular tests, the Quality Control department
performs additional statistical tests at the time of shipment. In this
case the packing may show signs of having been opened, and the
accumulated lamp operating hours may be slightly higher than the
hours associated with the standard tests.
5
�����������������������������������������������������
CONTROL
REMOTE CONTROL
The remote control transmits commands to the system by infrared
signals.
The infrared sensor is on the front panel of the DOMINO 55M. Avoid
placing obstructions between the remote control and the infrared
sensor; this will impair the remote control performance.
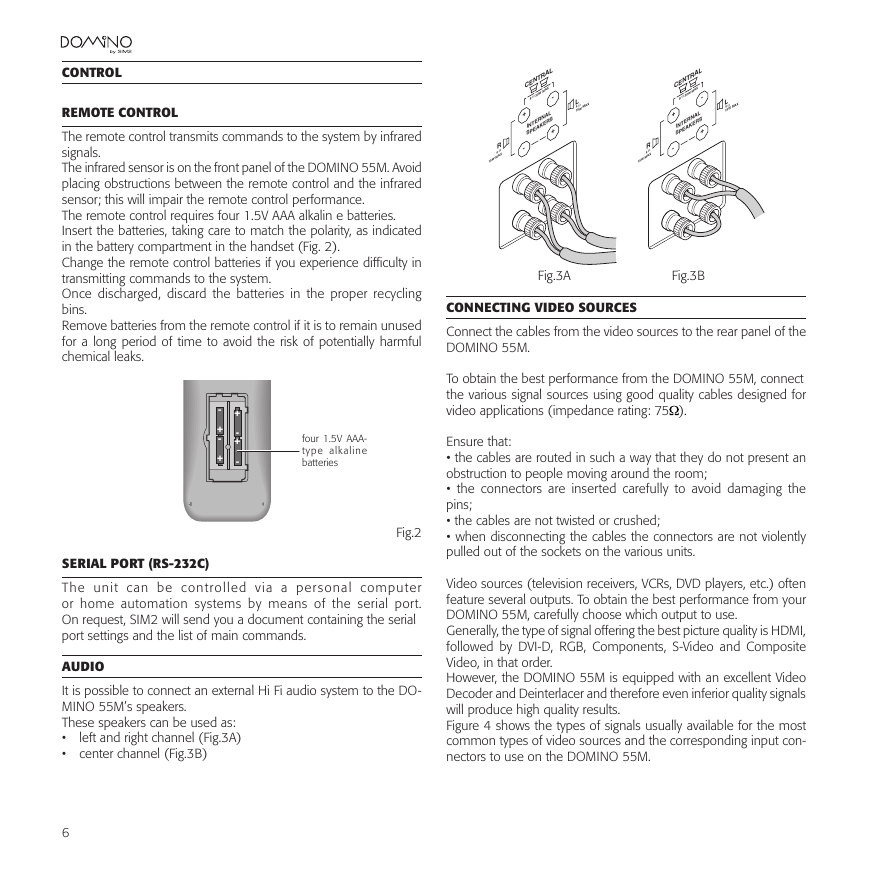
The remote control requires four 1.5V AAA alkalin e batteries.
Insert the batteries, taking care to match the polarity, as indicated
in the battery compartment in the handset (Fig. 2).
Change the remote control batteries if you experience difficulty in
transmitting commands to the system.
Once discharged, discard the batteries in the proper recycling
bins.
Remove batteries from the remote control if it is to remain unused
for a long period of time to avoid the risk of potentially harmful
chemical leaks.
-
+
-
+
+
-
+
-
four 1.5V AAA-
type alkaline
batteries
Fig.2
SERIAL PORT (RS-232C)
The unit can be controlled via a personal computer
or home automation systems by means of the serial port.
On request, SIM2 will send you a document containing the serial
port settings and the list of main commands.
AUDIO
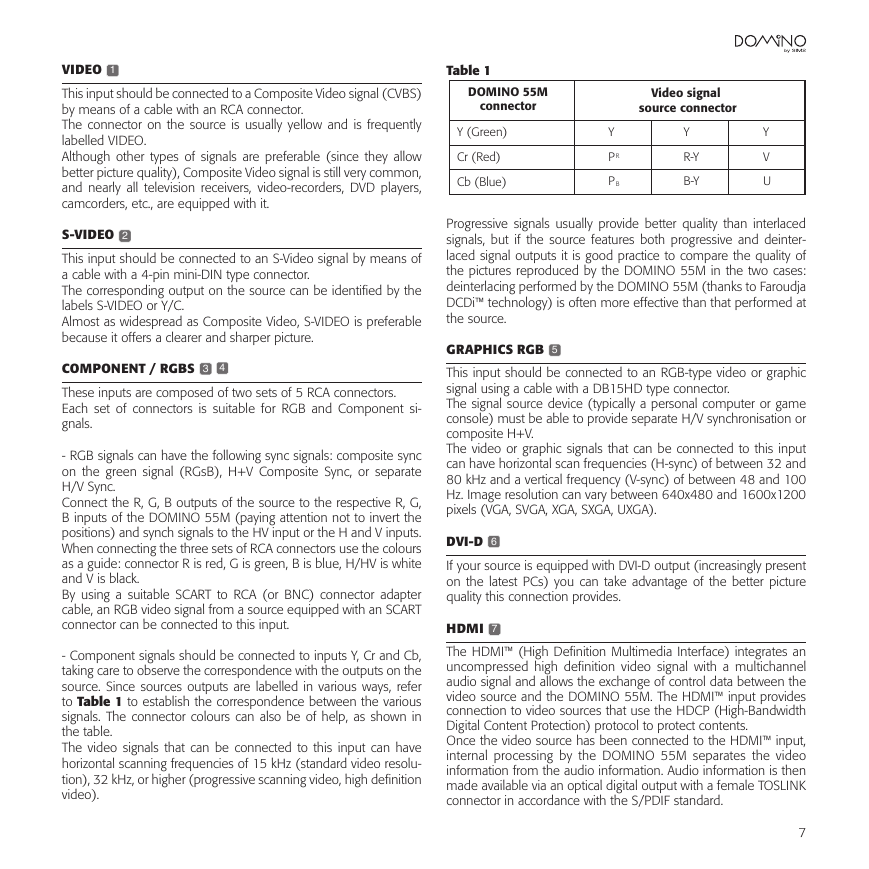
It is possible to connect an external Hi Fi audio system to the DO-
MINO 55M’s speakers.
These speakers can be used as:
• left and right channel (Fig.3A)
• center channel (Fig.3B)
6
CENTRAL
8 � 30W MAX
INTERNAL
SPEAKERS
+
-
+
L4 �
15W MAX
CENTRAL
8 � 30W MAX
INTERNAL
SPEAKERS
+
-
+
L4 �
15W MAX
R
4 �
15W MAX
-
R
4 �
15W MAX
-
Fig.3A
Fig.3B
CONNECTING VIDEO SOURCES
Connect the cables from the video sources to the rear panel of the
DOMINO 55M.
To obtain the best performance from the DOMINO 55M, connect
the various signal sources using good quality cables designed for
video applications (impedance rating: 75 ).
Ensure that:
• the cables are routed in such a way that they do not present an
obstruction to people moving around the room;
• the connectors are inserted carefully to avoid damaging the
pins;
• the cables are not twisted or crushed;
• when disconnecting the cables the connectors are not violently
pulled out of the sockets on the various units.
Video sources (television receivers, VCRs, DVD players, etc.) often
feature several outputs. To obtain the best performance from your
DOMINO 55M, carefully choose which output to use.
Generally, the type of signal offering the best picture quality is HDMI,
followed by DVI-D, RGB, Components, S-Video and Composite
Video, in that order.
However, the DOMINO 55M is equipped with an excellent Video
Decoder and Deinterlacer and therefore even inferior quality signals
will produce high quality results.
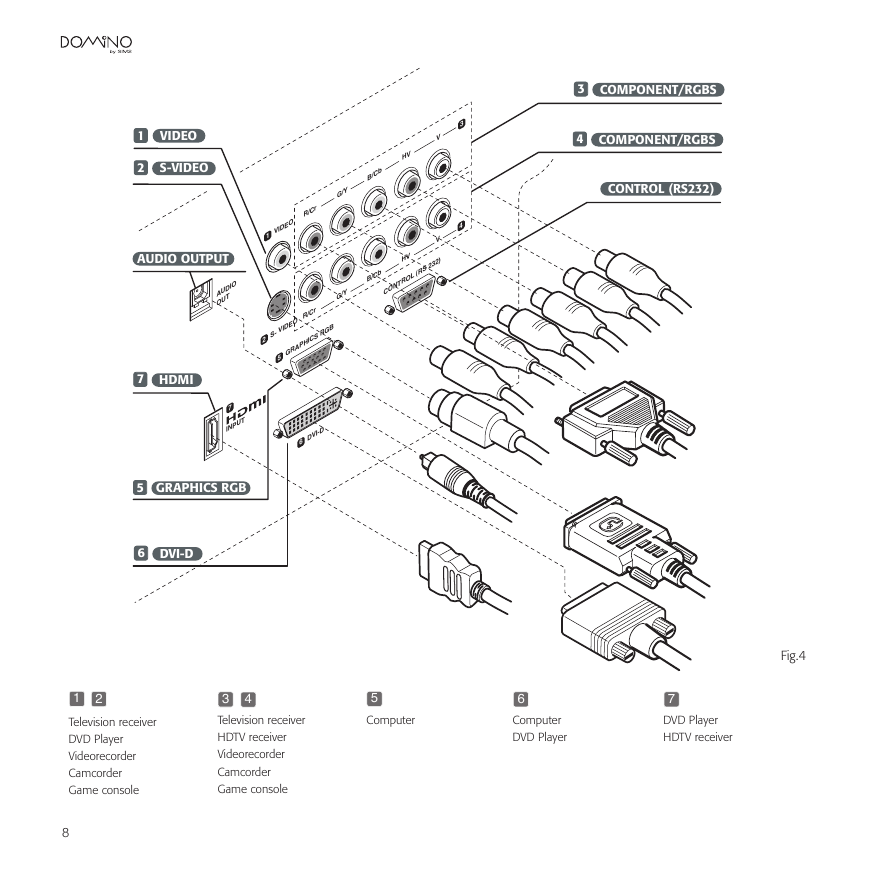
Figure 4 shows the types of signals usually available for the most
common types of video sources and the corresponding input con-
nectors to use on the DOMINO 55M.
�
VIDEO 1
This input should be connected to a Composite Video signal (CVBS)
by means of a cable with an RCA connector.
The connector on the source is usually yellow and is frequently
labelled VIDEO.
Although other types of signals are preferable (since they allow
better picture quality), Composite Video signal is still very common,
and nearly all television receivers, video-recorders, DVD players,
camcorders, etc., are equipped with it.
S-VIDEO 2
This input should be connected to an S-Video signal by means of
a cable with a 4-pin mini-DIN type connector.
The corresponding output on the source can be identified by the
labels S-VIDEO or Y/C.
Almost as widespread as Composite Video, S-VIDEO is preferable
because it offers a clearer and sharper picture.
COMPONENT / RGBS 3 4
These inputs are composed of two sets of 5 RCA connectors.
Each set of connectors is suitable for RGB and Component si-
gnals.
- RGB signals can have the following sync signals: composite sync
on the green signal (RGsB), H+V Composite Sync, or separate
H/V Sync.
Connect the R, G, B outputs of the source to the respective R, G,
B inputs of the DOMINO 55M (paying attention not to invert the
positions) and synch signals to the HV input or the H and V inputs.
When connecting the three sets of RCA connectors use the colours
as a guide: connector R is red, G is green, B is blue, H/HV is white
and V is black.
By using a suitable SCART to RCA (or BNC) connector adapter
cable, an RGB video signal from a source equipped with an SCART
connector can be connected to this input.
- Component signals should be connected to inputs Y, Cr and Cb,
taking care to observe the correspondence with the outputs on the
source. Since sources outputs are labelled in various ways, refer
to Table 1 to establish the correspondence between the various
signals. The connector colours can also be of help, as shown in
the table.
The video signals that can be connected to this input can have
horizontal scanning frequencies of 15 kHz (standard video resolu-
tion), 32 kHz, or higher (progressive scanning video, high definition
video).
Table 1
����������
���������
���������
��������
���������
�������������
����������������
�
�
�
� �
�
���
���
�
�
�
Progressive signals usually provide better quality than interlaced
signals, but if the source features both progressive and deinter-
laced signal outputs it is good practice to compare the quality of
the pictures reproduced by the DOMINO 55M in the two cases:
deinterlacing performed by the DOMINO 55M (thanks to Faroudja
DCDi™ technology) is often more effective than that performed at
the source.
GRAPHICS RGB 5
This input should be connected to an RGB-type video or graphic
signal using a cable with a DB15HD type connector.
The signal source device (typically a personal computer or game
console) must be able to provide separate H/V synchronisation or
composite H+V.
The video or graphic signals that can be connected to this input
can have horizontal scan frequencies (H-sync) of between 32 and
80 kHz and a vertical frequency (V-sync) of between 48 and 100
Hz. Image resolution can vary between 640x480 and 1600x1200
pixels (VGA, SVGA, XGA, SXGA, UXGA).
DVI-D 6
If your source is equipped with DVI-D output (increasingly present
on the latest PCs) you can take advantage of the better picture
quality this connection provides.
HDMI 7
The HDMI™ (High Definition Multimedia Interface) integrates an
uncompressed high definition video signal with a multichannel
audio signal and allows the exchange of control data between the
video source and the DOMINO 55M. The HDMI™ input provides
connection to video sources that use the HDCP (High-Bandwidth
Digital Content Protection) protocol to protect contents.
Once the video source has been connected to the HDMI™ input,
internal processing by the DOMINO 55M separates the video
information from the audio information. Audio information is then
made available via an optical digital output with a female TOSLINK
connector in accordance with the S/PDIF standard.
7
�
�
��������������
�
��������������
���������������
HV
B/Cb
3
4
V
V
B/Cb
HV
CONTROL (RS 232)
G/Y
G/Y
R/Cr
VIDEO
1
S- VIDEO R/Cr
GRAPHICS RGB
5
2
DVI-D
6
�
�
�����
�������
������������
AUDIO
OUT
7
INPUT
�
����
�
������������
�
�����
5
Computer
6
Computer
DVD Player
7
DVD Player
HDTV receiver
Fig.4
2
1
Television receiver
DVD Player
Videorecorder
Camcorder
Game console
8
4
3
Television receiver
HDTV receiver
Videorecorder
Camcorder
Game console
�


 2023年江西萍乡中考道德与法治真题及答案.doc
 2012年重庆南川中考生物真题及答案.doc
 2013年江西师范大学地理学综合及文艺理论基础考研真题.doc
 2020年四川甘孜小升初语文真题及答案I卷.doc
 2020年注册岩土工程师专业基础考试真题及答案.doc
 2023-2024学年福建省厦门市九年级上学期数学月考试题及答案.doc
 2021-2022学年辽宁省沈阳市大东区九年级上学期语文期末试题及答案.doc
 2022-2023学年北京东城区初三第一学期物理期末试卷及答案.doc
 2018上半年江西教师资格初中地理学科知识与教学能力真题及答案.doc
 2012年河北国家公务员申论考试真题及答案-省级.doc
 2020-2021学年江苏省扬州市江都区邵樊片九年级上学期数学第一次质量检测试题及答案.doc
 2022下半年黑龙江教师资格证中学综合素质真题及答案.doc