Digital Camera
Appareil photo
numérique
Digital-Kamera
Cámara Digital
C-990ZOOM
Operating Instructions
• Before you use this camera, read this manual and then store it in a
safe location where you can find it for future use.
• We recommend that you spend some time taking test shots and
experimenting with all of the features before you take important
pictures.
Mode d’emploi
• Avant d’utiliser votre appareil photo, lire ce mode d’emploi puis le
ranger dans un endroit sûr et à portée de la main pour toute
consultation future.
• Nous vous conseillons de prendre le temps de faire des essais et de
vous familiariser avec toutes les fonctions avant d’effectuer des prises
de vues importantes.
Bedienungsanleitung
• Bitte lesen Sie vor Gebrauch dieser Kamera sorgfältig diese
Bedienungsanleitung, um optimale Ergebnisse beim Fotografieren zu
erzielen.
• Wir empfehlen, vor wichtigen Aufnahmen Probeaufnahmen
durchzuführen, um sich mit der Bedienung und den Funktionen der
Kamera vertraut zu machen.
Manual de instrucciones
• Antes de utilizar la cámara, lea este manual y luego guárdelo en
algún lugar seguro donde lo pueda ubicar para un uso futuro.
• Le recomendamos que dedique cierto tiempo a la toma de fotos de
prueba utilizando todas las características de la cámara antes de
tomar fotografías importantes.
h
s
i
l
g
n
E
i
s
a
ç
n
a
r
F
h
c
s
t
u
e
D
l
o
ñ
a
p
s
E
�
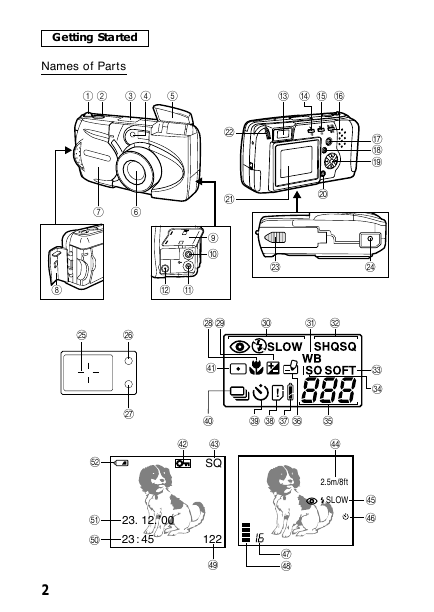
Getting Started
Names of Parts
1 2 3
54
C
D
E F
L
K
9
0
7
6
G
H
I
J
8
AB
M
N
O
P
RS
T
U
V
a
Q
`
YZ[\]
l
k
j
23. 12. ’00
23 : 45
cb
SQ
d
2.5m/8ft
SLOW
122
i
g
h
W
X
e
f
2
�
Camera
1 Zoom lever
2 Shutter release button
3 Control panel
4 Self-timer signal lamp
5 Flash
6 Lens
7 Lens barrier
8 Card compartment cover
9 Connector cover
= Video output connector
A Computer connector
B AC adapter connector
C Viewfinder
D Flash mode button/Erase
button
E Self-timer/Print button
F Macro •Digital telephoto
button/Write-protect button
G Monitor button
H Menu button
I Arrow pad
J OK button
K Monitor
L Diopter adjustment dial
M Battery compartment cover
(bottom)
N Tripod socket (bottom)
Viewfinder
O Autofocus mark/Backlighting
correction mark
P Orange lamp
Q Green lamp
h
s
i
l
g
n
E
Control Panel
R Macro mode mark
S Exposure compensation mark
T Flash mode
U White balance mark
V Record mode
W Sharpness
X ISO mark
Y Remaining picture count
Z Write mark
[ Battery check
\ Card error/Card function
] Self-timer
_ Sequential shooting
a Spot metering mark
Monitor
b Protect mark
c Record mode
d Quick focus
e Flash
f Self-timer
g Remaining picture count
h Memory gauge
i Frame number
j Time
k Date
l Battery check
3
�
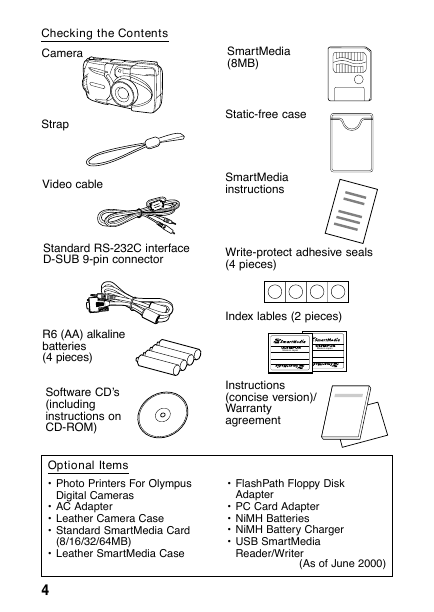
Checking the Contents
Camera
Strap
Video cable
SmartMedia
(8MB)
Static-free case
SmartMedia
instructions
Standard RS-232C interface
D-SUB 9-pin connector
Write-protect adhesive seals
(4 pieces)
R6 (AA) alkaline
batteries
(4 pieces)
Software CD’s
(including
instructions on
CD-ROM)
Index lables (2 pieces)
Made in Japan
Made in Japan
Instructions
(concise version)/
Warranty
agreement
Optional Items
• Photo Printers For Olympus
Digital Cameras
• AC Adapter
• Leather Camera Case
• Standard SmartMedia Card
(8/16/32/64MB)
• Leather SmartMedia Case
4
• FlashPath Floppy Disk
Adapter
• PC Card Adapter
• NiMH Batteries
• NiMH Battery Charger
• USB SmartMedia
Reader/Writer
(As of June 2000)
�
h
s
i
l
g
n
E
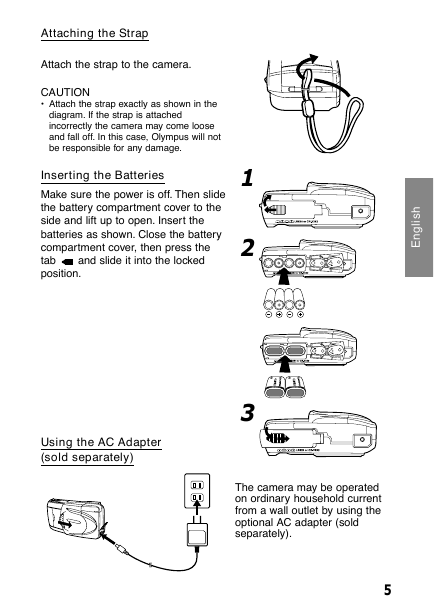
Attaching the Strap
Attach the strap to the camera.
CAUTION
• Attach the strap exactly as shown in the
diagram. If the strap is attached
incorrectly the camera may come loose
and fall off. In this case, Olympus will not
be responsible for any damage.
Inserting the Batteries
Make sure the power is off. Then slide
the battery compartment cover to the
side and lift up to open. Insert the
batteries as shown. Close the battery
compartment cover, then press the
tab
and slide it into the locked
position.
Using the AC Adapter
(sold separately)
1
2
3
The camera may be operated
on ordinary household current
from a wall outlet by using the
optional AC adapter (sold
separately).
5
�
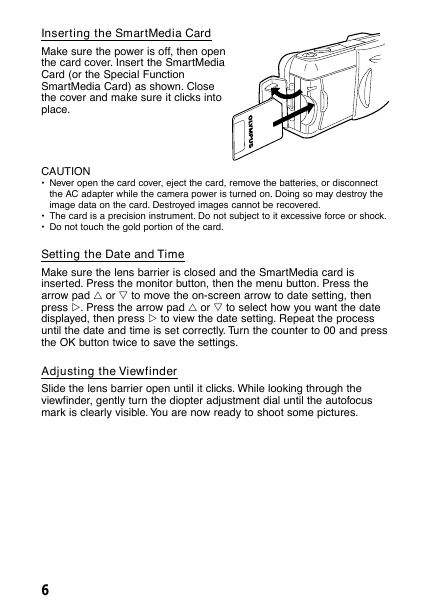
Inserting the SmartMedia Card
Make sure the power is off, then open
the card cover. Insert the SmartMedia
Card (or the Special Function
SmartMedia Card) as shown. Close
the cover and make sure it clicks into
place.
CAUTION
• Never open the card cover, eject the card, remove the batteries, or disconnect
the AC adapter while the camera power is turned on. Doing so may destroy the
image data on the card. Destroyed images cannot be recovered.
• The card is a precision instrument. Do not subject to it excessive force or shock.
• Do not touch the gold portion of the card.
Setting the Date and Time
Make sure the lens barrier is closed and the SmartMedia card is
inserted. Press the monitor button, then the menu button. Press the
arrow pad 왕 or 왓 to move the on-screen arrow to date setting, then
press 컄. Press the arrow pad 왕 or 왓 to select how you want the date
displayed, then press 컄 to view the date setting. Repeat the process
until the date and time is set correctly. Turn the counter to 00 and press
the OK button twice to save the settings.
Adjusting the Viewfinder
Slide the lens barrier open until it clicks. While looking through the
viewfinder, gently turn the diopter adjustment dial until the autofocus
mark is clearly visible. You are now ready to shoot some pictures.
6
�
Learning the Basics
Turning the Power On
Slide the lens barrier open until it clicks. This turns on the power and
extends the lens. The battery check level goes off automatically after a
few seconds.
Checking the Control Panel
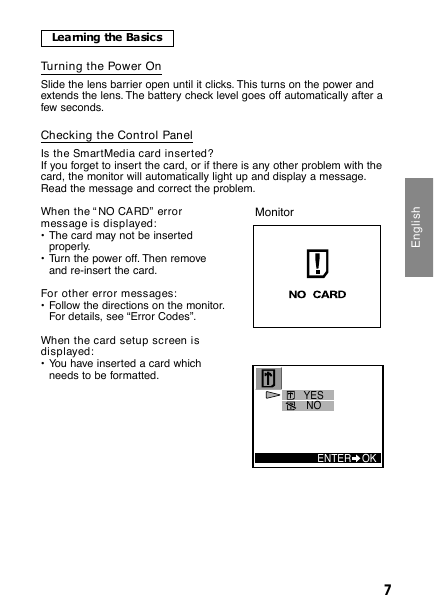
Is the SmartMedia card inserted?
If you forget to insert the card, or if there is any other problem with the
card, the monitor will automatically light up and display a message.
Read the message and correct the problem.
When the “NO CARD” error
message is displayed:
• The card may not be inserted
properly.
• Turn the power off. Then remove
and re-insert the card.
For other error messages:
• Follow the directions on the monitor.
For details, see “Error Codes”.
When the card setup screen is
displayed:
• You have inserted a card which
needs to be formatted.
h
s
i
l
g
n
E
Monitor
YES
NO
ENTER
OK
7
�
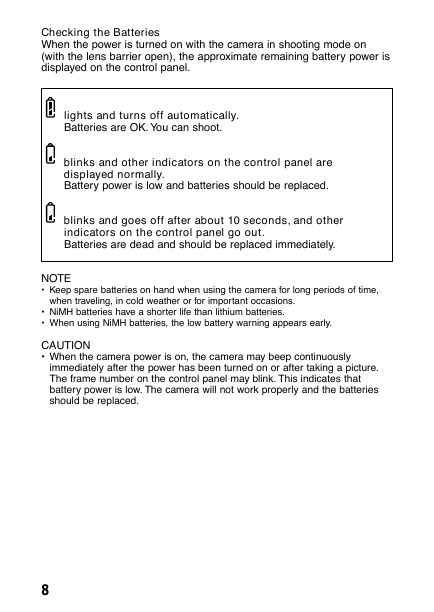
Checking the Batteries
When the power is turned on with the camera in shooting mode on
(with the lens barrier open), the approximate remaining battery power is
displayed on the control panel.
lights and turns off automatically.
Batteries are OK. You can shoot.
blinks and other indicators on the control panel are
displayed normally.
Battery power is low and batteries should be replaced.
blinks and goes off after about 10 seconds, and other
indicators on the control panel go out.
Batteries are dead and should be replaced immediately.
NOTE
• Keep spare batteries on hand when using the camera for long periods of time,
when traveling, in cold weather or for important occasions.
• NiMH batteries have a shorter life than lithium batteries.
• When using NiMH batteries, the low battery warning appears early.
CAUTION
• When the camera power is on, the camera may beep continuously
immediately after the power has been turned on or after taking a picture.
The frame number on the control panel may blink. This indicates that
battery power is low. The camera will not work properly and the batteries
should be replaced.
8
�




 2023年江西萍乡中考道德与法治真题及答案.doc
 2012年重庆南川中考生物真题及答案.doc
 2013年江西师范大学地理学综合及文艺理论基础考研真题.doc
 2020年四川甘孜小升初语文真题及答案I卷.doc
 2020年注册岩土工程师专业基础考试真题及答案.doc
 2023-2024学年福建省厦门市九年级上学期数学月考试题及答案.doc
 2021-2022学年辽宁省沈阳市大东区九年级上学期语文期末试题及答案.doc
 2022-2023学年北京东城区初三第一学期物理期末试卷及答案.doc
 2018上半年江西教师资格初中地理学科知识与教学能力真题及答案.doc
 2012年河北国家公务员申论考试真题及答案-省级.doc
 2020-2021学年江苏省扬州市江都区邵樊片九年级上学期数学第一次质量检测试题及答案.doc
 2022下半年黑龙江教师资格证中学综合素质真题及答案.doc