E
INSTRUCTION MANUAL
�
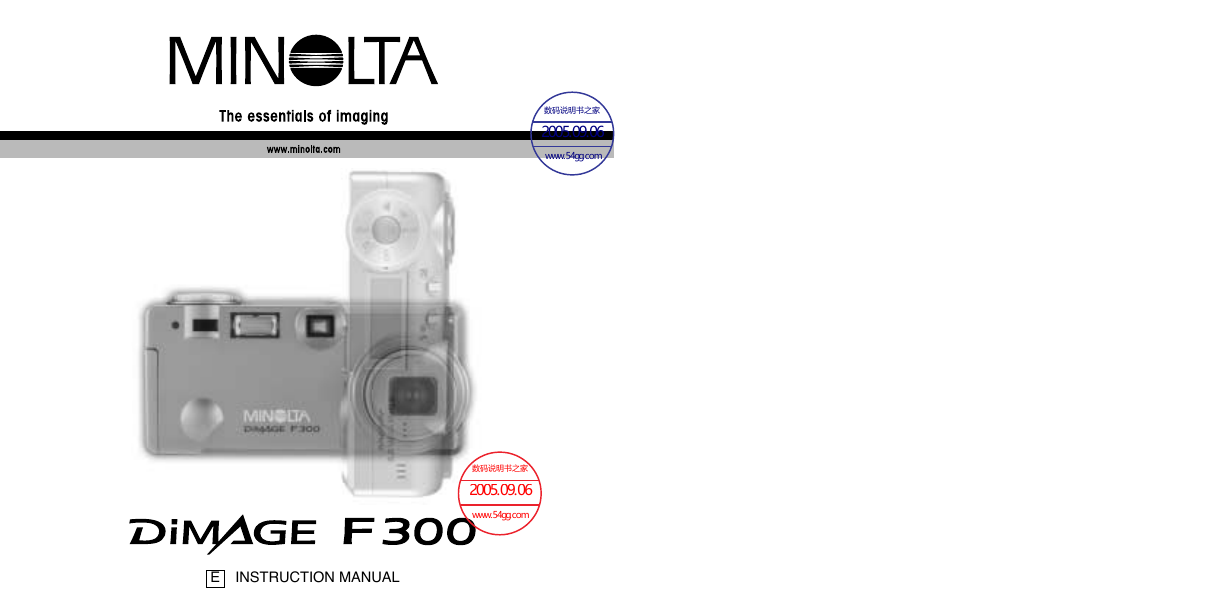
Before you begin
Thank you for purchasing this Minolta digital camera. Please take the time to read
through this instruction manual so you can enjoy all the features of your new camera.
Check the packing list before using this product. If any items are missing, immediately
contact your camera dealer.
Minolta DiMAGE F300 digital camera
CR-V3 battery
Hand strap HS-DG100
16MB SD Memory Card
AV cable AVC-200
USB cable USB-500
DiMAGE Viewer CD-ROM
DiMAGE F300 instruction manual
DiMAGE Viewer instruction manual
Warranty card
Apple, the Apple logo, Macintosh, Power Macintosh, Mac OS, and the Mac OS logo are registered
trademarks of Apple Computer Inc. Microsoft and Windows are registered trademarks of the
Microsoft Corporation. The official name of Windows is Microsoft Windows Operating System.
Pentium is a registered trademark of the Intel Corporation. Power PC is a trademark of the
International Business Machines Corporation. QuickTime is a trademark used under license. USB
DIRECT-PRINT is a trademark of Seiko Epson Corporation. All other trademarks are the property of
their respective owners.
2
BEFORE YOU BEGIN
For proper and safe use
Read and understand all warnings and cautions before using this product.
WARNING
Using batteries improperly can cause them to leak harmful solutions, overheat, or explode
which may damage property or cause personal injury. Do not ignore the following
warnings.
• Only use the batteries specified in this instruction manual.
• Do not install the batteries with the polarity (+/–) reversed.
• Do not use batteries which show wear or damage.
• Do not expose batteries to fire, high temperatures, water, or moisture.
• Do not attempt to short or disassemble batteries.
• Do not store batteries near or in metallic products.
• Do not mix batteries of different types, brands, ages, or charge levels.
• Do not charge lithium batteries.
• When recharging rechargeable batteries, only use the recommended charger.
• Do not use leaking batteries. If fluid from the batteries enters your eye, immediately
rinse the eye with plenty of fresh water and contact a doctor. If fluid from the batteries
makes contact with your skin or clothing, wash the area thoroughly with water.
• Tape over lithium battery contacts to avoid short-circuiting during disposal; always follow
local regulations for battery disposal.
• Use only the specified AC adapter within the voltage range indicated on the adapter
unit. An inappropriate adapter or current may cause damage or injury through fire or
electric shock.
• Do not disassemble this product. Electric shock may cause injury if a high voltage circuit
inside the product is touched.
• Immediately remove the batteries or unplug the AC adapter and discontinue use if the
camera is dropped or subjected to an impact in which the interior, especially the flash
unit, is exposed. The flash has a high voltage circuit which may cause an electric shock
resulting in injury. The continued use of a damaged product or part may cause injuries
or fire.
3
�
• Keep batteries or small parts that could be swallowed away from infants. Contact a
doctor immediately if an object is swallowed.
• Store this product out of reach of children. Be careful when around children, not to harm
them with the product or parts.
• Do not fire the flash directly into the eyes. It may damage eyesight.
• Do not fire the flash at vehicle operators. It may cause a distraction or temporary
blindness which may lead to an accident.
• Do not use the monitor while operating a vehicle or walking. It may result in injury or an
accident.
• Do not look directly at the sun or strong light sources through the viewfinder. It may
damage your eyesight or cause blindness.
• Do not use this product in a humid environment, or operate this product with wet hands.
If liquid enters the product, immediately remove the batteries or unplug the AC adapter
and discontinue use. The continued use of a product exposed to liquids may cause
damage or injury through fire or electric shock.
• Do not use the product near inflammable gases or liquids such as gasoline, benzine, or
paint thinner. Do not use inflammable products such as alcohol, benzine, or paint
thinner to clean the product. The use of inflammable cleaners and solvents may cause
an explosion or fire.
• When unplugging the AC adapter, do not pull on the power cord. Hold the adapter unit
when removing it from an outlet.
• Do not damage, twist, modify, heat, or place heavy objects on the AC adapter cord. A
damaged cord may cause damage or injury through fire or electric shock.
• If the product emits a strange odor, heat, or smoke, discontinue use. Immediately
remove the batteries taking care not to burn yourself as the batteries become hot with
use. The continued use of a damaged product or part may cause injuries or fire.
• Take the product to a Minolta Service Facility when repairs are required
CAUTION
• Do not use or store the product in a hot or humid environment such as the glove
compartment or trunk of a car. It may damage the product and batteries which may
result in burns or injuries caused by heat, fire, explosion, or leaking battery fluid.
• If batteries are leaking, discontinue use of the product.
• The lens retracts when the camera is turned off. Touching the lens barrel while it is
retracting may cause injury.
• The camera temperature rises with extended periods of use. Care should be taken to
avoid burns.
• Burns may result if the memory card or batteries are removed immediately after
extended periods of use. Turn the camera off and wait for it to cool.
• Do not fire the flash while it is in contact with people or objects. The flash unit
discharges a large amount of energy which may cause burns.
• Do not apply pressure to the LCD monitor. A damaged monitor may cause injury, and
the liquid from the monitor may cause inflammation. If liquid from the monitor makes
contact with skin, wash the area with fresh water. If liquid from the monitor comes in
contact with the eyes, immediately rinse the eyes with plenty of water and contact a
doctor.
• When using the AC adapter, insert the plug securely into the electrical outlet.
• Do not use if the AC adapter cord is damaged.
• Do not cover the AC adapter. A fire may result.
• Do not obstruct access to the AC adapter; this can hinder the unplugging of the unit in
emergencies.
• Unplug the AC adapter when cleaning or when the product is not in use.
4
FOR PROPER AND SAFE USE
5
�
About this manual
The basic operation of this camera is covered between pages 14 and 37. This section
of the manual covers the camera parts, preparation of the camera for use, and the
basic camera operation for recording, viewing, and deleting images.
The basic and advanced auto-recording mode sections cover all the basic functions of
the camera in this mode and in the multi-function recording mode. Take time to read
these sections before moving on to the multi-function recording mode section. The
basic playback section describes how to view images. The other sections can be read
as needed.
Many of the features of this camera are controlled with menus. The menu navigation
sections concisely describe how to change menu settings. Descriptions of the settings
immediately follow the navigation sections.
Names of parts ....................................................................................................................................10
Camera body ...........................................................................................................................10
Viewfinder ................................................................................................................................12
Mode dial .................................................................................................................................12
Data panel ...............................................................................................................................13
Getting up and running.........................................................................................................................14
Changing the CR-3V battery ...................................................................................................14
Installing AA batteries ..............................................................................................................15
Attaching the hand strap .........................................................................................................15
Battery condition indicator .......................................................................................................16
Auto power save......................................................................................................................16
Connecting the AC adapter (sold separately) .........................................................................17
Changing the memory card .....................................................................................................18
About memory cards...................................................................................................19
Setting the date and time ........................................................................................................20
Auto-recording mode - basic operation................................................................................................22
Handling the camera ...............................................................................................................22
Power / Access lamp ...............................................................................................................22
Setting the camera to record images automatically ................................................................23
Using the zoom lens................................................................................................................24
Focus range.............................................................................................................................24
About camera operation ..........................................................................................................25
Basic recording operation........................................................................................................26
6
TABLE OF CONTENTS
Focus signals...........................................................................................................................27
Special focusing situations ......................................................................................................27
Automatic Digital Subject Program Selection..........................................................................28
Digital-subject-program button ................................................................................................29
Display button - recording mode .............................................................................................31
Flash modes ............................................................................................................................32
Flash range - auto-recording mode .........................................................................................33
Flash signals............................................................................................................................33
Camera-shake warning ...........................................................................................................33
Playback - basic operation ...................................................................................................................34
Single-frame playback and histogram display.........................................................................34
Viewing and deleting images...................................................................................................35
Display button - playback mode ..............................................................................................36
Display button - Quick View ....................................................................................................36
Enlarged playback ...................................................................................................................37
Auto-recording mode - advanced operation.........................................................................................38
Navigating the auto-recording mode menu .............................................................................38
Digital zoom.............................................................................................................................40
Drive modes ............................................................................................................................41
Self-timer .................................................................................................................................42
Remote control (sold separately) ............................................................................................43
Continuous advance................................................................................................................44
UHS continuous advance........................................................................................................45
Bracketing................................................................................................................................46
Image size and image quality..................................................................................................48
Date imprinting ........................................................................................................................50
Exposure compensation ..........................................................................................................51
Focus area selection ...............................................................................................................52
Focus lock ...............................................................................................................................53
Multi-function recording mode - advanced operation...........................................................................54
Multi-function recording mode display.....................................................................................55
Navigating the multi-function recording mode menu...............................................................56
Exposure modes......................................................................................................................58
Programmed AE - P....................................................................................................58
Aperture priority - A.....................................................................................................58
Shutter priority - S.......................................................................................................59
Manual exposure - M..................................................................................................60
Bulb exposures........................................................................................................................61
White balance..........................................................................................................................62
Automatic white balance.............................................................................................62
7
�
Preset white balance ..................................................................................................62
Custom white balance ................................................................................................63
Focus modes ...........................................................................................................................64
Single-shot AF ............................................................................................................64
Subject Tracking AF....................................................................................................64
Manual focus ..............................................................................................................65
Full-time AF .............................................................................................................................65
Flash compensation ................................................................................................................66
Metering modes.......................................................................................................................66
Camera sensitivity - ISO..........................................................................................................67
Flash range and camera sensitivity ............................................................................67
Digital Effects Control ..............................................................................................................68
Voice memo.............................................................................................................................70
Instant playback.......................................................................................................................71
A short guide to photography ...............................................................................................................72
Using exposure and flash compensation ................................................................................74
What is an Ev? What is a stop? ..............................................................................................75
Exposure latitude.....................................................................................................................75
Movie and audio recording...................................................................................................................76
Recording movies....................................................................................................................76
Recording audio ......................................................................................................................77
Navigating the movie menu.....................................................................................................78
Notes on movie recording .......................................................................................................79
Recording movies and audio with the RC-3 remote control (sold separately)........................79
Playback mode - advanced operation..................................................................................................80
Playing back voice memos and audio captions ......................................................................80
Playing back movies and audio recordings.............................................................................81
Navigating the playback-mode menu ......................................................................................82
Frame-selection screen ...........................................................................................................84
Deleting files ............................................................................................................................85
Locking files.............................................................................................................................86
Audio captioning ......................................................................................................................87
Slide Show...............................................................................................................................88
About DPOF ............................................................................................................................90
Creating a DPOF print order ...................................................................................................90
Ordering an index print............................................................................................................91
Copy and E-mail Copy ............................................................................................................92
Viewing images on a television ...............................................................................................94
Setup mode - controlling the camera’s operation ................................................................................95
Navigating the setup menu......................................................................................................96
8
TABLE OF CONTENTS
LCD monitor brightness...........................................................................................................98
Formatting memory cards........................................................................................................98
Auto power save......................................................................................................................99
Language.................................................................................................................................99
File number (#) memory ..........................................................................................................99
Folder name ..........................................................................................................................100
Audio signals .........................................................................................................................100
Shutter FX .............................................................................................................................101
Volume ..................................................................................................................................102
Reset default .........................................................................................................................102
Noise reduction......................................................................................................................104
Setting the date and time ......................................................................................................104
Setting the date format ..........................................................................................................104
Video output ..........................................................................................................................104
Data-transfer mode - connecting to a computer ................................................................................105
System requirements.............................................................................................................105
Connecting the camera to a computer ..................................................................................106
Connecting to Windows 98 and 98 Second Edition ..............................................................108
Automatic installation................................................................................................108
Manual installation ....................................................................................................109
Connecting to Mac OS 8.6.....................................................................................................111
QuickTime system requirements............................................................................................111
Auto power save (data-transfer mode) ..................................................................................111
Memory card folder organization ...........................................................................................112
Disconnecting the camera from the computer.......................................................................114
Windows 98 and 98 Second Edition.........................................................................114
Windows Me, 2000 Professional, and XP.................................................................114
Macintosh..................................................................................................................115
Changing the memory card (data-transfer mode) .................................................................116
..................................................................................................................................117
Troubleshooting .....................................................................................................................117
About Ni-MH batteries ...........................................................................................................119
Uninstalling the driver software - Windows ...........................................................................120
Using USB DIRECT-PRINT...................................................................................................121
Care and storage...................................................................................................................122
Technical specifications .........................................................................................................126
Appendix
9
�
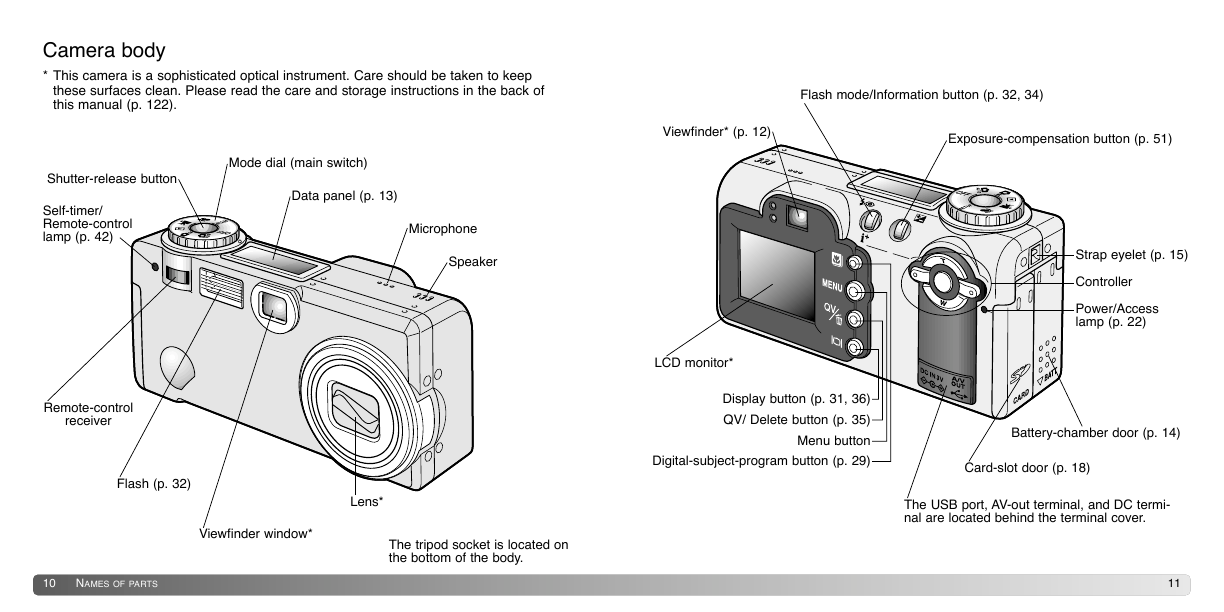
Camera body
* This camera is a sophisticated optical instrument. Care should be taken to keep
these surfaces clean. Please read the care and storage instructions in the back of
this manual (p. 122).
Shutter-release button
Self-timer/
Remote-control
lamp (p. 42)
Mode dial (main switch)
Data panel (p. 13)
Microphone
Speaker
Remote-control
receiver
Flash (p. 32)
Lens*
Viewfinder window*
The tripod socket is located on
the bottom of the body.
Flash mode/Information button (p. 32, 34)
Viewfinder* (p. 12)
Exposure-compensation button (p. 51)
Strap eyelet (p. 15)
Controller
Power/Access
lamp (p. 22)
LCD monitor*
Display button (p. 31, 36)
QV/ Delete button (p. 35)
Menu button
Digital-subject-program button (p. 29)
Battery-chamber door (p. 14)
Card-slot door (p. 18)
The USB port, AV-out terminal, and DC termi-
nal are located behind the terminal cover.
10
NAMES OF PARTS
11
�
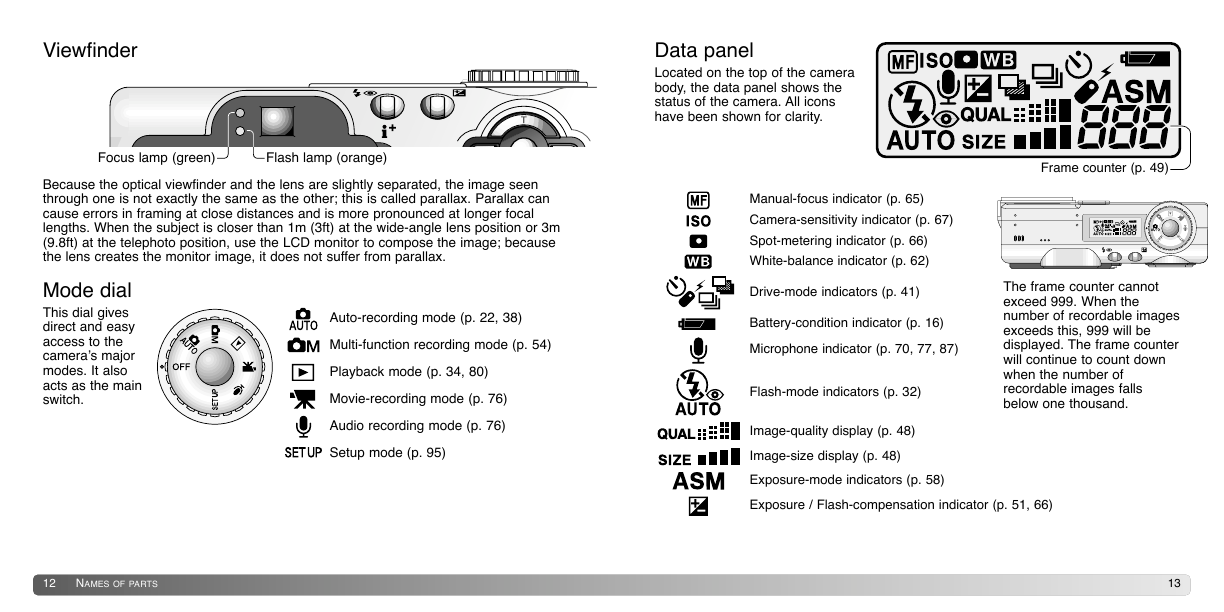
Viewfinder
Data panel
Located on the top of the camera
body, the data panel shows the
status of the camera. All icons
have been shown for clarity.
Focus lamp (green)
Flash lamp (orange)
Because the optical viewfinder and the lens are slightly separated, the image seen
through one is not exactly the same as the other; this is called parallax. Parallax can
cause errors in framing at close distances and is more pronounced at longer focal
lengths. When the subject is closer than 1m (3ft) at the wide-angle lens position or 3m
(9.8ft) at the telephoto position, use the LCD monitor to compose the image; because
the lens creates the monitor image, it does not suffer from parallax.
Mode dial
This dial gives
direct and easy
access to the
camera’s major
modes. It also
acts as the main
switch.
Auto-recording mode (p. 22, 38)
Multi-function recording mode (p. 54)
Playback mode (p. 34, 80)
Movie-recording mode (p. 76)
Audio recording mode (p. 76)
Setup mode (p. 95)
Frame counter (p. 49)
The frame counter cannot
exceed 999. When the
number of recordable images
exceeds this, 999 will be
displayed. The frame counter
will continue to count down
when the number of
recordable images falls
below one thousand.
Manual-focus indicator (p. 65)
Camera-sensitivity indicator (p. 67)
Spot-metering indicator (p. 66)
White-balance indicator (p. 62)
Drive-mode indicators (p. 41)
Battery-condition indicator (p. 16)
Microphone indicator (p. 70, 77, 87)
Flash-mode indicators (p. 32)
Image-quality display (p. 48)
Image-size display (p. 48)
Exposure-mode indicators (p. 58)
Exposure / Flash-compensation indicator (p. 51, 66)
12
NAMES OF PARTS
13
�
GETTING UP AND RUNNING
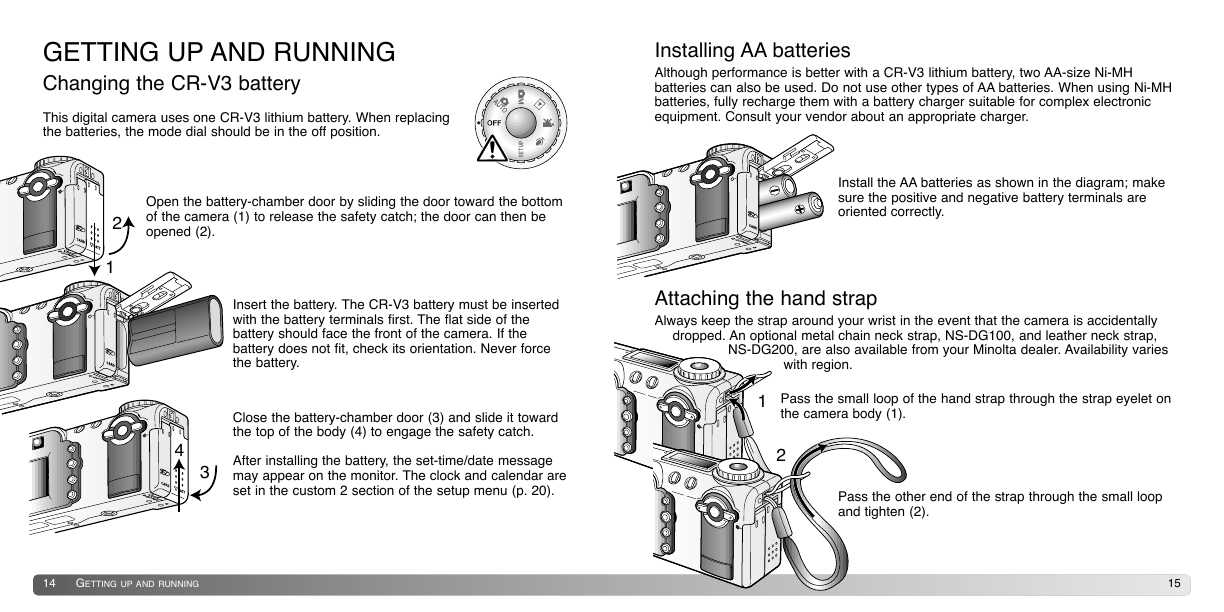
Changing the CR-V3 battery
This digital camera uses one CR-V3 lithium battery. When replacing
the batteries, the mode dial should be in the off position.
Installing AA batteries
Although performance is better with a CR-V3 lithium battery, two AA-size Ni-MH
batteries can also be used. Do not use other types of AA batteries. When using Ni-MH
batteries, fully recharge them with a battery charger suitable for complex electronic
equipment. Consult your vendor about an appropriate charger.
Open the battery-chamber door by sliding the door toward the bottom
of the camera (1) to release the safety catch; the door can then be
opened (2).
2
1
Insert the battery. The CR-V3 battery must be inserted
with the battery terminals first. The flat side of the
battery should face the front of the camera. If the
battery does not fit, check its orientation. Never force
the battery.
4
3
Close the battery-chamber door (3) and slide it toward
the top of the body (4) to engage the safety catch.
After installing the battery, the set-time/date message
may appear on the monitor. The clock and calendar are
set in the custom 2 section of the setup menu (p. 20).
Install the AA batteries as shown in the diagram; make
sure the positive and negative battery terminals are
oriented correctly.
Attaching the hand strap
Always keep the strap around your wrist in the event that the camera is accidentally
dropped. An optional metal chain neck strap, NS-DG100, and leather neck strap,
NS-DG200, are also available from your Minolta dealer. Availability varies
with region.
1 Pass the small loop of the hand strap through the strap eyelet on
the camera body (1).
2
Pass the other end of the strap through the small loop
and tighten (2).
14
GETTING UP AND RUNNING
15
�




 2023年江西萍乡中考道德与法治真题及答案.doc
 2012年重庆南川中考生物真题及答案.doc
 2013年江西师范大学地理学综合及文艺理论基础考研真题.doc
 2020年四川甘孜小升初语文真题及答案I卷.doc
 2020年注册岩土工程师专业基础考试真题及答案.doc
 2023-2024学年福建省厦门市九年级上学期数学月考试题及答案.doc
 2021-2022学年辽宁省沈阳市大东区九年级上学期语文期末试题及答案.doc
 2022-2023学年北京东城区初三第一学期物理期末试卷及答案.doc
 2018上半年江西教师资格初中地理学科知识与教学能力真题及答案.doc
 2012年河北国家公务员申论考试真题及答案-省级.doc
 2020-2021学年江苏省扬州市江都区邵樊片九年级上学期数学第一次质量检测试题及答案.doc
 2022下半年黑龙江教师资格证中学综合素质真题及答案.doc