MULTI-FUNCTION RECORDING
Except for digital subject programs, the basic operation of the camera in multi-function
recording mode is identical to the auto-recording mode. Thoroughly familiarize yourself
with the previous sections before moving on.
The multi-function recording mode allows greater control over image making. This
recording mode gives more control over autofocus and composition. The menu controls
are extensive allowing critical adjustments to image qualities such as sharpness,
contrast, and color saturation.
Multi-function recording mode display
Minolta history
In the center of the Sakai plant in Japan is Okina bridge.
In the 15th century, Sakai was a very prosperous free
city, and Okina bridge spanned the moat at one of the
entrances into the walled town. For centuries, this bridge
carried pilgrims on their way to two of Japan’s sacred
places: the mountain monastery of Koyasan and the
great Shinto shrine, Kumano Taisha.
The bridge in the courtyard dates from 1855. In 1968,
Minolta offered to remove and preserve the bridge when
the city government announced they would fill in the
moat for a planned highway. The bridge now spans a
specially constructed goldfish pond. The writing on the
stone bollard at the front of the bridge prohibits vehicles
from crossing.
a. Digital-subject-program indicator (p. 29)
b. Microphone indicator
c. Mode indicator
d. Flash-mode indicator (p. 32)
e. Flash-compensation display (p. 66)
f. Sharpness, contrast, and color-
saturation compensation displays (p. 68)
g. Exposure-compensation display (p. 51)
h. White-balance indicator (p. 62)
i. Exposure-mode indicator (p. 58)
j. Shutter-speed display
k. Metering-mode indicator (p. 66)
l. Aperture display
m. Camera-shake warning (p. 33)
n. Camera-sensitivity (ISO) display (p. 67)
o. Focus signal (p. 27, 53)
p. Date-imprinting indicator (p. 50)
q. Frame counter (p. 13, 49)
r. Drive-mode indicator (p. 41)
s. Digital-zoom display (p. 40)
t.
u. Image-size display (p. 48)
v. Color-mode display (p. 68)
Image-quality indicator (p. 48)
1. Focus frame
2. Spot metering area (p. 66)
3. Spot focus areas (p. 52)
54
MULTI-FUNCTION RECORDING
55
�
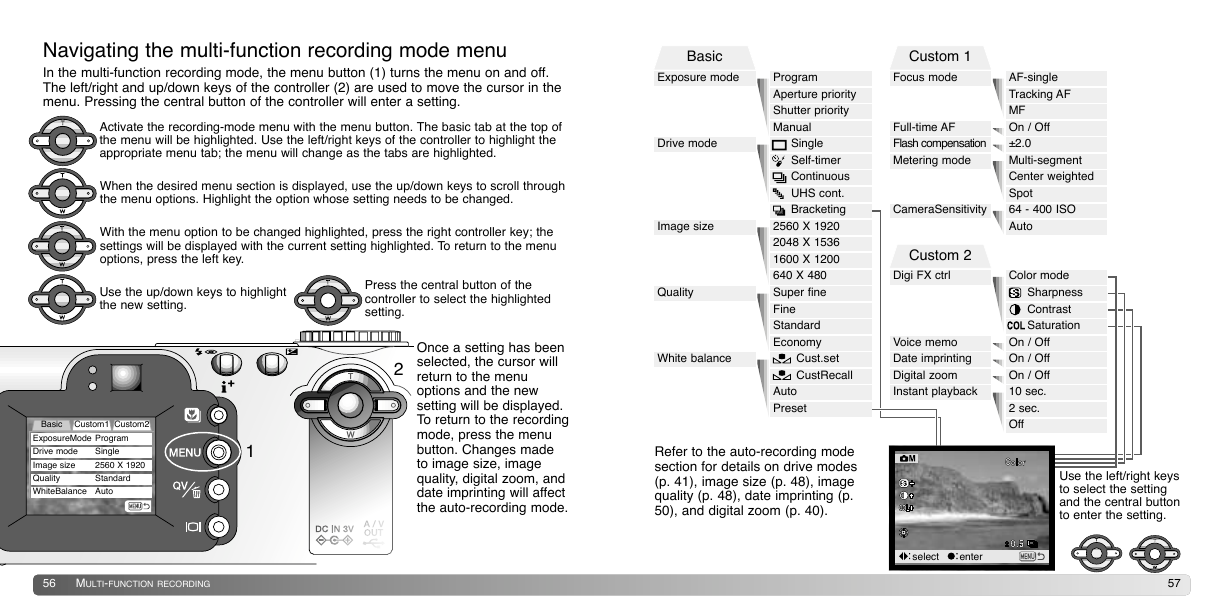
Navigating the multi-function recording mode menu
In the multi-function recording mode, the menu button (1) turns the menu on and off.
The left/right and up/down keys of the controller (2) are used to move the cursor in the
menu. Pressing the central button of the controller will enter a setting.
Activate the recording-mode menu with the menu button. The basic tab at the top of
the menu will be highlighted. Use the left/right keys of the controller to highlight the
appropriate menu tab; the menu will change as the tabs are highlighted.
When the desired menu section is displayed, use the up/down keys to scroll through
the menu options. Highlight the option whose setting needs to be changed.
With the menu option to be changed highlighted, press the right controller key; the
settings will be displayed with the current setting highlighted. To return to the menu
options, press the left key.
Use the up/down keys to highlight
the new setting.
Press the central button of the
controller to select the highlighted
setting.
2
Once a setting has been
selected, the cursor will
return to the menu
options and the new
setting will be displayed.
To return to the recording
mode, press the menu
button. Changes made
to image size, image
quality, digital zoom, and
date imprinting will affect
the auto-recording mode.
Basic Custom1 Custom2
ExposureMode
Drive mode
Image size
Quality
WhiteBalance Auto
Program
Single
2560 X 1920
Standard
1
56
MULTI-FUNCTION RECORDING
Basic
Exposure mode
Drive mode
Image size
Quality
White balance
Program
Aperture priority
Shutter priority
Manual
Single
Self-timer
Continuous
UHS cont.
Bracketing
2560 X 1920
2048 X 1536
1600 X 1200
640 X 480
Super fine
Fine
Standard
Economy
Cust.set
CustRecall
Auto
Preset
Custom 1
Focus mode
Full-time AF
Flash compensation
Metering mode
CameraSensitivity
AF-single
Tracking AF
MF
On / Off
±2.0
Multi-segment
Center weighted
Spot
64 - 400 ISO
Auto
Custom 2
Digi FX ctrl
Color mode
Voice memo
Date imprinting
Digital zoom
Instant playback
Sharpness
Contrast
Saturation
On / Off
On / Off
On / Off
10 sec.
2 sec.
Off
Refer to the auto-recording mode
section for details on drive modes
(p. 41), image size (p. 48), image
quality (p. 48), date imprinting (p.
50), and digital zoom (p. 40).
Use the left/right keys
to select the setting
and the central button
to enter the setting.
57
select
enter
�
Exposure modes
Programmed AE - P
The program exposure mode controls both the shutter speed and aperture to ensure
perfect exposures. The sophisticated exposure system allows the photographer the
freedom to shoot without having to worry about the technical details of exposure
settings. The shutter speed and aperture values of the exposure are displayed on the
monitor. If shutter speed and aperture displays turn red, the scene is beyond the
exposure control range of the camera. This exposure mode is also used in the auto-
recording mode, but the exposure-mode indicator is not displayed.
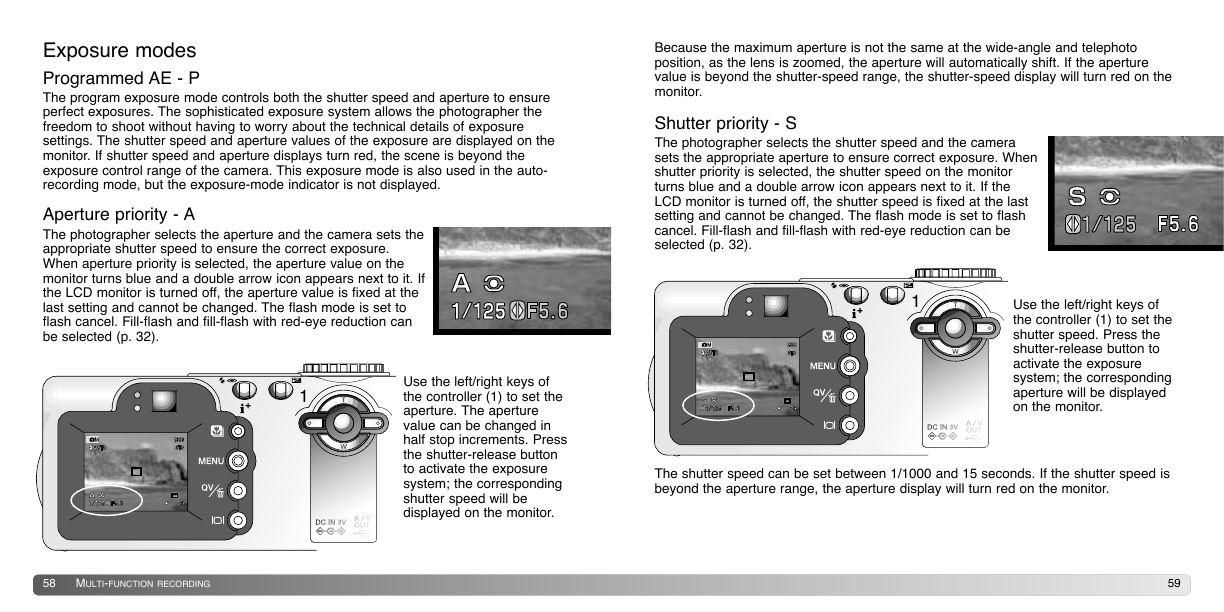
Aperture priority - A
The photographer selects the aperture and the camera sets the
appropriate shutter speed to ensure the correct exposure.
When aperture priority is selected, the aperture value on the
monitor turns blue and a double arrow icon appears next to it. If
the LCD monitor is turned off, the aperture value is fixed at the
last setting and cannot be changed. The flash mode is set to
flash cancel. Fill-flash and fill-flash with red-eye reduction can
be selected (p. 32).
1
Use the left/right keys of
the controller (1) to set the
aperture. The aperture
value can be changed in
half stop increments. Press
the shutter-release button
to activate the exposure
system; the corresponding
shutter speed will be
displayed on the monitor.
Because the maximum aperture is not the same at the wide-angle and telephoto
position, as the lens is zoomed, the aperture will automatically shift. If the aperture
value is beyond the shutter-speed range, the shutter-speed display will turn red on the
monitor.
Shutter priority - S
The photographer selects the shutter speed and the camera
sets the appropriate aperture to ensure correct exposure. When
shutter priority is selected, the shutter speed on the monitor
turns blue and a double arrow icon appears next to it. If the
LCD monitor is turned off, the shutter speed is fixed at the last
setting and cannot be changed. The flash mode is set to flash
cancel. Fill-flash and fill-flash with red-eye reduction can be
selected (p. 32).
1
Use the left/right keys of
the controller (1) to set the
shutter speed. Press the
shutter-release button to
activate the exposure
system; the corresponding
aperture will be displayed
on the monitor.
The shutter speed can be set between 1/1000 and 15 seconds. If the shutter speed is
beyond the aperture range, the aperture display will turn red on the monitor.
58
MULTI-FUNCTION RECORDING
59
�
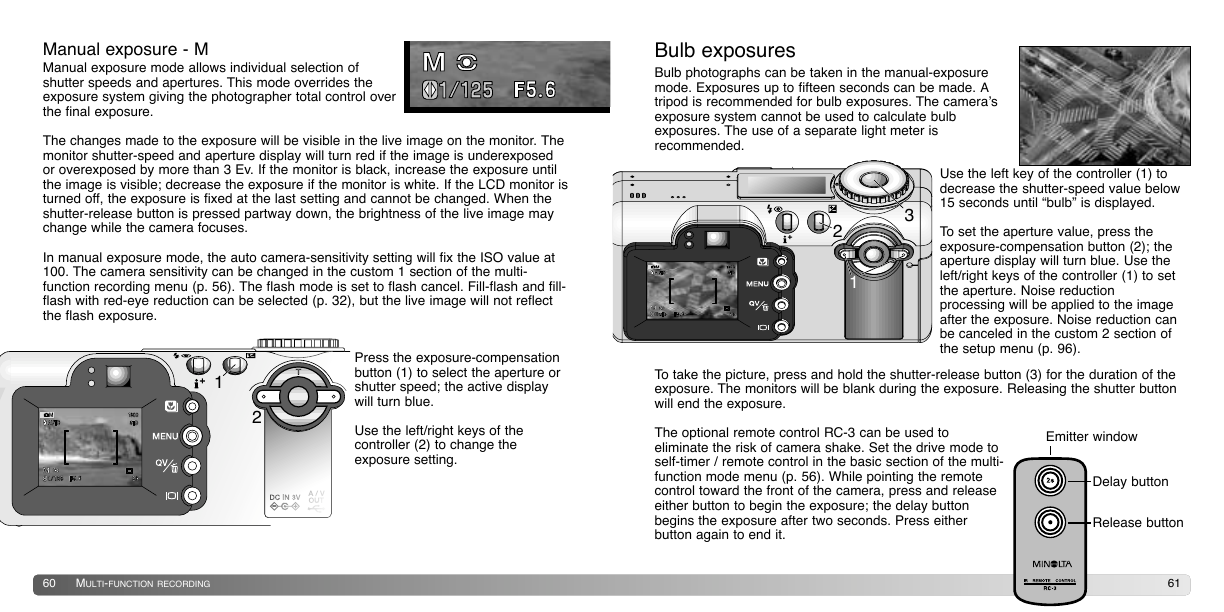
Manual exposure - M
Manual exposure mode allows individual selection of
shutter speeds and apertures. This mode overrides the
exposure system giving the photographer total control over
the final exposure.
The changes made to the exposure will be visible in the live image on the monitor. The
monitor shutter-speed and aperture display will turn red if the image is underexposed
or overexposed by more than 3 Ev. If the monitor is black, increase the exposure until
the image is visible; decrease the exposure if the monitor is white. If the LCD monitor is
turned off, the exposure is fixed at the last setting and cannot be changed. When the
shutter-release button is pressed partway down, the brightness of the live image may
change while the camera focuses.
In manual exposure mode, the auto camera-sensitivity setting will fix the ISO value at
100. The camera sensitivity can be changed in the custom 1 section of the multi-
function recording menu (p. 56). The flash mode is set to flash cancel. Fill-flash and fill-
flash with red-eye reduction can be selected (p. 32), but the live image will not reflect
the flash exposure.
1
2
Press the exposure-compensation
button (1) to select the aperture or
shutter speed; the active display
will turn blue.
Use the left/right keys of the
controller (2) to change the
exposure setting.
60
MULTI-FUNCTION RECORDING
Bulb exposures
Bulb photographs can be taken in the manual-exposure
mode. Exposures up to fifteen seconds can be made. A
tripod is recommended for bulb exposures. The camera’s
exposure system cannot be used to calculate bulb
exposures. The use of a separate light meter is
recommended.
3
2
1
Use the left key of the controller (1) to
decrease the shutter-speed value below
15 seconds until “bulb” is displayed.
To set the aperture value, press the
exposure-compensation button (2); the
aperture display will turn blue. Use the
left/right keys of the controller (1) to set
the aperture. Noise reduction
processing will be applied to the image
after the exposure. Noise reduction can
be canceled in the custom 2 section of
the setup menu (p. 96).
To take the picture, press and hold the shutter-release button (3) for the duration of the
exposure. The monitors will be blank during the exposure. Releasing the shutter button
will end the exposure.
The optional remote control RC-3 can be used to
eliminate the risk of camera shake. Set the drive mode to
self-timer / remote control in the basic section of the multi-
function mode menu (p. 56). While pointing the remote
control toward the front of the camera, press and release
either button to begin the exposure; the delay button
begins the exposure after two seconds. Press either
button again to end it.
Emitter window
Delay button
Release button
61
�
White balance
White balance is the camera’s ability to make different types of lighting appear neutral.
The effect is similar to selecting daylight or tungsten film, or using color compensating
filters in conventional photography. An indicator will be displayed on the monitor if a
setting other than auto white-balance is chosen. White balance is set in the basic
section of the multi-function recording mode menu (p. 56).
Automatic White Balance
The automatic white balance compensates for the color temperature of a scene. In
most cases, the auto setting will balance the ambient light and create beautiful images,
even under mixed-lighting conditions. When the built-in flash is used, the white balance
is set for the color temperature of the flash.
Preset White Balance
Preset white-balance settings must be set before the image is taken. Once set, the
effect is immediately visible on the LCD monitor.
The built-in flash can be used with
preset white-balance settings, but will
create a pinkish or blueish cast with
the fluorescent and tungsten settings.
The flash is daylight balanced and will
produce acceptable results with the
daylight and cloudy settings.
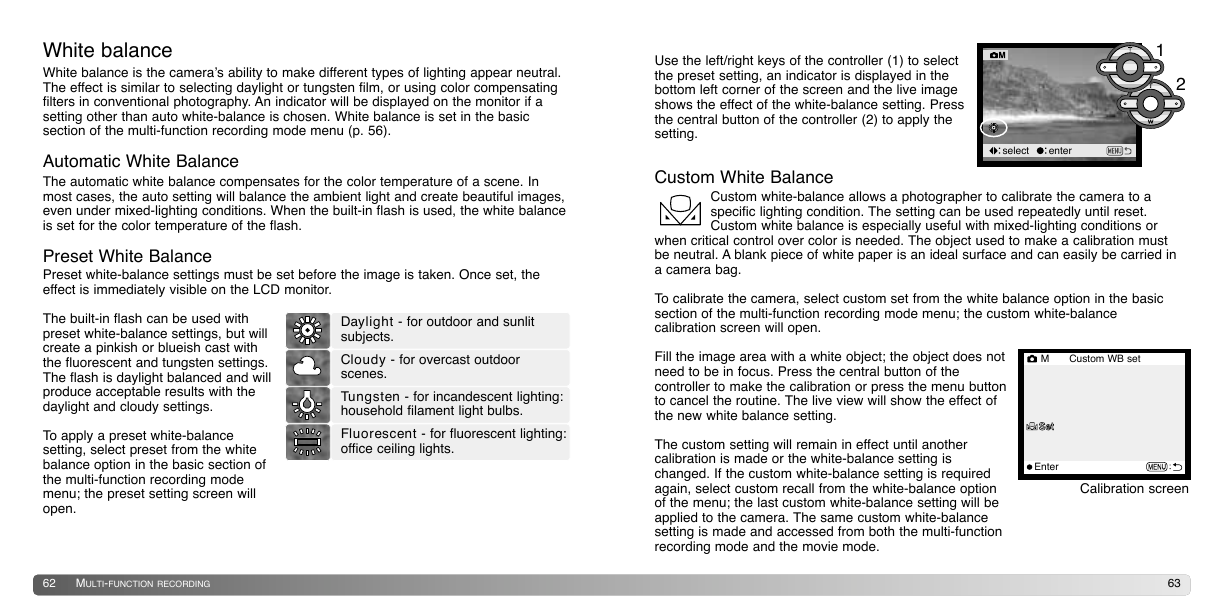
To apply a preset white-balance
setting, select preset from the white
balance option in the basic section of
the multi-function recording mode
menu; the preset setting screen will
open.
Daylight - for outdoor and sunlit
subjects.
Cloudy - for overcast outdoor
scenes.
Tungsten - for incandescent lighting:
household filament light bulbs.
Fluorescent - for fluorescent lighting:
office ceiling lights.
Use the left/right keys of the controller (1) to select
the preset setting, an indicator is displayed in the
bottom left corner of the screen and the live image
shows the effect of the white-balance setting. Press
the central button of the controller (2) to apply the
setting.
1
2
select
enter
Custom White Balance
Custom white-balance allows a photographer to calibrate the camera to a
specific lighting condition. The setting can be used repeatedly until reset.
Custom white balance is especially useful with mixed-lighting conditions or
when critical control over color is needed. The object used to make a calibration must
be neutral. A blank piece of white paper is an ideal surface and can easily be carried in
a camera bag.
To calibrate the camera, select custom set from the white balance option in the basic
section of the multi-function recording mode menu; the custom white-balance
calibration screen will open.
Fill the image area with a white object; the object does not
need to be in focus. Press the central button of the
controller to make the calibration or press the menu button
to cancel the routine. The live view will show the effect of
the new white balance setting.
The custom setting will remain in effect until another
calibration is made or the white-balance setting is
changed. If the custom white-balance setting is required
again, select custom recall from the white-balance option
of the menu; the last custom white-balance setting will be
applied to the camera. The same custom white-balance
setting is made and accessed from both the multi-function
recording mode and the movie mode.
M
Custom WB set
Enter
Calibration screen
62
MULTI-FUNCTION RECORDING
63
�
Focus modes
This camera has autofocus and manual focus control. The focus mode is set in the
custom 1 section of the multi-function recording mode menu (p. 56).
Autofocus will produce excellent results in almost every situation, however, under
certain conditions, the autofocus system will not work accurately; see special focusing
situations on page 27. In these situations the camera can be manually focused.
Single-shot AF
Single-shot AF focuses on the subject and locks the focus position. This focus mode is
ideal for static subjects. Because the focus is locked when the shutter-release button is
pressed partway down, single-shot AF can be used when the subject is outside the
focus frames, or when a special focusing situation is preventing the autofocus system
from focusing. For more on focus lock, see page 53. Focus Area Selection (p. 52) and
the self-timer/remote control drive mode (p. 42) use single-shot AF.
Subject Tracking AF
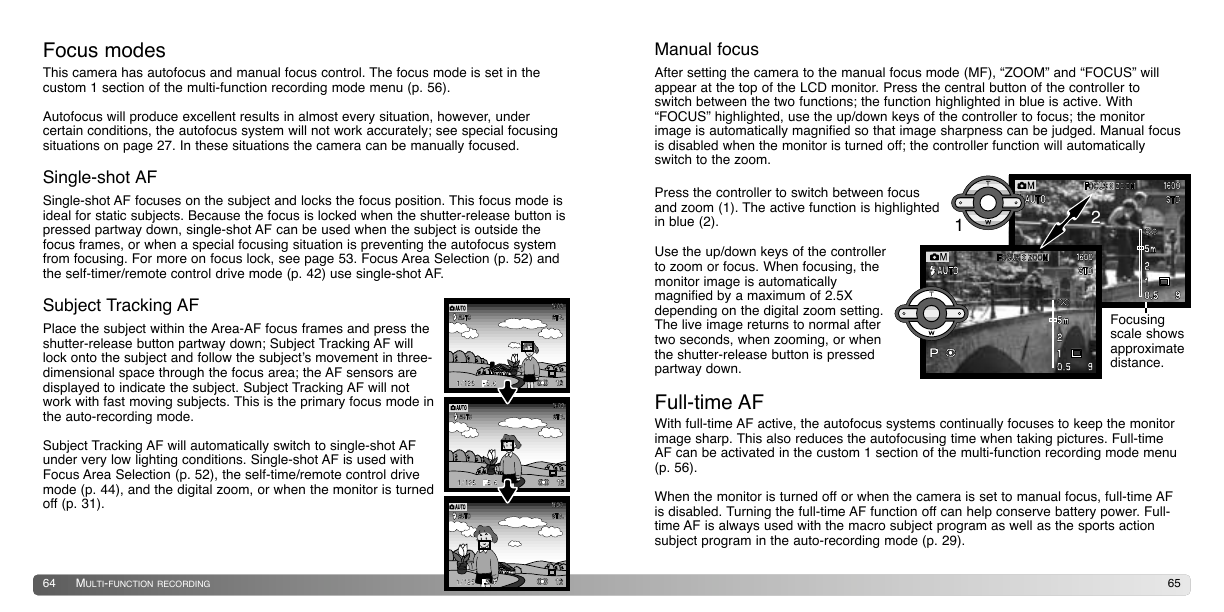
Place the subject within the Area-AF focus frames and press the
shutter-release button partway down; Subject Tracking AF will
lock onto the subject and follow the subject’s movement in three-
dimensional space through the focus area; the AF sensors are
displayed to indicate the subject. Subject Tracking AF will not
work with fast moving subjects. This is the primary focus mode in
the auto-recording mode.
Subject Tracking AF will automatically switch to single-shot AF
under very low lighting conditions. Single-shot AF is used with
Focus Area Selection (p. 52), the self-time/remote control drive
mode (p. 44), and the digital zoom, or when the monitor is turned
off (p. 31).
Manual focus
After setting the camera to the manual focus mode (MF), “ZOOM” and “FOCUS” will
appear at the top of the LCD monitor. Press the central button of the controller to
switch between the two functions; the function highlighted in blue is active. With
“FOCUS” highlighted, use the up/down keys of the controller to focus; the monitor
image is automatically magnified so that image sharpness can be judged. Manual focus
is disabled when the monitor is turned off; the controller function will automatically
switch to the zoom.
Press the controller to switch between focus
and zoom (1). The active function is highlighted
in blue (2).
1
2
Use the up/down keys of the controller
to zoom or focus. When focusing, the
monitor image is automatically
magnified by a maximum of 2.5X
depending on the digital zoom setting.
The live image returns to normal after
two seconds, when zooming, or when
the shutter-release button is pressed
partway down.
Focusing
scale shows
approximate
distance.
Full-time AF
With full-time AF active, the autofocus systems continually focuses to keep the monitor
image sharp. This also reduces the autofocusing time when taking pictures. Full-time
AF can be activated in the custom 1 section of the multi-function recording mode menu
(p. 56).
When the monitor is turned off or when the camera is set to manual focus, full-time AF
is disabled. Turning the full-time AF function off can help conserve battery power. Full-
time AF is always used with the macro subject program as well as the sports action
subject program in the auto-recording mode (p. 29).
64
MULTI-FUNCTION RECORDING
65
�
Flash compensation
Flash compensation increases or decreases the flash
exposure in reference to the ambient exposure by as
much as 2 Ev. For information on the use of flash
compensation, see page 74.
Basic
Custom 1 Custom 2
– 2 ~ + 2
+1.3
Focus mode
Full-time AF
Flash comp.
Metering mode
Sensitivity
1
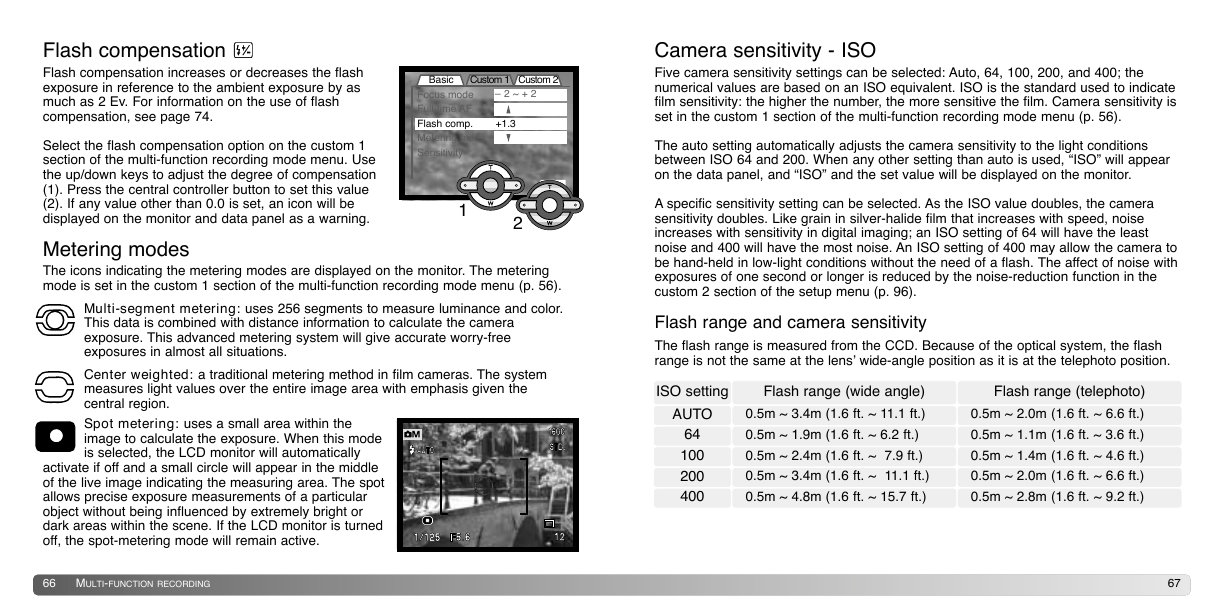
Select the flash compensation option on the custom 1
section of the multi-function recording mode menu. Use
the up/down keys to adjust the degree of compensation
(1). Press the central controller button to set this value
(2). If any value other than 0.0 is set, an icon will be
displayed on the monitor and data panel as a warning.
Metering modes
The icons indicating the metering modes are displayed on the monitor. The metering
mode is set in the custom 1 section of the multi-function recording mode menu (p. 56).
Multi-segment metering: uses 256 segments to measure luminance and color.
This data is combined with distance information to calculate the camera
exposure. This advanced metering system will give accurate worry-free
exposures in almost all situations.
Center weighted: a traditional metering method in film cameras. The system
measures light values over the entire image area with emphasis given the
central region.
Spot metering: uses a small area within the
image to calculate the exposure. When this mode
is selected, the LCD monitor will automatically
2
activate if off and a small circle will appear in the middle
of the live image indicating the measuring area. The spot
allows precise exposure measurements of a particular
object without being influenced by extremely bright or
dark areas within the scene. If the LCD monitor is turned
off, the spot-metering mode will remain active.
Camera sensitivity - ISO
Five camera sensitivity settings can be selected: Auto, 64, 100, 200, and 400; the
numerical values are based on an ISO equivalent. ISO is the standard used to indicate
film sensitivity: the higher the number, the more sensitive the film. Camera sensitivity is
set in the custom 1 section of the multi-function recording mode menu (p. 56).
The auto setting automatically adjusts the camera sensitivity to the light conditions
between ISO 64 and 200. When any other setting than auto is used, “ISO” will appear
on the data panel, and “ISO” and the set value will be displayed on the monitor.
A specific sensitivity setting can be selected. As the ISO value doubles, the camera
sensitivity doubles. Like grain in silver-halide film that increases with speed, noise
increases with sensitivity in digital imaging; an ISO setting of 64 will have the least
noise and 400 will have the most noise. An ISO setting of 400 may allow the camera to
be hand-held in low-light conditions without the need of a flash. The affect of noise with
exposures of one second or longer is reduced by the noise-reduction function in the
custom 2 section of the setup menu (p. 96).
Flash range and camera sensitivity
The flash range is measured from the CCD. Because of the optical system, the flash
range is not the same at the lens’ wide-angle position as it is at the telephoto position.
ISO setting
AUTO
64
100
200
400
Flash range (wide angle)
0.5m ~ 3.4m (1.6 ft. ~ 11.1 ft.)
0.5m ~ 1.9m (1.6 ft. ~ 6.2 ft.)
0.5m ~ 2.4m (1.6 ft. ~ 7.9 ft.)
0.5m ~ 3.4m (1.6 ft. ~ 11.1 ft.)
0.5m ~ 4.8m (1.6 ft. ~ 15.7 ft.)
Flash range (telephoto)
0.5m ~ 2.0m (1.6 ft. ~ 6.6 ft.)
0.5m ~ 1.1m (1.6 ft. ~ 3.6 ft.)
0.5m ~ 1.4m (1.6 ft. ~ 4.6 ft.)
0.5m ~ 2.0m (1.6 ft. ~ 6.6 ft.)
0.5m ~ 2.8m (1.6 ft. ~ 9.2 ft.)
66
MULTI-FUNCTION RECORDING
67
�
Digital Effects Control
Changes in color, sharpness, contrast, and saturation can be made using the custom 2
section of the multi-function recording mode menu (p. 56). These imaging controls give
photographers the ability to maximize the image information at the scene. For example,
if a scene is too contrasty, information can
be lost in the shadows and highlights;
decreasing the contrast will bring out more
detail.
Any changes made with these functions are
applied to the live image on the monitor.
The color mode, sharpness, contrast, and
color saturation levels must be set before
the image is recorded. These functions can
be used individually or in combination.
Turning the camera off will not reset these
functions; they must be manually reset
using the menu.
High
contrast
scene
After compensation (–)
Color mode - to select between Natural Color, Vivid Color, and black and
white images. Vivid Color has increased saturation.
Sharpness - to accent or soften details in an image in three levels: hard (+),
normal, and soft (–).
Contrast - to increase or decrease the contrast of the scene in three levels:
high (+), normal, and low (–).
Color saturation - to accent or subdue the color of a scene in three levels:
high (+), normal, and low (–).
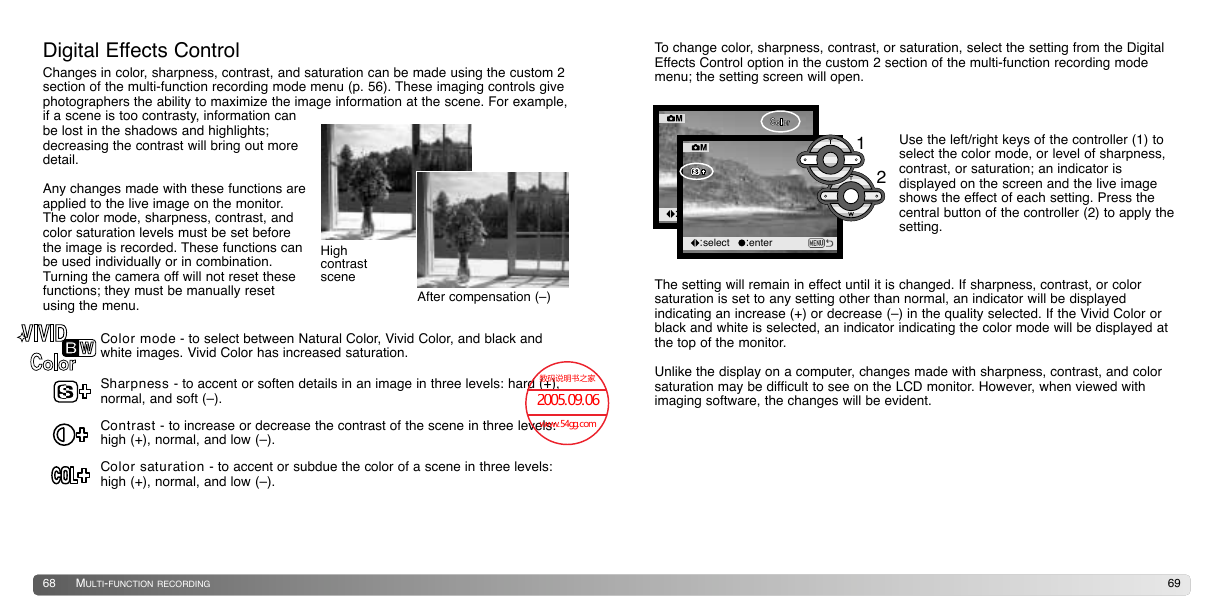
To change color, sharpness, contrast, or saturation, select the setting from the Digital
Effects Control option in the custom 2 section of the multi-function recording mode
menu; the setting screen will open.
1
2
Use the left/right keys of the controller (1) to
select the color mode, or level of sharpness,
contrast, or saturation; an indicator is
displayed on the screen and the live image
shows the effect of each setting. Press the
central button of the controller (2) to apply the
setting.
select
enter
The setting will remain in effect until it is changed. If sharpness, contrast, or color
saturation is set to any setting other than normal, an indicator will be displayed
indicating an increase (+) or decrease (–) in the quality selected. If the Vivid Color or
black and white is selected, an indicator indicating the color mode will be displayed at
the top of the monitor.
Unlike the display on a computer, changes made with sharpness, contrast, and color
saturation may be difficult to see on the LCD monitor. However, when viewed with
imaging software, the changes will be evident.
68
MULTI-FUNCTION RECORDING
69
�



 2023年江西萍乡中考道德与法治真题及答案.doc
 2012年重庆南川中考生物真题及答案.doc
 2013年江西师范大学地理学综合及文艺理论基础考研真题.doc
 2020年四川甘孜小升初语文真题及答案I卷.doc
 2020年注册岩土工程师专业基础考试真题及答案.doc
 2023-2024学年福建省厦门市九年级上学期数学月考试题及答案.doc
 2021-2022学年辽宁省沈阳市大东区九年级上学期语文期末试题及答案.doc
 2022-2023学年北京东城区初三第一学期物理期末试卷及答案.doc
 2018上半年江西教师资格初中地理学科知识与教学能力真题及答案.doc
 2012年河北国家公务员申论考试真题及答案-省级.doc
 2020-2021学年江苏省扬州市江都区邵樊片九年级上学期数学第一次质量检测试题及答案.doc
 2022下半年黑龙江教师资格证中学综合素质真题及答案.doc