i
T
m
e
L
a
p
s
e
i
H
D
V
d
e
o
C
a
m
e
r
a
TLC 200
User Manual
www.brinno.com
�
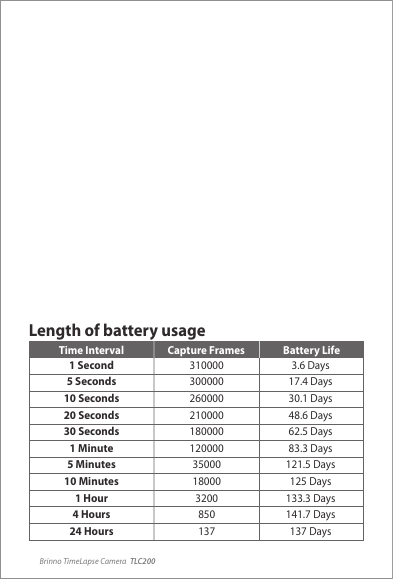
Length of battery usage
Time Interval
Capture Frames
Battery Life
1 Second
5 Seconds
10 Seconds
20 Seconds
30 Seconds
1 Minute
5 Minutes
10 Minutes
1 Hour
4 Hours
24 Hours
310000
300000
260000
210000
180000
120000
35000
18000
3200
850
137
3.6 Days
17.4 Days
30.1 Days
48.6 Days
62.5 Days
83.3 Days
121.5 Days
125 Days
133.3 Days
141.7 Days
137 Days
Brinno TimeLapse Camera TLC200
�
Thank you for purchasing Brinno TimeLapse Camera!
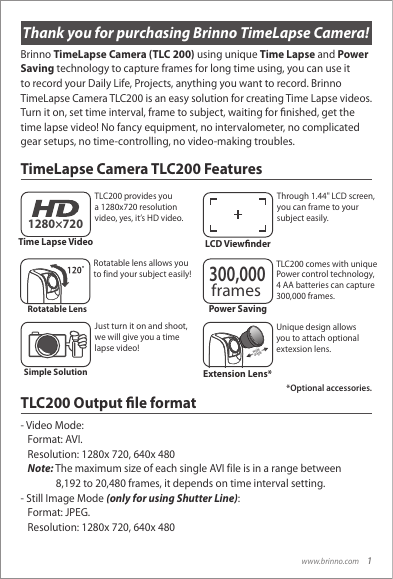
Brinno TimeLapse Camera (TLC 200) using unique Time Lapse and Power
Saving technology to capture frames for long time using, you can use it
to record your Daily Life, Projects, anything you want to record. Brinno
TimeLapse Camera TLC200 is an easy solution for creating Time Lapse videos.
Turn it on, set time interval, frame to subject, waiting for finished, get the
time lapse video! No fancy equipment, no intervalometer, no complicated
gear setups, no time-controlling, no video-making troubles.
TimeLapse Camera TLC200 Features
1280×720
Time Lapse Video
Rotatable Lens
Simple Solution
TLC200 provides you
a 1280x720 resolution
video, yes, it’s HD video.
Rotatable lens allows you
to find your subject easily!
Just turn it on and shoot,
we will give you a time
lapse video!
LCD Viewfinder
300,000
frames
Power Saving
e
g le
w i d
n
a
Extension Lens*
Through 1.44" LCD screen,
you can frame to your
subject easily.
TLC200 comes with unique
Power control technology,
4 AA batteries can capture
300,000 frames.
Unique design allows
you to attach optional
extexsion lens.
*Optional accessories.
TLC200 Output file format
- Video Mode:
Format: AVI.
Resolution: 1280x 720, 640x 480
Note: The maximum size of each single AVI file is in a range between
8,192 to 20,480 frames, it depends on time interval setting.
- Still Image Mode (only for using Shutter Line):
Format: JPEG.
Resolution: 1280x 720, 640x 480
www.brinno.com
1
�
Package Contents
1
1
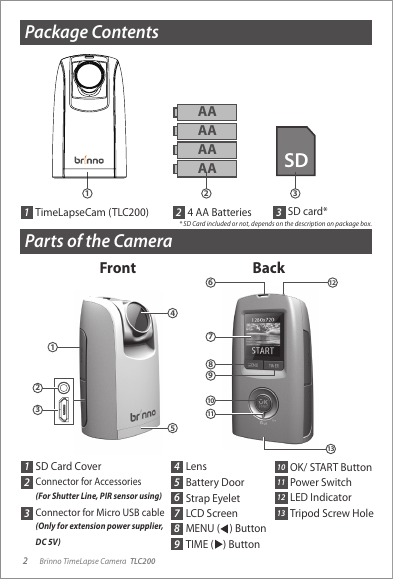
TimeLapseCam (TLC200)
Parts of the Camera
Front
1
2
3
4
5
AA
AA
AA
AA
2
SD
4 AA Batteries
2
* SD Card included or not, depends on the description on package box.
3
SD card*
3
Back
6
7
8
9
10
11
12
13
1
2
3
SD Card Cover
Connector for Accessories
(For Shutter Line, PIR sensor using)
Connector for Micro USB cable
(Only for extension power supplier,
DC 5V)
4
5
6
7
8
9
Lens
Battery Door
Strap Eyelet
LCD Screen
MENU ( ) Button
TIME ( ) Button
2
Brinno TimeLapse Camera TLC200
10
11
12
13
OK/ START Button
Power Switch
LED Indicator
Tripod Screw Hole
�
4
Display Icons
1
2
3
5
6
Setting screen
Normal
2 Sec
OK
2011/08/31
22:58:32
Preview screen
1280x720
START
BATTERY
EMPTY
SD
FULL
10
7
8
9
SD
SD
ERROR NO CARD
1
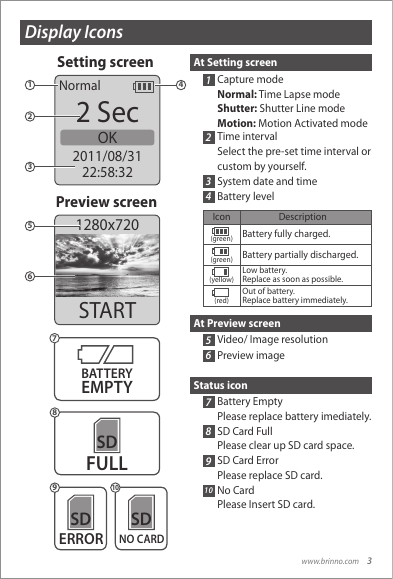
At Setting screen
Capture mode
Normal: Time Lapse mode
Shutter: Shutter Line mode
Motion: Motion Activated mode
Time interval
Select the pre-set time interval or
custom by yourself.
System date and time
Battery level
Icon
3
4
2
Description
Battery fully charged.
(green)
(green)
(yellow)
(red)
Battery partially discharged.
Low battery.
Replace as soon as possible.
Out of battery.
Replace battery immediately.
At Preview screen
5
6
Video/ Image resolution
Preview image
Status icon
7
8
9
10
Battery Empty
Please replace battery imediately.
SD Card Full
Please clear up SD card space.
SD Card Error
Please replace SD card.
No Card
Please Insert SD card.
www.brinno.com
3
�
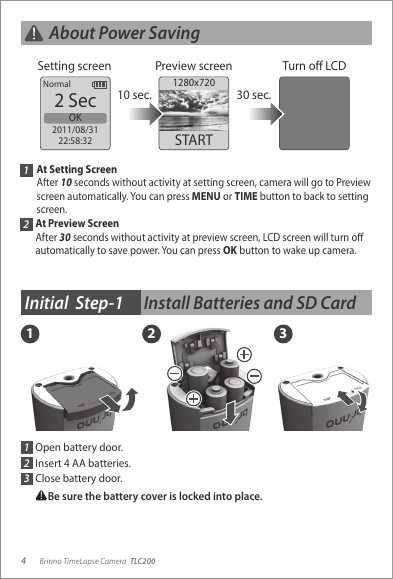
About Power Saving
Setting screen
Normal
2011/08/31
22:58:32
2 Sec
OK
Preview screen
1280x720
10 sec.
30 sec.
Turn off LCD
START
1
2
At Setting Screen
After 10 seconds without activity at setting screen, camera will go to Preview
screen automatically. You can press MENU or TIME button to back to setting
screen.
At Preview Screen
After 30 seconds without activity at preview screen, LCD screen will turn off
automatically to save power. You can press OK button to wake up camera.
Initial Step-1
1
Install Batteries and SD Card
2
3
1
2
3
Open battery door.
Insert 4 AA batteries.
Close battery door.
Be sure the battery cover is locked into place.
4
Brinno TimeLapse Camera TLC200
�
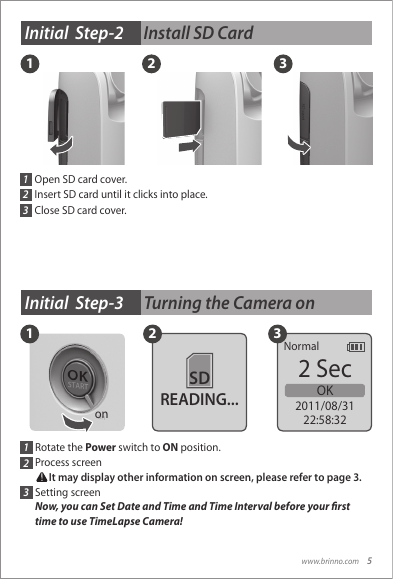
Initial Step-2
1
Install SD Card
2
3
1
2
3
Open SD card cover.
Insert SD card until it clicks into place.
Close SD card cover.
Initial Step-3
1
Turning the Camera on
2
3
Normal
SD
READING...
on
2 Sec
OK
2011/08/31
22:58:32
1
2
3
Rotate the Power switch to ON position.
Process screen
It may display other information on screen, please refer to page 3.
Setting screen
Now, you can Set Date and Time and Time Interval before your first
time to use TimeLapse Camera!
www.brinno.com
5
�
Initial Step-4
1
Set Date and Time
3
2
MENU
Set Date
& Time
OK
Date & Time
2011/ 08 /31
22 : 58 : 32
OK : Next
1
2
3
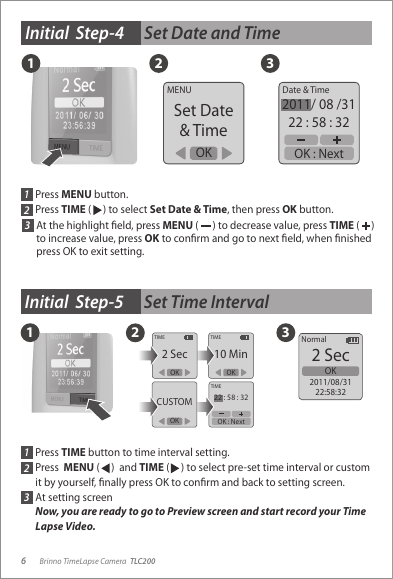
Press MENU button.
Press TIME ( ) to select Set Date & Time, then press OK button.
At the highlight field, press MENU ( ) to decrease value, press TIME ( )
to increase value, press OK to confirm and go to next field, when finished
press OK to exit setting.
Initial Step-5
1
2
Set Time Interval
3
TIME
TIME
2 Sec
OK
CUSTOM
10 Min
OK
TIME
22 : 58 : 32
OK
OK : Next
2 Sec
OK
Normal
2011/08/31
22:58:32
1
2
3
Press TIME button to time interval setting.
Press MENU ( ) and TIME ( ) to select pre-set time interval or custom
it by yourself, finally press OK to confirm and back to setting screen.
At setting screen
Now, you are ready to go to Preview screen and start record your Time
Lapse Video.
6
Brinno TimeLapse Camera TLC200
�



 2023年江西萍乡中考道德与法治真题及答案.doc
 2012年重庆南川中考生物真题及答案.doc
 2013年江西师范大学地理学综合及文艺理论基础考研真题.doc
 2020年四川甘孜小升初语文真题及答案I卷.doc
 2020年注册岩土工程师专业基础考试真题及答案.doc
 2023-2024学年福建省厦门市九年级上学期数学月考试题及答案.doc
 2021-2022学年辽宁省沈阳市大东区九年级上学期语文期末试题及答案.doc
 2022-2023学年北京东城区初三第一学期物理期末试卷及答案.doc
 2018上半年江西教师资格初中地理学科知识与教学能力真题及答案.doc
 2012年河北国家公务员申论考试真题及答案-省级.doc
 2020-2021学年江苏省扬州市江都区邵樊片九年级上学期数学第一次质量检测试题及答案.doc
 2022下半年黑龙江教师资格证中学综合素质真题及答案.doc