User Guide
7 Megapixel Digital Camera
NS-DSC7B-09, NS-DSC7P-09, and NS-DSC7S-09
�
�
Insignia NS-DSC7B-09,
NS-DSC7P-09, or
NS-DSC7S-09
7 Megapixel Digital
Camera
Contents
Welcome . . . . . . . . . . . . . . . . . . . . . . . . . . . . . . . . 3
Safety information . . . . . . . . . . . . . . . . . . . . . . . . . 3
Features. . . . . . . . . . . . . . . . . . . . . . . . . . . . . . . . . 3
Setting up your camera . . . . . . . . . . . . . . . . . . . . . 5
Using your camera. . . . . . . . . . . . . . . . . . . . . . . . . 8
Basic picture taking . . . . . . . . . . . . . . . . . . . . . . . 11
Viewing photos and video . . . . . . . . . . . . . . . . . . 18
Editing your photos . . . . . . . . . . . . . . . . . . . . . . . 19
Making connections . . . . . . . . . . . . . . . . . . . . . . . 22
Specifications. . . . . . . . . . . . . . . . . . . . . . . . . . . . 23
Appendix . . . . . . . . . . . . . . . . . . . . . . . . . . . . . . . 24
Available functions . . . . . . . . . . . . . . . . . . . . . . . . 25
Legal notices . . . . . . . . . . . . . . . . . . . . . . . . . . . . 28
One-Year Limited Warranty . . . . . . . . . . . . . . . . . 29
Welcome
Congratulations on your purchase of a
high-quality Insignia product. Your
NS-DSC7B-09, NS-DSC7P-09, or
NS-DSC7S-09 represents the state of the art in
digital camera design and is designed for reliable
and trouble-free performance.
Safety information
The lightning flash with arrowhead symbol within
an equilateral triangle is intended to alert you to
the presence of uninsulated dangerous voltage
within your shelf system’s enclosure that may be
of sufficient magnitude to constitute a risk of
electric shock.
The exclamation point within an equilateral
triangle is intended to alert you to the presence of
important operating and maintenance (servicing)
instructions in the literature accompanying your
shelf system.
Before using the camera, read and understand
the safety precautions described below. Always
make that you operate the camera correctly.
• Do not aim the camera directly into the sun or
other intense light sources that could
damage your eyesight.
Do not try to open the case of the camera or
attempt to modify this camera in any way.
High-voltage internal components create the
risk of electric shock when exposed.
Maintenance and repairs should be carried
out only by authorized service providers.
Moisture creates the danger of electric
shock.
Do not fire the flash too close to the eyes of
animals or people, especially for young
children. Eye damage may result. Remain at
least three feet (one meter) away from infants
when using flash.
Keep the camera away from water and other
liquids. Do not use the camera with wet
hands. Never use the camera in the rain or
snow.
Keep the camera and its accessories out of
the reach of children and animals to prevent
accidents or damage to the camera.
If you notice smoke or a strange odor coming
from the camera, turn the power off
immediately. Take the camera to the nearest
authorized service center for repair. Never
attempt to repair the camera yourself.
Use only the recommended power
accessories. Use of power sources not
expressly recommended for this equipment
may lead to overheating, distortion of the
equipment, fire, electrical shock, or other
hazards.
Do not swing the camera around by the strap.
Features
Included
7 megapixel digital camera
2 AA Alkaline batteries
Wrist strap
USB cable
AV cable
User Guide CD
Quick Start Guide
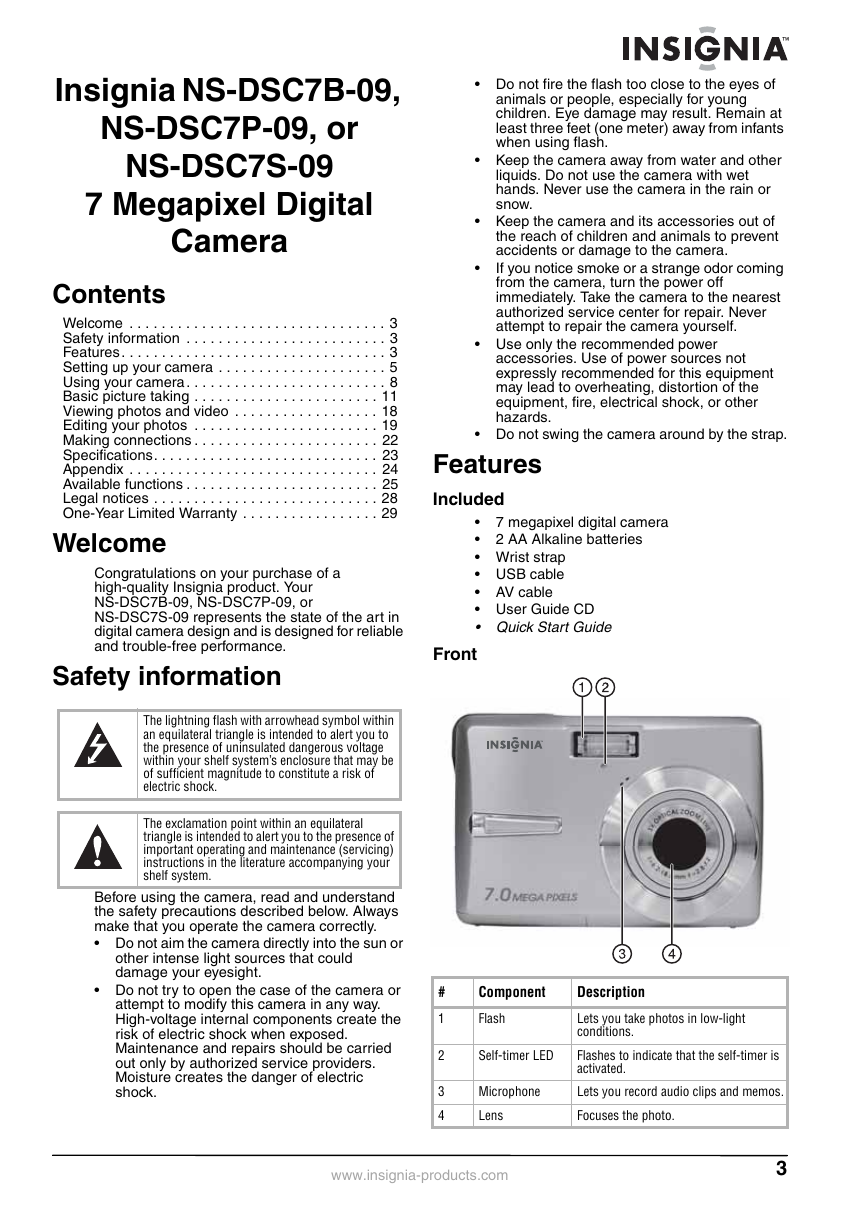
Front
#
1
2
3
4
Component
Description
Flash
Self-timer LED
Microphone
Lens
Lets you take photos in low-light
conditions.
Flashes to indicate that the self-timer is
activated.
Lets you record audio clips and memos.
Focuses the photo.
www.insignia-products.com
3
�
Insignia NS-DSC7B-09, NS-DSC7P-09, or NS-DSC7S-09 7 Megapixel Digital Camera
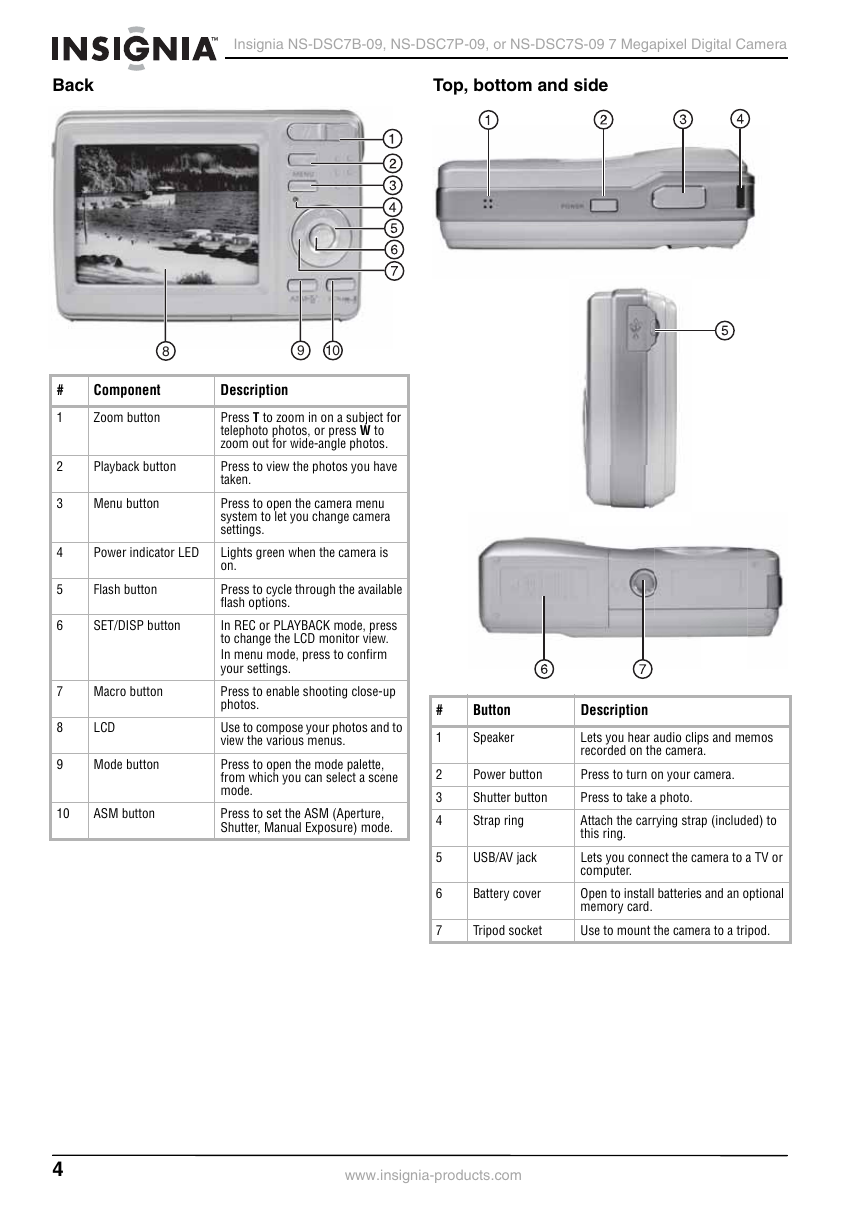
Back
Top, bottom and side
8
9
10
#
1
2
3
4
5
6
7
8
9
Component
Zoom button
Playback button
Menu button
Power indicator LED
Flash button
SET/DISP button
Macro button
LCD
Mode button
10
ASM button
Description
Press T to zoom in on a subject for
telephoto photos, or press W to
zoom out for wide-angle photos.
Press to view the photos you have
taken.
Press to open the camera menu
system to let you change camera
settings.
Lights green when the camera is
on.
Press to cycle through the available
flash options.
In REC or PLAYBACK mode, press
to change the LCD monitor view.
In menu mode, press to confirm
your settings.
Press to enable shooting close-up
photos.
Use to compose your photos and to
view the various menus.
Press to open the mode palette,
from which you can select a scene
mode.
Press to set the ASM (Aperture,
Shutter, Manual Exposure) mode.
#
1
2
3
4
5
6
7
Button
Speaker
Power button
Shutter button
Strap ring
USB/AV jack
Battery cover
Tripod socket
Description
Lets you hear audio clips and memos
recorded on the camera.
Press to turn on your camera.
Press to take a photo.
Attach the carrying strap (included) to
this ring.
Lets you connect the camera to a TV or
computer.
Open to install batteries and an optional
memory card.
Use to mount the camera to a tripod.
4
www.insignia-products.com
�
Insignia NS-DSC7B-09, NS-DSC7P-09, or NS-DSC7S-09 7 Megapixel Digital Camera
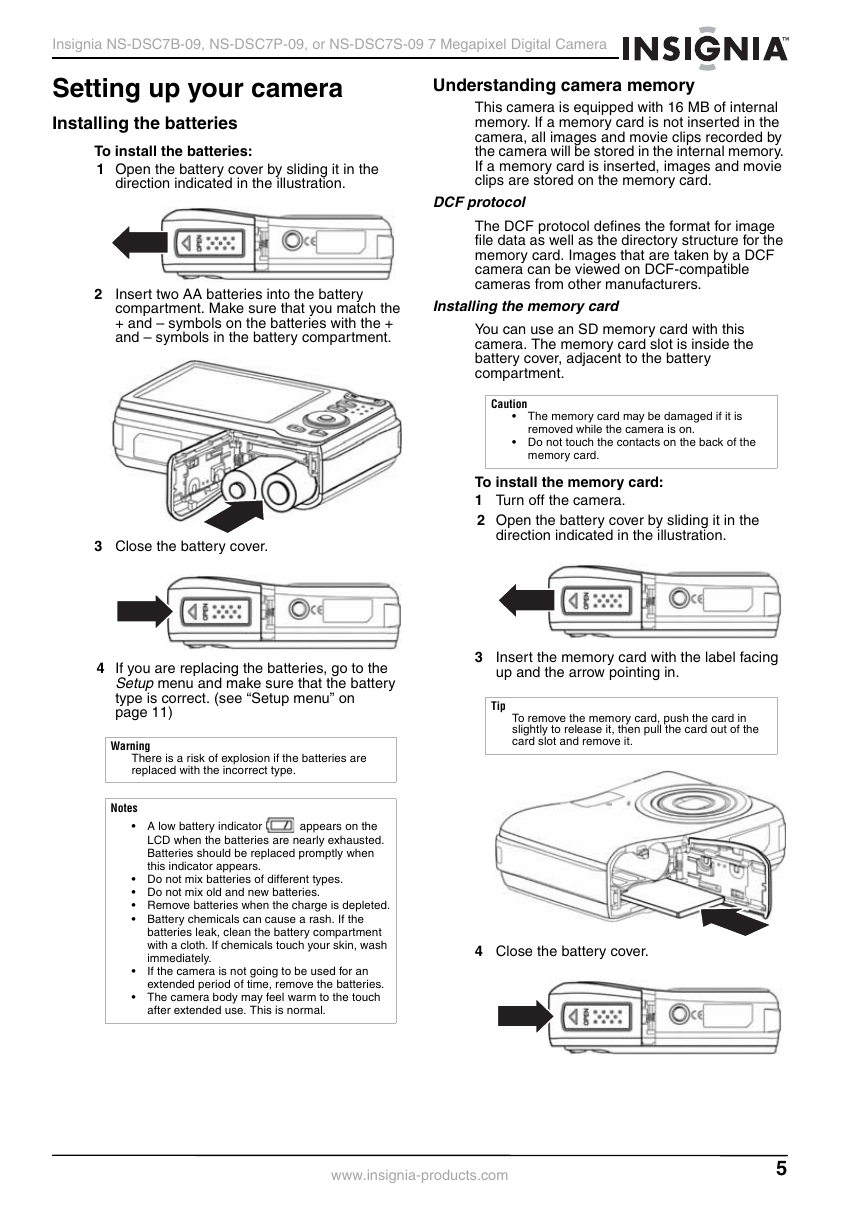
Setting up your camera
Installing the batteries
To install the batteries:
1 Open the battery cover by sliding it in the
direction indicated in the illustration.
2 Insert two AA batteries into the battery
compartment. Make sure that you match the
+ and – symbols on the batteries with the +
and – symbols in the battery compartment.
Understanding camera memory
This camera is equipped with 16 MB of internal
memory. If a memory card is not inserted in the
camera, all images and movie clips recorded by
the camera will be stored in the internal memory.
If a memory card is inserted, images and movie
clips are stored on the memory card.
DCF protocol
The DCF protocol defines the format for image
file data as well as the directory structure for the
memory card. Images that are taken by a DCF
camera can be viewed on DCF-compatible
cameras from other manufacturers.
Installing the memory card
You can use an SD memory card with this
camera. The memory card slot is inside the
battery cover, adjacent to the battery
compartment.
Caution
memory card.
The memory card may be damaged if it is
removed while the camera is on.
Do not touch the contacts on the back of the
3 Close the battery cover.
To install the memory card:
1 Turn off the camera.
2 Open the battery cover by sliding it in the
direction indicated in the illustration.
4 If you are replacing the batteries, go to the
Setup menu and make sure that the battery
type is correct. (see “Setup menu” on
page 11)
Warning
There is a risk of explosion if the batteries are
replaced with the incorrect type.
Notes
3 Insert the memory card with the label facing
up and the arrow pointing in.
Tip
To remove the memory card, push the card in
slightly to release it, then pull the card out of the
card slot and remove it.
A low battery indicator
appears on the
LCD when the batteries are nearly exhausted.
Batteries should be replaced promptly when
this indicator appears.
Do not mix batteries of different types.
Do not mix old and new batteries.
Remove batteries when the charge is depleted.
Battery chemicals can cause a rash. If the
batteries leak, clean the battery compartment
with a cloth. If chemicals touch your skin, wash
immediately.
If the camera is not going to be used for an
extended period of time, remove the batteries.
The camera body may feel warm to the touch
after extended use. This is normal.
4 Close the battery cover.
www.insignia-products.com
5
�
Insignia NS-DSC7B-09, NS-DSC7P-09, or NS-DSC7S-09 7 Megapixel Digital Camera
Making initial settings
When using the camera for the first time, make
sure that you choose a language and set the
date and time before using the camera.
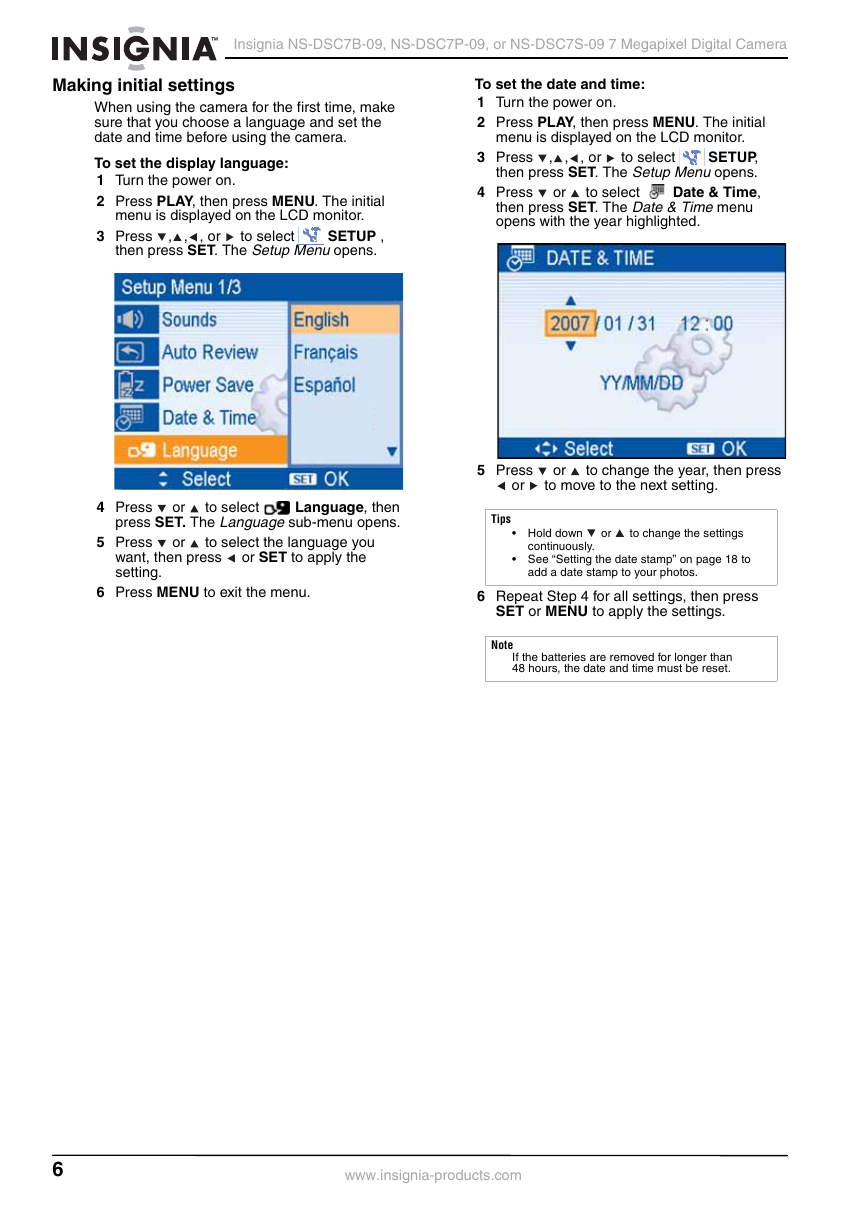
To set the display language:
1 Turn the power on.
2 Press PLAY, then press MENU. The initial
menu is displayed on the LCD monitor.
3 Press
,
,
, or
to select
SETUP ,
then press SET. The Setup Menu opens.
4 Press
Language, then
press SET. The Language sub-menu opens.
to select
or
5 Press
or
want, then press
setting.
to select the language you
or SET to apply the
To set the date and time:
1 Turn the power on.
2 Press PLAY, then press MENU. The initial
menu is displayed on the LCD monitor.
3 Press
,
,
, or
to select
SETUP,
then press SET. The Setup Menu opens.
Date & Time,
then press SET. The Date & Time menu
opens with the year highlighted.
to select
or
4 Press
or
to change the year, then press
to move to the next setting.
5 Press
or
Tips
Hold down
or
to change the settings
continuously.
See “Setting the date stamp” on page 18 to
add a date stamp to your photos.
6 Press MENU to exit the menu.
6 Repeat Step 4 for all settings, then press
SET or MENU to apply the settings.
Note
If the batteries are removed for longer than
48 hours, the date and time must be reset.
6
www.insignia-products.com
�
Insignia NS-DSC7B-09, NS-DSC7P-09, or NS-DSC7S-09 7 Megapixel Digital Camera
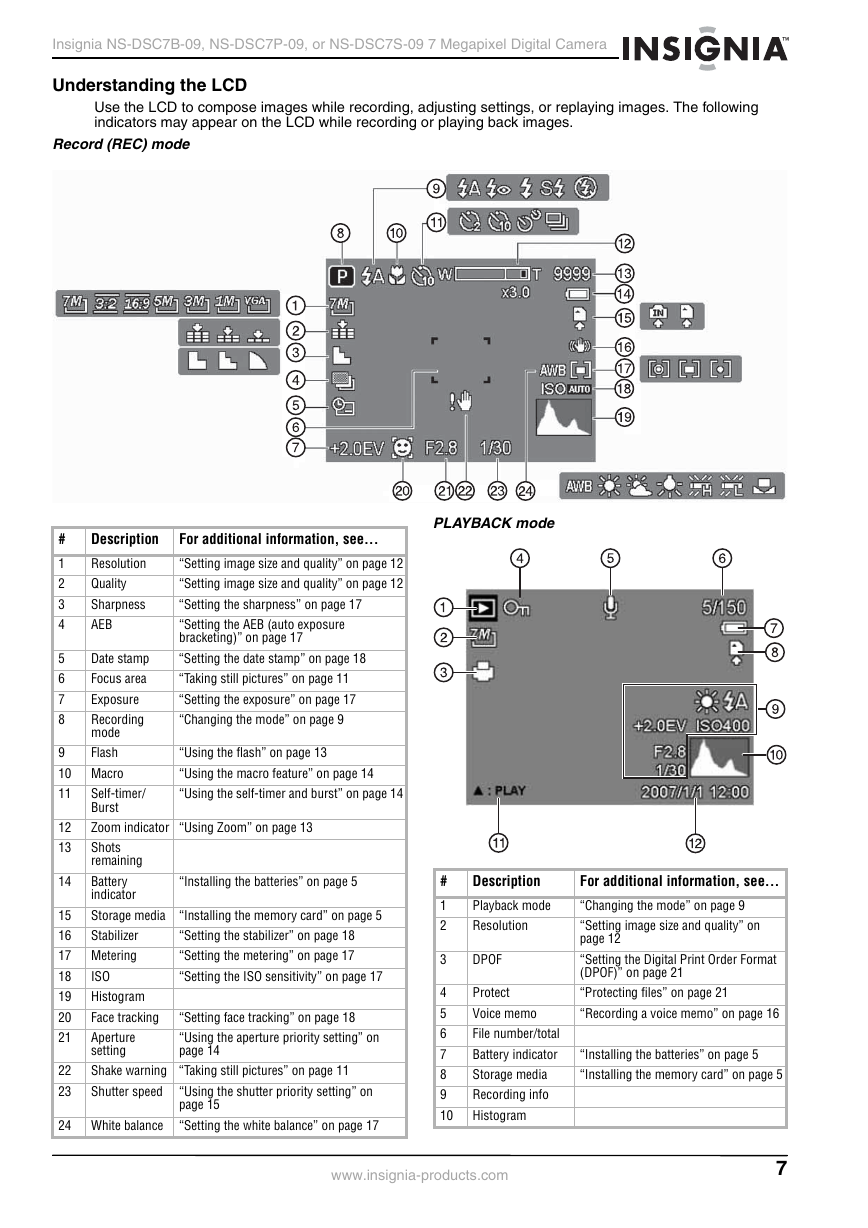
Understanding the LCD
Use the LCD to compose images while recording, adjusting settings, or replaying images. The following
indicators may appear on the LCD while recording or playing back images.
Record (REC) mode
PLAYBACK mode
For additional information, see...
“Setting image size and quality” on page 12
“Setting image size and quality” on page 12
“Setting the sharpness” on page 17
“Setting the AEB (auto exposure
bracketing)” on page 17
“Setting the date stamp” on page 18
“Taking still pictures” on page 11
“Setting the exposure” on page 17
“Changing the mode” on page 9
#
1
2
3
4
Description
Resolution
Quality
Sharpness
AEB
5
6
7
8
Date stamp
Focus area
Exposure
Recording
mode
9
Flash
10 Macro
11
“Using the flash” on page 13
“Using the macro feature” on page 14
“Using the self-timer and burst” on page 14
“Installing the batteries” on page 5
Self-timer/
Burst
Zoom indicator “Using Zoom” on page 13
Shots
remaining
Battery
indicator
Storage media
15
16
Stabilizer
17 Metering
18
19
20
21
ISO
Histogram
Face tracking
Aperture
setting
Shake warning “Taking still pictures” on page 11
Shutter speed
“Installing the memory card” on page 5
“Setting the stabilizer” on page 18
“Setting the metering” on page 17
“Setting the ISO sensitivity” on page 17
“Setting face tracking” on page 18
“Using the aperture priority setting” on
page 14
12
13
14
22
23
24 White balance
“Using the shutter priority setting” on
page 15
“Setting the white balance” on page 17
#
1
2
3
4
5
6
7
8
9
10
Description
Playback mode
Resolution
DPOF
Protect
Voice memo
File number/total
Battery indicator
Storage media
Recording info
Histogram
For additional information, see...
“Changing the mode” on page 9
“Setting image size and quality” on
page 12
“Setting the Digital Print Order Format
(DPOF)” on page 21
“Protecting files” on page 21
“Recording a voice memo” on page 16
“Installing the batteries” on page 5
“Installing the memory card” on page 5
www.insignia-products.com
7
�
Insignia NS-DSC7B-09, NS-DSC7P-09, or NS-DSC7S-09 7 Megapixel Digital Camera
#
11
12
Description
Voice memo
control
Captured date and
time
For additional information, see...
“Recording a voice memo” on page 16
Shows the date and time that the photo
was taken.
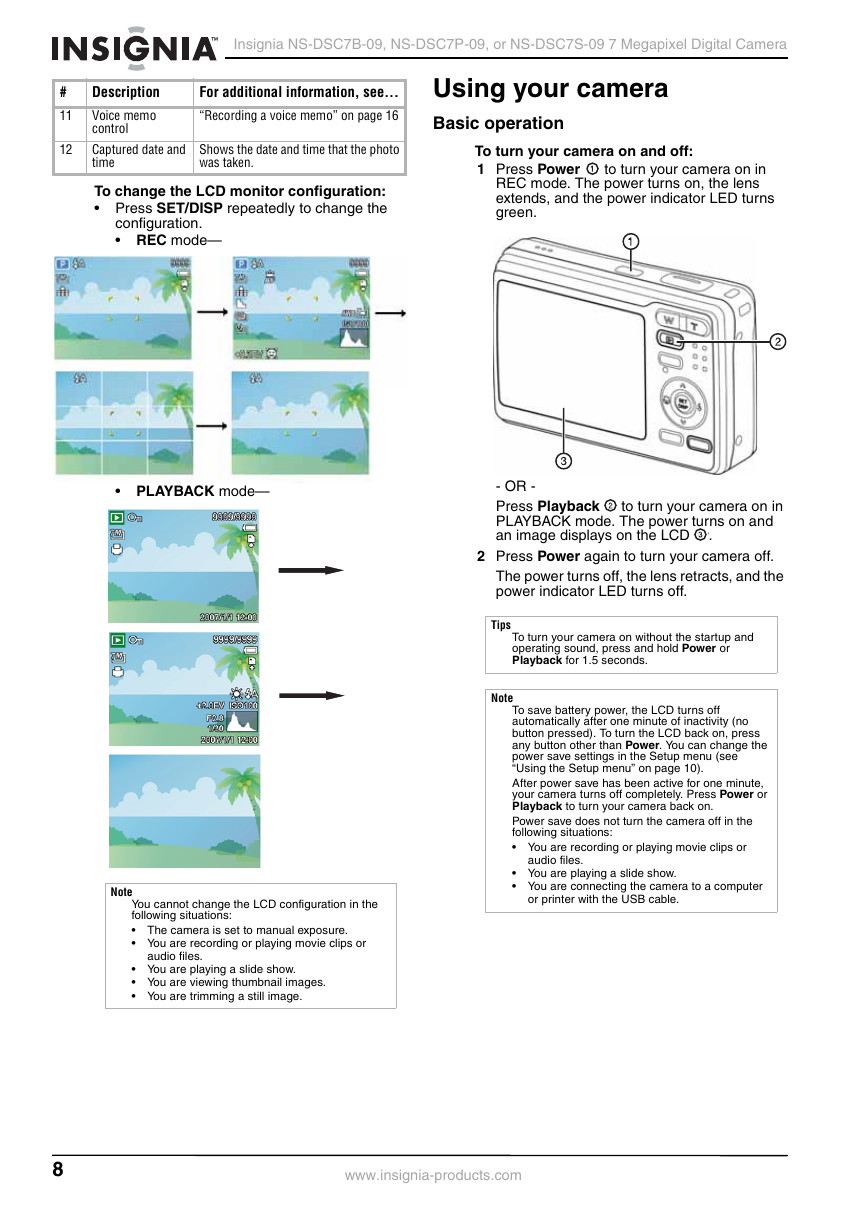
To change the LCD monitor configuration:
Press SET/DISP repeatedly to change the
configuration.
REC mode—
Using your camera
Basic operation
To turn your camera on and off:
1 Press Power
to turn your camera on in
REC mode. The power turns on, the lens
extends, and the power indicator LED turns
green.
PLAYBACK mode—
- OR -
Press Playback
PLAYBACK mode. The power turns on and
an image displays on the LCD
to turn your camera on in
.
2 Press Power again to turn your camera off.
The power turns off, the lens retracts, and the
power indicator LED turns off.
Tips
To turn your camera on without the startup and
operating sound, press and hold Power or
Playback for 1.5 seconds.
Note
To save battery power, the LCD turns off
automatically after one minute of inactivity (no
button pressed). To turn the LCD back on, press
any button other than Power. You can change the
power save settings in the Setup menu (see
“Using the Setup menu” on page 10).
After power save has been active for one minute,
your camera turns off completely. Press Power or
Playback to turn your camera back on.
Power save does not turn the camera off in the
following situations:
You are recording or playing movie clips or
audio files.
You are playing a slide show.
You are connecting the camera to a computer
or printer with the USB cable.
Note
You cannot change the LCD configuration in the
following situations:
The camera is set to manual exposure.
You are recording or playing movie clips or
audio files.
You are playing a slide show.
You are viewing thumbnail images.
You are trimming a still image.
8
www.insignia-products.com
�



 2023年江西萍乡中考道德与法治真题及答案.doc
 2012年重庆南川中考生物真题及答案.doc
 2013年江西师范大学地理学综合及文艺理论基础考研真题.doc
 2020年四川甘孜小升初语文真题及答案I卷.doc
 2020年注册岩土工程师专业基础考试真题及答案.doc
 2023-2024学年福建省厦门市九年级上学期数学月考试题及答案.doc
 2021-2022学年辽宁省沈阳市大东区九年级上学期语文期末试题及答案.doc
 2022-2023学年北京东城区初三第一学期物理期末试卷及答案.doc
 2018上半年江西教师资格初中地理学科知识与教学能力真题及答案.doc
 2012年河北国家公务员申论考试真题及答案-省级.doc
 2020-2021学年江苏省扬州市江都区邵樊片九年级上学期数学第一次质量检测试题及答案.doc
 2022下半年黑龙江教师资格证中学综合素质真题及答案.doc