/
3
0
9
0
L
G
K
N
1
2
5
1
C
2
O
Xda II user guide
�
Get started
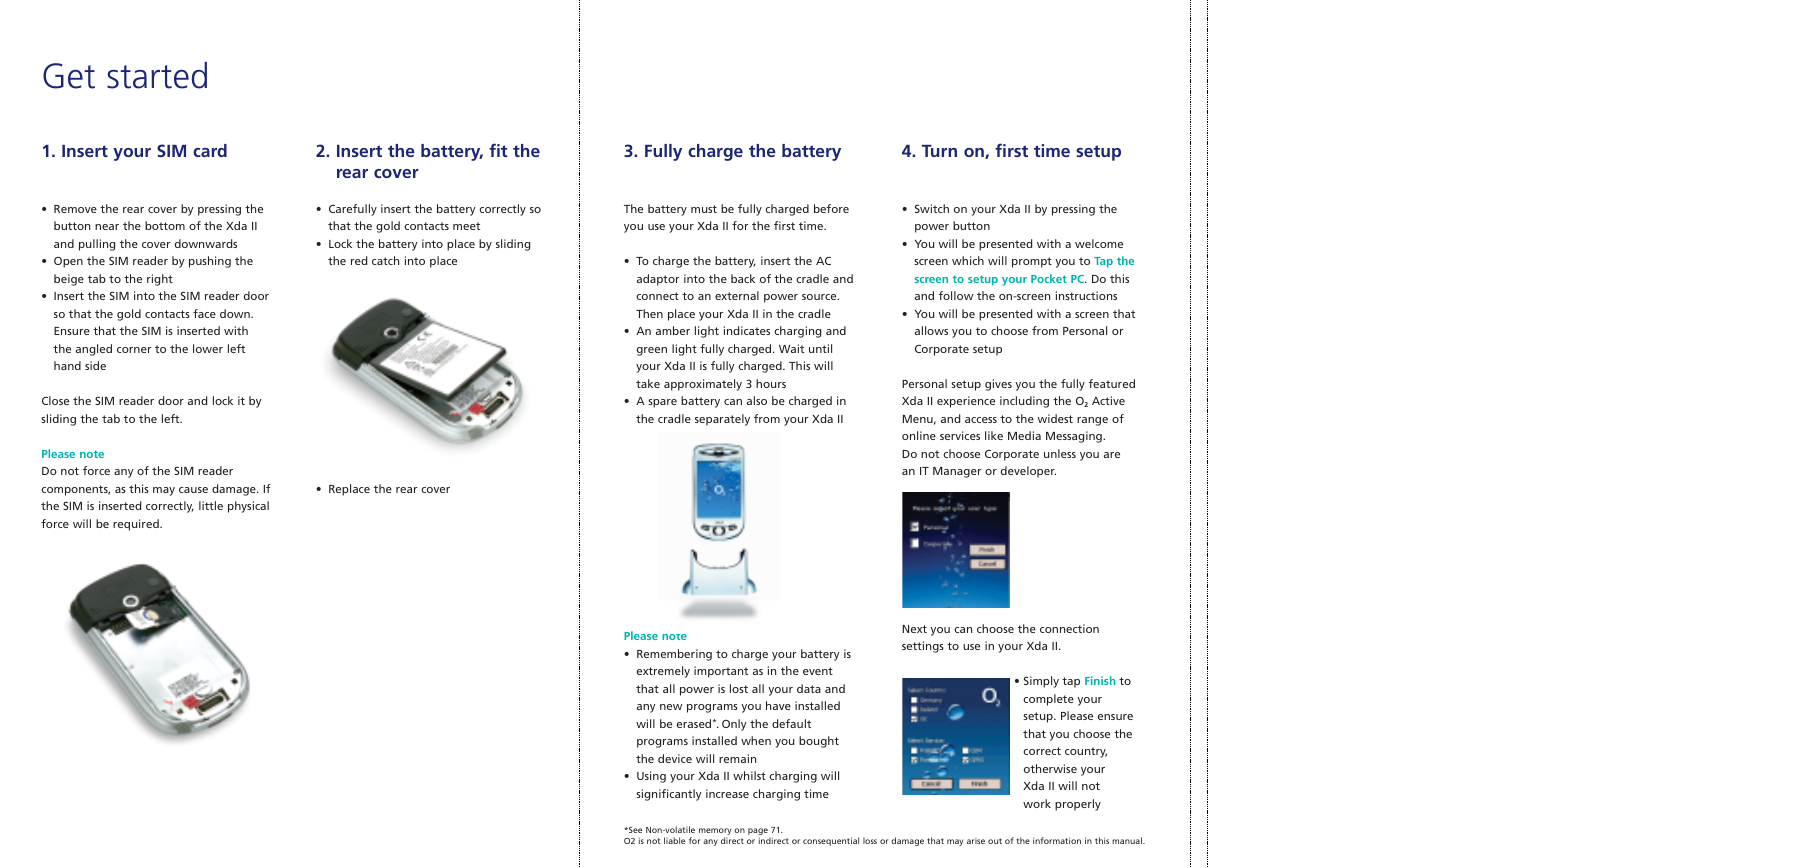
1. Insert your SIM card
• Remove the rear cover by pressing the
button near the bottom of the Xda II
and pulling the cover downwards
• Open the SIM reader by pushing the
beige tab to the right
• Insert the SIM into the SIM reader door
so that the gold contacts face down.
Ensure that the SIM is inserted with
the angled corner to the lower left
hand side
Close the SIM reader door and lock it by
sliding the tab to the left.
Please note
Do not force any of the SIM reader
components, as this may cause damage. If
the SIM is inserted correctly, little physical
force will be required.
2. Insert the battery, fit the
rear cover
• Carefully insert the battery correctly so
that the gold contacts meet
• Lock the battery into place by sliding
the red catch into place
• Replace the rear cover
3. Fully charge the battery
4. Turn on, first time setup
The battery must be fully charged before
you use your Xda II for the first time.
• To charge the battery, insert the AC
adaptor into the back of the cradle and
connect to an external power source.
Then place your Xda II in the cradle
• An amber light indicates charging and
green light fully charged. Wait until
your Xda II is fully charged. This will
take approximately 3 hours
• A spare battery can also be charged in
the cradle separately from your Xda II
• Switch on your Xda II by pressing the
power button
• You will be presented with a welcome
screen which will prompt you to Tap the
screen to setup your Pocket PC. Do this
and follow the on-screen instructions
• You will be presented with a screen that
allows you to choose from Personal or
Corporate setup
Personal setup gives you the fully featured
Xda II experience including the O2 Active
Menu, and access to the widest range of
online services like Media Messaging.
Do not choose Corporate unless you are
an IT Manager or developer.
Please note
• Remembering to charge your battery is
extremely important as in the event
that all power is lost all your data and
any new programs you have installed
will be erased*. Only the default
programs installed when you bought
the device will remain
• Using your Xda II whilst charging will
significantly increase charging time
Next you can choose the connection
settings to use in your Xda II.
• Simply tap Finish to
complete your
setup. Please ensure
that you choose the
correct country,
otherwise your
Xda II will not
work properly
*See Non-volatile memory on page 71.
O2 is not liable for any direct or indirect or consequential loss or damage that may arise out of the information in this manual.
�
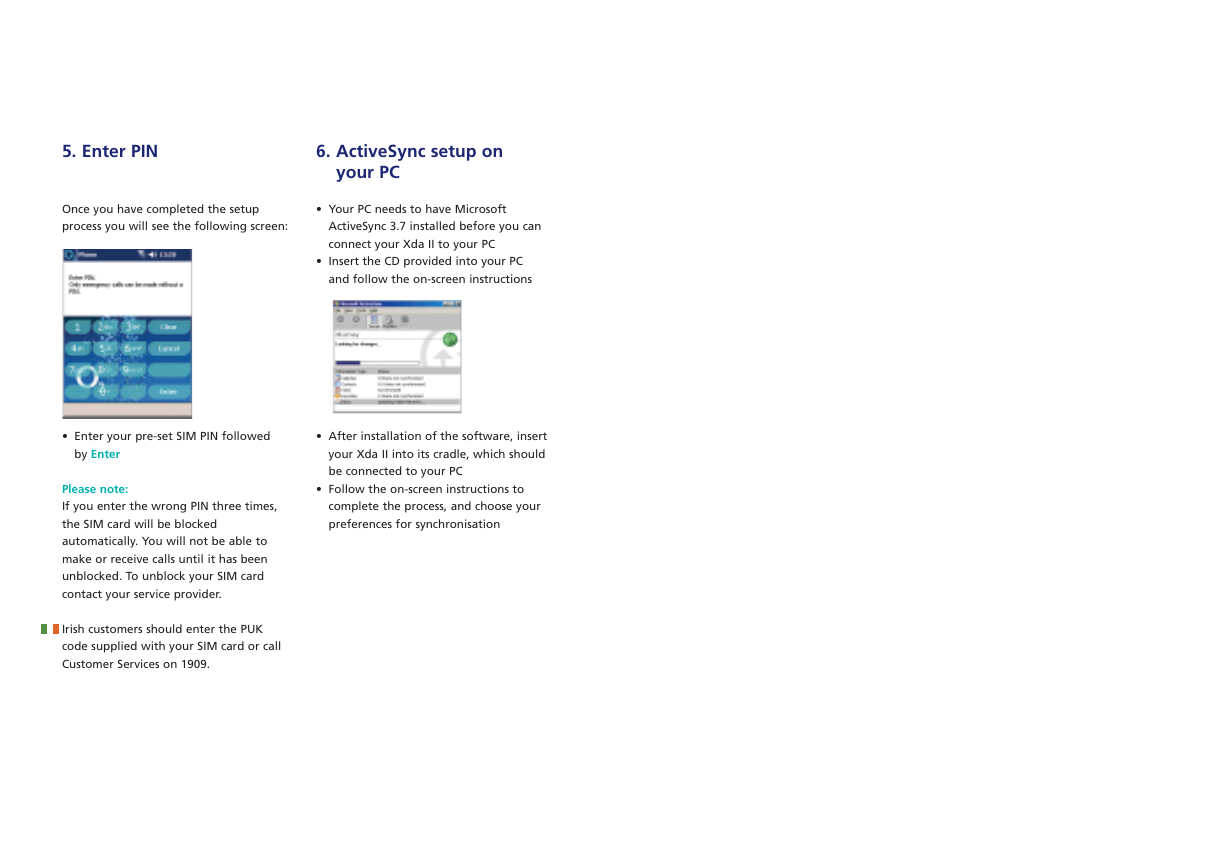
5. Enter PIN
Once you have completed the setup
process you will see the following screen:
6. ActiveSync setup on
your PC
• Your PC needs to have Microsoft
ActiveSync 3.7 installed before you can
connect your Xda II to your PC
• Insert the CD provided into your PC
and follow the on-screen instructions
• After installation of the software, insert
your Xda II into its cradle, which should
be connected to your PC
• Follow the on-screen instructions to
complete the process, and choose your
preferences for synchronisation
• Enter your pre-set SIM PIN followed
by Enter
Please note:
If you enter the wrong PIN three times,
the SIM card will be blocked
automatically. You will not be able to
make or receive calls until it has been
unblocked. To unblock your SIM card
contact your service provider.
Irish customers should enter the PUK
code supplied with your SIM card or call
Customer Services on 1909.
�
Contents
Experience the Xda II
Your Xda II
Your Xda II box contains
Your Xda II – a tour
Top components
Front components
Side components
Back panel components
Bottom edge components
Navigation bar
Baseline navigation bar
O2 Active
Messaging
Inbox
Email/Accounts
Media Messaging
Voicemail
Text
MSN Messenger
WAP Chat
Email setup
Internet Email
Corporate Messaging
Phone
Managing your contacts
Make a call
Receive a call
Voicemail
Phone settings
Internet
Internet
O2 Active
Video
Camera
Media Player
3
4
4
6
6
7
8
9
10
11
12
13
14
15
15
18
24
25
26
26
28
29
30
34
34
35
35
36
36
39
40
41
45
47
49
Album
Video Downloads
News
Sports
Info/Travel
My Xda
Profiles
Backup/Restore
Photo Contacts
Accessories
Email Setup
Connections
ActiveSync
Start Menu
Programs
Games
Pocket MSN
Other useful info
Signal
Using the Internet abroad
Wireless Modem
Java on your Xda II
Doc Rocket
Bluetooth
Wireless LAN
Non-volatile memory
Hard reset
Help and trouble shooting
Help online
Talk to us
Frequently asked questions
Index
50
50
51
53
55
56
57
57
58
59
60
60
61
62
64
67
68
69
69
69
70
70
70
71
71
71
71
73
73
73
73
77
1
�
Experience the Xda II
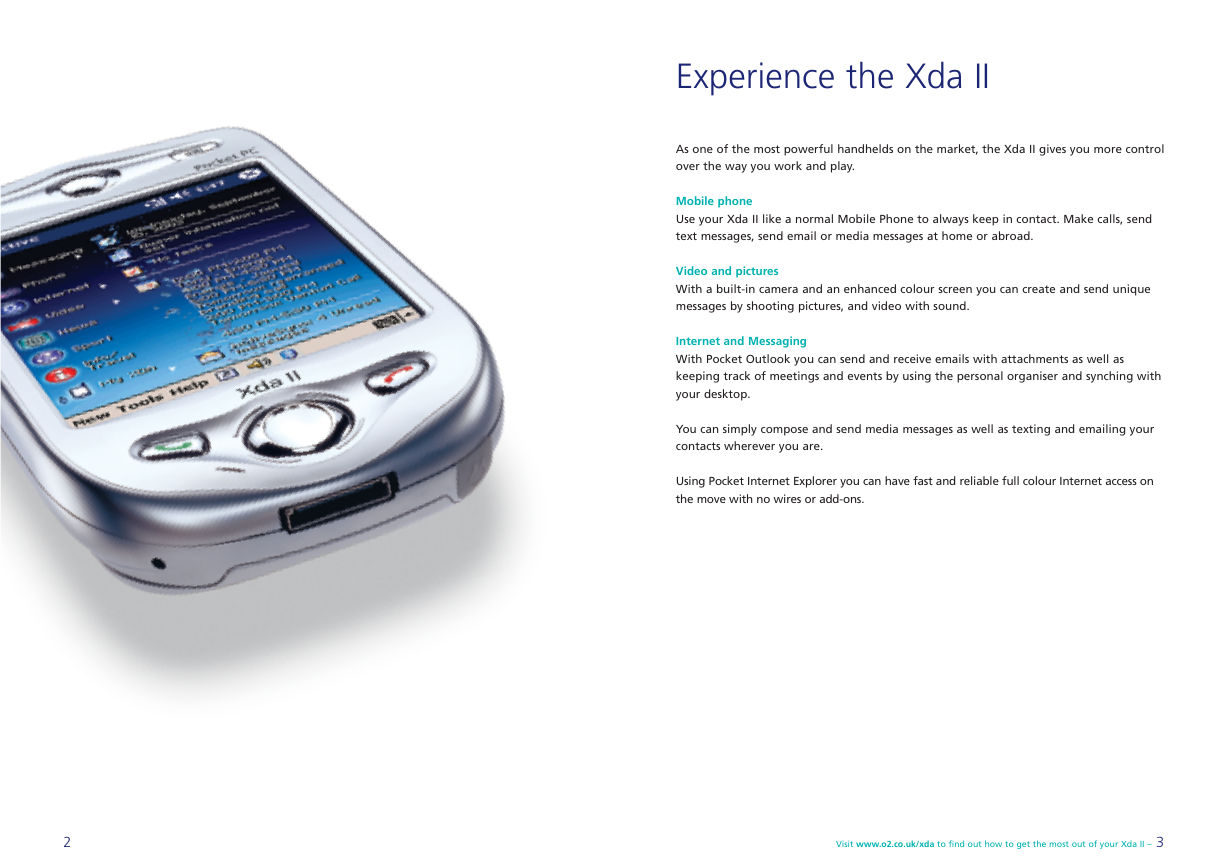
As one of the most powerful handhelds on the market, the Xda II gives you more control
over the way you work and play.
Mobile phone
Use your Xda II like a normal Mobile Phone to always keep in contact. Make calls, send
text messages, send email or media messages at home or abroad.
Video and pictures
With a built-in camera and an enhanced colour screen you can create and send unique
messages by shooting pictures, and video with sound.
Internet and Messaging
With Pocket Outlook you can send and receive emails with attachments as well as
keeping track of meetings and events by using the personal organiser and synching with
your desktop.
You can simply compose and send media messages as well as texting and emailing your
contacts wherever you are.
Using Pocket Internet Explorer you can have fast and reliable full colour Internet access on
the move with no wires or add-ons.
2
Visit www.o2.co.uk/xda to find out how to get the most out of your Xda II – 3
�
Your Xda II
Your Xda II box contains
Your Xda II
Xda II – your phone
and handheld PC
in one
Stylus – to operate your
Xda II’s touch sensitive
screen
Warranty card
Microsoft Windows
Mobile user manual
Cradle – for charging
your Xda II and battery,
and physically
connecting to your PC
Xda II case – to protect
your Xda II and connect
to your belt clip
Xda II battery – to
power your Xda II
Xda II battery cover –
to conceal the
removable battery
22 PIN DC power
connector – allows you
to connect your AC
adaptor to the Xda II
without your cradle
Hands free stereo
headset
Microsoft Pocket PC
Companion CD
including ActiveSync
for linking your Xda II
and PC
AC power adaptor –
to connect your
Xda II cradle to
a power source
Belt clip – for a
convenient place to carry
your Xda II
O2 user guide
(this booklet)
Please note:
O2 may provide additional items with your
Xda II as they become available.
4
5
�
Your Xda II – a tour
2
3
4
5
1
6
1
5
6
7
8
9
2
10
11
3
4
12
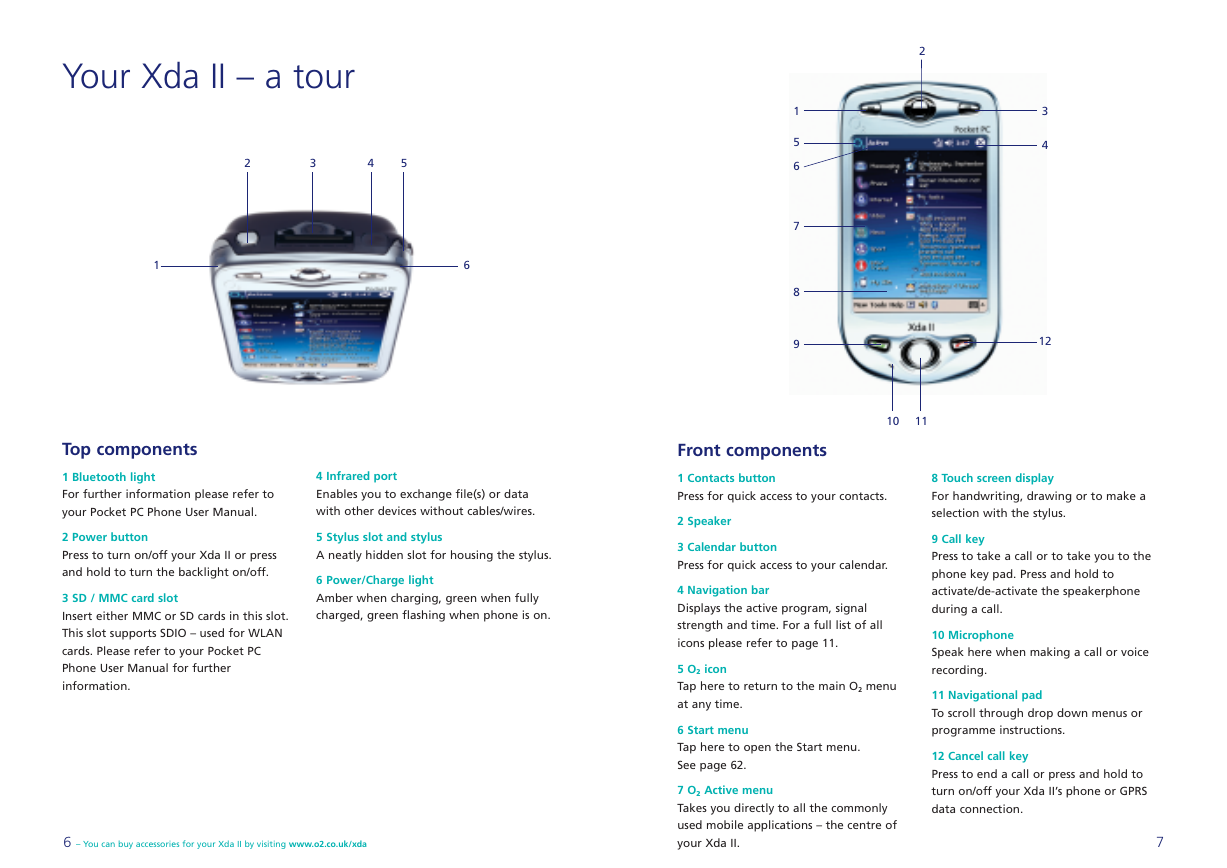
Top components
1 Bluetooth light
For further information please refer to
your Pocket PC Phone User Manual.
4 Infrared port
Enables you to exchange file(s) or data
with other devices without cables/wires.
2 Power button
Press to turn on/off your Xda II or press
and hold to turn the backlight on/off.
3 SD / MMC card slot
Insert either MMC or SD cards in this slot.
This slot supports SDIO – used for WLAN
cards. Please refer to your Pocket PC
Phone User Manual for further
information.
5 Stylus slot and stylus
A neatly hidden slot for housing the stylus.
6 Power/Charge light
Amber when charging, green when fully
charged, green flashing when phone is on.
6 – You can buy accessories for your Xda II by visiting www.o2.co.uk/xda
Front components
1 Contacts button
Press for quick access to your contacts.
2 Speaker
3 Calendar button
Press for quick access to your calendar.
4 Navigation bar
Displays the active program, signal
strength and time. For a full list of all
icons please refer to page 11.
5 O2 icon
Tap here to return to the main O2 menu
at any time.
6 Start menu
Tap here to open the Start menu.
See page 62.
7 O2 Active menu
Takes you directly to all the commonly
used mobile applications – the centre of
your Xda II.
8 Touch screen display
For handwriting, drawing or to make a
selection with the stylus.
9 Call key
Press to take a call or to take you to the
phone key pad. Press and hold to
activate/de-activate the speakerphone
during a call.
10 Microphone
Speak here when making a call or voice
recording.
11 Navigational pad
To scroll through drop down menus or
programme instructions.
12 Cancel call key
Press to end a call or press and hold to
turn on/off your Xda II’s phone or GPRS
data connection.
7
�
1
2
3
1
7
2
3
4
5
6
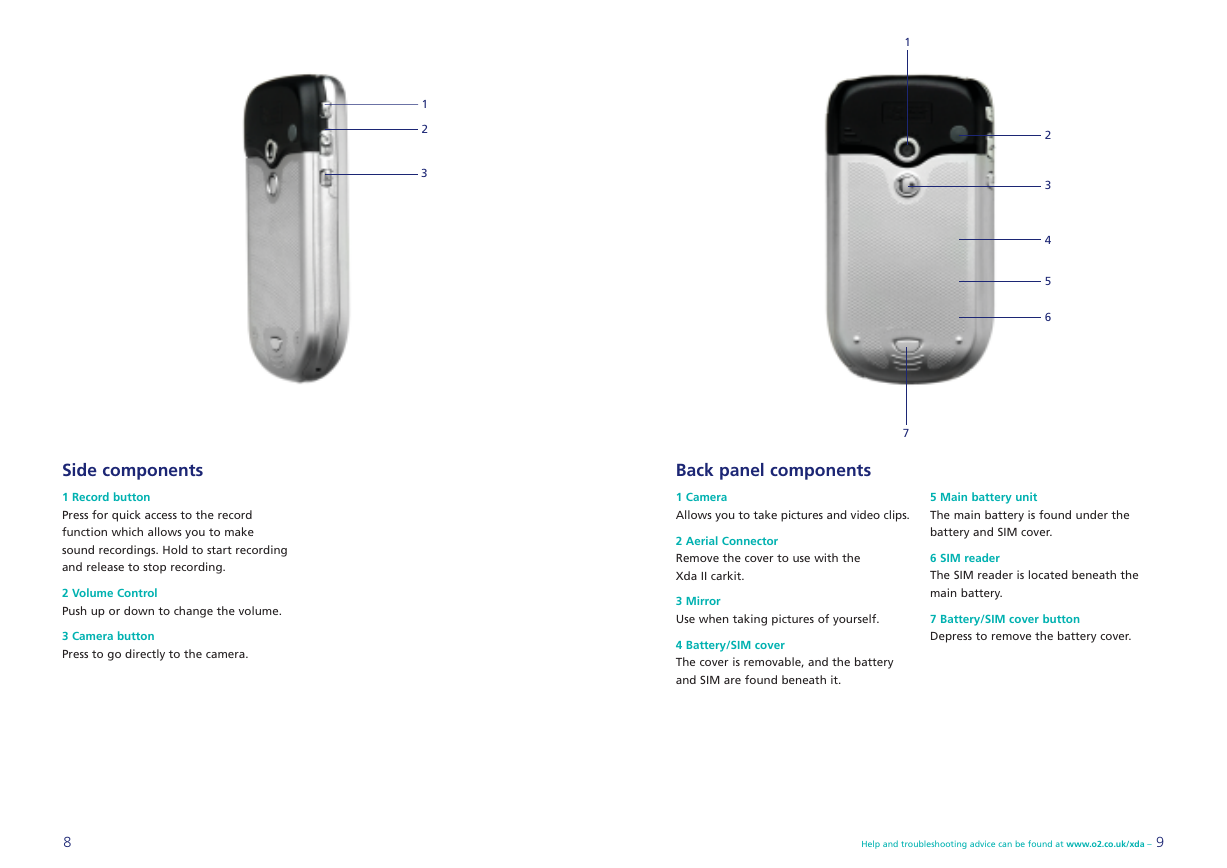
Side components
1 Record button
Press for quick access to the record
function which allows you to make
sound recordings. Hold to start recording
and release to stop recording.
2 Volume Control
Push up or down to change the volume.
3 Camera button
Press to go directly to the camera.
Back panel components
1 Camera
Allows you to take pictures and video clips.
2 Aerial Connector
Remove the cover to use with the
Xda II carkit.
3 Mirror
Use when taking pictures of yourself.
4 Battery/SIM cover
The cover is removable, and the battery
and SIM are found beneath it.
5 Main battery unit
The main battery is found under the
battery and SIM cover.
6 SIM reader
The SIM reader is located beneath the
main battery.
7 Battery/SIM cover button
Depress to remove the battery cover.
8
Help and troubleshooting advice can be found at www.o2.co.uk/xda – 9
�



 2023年江西萍乡中考道德与法治真题及答案.doc
 2012年重庆南川中考生物真题及答案.doc
 2013年江西师范大学地理学综合及文艺理论基础考研真题.doc
 2020年四川甘孜小升初语文真题及答案I卷.doc
 2020年注册岩土工程师专业基础考试真题及答案.doc
 2023-2024学年福建省厦门市九年级上学期数学月考试题及答案.doc
 2021-2022学年辽宁省沈阳市大东区九年级上学期语文期末试题及答案.doc
 2022-2023学年北京东城区初三第一学期物理期末试卷及答案.doc
 2018上半年江西教师资格初中地理学科知识与教学能力真题及答案.doc
 2012年河北国家公务员申论考试真题及答案-省级.doc
 2020-2021学年江苏省扬州市江都区邵樊片九年级上学期数学第一次质量检测试题及答案.doc
 2022下半年黑龙江教师资格证中学综合素质真题及答案.doc