logo资料库

Mimaki打印机-JFX-1631/1631+说明书.pdf

第1页 / 共152页
第2页 / 共152页
第3页 / 共152页
第4页 / 共152页
第5页 / 共152页
第6页 / 共152页
第7页 / 共152页
第8页 / 共152页
资料共152页,剩余部分请下载后查看
TABLE OF CONTENS
CAUTION
CAUTION
Requests
FCC Statement (USA)
INTERFERENCE TO TELEVISIONS AND RADIOS
CDRH REGULATION
Foreword
On this operation manual
For safe operation
Pictorial signs
Example of pictorial signs
Never do the following
Precautions for use
Notices for installation
Position of the warning label
How to Read This Operation Manual
CHAPTER 1 Before Use
Installing the device
Where to install the device
Configuration and Function
Front Side
Rear Side
Operation Panel
Function of Jog Keys
Carriage
EMERGENCY SWITCH
Connecting the cables
Connecting the USB2.0 interface cable
Connecting the power cable
UV LED Unit and Indicator
UV LED Unit
Function of indicator
Setting of ink cartridge
Kinds of ink that can be used
Precautions at the time of setting the ink cartridge
Precautions in handling ink cartridge
Precautions in handling an unused slot
About Media
The sizes of media that can be used
Precautions in handling the media
Menu mode
CHAPTER 2 Basic Operations
How to use the opening/closing door
When setting the media
When drawing the image
Operation flow
Turning the power ON
Setting the media
Setting the media
On the absorption area
Test drawing
Execution of test drawing
Execution of head cleaning
When cleaning with “Normal” or “Hard” or “SUBTANK MAINTE”
When cleaning with “Wiping”
Cleaning automatically when turning the power on
Drawing an image from source data
Starting the drawing operation
Interruption of drawing
Move the Y-bar
Setting the view position
Evacuation of Y-bar from the table
Turning the power OFF
Preventing nozzle drop out while power-off
When turning the power OFF
CHAPTER 3 Useful Function
Changing origin
Changing origin with JOG keys
Changing origin with FUNCTION menu
Registering the thickness of the media
Register the thickness of the media manually
Adjust head gap with the [UP] or [DOWN] keys
Measuring the thickness of the media automatically
Registering Head gap value
Other useful functions
Data clear
Displaying information of this device
Each setting
Setting the print method
Setting the light intensity of the UV LED
Setting of priority
Changing language display on the screen
Output the setting list
Displaying machine information of this device
Other useful settings
Initializing set contents
For setting media correctly
Arrangement of guide holes
Adjust the height of the Post Cure Unit
Use the Post Cure Unit
Note when using Post Cure Unit
Note when drawing on thick media
Attach the UV shade curtain
Turn on the power supply of the Post Cure Unit
Switch the drawing range when using the post cure function
Select the use method of the Post Cure Unit (setting secondary curing)
When [DRAWING RANGE] is “Cure Print”
When [DRAWING RANGE] is “after print”
Enlarge the irradiation area of the post cure
Re-irradiate lamp light on the drawn media
Setting method of area for irradiating lamp light
About time to replace lamp
Note for using post cure unit
If you cannot keep the head gap properly/evenly
When performing long hours of continuous printing
CHAPTER 4 Maintenance
Routine maintenance
When the device is left unused for a long period of time
Notes on cleaning
Maintenance of frame component
Ink cartridge
Replacing with a new ink pack
Replacement of ink packs
State of Lamp
Cartridges that cannot be used (Lights in red)
Conditions for cartridge switching
How to shake an ink cartridge
Ink cartridge trouble
Warnings and operations
Avoiding dripping of ink droplet at printing
Cleaning of the head guard plate
Cleaning nozzle face automatically
Setting of Interval Wiping
Setting of Interval Cleaning
Cleaning of wiper
Subtank Maintenance
Prevent the nozzle clogging of special color
When the waste ink is pooled up
Disposing of the ink in the waste ink tank
Disposing of the ink in the wiper tank
Regular maintenance for white ink
Replacing the filter of the cooling fan
Replacing the mist suction filter
When media thickness is changed
Samples of pattern drawn
In case defective printing is not resolved
Filling the ink
Replacing water in water heater tank
Replacement method of antifreeze liquid water
Replacing using water heater exchange mode
Replacing when the power is turned OFF
Replacing the UV LED Unit filter
Irradiation Time of UV LED Unit
Displaying the irradiation time of the UV LED unit
Resetting the irradiation time of the UV LED unit
Checking UV ink curing level
Adjusting UV light level
Setting vacuuming / blowing level of the vacuum unit
Drawing the Drop Pattern
CHAPTER 5 In Case of Trouble
Before taking a phenomenon as a trouble
The device cannot be energized
The device cannot perform printing
Display [ WATER NOT READY ]
If image quality declines
Resolving nozzle clogging
Stopping the unit during the operation
Even when ink remains, [INK NEAR END] is displayed
Troubles for which error messages are given on the LCD
Errors accompanied by warnings
Error message
CHAPTER 6 Appendix
Specifications
Basic unit specifications
Specifications for ink
Function Flowchart
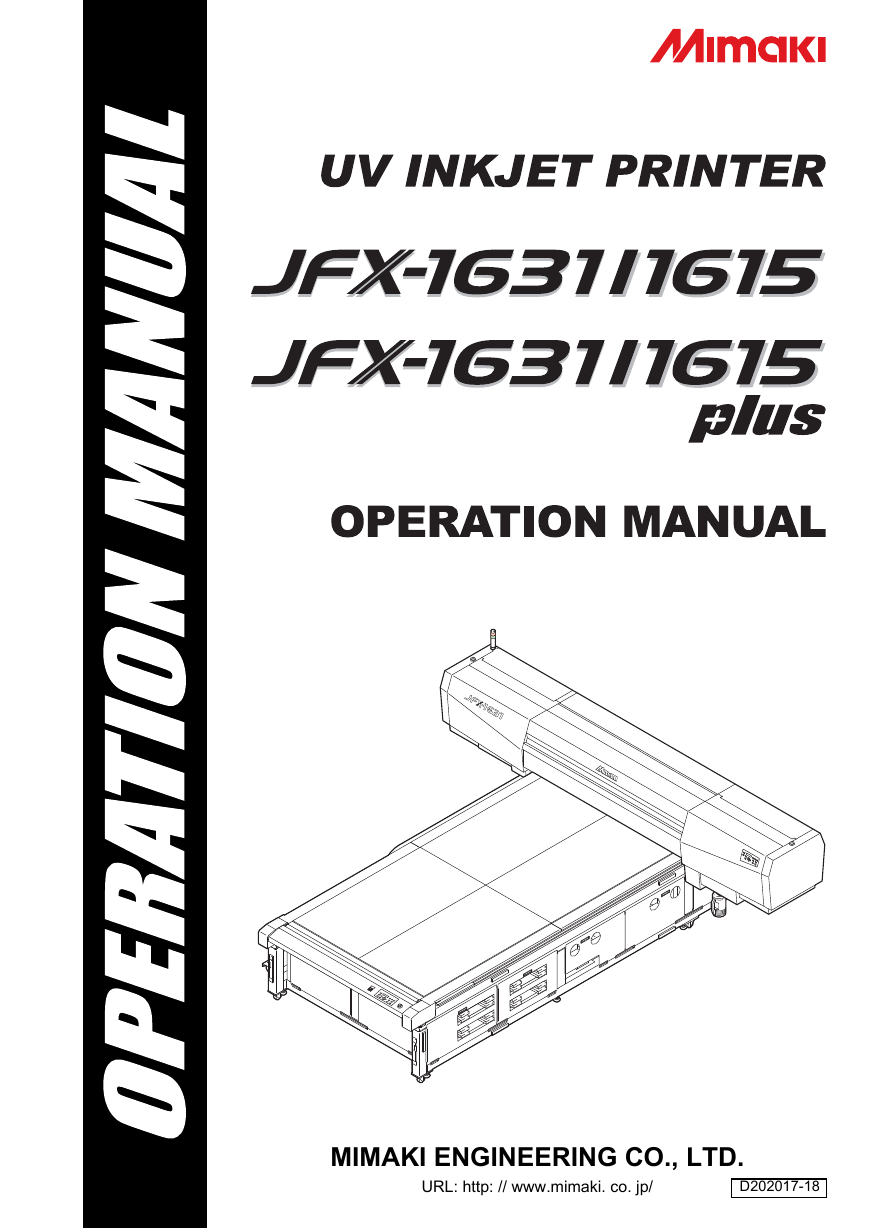
MIMAKI ENGINEERING CO., LTD. URL: http: // www.mimaki. co. jp/ D202017-18
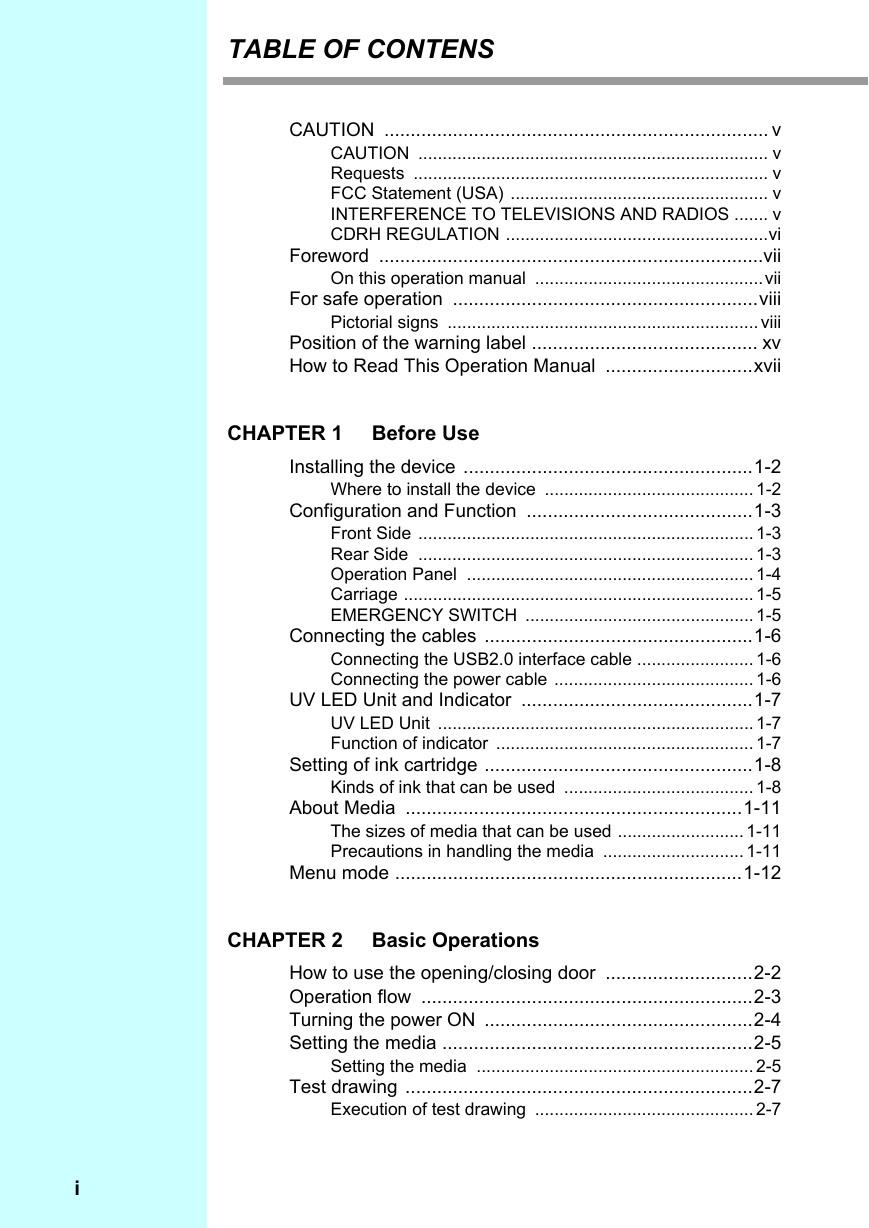
TABLE OF CONTENS CAUTION ......................................................................... v CAUTION ........................................................................ v Requests ......................................................................... v FCC Statement (USA) ..................................................... v INTERFERENCE TO TELEVISIONS AND RADIOS ....... v CDRH REGULATION ......................................................vi Foreword .........................................................................vii On this operation manual ...............................................vii For safe operation ..........................................................viii Pictorial signs ................................................................ viii Position of the warning label ........................................... xv How to Read This Operation Manual ............................xvii CHAPTER 1 Before Use Installing the device .......................................................1-2 Where to install the device ........................................... 1-2 Configuration and Function ...........................................1-3 Front Side ..................................................................... 1-3 Rear Side ..................................................................... 1-3 Operation Panel ........................................................... 1-4 Carriage ........................................................................1-5 EMERGENCY SWITCH ...............................................1-5 Connecting the cables ...................................................1-6 Connecting the USB2.0 interface cable ........................ 1-6 Connecting the power cable ......................................... 1-6 UV LED Unit and Indicator ............................................1-7 UV LED Unit .................................................................1-7 Function of indicator ..................................................... 1-7 Setting of ink cartridge ...................................................1-8 Kinds of ink that can be used ....................................... 1-8 About Media ................................................................1-11 The sizes of media that can be used ..........................1-11 Precautions in handling the media ............................. 1-11 Menu mode ..................................................................1-12 CHAPTER 2 Basic Operations How to use the opening/closing door ............................2-2 Operation flow ...............................................................2-3 Turning the power ON ...................................................2-4 Setting the media ...........................................................2-5 Setting the media ......................................................... 2-5 Test drawing ..................................................................2-7 Execution of test drawing ............................................. 2-7 i
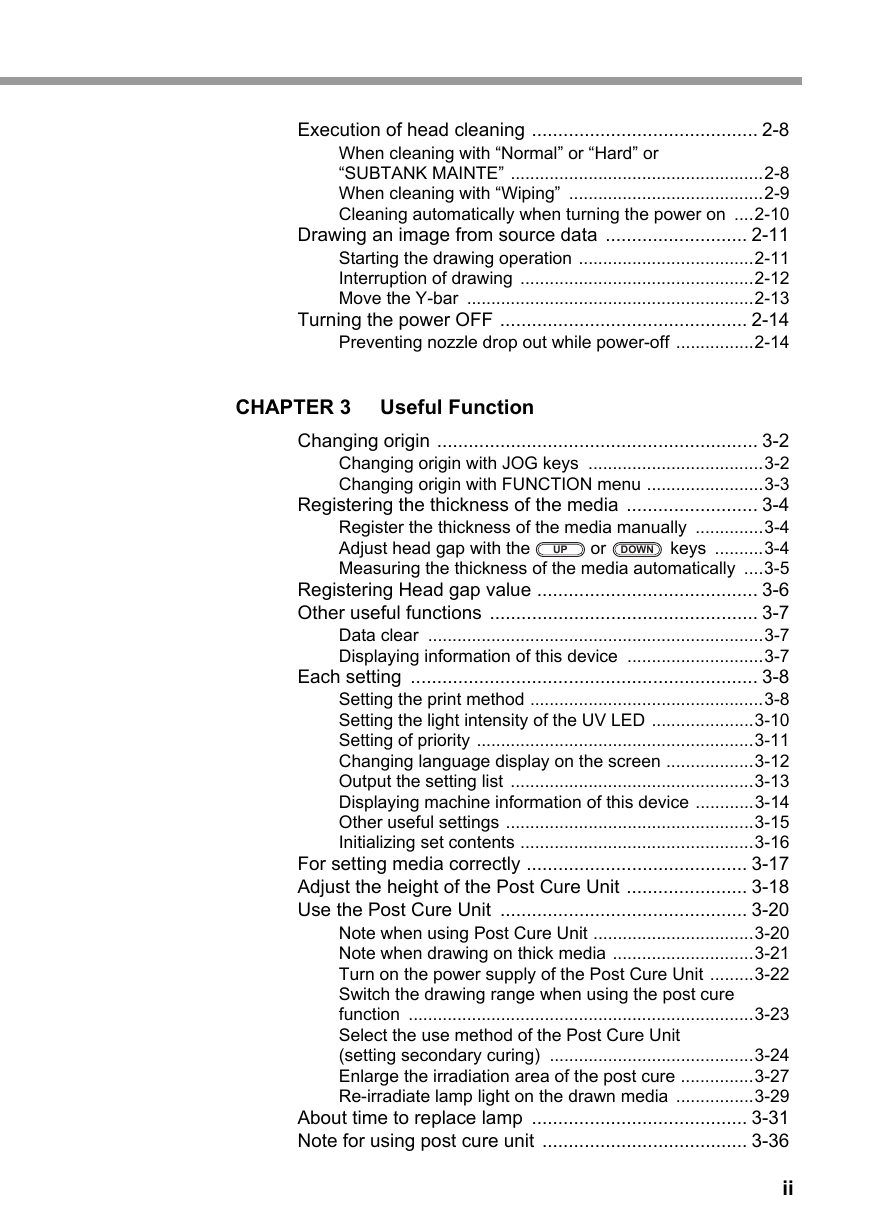
Execution of head cleaning ........................................... 2-8 When cleaning with “Normal” or “Hard” or “SUBTANK MAINTE” ....................................................2-8 When cleaning with “Wiping” ........................................2-9 Cleaning automatically when turning the power on ....2-10 Drawing an image from source data ........................... 2-11 Starting the drawing operation ....................................2-11 Interruption of drawing ................................................2-12 Move the Y-bar ...........................................................2-13 Turning the power OFF ............................................... 2-14 Preventing nozzle drop out while power-off ................2-14 CHAPTER 3 Useful Function UP DOWN or Changing origin ............................................................. 3-2 Changing origin with JOG keys ....................................3-2 Changing origin with FUNCTION menu ........................3-3 Registering the thickness of the media ......................... 3-4 Register the thickness of the media manually ..............3-4 Adjust head gap with the keys ..........3-4 Measuring the thickness of the media automatically ....3-5 Registering Head gap value .......................................... 3-6 Other useful functions ................................................... 3-7 Data clear .....................................................................3-7 Displaying information of this device ............................3-7 Each setting .................................................................. 3-8 Setting the print method ................................................3-8 Setting the light intensity of the UV LED .....................3-10 Setting of priority .........................................................3-11 Changing language display on the screen ..................3-12 Output the setting list ..................................................3-13 Displaying machine information of this device ............3-14 Other useful settings ...................................................3-15 Initializing set contents ................................................3-16 For setting media correctly .......................................... 3-17 Adjust the height of the Post Cure Unit ....................... 3-18 Use the Post Cure Unit ............................................... 3-20 Note when using Post Cure Unit .................................3-20 Note when drawing on thick media .............................3-21 Turn on the power supply of the Post Cure Unit .........3-22 Switch the drawing range when using the post cure function .......................................................................3-23 Select the use method of the Post Cure Unit (setting secondary curing) ..........................................3-24 Enlarge the irradiation area of the post cure ...............3-27 Re-irradiate lamp light on the drawn media ................3-29 About time to replace lamp ......................................... 3-31 Note for using post cure unit ....................................... 3-36 ii
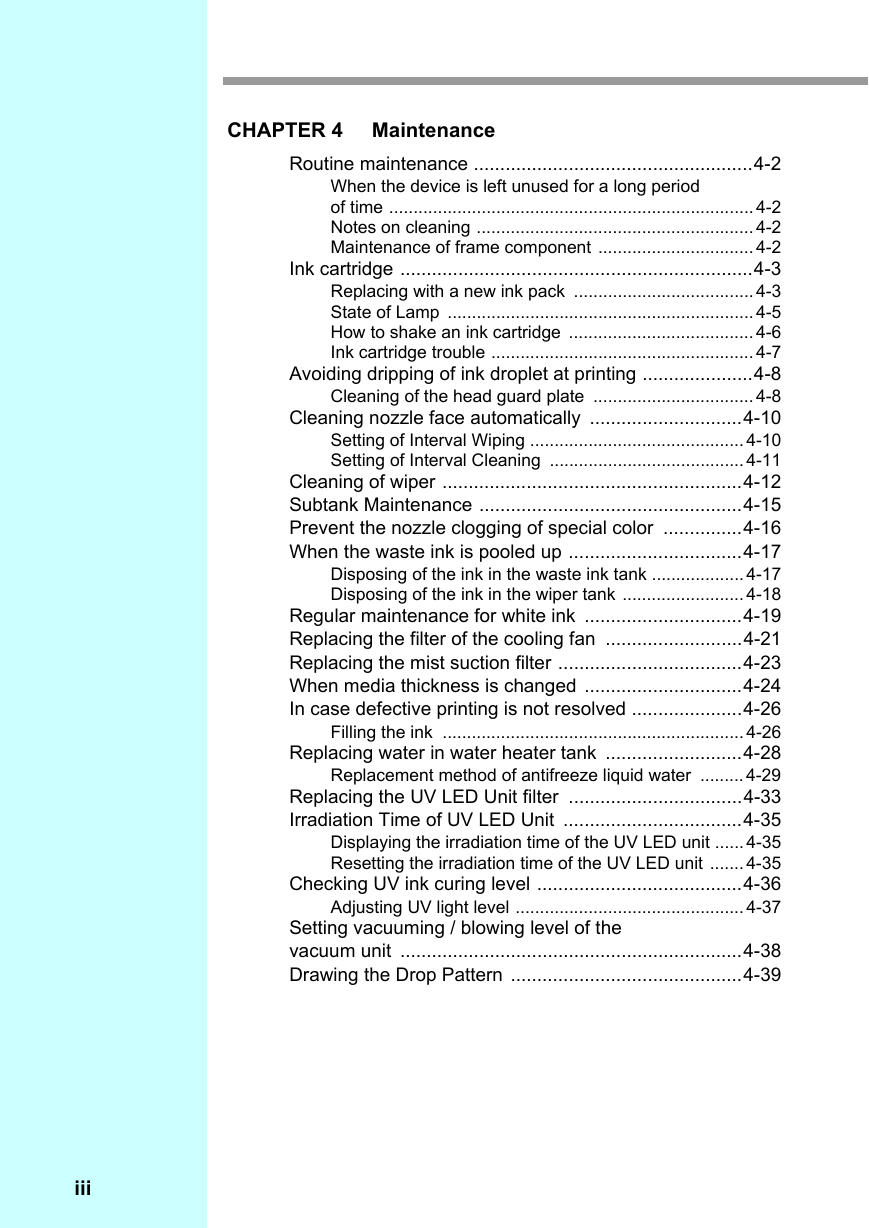
CHAPTER 4 Maintenance Routine maintenance .....................................................4-2 When the device is left unused for a long period of time ...........................................................................4-2 Notes on cleaning ......................................................... 4-2 Maintenance of frame component ................................ 4-2 Ink cartridge ...................................................................4-3 Replacing with a new ink pack .....................................4-3 State of Lamp ...............................................................4-5 How to shake an ink cartridge ...................................... 4-6 Ink cartridge trouble ......................................................4-7 Avoiding dripping of ink droplet at printing .....................4-8 Cleaning of the head guard plate .................................4-8 Cleaning nozzle face automatically .............................4-10 Setting of Interval Wiping ............................................ 4-10 Setting of Interval Cleaning ........................................4-11 Cleaning of wiper .........................................................4-12 Subtank Maintenance ..................................................4-15 Prevent the nozzle clogging of special color ...............4-16 When the waste ink is pooled up .................................4-17 Disposing of the ink in the waste ink tank ...................4-17 Disposing of the ink in the wiper tank ......................... 4-18 Regular maintenance for white ink ..............................4-19 Replacing the filter of the cooling fan ..........................4-21 Replacing the mist suction filter ...................................4-23 When media thickness is changed ..............................4-24 In case defective printing is not resolved .....................4-26 Filling the ink .............................................................. 4-26 Replacing water in water heater tank ..........................4-28 Replacement method of antifreeze liquid water ......... 4-29 Replacing the UV LED Unit filter .................................4-33 Irradiation Time of UV LED Unit ..................................4-35 Displaying the irradiation time of the UV LED unit ...... 4-35 Resetting the irradiation time of the UV LED unit .......4-35 Checking UV ink curing level .......................................4-36 Adjusting UV light level ...............................................4-37 Setting vacuuming / blowing level of the vacuum unit .................................................................4-38 Drawing the Drop Pattern ............................................4-39 iii
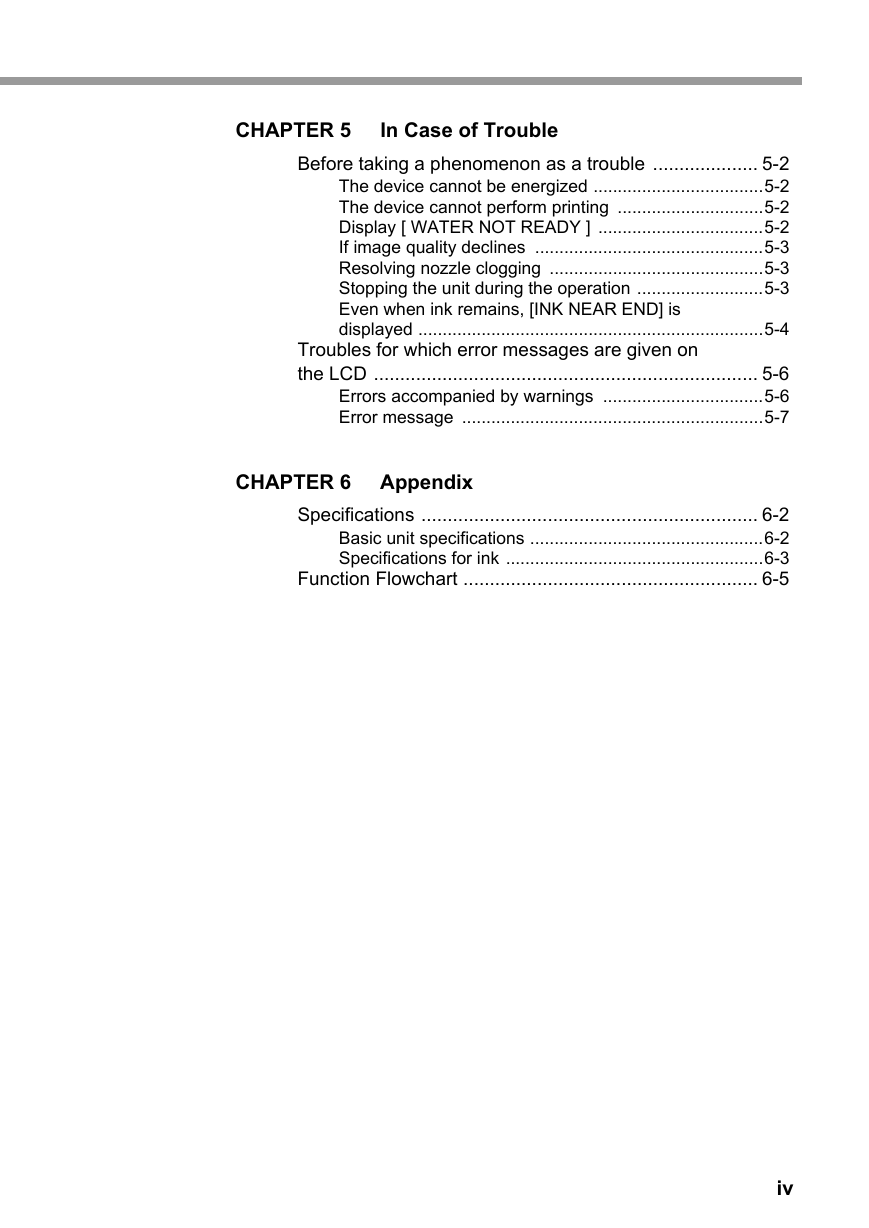
CHAPTER 5 In Case of Trouble Before taking a phenomenon as a trouble .................... 5-2 The device cannot be energized ...................................5-2 The device cannot perform printing ..............................5-2 Display [ WATER NOT READY ] ..................................5-2 If image quality declines ...............................................5-3 Resolving nozzle clogging ............................................5-3 Stopping the unit during the operation ..........................5-3 Even when ink remains, [INK NEAR END] is displayed .......................................................................5-4 Troubles for which error messages are given on the LCD ......................................................................... 5-6 Errors accompanied by warnings .................................5-6 Error message ..............................................................5-7 CHAPTER 6 Appendix Specifications ................................................................ 6-2 Basic unit specifications ................................................6-2 Specifications for ink .....................................................6-3 Function Flowchart ........................................................ 6-5 iv
CAUTION CAUTION DISCLAIMER OF WARRANTY: THIS LIMITED WARRANTY OF MIMAKI SHALL BE THE SOLE AND EXCLUSIVE WARRANTY AND IS IN LIEU OF ALL OTHER WARRANTIES, EXPRESS OR IMPLIED, INCLUDING , BUT NOT LIMITED TO, ANY IMPLIED WARRANTY OF MERCHANTABILITY OR FITNESS, AND MIMAKI NEITHER ASSUMES NOR AUTHORIZES DEALER TO ASSUME FOR IT ANY OTHER OBLIGATION OR LIABILITY OR MAKE ANY OTHER WARRANTY OR MAKE ANY OTHER WARRANTY IN CONNECTION WITH ANY PRODUCT WITHOUT MIMAKI’S PRIOR WRITTEN CONSENT. IN NO EVENT SHALL MIMAKI BE LIABLE FOR SPECIAL, INCIDNETAL OR CONSEQUENTIAL DAMAGES OR FOR LOSS OF PROFITS OF DEALER OR CUSTOMERS OF ANY PRODUCT. Requests • This Operation Manual has been carefully prepared for your easy understanding, however, please do not hesitate to contact a distributor in your district or our office if you have any inquiry. • Description contained in this Operation Manual are subject to change without notice for improvement. • Generally, names and designations referred to in this Operation Manual are trade marks or registered trade marks of the manufacturers or suppliers. FCC Statement (USA) This equipment has been tested and found to comply with the limits for a Class A digital device, pursuant to Part 15 of the FCC Rules. These limits are designed to provide reasonable protection against harmful interference when the equipment is operated in a commercial environment. This equipment generates, uses and can radiate radio frequency energy and, if not installed and used in accordance with the instruction manual, may cause harmful interference to radio communications. Operation of this equipment in a residential area is likely to cause harmful interference in which cause the user will be required to correct the interference at his own expense. • In the case where MIMAKI-recommended cable is not used for connection of this device, limits provided by FCC rules can be exceeded. To prevent this, use of MIMAKI-recommended cable is essential for the connection of this device. INTERFERENCE TO TELEVISIONS AND RADIOS The product covered by this Instruction Manual produces low radio waves while it is in operation. The product can interfere with radios and televisions if set up or commissioned under improper conditions. The product is not guaranteed against any damage to specificpurpose radio and televisions. The product’s interference with your radio or television will be checked by turning on/off the power switch of the product. In the event that the product is the cause of interference, try to eliminate it by taking one of the following corrective measures or taking some of them in combination. • Change the direction of the receiving antenna or the feeder of your radio/television. • Change the installing direction of the product. • Move the receiver away from the product. • Use a power line for the receiver that is not shared with the product. v
CAUTION CDRH REGULATION The Center for Devices and Radiological Health for the U.S. Food and Drug Administration Implement regulations for laser products. The sentence of “This product complies with 21 CFR chapter I and subchapter J” indicates compliance with the CDRH regulations and is labeled on the product when marketed in the United States. This Model is equivalent to Class II laser device according to CDRH Regulation. This product complies with 21 CFR chapter I and subchapter J • Use of controls, adjustments or performance of procedures other than those specified in this manual may results in hazardous radiation exposure. vi
Foreword Congratulations on your purchase of MIMAKI UV ink jet printer “JFX-1631/1615 , JFX-1631/1615plus”. UV Inkjet Printer JFX-1631/1615 , JFX-1631/1615plus uses ultraviolet ray curing ink (UV ink). Read this Operation Manual carefully and make the most effective use of your printer. In addition, JFX-1631/1615plus includes “Post Cure Unit” to dehydrate UV ink more rapidly at drawing as standard. Before starting to operate the printer, be sure to read this Operation Manual carefully . On this operation manual • This Operation Manual describes the operation and maintenance of Model JFX-1631/1615 , JFX-1631/1615plus UV Ink Jet Printer (hereinafter referred to as the device). • Please read and fully understand this Operation Manual before putting the machine into service. It is also necessary to keep this Operation Manual on hand. • Make arrangements to deliver this Operation Manual to the person in charge of the operation of this device. • This Operation Manual has been carefully prepared for your easy understanding, however, please do not hesitate to contact a distributor in your district or our office if you have any inquiry. • Description contained in this Operation Manual are subject to change without notice for improvement. • In the case where this Operation Manual should be illegible due to destruction or lost by fire or breakage, purchase another copy of the Operation Manual from our office. • You can also download the latest manual from our website. Reproduction of this manual is strictly prohibited. All Rights Reserved. Copyright © 2012 MIMAKI ENGINEERING CO., LTD. vii
分享到:
收藏