Welcome:
Thank you kindly for purchasing this fine product.
Much investment in time and effort has gone into its development, and it is our hope
that it will give you many years of trouble-free service.
Safety Notice:
1. Do not drop, puncture or disassemble the device; otherwise the warranty will be voided.
2. Avoid all contact with water, and dry hands before using.
3. Do not expose the device to high temperature or leave it in direct sunlight. Doing so may
damage the device.
4. Use the device with care. Avoid pressing hard on the device body.
5. For your own safety, avoid using the device when there is a storm or lightning.
FCC Compliance Statement:
This device complies with Part 15 of the FCC Rules. Operation is
subjected to the following two conditions: (1) this device may not cause
harmful interference, and (2) this device must accept any interference
received, including interference that may cause undesired operation.
This equipment has been tested and found to comply with limits for a
Class B digital device, pursuant to Part 15 of the FCC rules. These limits
are designed to provide reasonable protection against harmful interference in residential
installations. This equipment generates, uses, and can radiate radio frequency energy, and if
not installed and used in accordance with the instructions, may cause harmful interference to
radio communications.
However, there is no guarantee that interference will not occur in a particular installation. If this
equipment does cause interference to radio or television equipment reception, which can be
determined by turning the equipment off and on, the user is encouraged to try to correct the
interference by one or more of the following measures:
-Reorient or relocate the receiving antenna.
-Move the equipment away from the receiver.
-Plug the equipment into an outlet on a circuit different from that to which the receiver is
connected.
-Consult the dealer or an experienced radio/television technician for additional suggestions.
You are cautioned that any change or modifications to the equipment not expressly approved
by the party responsible for compliance could void Your authority to operate such equipment.
If the time arises to throw away your product,
please recycle all the components possible.
Batteries and rechargeable batteries are
not to be disposed in your domestic waste!
Please recycle them at your local recycling
point.
Together we can help to protect the environ-
ment.
�
�
Introduction
This USB projector is to be powered and project Notebook screen via USB port.
It is an ideal projector for mobile Notebook users doing small group
presentations. Please check the package content first and then follow the steps
below to install your USB projector.
Package Content
Following items are inclueded:
- USB projector
- USB cable
- Tri-pod
- User’s guide
- Pouch
Knowing the USB projector
Power Indicator
Mode switch
Mini USB jack
Lens ring
- Lens ring: To adjust projection focus by rolling the ring
- Power indicator: When USB projector is powered by your Notebook PC, the power
indicator will turn blue.
- Mode switch: “Auto Installation” mode and “Projection” mode for selection.
- Mini USB jack: The jack is to connect to the bundled USB cable.
System Requirements
Notebook PC with:
- Pentium 4 / Celeron Family, AMD K6 / Athlon / Duron Family. 1GHz or higher
processor.
- 5��MB RAM or higher (Higher memory recommended for optimal performance)
- Available USB 2.0 Port (s)
- Windows XP SP3 / Windows Vista / Windows 7
�
�
Installation
Hardware Installation
1. Please make sure the Mode switch is set to “Auto
Installation” mode.
2. Connect the mini USB connector of the USB cable to the
USB port of the projector.
3. Connect the other end of the USB cable
(marked
logo) to a powered PC.
Driver Installation
The USB projector device driver is stored inside USB projector and it will run the
driver installation automatically by following steps.
1. Click Next to continue.
3
�
2. Check Accept and click Next to continue.
3. Installing driver.
4. Click Continue Anyway to continue the installation.
(*The actual screen may vary depending on the operating system you use.)
�
�
5. Please re-start your PC when driver installation is completed, and then turn
Mode switch to “Projection” mode.
5
�
6. After your PC is re-started completely, please unplug the USB cable for a
second and re-plug the USB cable to activate the projector driver.
7. When the driver is activated you will find a small projector icon
(
) on the function bar of your PC.
Note �: In projection mode the resolution of your notebook screen
will be reduced to an equal resolution 640 x 480, same as
the resolution of notebook projector. When turning off the
projector, the screen resolution will automatically switch back
to previous setting.
Note �: The icons (or shortcuts) on your desktop will be re-arranged
after using the notebook projector. It’s normal because the
desktop was scaled to a smaller size during projection.
�
�
Note: Next time you connect the USB projector to a different USB
port of a powered PC, the driver installation will be installed again.
It’s normal since the USB port didn’t recognize the USB projector in
the beginning.
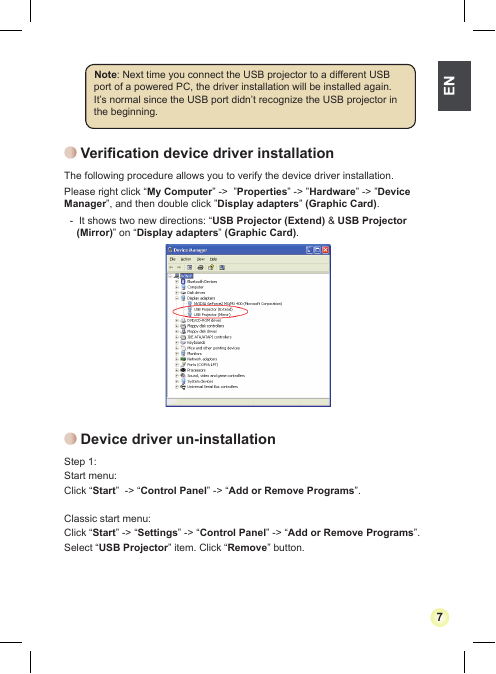
Verification device driver installation
The following procedure allows you to verify the device driver installation.
Please right click “My Computer” -> ”Properties” -> ”Hardware” -> ”Device
Manager”, and then double click ”Display adapters” (Graphic Card).
- It shows two new directions: “USB Projector (Extend) & USB Projector
(Mirror)” on “Display adapters” (Graphic Card).
Device driver un-installation
Step 1:
Start menu:
Click “Start” -> “Control Panel” -> “Add or Remove Programs”.
Classic start menu:
Click “Start” -> “Settings” -> “Control Panel” -> “Add or Remove Programs”.
Select “USB Projector” item. Click “Remove” button.
7
�
Step 2:
Unplug the device and click “OK” to continue.
Step 3:
Select “Yes, I want to restart my computer now” and click “Finish” to reboot.
After reboot, you will complete the driver un-installation.
Setup your USB projector
After installation please plug both USB connectors to your Notebook/Netbook
PC. Then you will find an USB projector setting icon (
function bar of your PC.
Right-click this icon to display mode selection box. There are four options: USB
Projector (Primary), USB Projector (Extended), USB Projector (Off) and USB
Projector (Mirror). The default setting is USB Projector (Off).
) shown on the
�
�


 2023年江西萍乡中考道德与法治真题及答案.doc
 2012年重庆南川中考生物真题及答案.doc
 2013年江西师范大学地理学综合及文艺理论基础考研真题.doc
 2020年四川甘孜小升初语文真题及答案I卷.doc
 2020年注册岩土工程师专业基础考试真题及答案.doc
 2023-2024学年福建省厦门市九年级上学期数学月考试题及答案.doc
 2021-2022学年辽宁省沈阳市大东区九年级上学期语文期末试题及答案.doc
 2022-2023学年北京东城区初三第一学期物理期末试卷及答案.doc
 2018上半年江西教师资格初中地理学科知识与教学能力真题及答案.doc
 2012年河北国家公务员申论考试真题及答案-省级.doc
 2020-2021学年江苏省扬州市江都区邵樊片九年级上学期数学第一次质量检测试题及答案.doc
 2022下半年黑龙江教师资格证中学综合素质真题及答案.doc