l
e
P
o
r
t
a
b
M
o
t
i
o
n
H
A
o
c
m
t
e
W
i
v
a
t
a
c
h
t
C
e
a
m
d
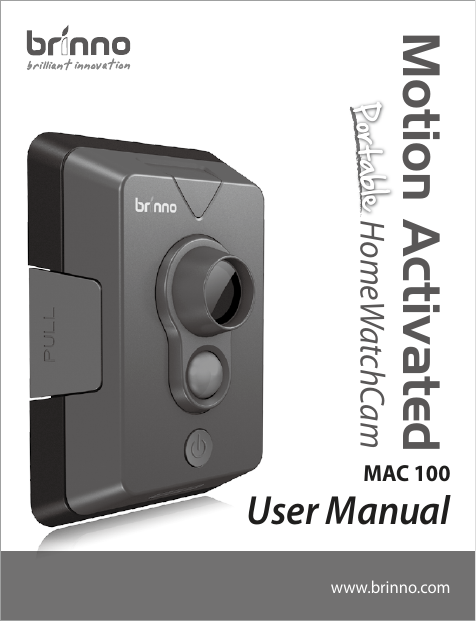
MAC 100
User Manual
www.brinno.com
�
Brinno Motion Activated Camera MAC100
�
Thank you for purchasing Brinno HomeWatchCam!
Brinno portable HomeWatchCam(MAC 100) using Motion Activated technology to capture
any movement in the detecting area, and turn the thousands photos into short time-lapse
video, it will save lots time to review those photos! You can use HomeWatchCam for home
security, or put it on your backyard to capture beautiful birds and tricky doggie!
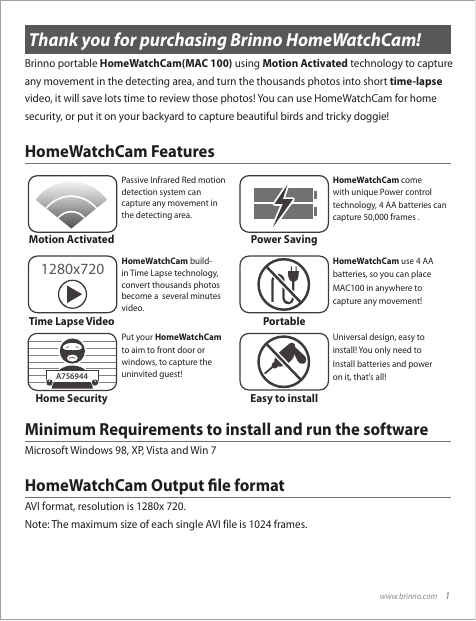
HomeWatchCam Features
Passive Infrared Red motion
detection system can
capture any movement in
the detecting area.
Motion Activated
1280x720
Time Lapse Video
A756944
Home Security
HomeWatchCam build-
in Time Lapse technology,
convert thousands photos
become a several minutes
video.
Put your HomeWatchCam
to aim to front door or
windows, to capture the
uninvited guest!
Power Saving
Portable
Easy to install
HomeWatchCam come
with unique Power control
technology, 4 AA batteries can
capture 50,000 frames .
HomeWatchCam use 4 AA
batteries, so you can place
MAC100 in anywhere to
capture any movement!
Universal design, easy to
install! You only need to
Install batteries and power
on it, that’s all!
Minimum Requirements to install and run the software
Microsoft Windows 98, XP, Vista and Win 7
HomeWatchCam Output file format
AVI format, resolution is 1280x 720.
Note: The maximum size of each single AVI file is 1024 frames.
www.brinno.com
1
�
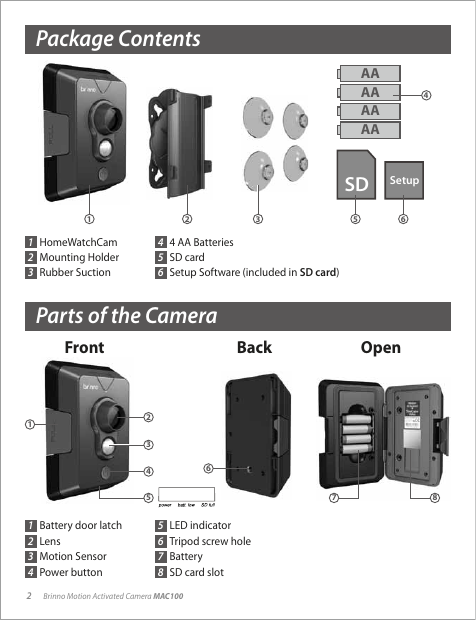
Package Contents
AA
AA
AA
AA
4
SD Setup
1
2
3
5
6
1
2
3
HomeWatchCam
Mounting Holder
Rubber Suction
4
5
6
4 AA Batteries
SD card
Setup Software (included in SD card)
Parts of the Camera
Front
Back
Open
2
3
4
5
6
Battery door latch
Lens
Motion Sensor
Power button
5
6
7
8
LED indicator
Tripod screw hole
Battery
SD card slot
Brinno Motion Activated Camera MAC100
1
1
2
3
4
2
7
8
�
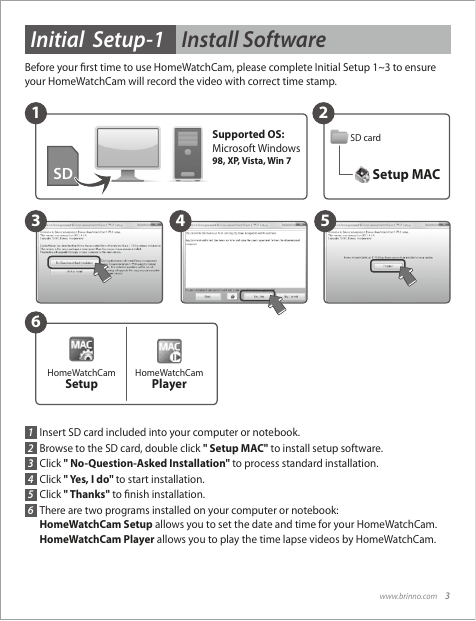
Initial Setup-1 Install Software
Before your first time to use HomeWatchCam, please complete Initial Setup 1~3 to ensure
your HomeWatchCam will record the video with correct time stamp.
Supported OS:
Microsoft Windows
98, XP, Vista, Win 7
4
2
5
SD card
Setup MAC
SD
1
3
6
HomeWatchCam
Setup
HomeWatchCam
Player
1
2
3
4
5
6
Insert SD card included into your computer or notebook.
Browse to the SD card, double click " Setup MAC" to install setup software.
Click " No-Question-Asked Installation" to process standard installation.
Click " Yes, I do" to start installation.
Click " Thanks" to finish installation.
There are two programs installed on your computer or notebook:
HomeWatchCam Setup allows you to set the date and time for your HomeWatchCam.
HomeWatchCam Player allows you to play the time lapse videos by HomeWatchCam.
www.brinno.com
3
�
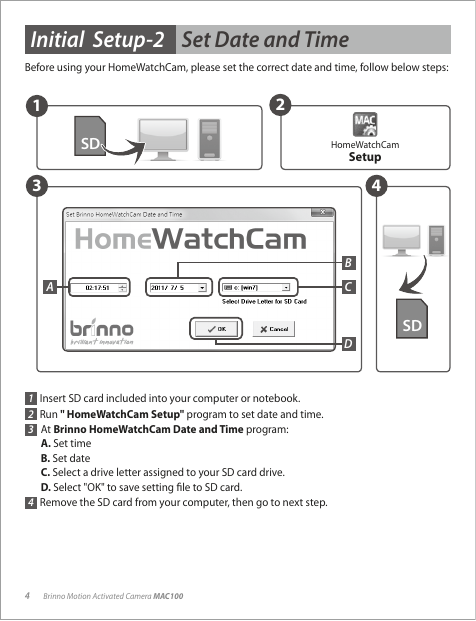
Initial Setup-2 Set Date and Time
Before using your HomeWatchCam, please set the correct date and time, follow below steps:
SD
1
3
A
2
HomeWatchCam
Setup
4
B
C
D
SD
1
2
3
4
Insert SD card included into your computer or notebook.
Run " HomeWatchCam Setup" program to set date and time.
At Brinno HomeWatchCam Date and Time program:
A. Set time
B. Set date
C. Select a drive letter assigned to your SD card drive.
D. Select "OK" to save setting file to SD card.
Remove the SD card from your computer, then go to next step.
4
Brinno Motion Activated Camera MAC100
�
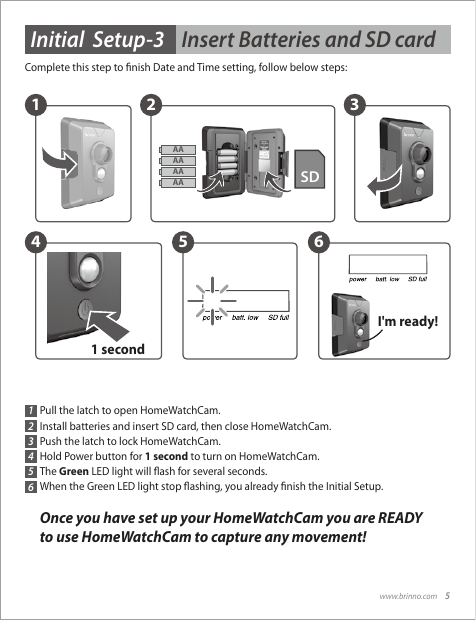
Initial Setup-3 Insert Batteries and SD card
Complete this step to finish Date and Time setting, follow below steps:
1
4
2
3
AA
AA
AA
AA
5
SD
6
1 second
I'm ready!
1
2
3
4
5
6
Pull the latch to open HomeWatchCam.
Install batteries and insert SD card, then close HomeWatchCam.
Push the latch to lock HomeWatchCam.
Hold Power button for 1 second to turn on HomeWatchCam.
The Green LED light will flash for several seconds.
When the Green LED light stop flashing, you already finish the Initial Setup.
Once you have set up your HomeWatchCam you are READY
to use HomeWatchCam to capture any movement!
www.brinno.com
5
�
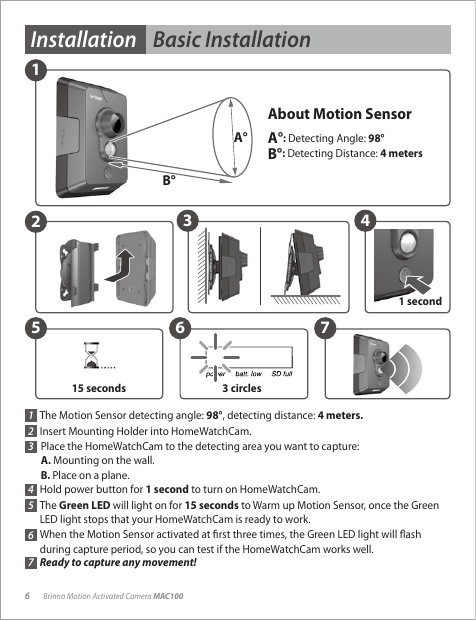
Installation Basic Installation
1
A°
About Motion Sensor
A°: Detecting Angle: 98°
B°: Detecting Distance: 4 meters
B°
3
6
7
4
1 second
2
5
15 seconds
3 circles
1
2
3
4
5
6
7
The Motion Sensor detecting angle: 98°, detecting distance: 4 meters.
Insert Mounting Holder into HomeWatchCam.
Place the HomeWatchCam to the detecting area you want to capture:
A. Mounting on the wall.
B. Place on a plane.
Hold power button for 1 second to turn on HomeWatchCam.
The Green LED will light on for 15 seconds to Warm up Motion Sensor, once the Green
LED light stops that your HomeWatchCam is ready to work.
When the Motion Sensor activated at first three times, the Green LED light will flash
during capture period, so you can test if the HomeWatchCam works well.
Ready to capture any movement!
6
Brinno Motion Activated Camera MAC100
�



 2023年江西萍乡中考道德与法治真题及答案.doc
 2012年重庆南川中考生物真题及答案.doc
 2013年江西师范大学地理学综合及文艺理论基础考研真题.doc
 2020年四川甘孜小升初语文真题及答案I卷.doc
 2020年注册岩土工程师专业基础考试真题及答案.doc
 2023-2024学年福建省厦门市九年级上学期数学月考试题及答案.doc
 2021-2022学年辽宁省沈阳市大东区九年级上学期语文期末试题及答案.doc
 2022-2023学年北京东城区初三第一学期物理期末试卷及答案.doc
 2018上半年江西教师资格初中地理学科知识与教学能力真题及答案.doc
 2012年河北国家公务员申论考试真题及答案-省级.doc
 2020-2021学年江苏省扬州市江都区邵樊片九年级上学期数学第一次质量检测试题及答案.doc
 2022下半年黑龙江教师资格证中学综合素质真题及答案.doc