C:\MUN\Data\FM\VPL-CS1\VPL-
CS1.nouhindata\407427811VPLCS1WW\01COV-
VPLCS1WW\01COV.fm
masterpage:Left
4-074-278-11 (1)
LCD Data Projector
Operating Instructions
Mode d’emploi
Manual de instrucciones
GB
FR
ES
VPL-CS1
© 1999 Sony Corporation
VPL-CS1
4-074-278-11 (1)
�
C:\MUN\Data\FM\VPL-CS1\VPL-
CS1.nouhindata\407427811VPLCS1WW\02GB-
VPLCS1WW\02REG.fm
masterpage:Left
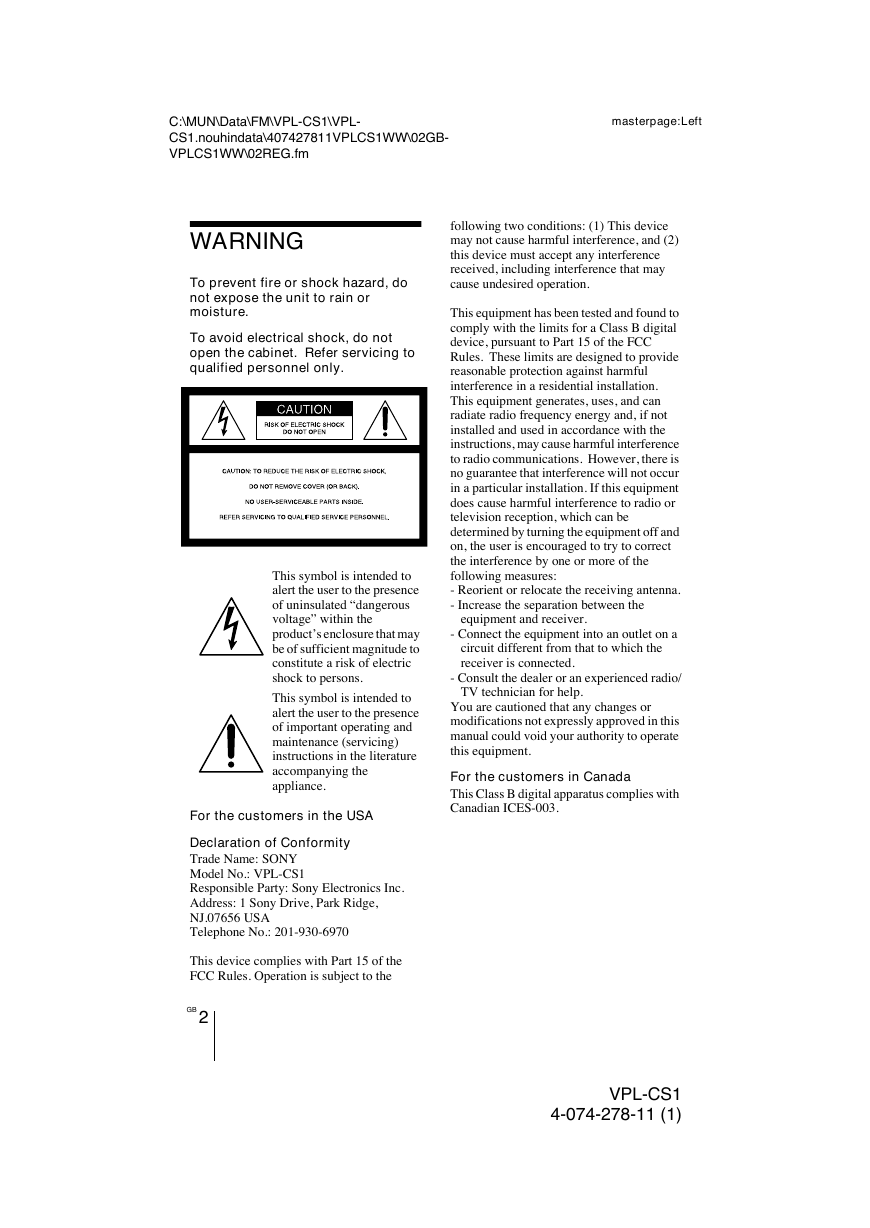
WARNING
To prevent fire or shock hazard, do
not expose the unit to rain or
moisture.
To avoid electrical shock, do not
open the cabinet. Refer servicing to
qualified personnel only.
This symbol is intended to
alert the user to the presence
of uninsulated “dangerous
voltage” within the
product’s enclosure that may
be of sufficient magnitude to
constitute a risk of electric
shock to persons.
This symbol is intended to
alert the user to the presence
of important operating and
maintenance (servicing)
instructions in the literature
accompanying the
appliance.
For the customers in the USA
Declaration of Conformity
Trade Name: SONY
Model No.: VPL-CS1
Responsible Party: Sony Electronics Inc.
Address: 1 Sony Drive, Park Ridge,
NJ.07656 USA
Telephone No.: 201-930-6970
This device complies with Part 15 of the
FCC Rules. Operation is subject to the
GB 2
following two conditions: (1) This device
may not cause harmful interference, and (2)
this device must accept any interference
received, including interference that may
cause undesired operation.
This equipment has been tested and found to
comply with the limits for a Class B digital
device, pursuant to Part 15 of the FCC
Rules. These limits are designed to provide
reasonable protection against harmful
interference in a residential installation.
This equipment generates, uses, and can
radiate radio frequency energy and, if not
installed and used in accordance with the
instructions, may cause harmful interference
to radio communications. However, there is
no guarantee that interference will not occur
in a particular installation. If this equipment
does cause harmful interference to radio or
television reception, which can be
determined by turning the equipment off and
on, the user is encouraged to try to correct
the interference by one or more of the
following measures:
- Reorient or relocate the receiving antenna.
- Increase the separation between the
equipment and receiver.
- Connect the equipment into an outlet on a
circuit different from that to which the
receiver is connected.
- Consult the dealer or an experienced radio/
TV technician for help.
You are cautioned that any changes or
modifications not expressly approved in this
manual could void your authority to operate
this equipment.
For the customers in Canada
This Class B digital apparatus complies with
Canadian ICES-003.
VPL-CS1
4-074-278-11 (1)
�
C:\MUN\Data\FM\VPL-CS1\VPL-
CS1.nouhindata\407427811VPLCS1WW\02GB-
VPLCS1WW\02REG.fm
masterpage:Left
For the customers in the United
Kingdom
WARNING
THIS APPARATUS MUST BE
EARTHED
IMPORTANT
The wires in this mains lead are coloured in
accordance with the following code:
Green-and-Yellow: Earth
Blue: Neutral
Brown: Live
As the colours of the wires in the mains lead
of this apparatus may not correspond with
the coloured markings identifying the
terminals in your plug proceed as follows:
The wire which is coloured green-and-
yellow must be connected to the terminal in
the plug which is marked by the letter E or
by the safety earth symbol I or coloured
green or green-and-yellow.
The wire which is coloured blue must be
connected to the terminal which is marked
with the letter N or coloured black. The wire
which is coloured brown must be connected
to the terminal which is marked with the
letter L or coloured red.
Voor de klanten in Nederland
Bij dit product zijn batterijen
geleverd. Wanneer deze leeg
zijn, moet u ze niet
weggooien maar inleveren
als KCA.
The socket-outlet should be installed near
the equipment and be easily accessible.
3 GB
VPL-CS1
4-074-278-11 (1)
�
C:\MUN\Data\FM\VPL-CS1\VPL-
CS1.nouhindata\407427811VPLCS1WW\02GB-
VPLCS1WW\02REG.fm
masterpage:Left
GB 4
VPL-CS1
4-074-278-11 (1)
�
C:\MUN\Data\FM\VPL-CS1\VPL-
CS1.nouhindata\407427811VPLCS1WW\02GB-
VPLCS1WW\01COVTOC.fm
masterpage:Left
Table of Contents
Overview
Precautions .........................................6
Features .............................................. 7
Location and Function of Controls ...8
Front/Left Side/Bottom ................ 8
Rear/Right Side ............................ 8
Control Panel ..............................10
Connector Panel .........................11
Remote Commander ...................12
Setting Up and Projecting
Installing the Projector .....................14
Connecting the Projector ..................15
Connecting with a Computer ......15
Connecting with a VCR or 15k
RGB/Component
Equipment .......................17
Selecting the Menu Language ..........19
Projecting .........................................21
Adjustments and Settings
Using the Menu
Using the MENU .............................24
The PICTURE CTRL Menu ............25
The INPUT SETTING Menu ...........26
The SET SETTING Menu ...............27
Maintenance
Maintenance .....................................29
Replacing the Lamp ....................29
Cleaning the Air Filter ................30
Troubleshooting ............................... 31
Warning Messages ..................... 33
Caution Messages ...................... 33
Other
Notes on Installation ........................ 34
Unsuitable Installation ............... 34
Unsuitable Conditions ................ 34
Specifications .................................. 35
Index ............................................... 41
GB
5 GB
VPL-CS1
4-074-278-11 (1)
�
C:\MUN\Data\FM\VPL-CS1\VPL-
CS1.nouhindata\407427811VPLCS1WW\02GB-
VPLCS1WW\03OVR.fm
masterpage:Left
B Overview
Precautions
On safety
Check that the operating voltage of your
unit is identical with the voltage of your
local power supply.
Should any liquid or solid object fall into
the cabinet, unplug the unit and have it
checked by qualified personnel before
operating it further.
Unplug the unit from the wall outlet if it is
not to be used for several days.
To disconnect the cord, pull it out by the
On preventing internal heat build-
up
After you turn off the power with the I / 1
key, do not disconnect the unit from the wall
outlet while the cooling fan is still running.
Caution
The projector is equipped with ventilation
holes (intake) on the bottom side and
ventilation holes (exhaust) on left and rear.
Do not block or place anything near these
holes, or internal heat build-up may occur,
causing picture degradation or damage to the
projector.
On cleaning
To keep the cabinet looking new,
periodically clean it with a soft cloth.
Stubborn stains may be removed with a
cloth lightly dampened with a mild
detergent solution. Never use strong
solvents, such as thinner, benzene, or
abrasive cleansers, since these will
damage the cabinet.
Avoid touching the lens. To remove dust
on the lens, use a soft dry cloth. Do not use
a damp cloth, detergent solution, or
thinner.
Clean the filter at regular intervals.
On repacking
Save the original shipping carton and
packing material; they will come in handy
if you ever have to ship your unit. For
maximum protection, repack your unit as
it was originally packed at the factory.
plug. Never pull the cord itself.
The wall outlet should be near the unit and
easily accessible.
The unit is not disconnected to the AC
power source (mains) as long as it is
connected to the wall outlet, even if the
unit itself has been turned off.
Do not look into the lens while the lamp is
on.
Do not place your hand or objects near the
ventilation holes. The air coming out is
hot.
Be careful not to catch your fingers by the
adjuster when you lift up the projector. Do
not push hard on the top of the projector
with the adjuster out.
On illumination
To obtain the best picture, the front of the
screen should not be exposed to direct
lighting or sunlight.
Ceiling-mounted spot lighting is
recommended. Use a cover over
fluorescent lamps to avoid lowering the
contrast ratio.
Cover any windows that face the screen
with opaque draperies.
It is desirable to install the projector in a
room where floor and walls are not of
light-reflecting material. If the floor and
walls are of reflecting material, it is
recommended that the carpet and wall
paper be changed to a dark color.
GB 6 Precautions
VPL-CS1
4-074-278-11 (1)
�
C:\MUN\Data\FM\VPL-CS1\VPL-
CS1.nouhindata\407427811VPLCS1WW\02GB-
VPLCS1WW\03OVR.fm
masterpage:Left
Features
High portability
• Light weight/small size
This projector has been miniaturized to
approx. 2.9 kg (6 lb 6 oz) in weight and
B5-file size through the adoption of a new
retractable mechanism. A carrying handle
and a removable strap are equipped with
the projector, so you can carry it easily
with your computer.
Reduced noise
Because the projector uses a new cooling
mechanism, noise has been reduced.
High brightness, high picture
quality
High brightness
Adopting the new developed optical
system and the 120 W UHP lamp allows
high brightness (light output 600 ANSI
lumen) and excellent uniformity on the
picture.
High resolution
Three 0.7-inch, about 480,000 pixel
SVGA panels provide a resolution of 800
× 600 dots for RGB input and 600
horizontal TV lines for video input.
Simple setup, easy presentation
Simple setup with external equipment
This projector is preset for 37 kinds of
input signals. You can project images from
an external signal source just by
connecting the equipment with the
supplied cable and pushing the APA key.
Simple Remote Commander with
mouse control functions
You can operate a computer with the
Remote Commander since the unit has a
build-in mouse receiver.
Compatible with USB (Universal
Serial Bus) hub function
You can connect the projector to USB
equipment, such as a USB mouse, and
O
v
e
r
v
e
w
i
control the projector by using the supplied
application software from a computer.1)
Using this application software, you can
open a file you want to use for your
presentation with the supplied Remote
Commander.
Accepts various input signals
Scan converter loaded
This projector has a build-in scan
converter that converts the input signal
within 800 × 600 dots.
Compatible input signals
This projector accepts video signals of
composite, S video, and component as
well as 15k RGB, VGA, SVGA, XGA,
and SXGA signals, which all can be
displayed.
Compatible with six color systems
NTSC, PAL, SECAM, NTSC4.432), PAL-
M, or PAL-N color system can be selected
automatically or manually.
......................................................................
Windows is a registered trademark of
Microsoft Corporation in the United States
and/or other countries.
VGA, SVGA, XGA, and SXGA are
registered trademarks of the International
Business Machines Corporation, U.S.A.
Macintosh is a registered trademark of
Apple Computer, Inc.
IBM PC/AT is a registered trademark of
International Business Machines
Corporation, U.S.A.
VESA is a registered trademark of Video
Electronics Standard Association.
Display Data Channel is a trademark of
Video Electronics Standard Association.
PC-98 is a trademark of NEC Corporation.
1)The supplied application software and the
USB hub function of this projector are
compatible with Windows 98 preinstall
model.
2)NTSC4.43 is the color system used when
playing back a video recorded on NTSC
on a NTSC4.43 system VCR.
Features
7 GB
VPL-CS1
4-074-278-11 (1)
�
C:\MUN\Data\FM\VPL-CS1\VPL-
CS1.nouhindata\407427811VPLCS1WW\02GB-
VPLCS1WW\03OVR.fm
masterpage:Left
Location and
Function of Controls
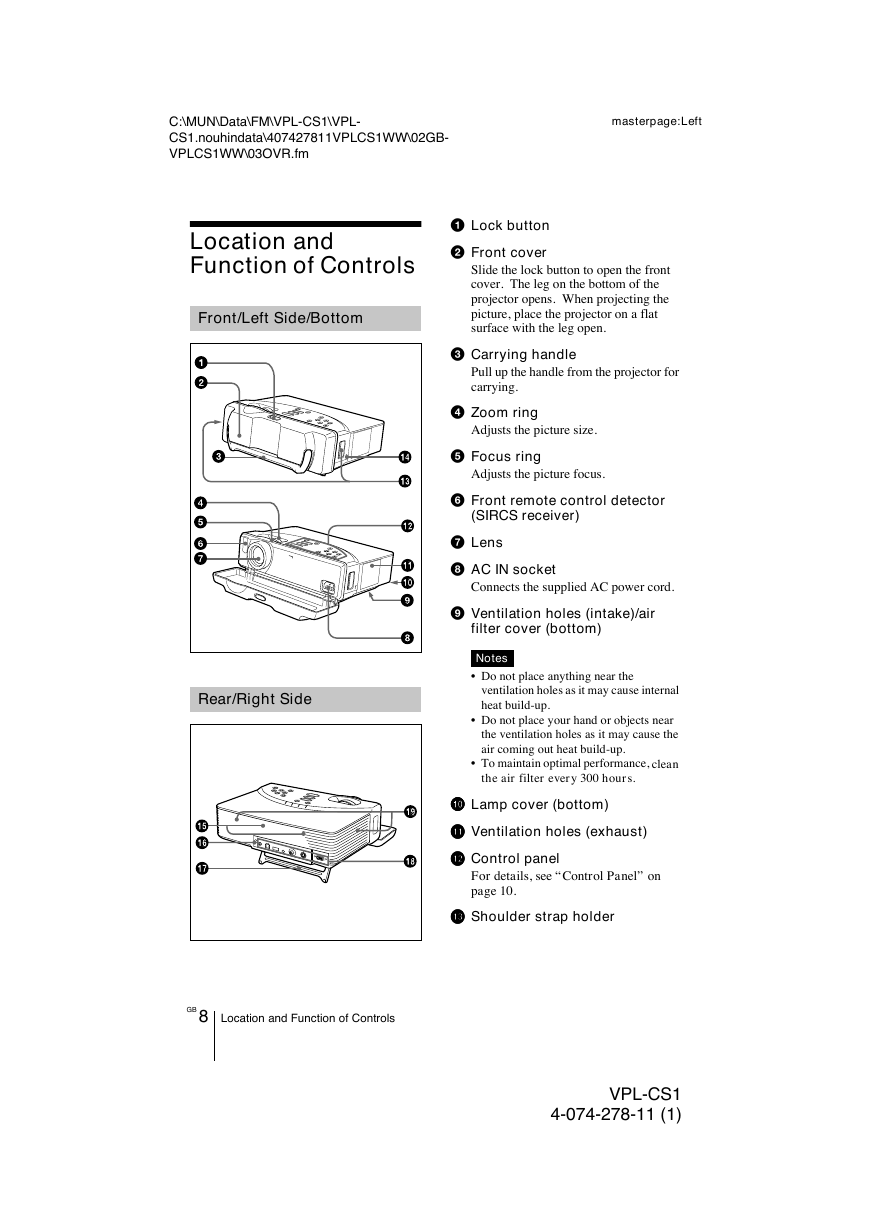
Front/Left Side/Bottom
Rear/Right Side
GB 8 Location and Function of Controls
1 Lock button
2 Front cover
Slide the lock button to open the front
cover. The leg on the bottom of the
projector opens. When projecting the
picture, place the projector on a flat
surface with the leg open.
3 Carrying handle
Pull up the handle from the projector for
carrying.
4 Zoom ring
Adjusts the picture size.
5 Focus ring
Adjusts the picture focus.
6 Front remote control detector
(SIRCS receiver)
7 Lens
8 AC IN socket
Connects the supplied AC power cord.
9 Ventilation holes (intake)/air
filter cover (bottom)
Notes
Do not place anything near the
ventilation holes as it may cause internal
heat build-up.
Do not place your hand or objects near
the ventilation holes as it may cause the
air coming out heat build-up.
To maintain optimal performance, clean
the air filter every 300 hours.
q;q;q;q; Lamp cover (bottom)
qaqaqaqa Ventilation holes (exhaust)
qsqsqsqs Control panel
For details, see “Control Panel” on
page 10.
qdqdqdqd Shoulder strap holder
VPL-CS1
4-074-278-11 (1)
�


 2023年江西萍乡中考道德与法治真题及答案.doc
 2012年重庆南川中考生物真题及答案.doc
 2013年江西师范大学地理学综合及文艺理论基础考研真题.doc
 2020年四川甘孜小升初语文真题及答案I卷.doc
 2020年注册岩土工程师专业基础考试真题及答案.doc
 2023-2024学年福建省厦门市九年级上学期数学月考试题及答案.doc
 2021-2022学年辽宁省沈阳市大东区九年级上学期语文期末试题及答案.doc
 2022-2023学年北京东城区初三第一学期物理期末试卷及答案.doc
 2018上半年江西教师资格初中地理学科知识与教学能力真题及答案.doc
 2012年河北国家公务员申论考试真题及答案-省级.doc
 2020-2021学年江苏省扬州市江都区邵樊片九年级上学期数学第一次质量检测试题及答案.doc
 2022下半年黑龙江教师资格证中学综合素质真题及答案.doc