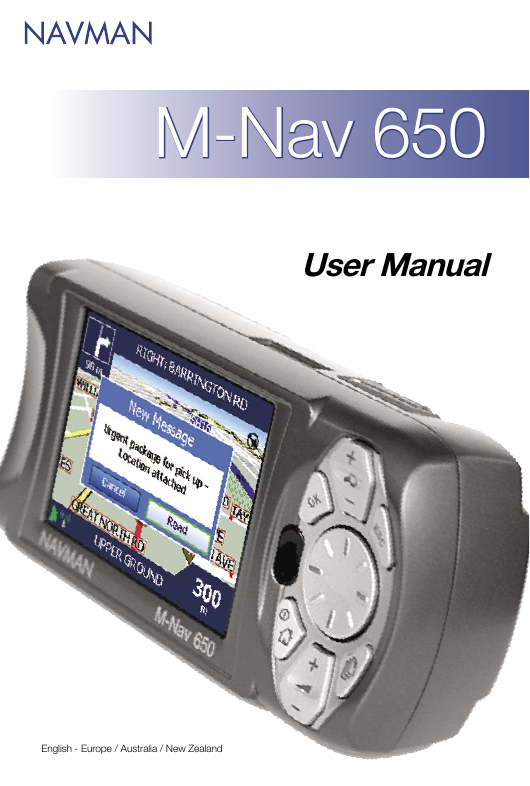
M-Nav 650
User Manual
English - Europe / Australia / New Zealand
�
2
NAVMAN
�
3
C
o
n
t
e
n
t
s
Contents
M-Nav 650 || User Manual
1
4.1 Main Menu Screen
4.2
To put the M-Nav in Standby Mode
5.1 GPS
5.2 Modem Signal Strength
The Message List
Safety Notice
Box Contents
2.1
2.2
Front Components
2.3 Back Components
3.1 M-Nav Suction-Mount
3.2 M-Nav Adhesive Tape and Screw-Mount
3.3 Panavise Screw-Mount
3.4
Inserting the M-Nav into the Clip
Introduction ____________________________________________________ 5
5
1.1 GPS and GPS Signals
5
1.2
2 M-Nav 650 Hardware ___________________________________________ 7
7
8
9
3 Positioning the M-Nav in a Vehicle ________________________________10
10
10
11
12
4 Getting Started ________________________________________________ 13
14
14
5 Modem Status ________________________________________________ 15
15
15
6 Messaging ____________________________________________________ 16
16
16
17
17
18
18
19
7 Setting Your Destination ________________________________________ 20
20
21
22
23
8 Setting Your Destination by Address _____________________________ 24
24
28
9 Setting Your Destination by POI _________________________________ 32
32
35
10 Using the 2D Map screen to Plan a Route ________________________ 38
11 Multi-stop Trips _______________________________________________ 39
39
44
49
49
6.1
6.2 Receiving Messages
6.3 Sending a Message
6.4 Reading Messages
6.5 Reading / Editing Sent Messages
6.6 Going to a Message Location
To navigate immediately to the message location:
11.1 Case Study 1: Europe and New Zealand
11.2 Case Study 2: Australia, Canada and USA
11.3 Skipping a Destination Point
11.4 Adding Message Locations to Multi-stop Trips
9.1 Case Study 1: Europe and New Zealand
9.2 Case Study 2: Australia, Canada and USA
7.1
7.2
7.3
7.4
Destination Screen
Keyboard Screen
Preview Screen
Address Search Rules
8.1 Case Study 1: Europe and New Zealand
8.2 Case Study 2: Australia, Canada and USA
�
4
NAVMAN
15.1 Select Departure Point
15.2 Select Destination Point
15.3 Activate Route Demonstrator
15.4 To Deactivate Route Demonstrator
16.1 Saving a Favourite
16.2 Saving a Favourite from the 2D Map Screen
16.3 Editing the Name of the Favourite
16.4 Deleting a Favourite
16.5 Navigating to a Favourite
16.6 Navigating to My Home
12.1 2D Map Screen
12.2 3D Map Screen
12.3 Message and Look Screen
12.4 Next Turn Screen
12.5 Next 4 Turns Screen
12.6 Back-On-Track™ Automatic Rerouting
12.7 Route Information Screen
12 Viewing your Route ____________________________________________ 50
50
51
51
52
52
53
53
13 The 2D Map Screen Pop-up Menu _______________________________ 55
14 Avoiding an Area ______________________________________________ 56
15 Route Demonstrator ___________________________________________ 57
57
57
57
58
16 Favourites and My Home _______________________________________ 59
59
60
61
62
63
63
17 Preferences ___________________________________________________ 64
64
64
64
66
67
67
68
68
69
69
70
71
72
72
73
74
Appendix A: Power Management ___________________________________ 75
75
75
75
Appendix B: Street Types __________________________________________ 76
Contacts ________________________________________________________ 79
17.1 Screen Brightness
17.2 Volume
17.3 Routing
17.4 Language
17.5 Maps
17.6 Alerts
17.7 My Data
17.8 More Preferences
Display
Internal Memory
Points of Interest (POIs)
Active POIs
Speed
GPS Status
Measurements
Startup
Powering Up from Off
Powering Up from Standby
Powering Down from On
�
M-Nav 650 || User Manual
5
1
.
I
n
t
r
o
d
u
c
t
i
o
n
1
Introduction
Thank you for purchasing this Navman M-Nav 650. We hope you enjoy your new GPS messaging and
navigation system.
Whether your fleet operates in your own city, across a country or a continent, the M-Nav will direct your
fleet operators to their destination without the need for map books or second hand directions. With
destinations provided from the OnlineAVL client by the Fleet Manager you can rest assured that your
fleet operators are taking the fastest route to the correct destination all the time, every time.
The Global Positioning System (GPS) is available free of charge, at any time, and is usually accurate to
within 5 m (15 ft). Your M-Nav map provides street-level detail for door-to-door navigation, including
Points of Interest (POIs) such as accommodation, petrol stations, railway stations and airports.
Navman welcomes your feedback. To contact us or visit our website, see Support Information in the
Contacts section.
1.1
GPS and GPS Signals
The GPS is a network of satellites that transmit accurate time and position information worldwide. GPS
receivers receive signals from these satellites and use the information to determine an exact location.
Satellites orbit the earth at around 12,000 miles. While a GPS receiver can detect signals from up to
12 satellites at any time, only three signals are needed to provide a position or “GPS fix” (latitude and
longitude) for vehicle navigation systems.
The GPS receiver, such as the Navman Halo or Qube, receives GPS signals. To receive GPS signals,
ensure that the the receiver is outdoors, or in a vehicle outdoors, and the GPS antenna has an
unobstructed view of the sky.
For more information about GPS and your M-Nav, see Section 5.
1.2
Safety Notice
WARNING: In a vehicle, it is your sole responsibility to place, secure and use the M-Nav in a manner
that will not cause accidents, personal injury or property damage. The user of this product is solely
responsible for observing safe driving practices and for all use of this device. It is your responsibility to
read and follow the vehicle mount installation instructions and to use the product consistent with your
government’s laws/regulations. Consult the vehicle manual to ensure the mounting location is safe.
It is your sole responsibility to adhere to the following safety instructions at all times:
• Do not operate the M-Nav while driving or place the M-Nav
in a position that obstructs the driver’s view.
• Do not mount the M-Nav in a way that may be distracting or interfere with the safe
operation of the vehicle, the deployment of airbags or other safety equipment.
• Do not leave the M-Nav in view while your vehicle is unattended,
especially in strong or direct sunlight.
• Do not use or handle the M-Nav when it is hot; leave it to cool, out of direct sunlight.
This device does not have the functionality to determine routes based on the height, weight, length
or Hazmat classification of the vehicle in which the device is installed. Accordingly it is your sole
responsibility for ensuring that your vehicle is legally and physically able to travel over routes that may
include narrow, twisting or steep roads, weak, narrow or low bridges, tunnels or other obstacles on the
routes determined by this device.
Failure to adhere to these instructions may lead to serious personal injury, including death, or property
damage. Navman disclaims all liability for use of the M-Nav that contributes to injuries, death, property
damage or violates law.
�
6
NAVMAN
�
M-Nav 650 || User Manual
7
2
.
M
-
N
a
v
6
5
0
H
a
r
d
w
a
r
e
2 M-Nav 650 Hardware
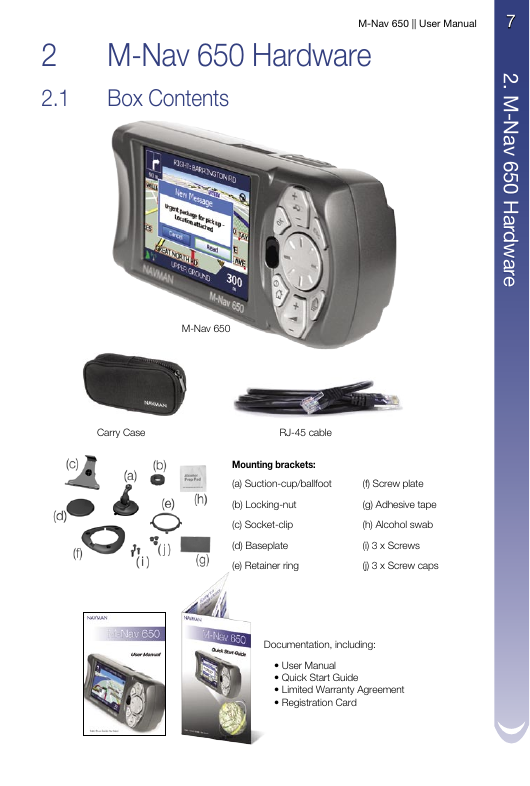
2.1
Box Contents
M-Nav 650
Carry Case
RJ-45 cable
Mounting brackets:
(a) Suction-cup/ballfoot
(f) Screw plate
(b) Locking-nut
(c) Socket-clip
(d) Baseplate
(e) Retainer ring
(g) Adhesive tape
(h) Alcohol swab
(i) 3 x Screws
(j) 3 x Screw caps
Documentation, including:
• User Manual
• Quick Start Guide
• Limited Warranty Agreement
• Registration Card
�
8
NAVMAN
2.2
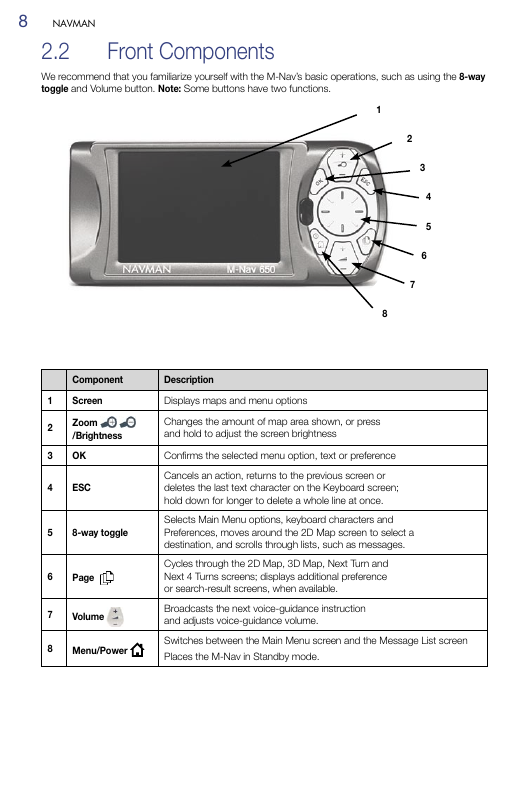
Front Components
We recommend that you familiarize yourself with the M-Nav’s basic operations, such as using the 8-way
toggle and Volume button. Note: Some buttons have two functions.
1
8
2
7
3
4
5
6
Component
Description
Screen
Zoom
/Brightness
OK
ESC
8-way toggle
Page
Volume
Displays maps and menu options
Changes the amount of map area shown, or press
and hold to adjust the screen brightness
Confirms the selected menu option, text or preference
Cancels an action, returns to the previous screen or
deletes the last text character on the Keyboard screen;
hold down for longer to delete a whole line at once.
Selects Main Menu options, keyboard characters and
Preferences, moves around the 2D Map screen to select a
destination, and scrolls through lists, such as messages.
Cycles through the 2D Map, 3D Map, Next Turn and
Next 4 Turns screens; displays additional preference
or search-result screens, when available.
Broadcasts the next voice-guidance instruction
and adjusts voice-guidance volume.
Menu/Power
Switches between the Main Menu screen and the Message List screen
Places the M-Nav in Standby mode.
1
2
3
4
5
6
7
8
�




 2023年江西萍乡中考道德与法治真题及答案.doc
 2012年重庆南川中考生物真题及答案.doc
 2013年江西师范大学地理学综合及文艺理论基础考研真题.doc
 2020年四川甘孜小升初语文真题及答案I卷.doc
 2020年注册岩土工程师专业基础考试真题及答案.doc
 2023-2024学年福建省厦门市九年级上学期数学月考试题及答案.doc
 2021-2022学年辽宁省沈阳市大东区九年级上学期语文期末试题及答案.doc
 2022-2023学年北京东城区初三第一学期物理期末试卷及答案.doc
 2018上半年江西教师资格初中地理学科知识与教学能力真题及答案.doc
 2012年河北国家公务员申论考试真题及答案-省级.doc
 2020-2021学年江苏省扬州市江都区邵樊片九年级上学期数学第一次质量检测试题及答案.doc
 2022下半年黑龙江教师资格证中学综合素质真题及答案.doc