English Edition
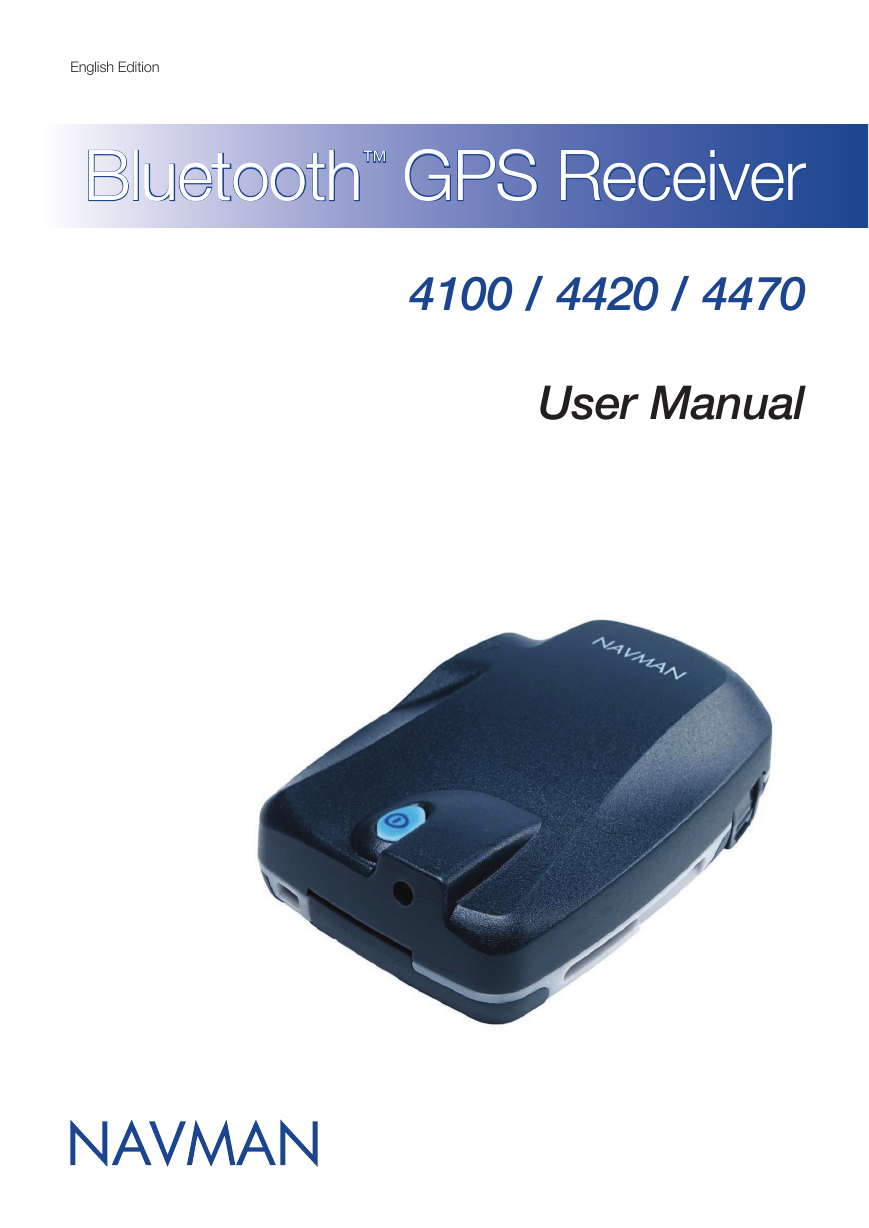
Bluetooth™ GPS Receiver
4100 / 4420 / 4470
User Manual
�
Bluetooth GPS Receiver | User Manual
Contents
1.
Introduction ................................................................................ 3
2. Bluetooth GPS Receiver Features .............................................. 4
3. Connecting the Bluetooth GPS Receiver to your PDA ............... 6
4. Positioning the Bluetooth GPS Receiver in a Vehicle ................. 7
5 Batteries ................................................................................... 10
6 Optional Accessories ............................................................... 11
7. Support Information ................................................................. 13
2
�
Bluetooth GPS Receiver | User Manual
1. Introduction
Whether you travel in your own country, or overseas, the Bluetooth™ GPS Receiver will provide you with a Global
Positioning System (GPS) based location accurate to within 5 m (15 ft) for 95% of the time.
The Bluetooth GPS Receiver contains:
• A GPS antenna to receive signals from the GPS satellites,
• An internal microcomputer to calculate the position of the receiver on Earth, and
• A Bluetooth link to send the GPS position to your PDA within a radius of less than 10 m (33 ft).
When using in a vehicle, the Bluetooth GPS Receiver can be mounted on your dash or back window in a position where
it has a clear view of the sky and can receive GPS signals easily.
GPS and GPS Signals
The Global Positioning System (GPS) is a network of satellites that transmit accurate time and position information
worldwide. GPS receivers receive signals from these satellites, and use the information to determine their exact location.
GPS satellites orbit the Earth at around 12,000 miles. While a GPS receiver can detect signals from up to 12 satellites
at any time, only three are needed to provide a two-dimensional position or “fix” (latitude and longitude) required for
vehicle navigation systems. GPS data is available free of charge for any user.
The Bluetooth GPS Receiver will send the GPS position information to your PDA which may then be used by your
third-party software to plot your position on a map and direct you to your destination.
Safety Notice
In a vehicle, it is your sole responsibility to place, secure and use the Bluetooth GPS Receiver in a manner that
will not cause accidents, personal injury or property damage. It is your sole responsibility to observe safe driving
practices and to ensure that the vehicle mount installation instructions are read carefully, understood and used
consistently with the laws of operation for each country in which the device is used.
It is your sole responsibility to adhere to the following safety instructions at all times:
• Do not operate the Bluetooth GPS Receiver while driving or place the receiver in a position that obstructs the
driver’s view
• Do not mount in a way that interferes with airbags or other safety equipment
• Do not leave in view while your vehicle is unattended, especially in strong sunlight
• Do not use or handle the Bluetooth GPS Receiver when it is hot, leave it to cool out of direct sunlight.
Navman disclaim all liability for use of this product in a way that may cause accidents, damage or that may violate
law.
3
�
Bluetooth GPS Receiver | User Manual
2. Bluetooth GPS Receiver Features
It is recommended that you familiarise yourself with the basic operations of your Bluetooth GPS Receiver:
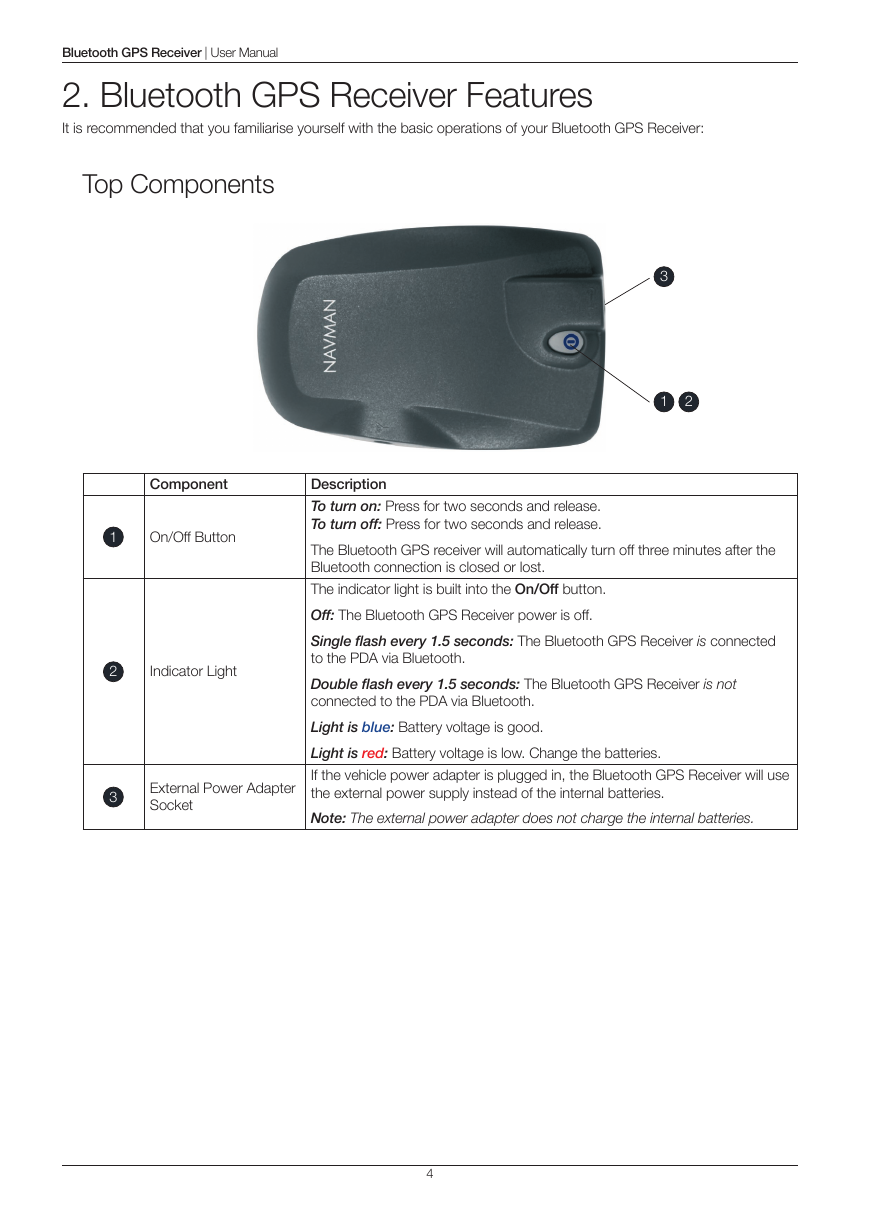
Top Components
3
1
2
Component
1
On/Off Button
2
Indicator Light
3
External Power Adapter
Socket
Description
To turn on: Press for two seconds and release.
To turn off: Press for two seconds and release.
The Bluetooth GPS receiver will automatically turn off three minutes after the
Bluetooth connection is closed or lost.
The indicator light is built into the On/Off button.
Off: The Bluetooth GPS Receiver power is off.
Single flash every 1.5 seconds: The Bluetooth GPS Receiver is connected
to the PDA via Bluetooth.
Double flash every 1.5 seconds: The Bluetooth GPS Receiver is not
connected to the PDA via Bluetooth.
Light is blue: Battery voltage is good.
Light is red: Battery voltage is low. Change the batteries.
If the vehicle power adapter is plugged in, the Bluetooth GPS Receiver will use
the external power supply instead of the internal batteries.
Note: The external power adapter does not charge the internal batteries.
4
�
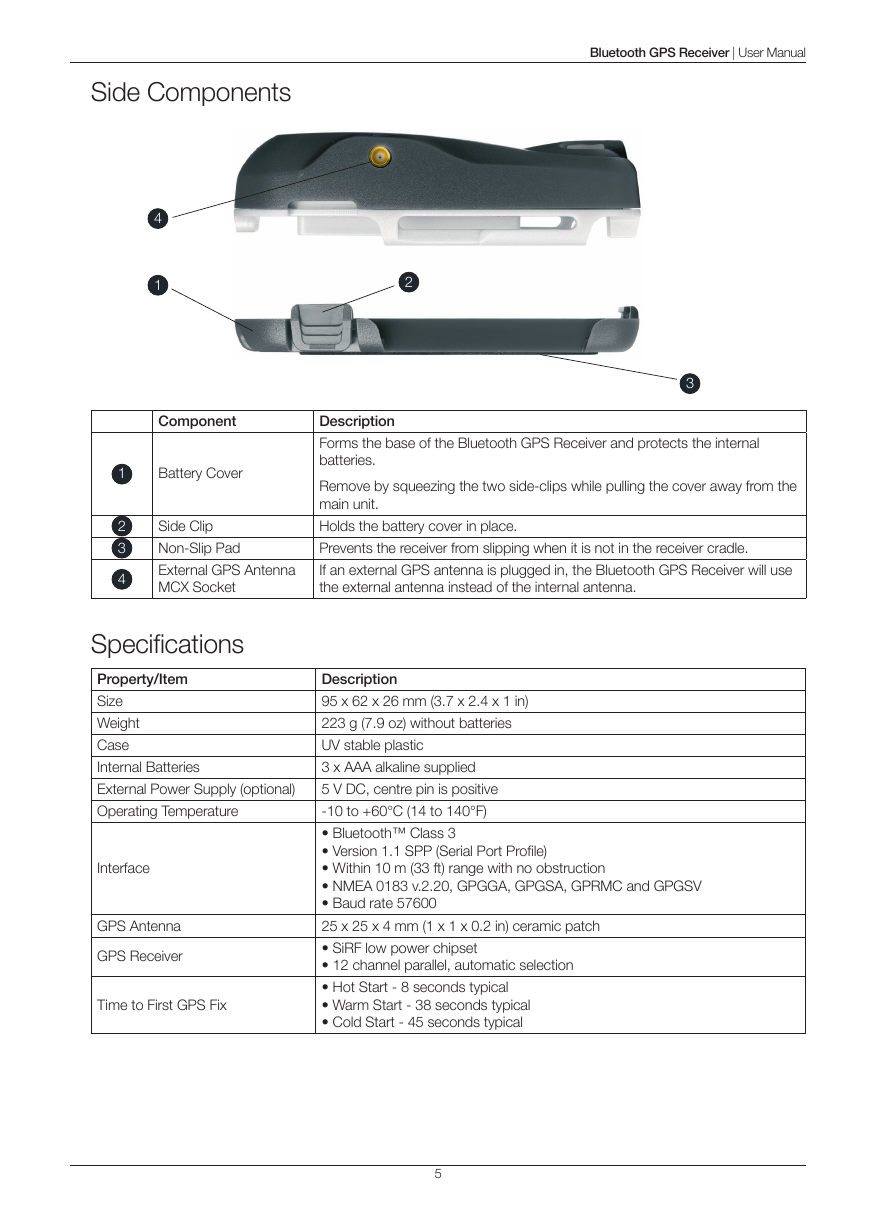
Side Components
Bluetooth GPS Receiver | User Manual
4
1
2
3
Component
Battery Cover
Side Clip
Non-Slip Pad
External GPS Antenna
MCX Socket
Description
Forms the base of the Bluetooth GPS Receiver and protects the internal
batteries.
Remove by squeezing the two side-clips while pulling the cover away from the
main unit.
Holds the battery cover in place.
Prevents the receiver from slipping when it is not in the receiver cradle.
If an external GPS antenna is plugged in, the Bluetooth GPS Receiver will use
the external antenna instead of the internal antenna.
1
2
3
4
Specifications
Property/Item
Size
Weight
Case
Internal Batteries
External Power Supply (optional)
Operating Temperature
Interface
GPS Antenna
GPS Receiver
Time to First GPS Fix
Description
95 x 62 x 26 mm (3.7 x 2.4 x 1 in)
223 g (7.9 oz) without batteries
UV stable plastic
3 x AAA alkaline supplied
5 V DC, centre pin is positive
-10 to +60°C (14 to 140°F)
• Bluetooth™ Class 3
• Version 1.1 SPP (Serial Port Profile)
• Within 10 m (33 ft) range with no obstruction
• NMEA 0183 v.2.20, GPGGA, GPGSA, GPRMC and GPGSV
• Baud rate 57600
25 x 25 x 4 mm (1 x 1 x 0.2 in) ceramic patch
• SiRF low power chipset
• 12 channel parallel, automatic selection
• Hot Start - 8 seconds typical
• Warm Start - 38 seconds typical
• Cold Start - 45 seconds typical
5
�
Bluetooth GPS Receiver | User Manual
3. Connecting the Bluetooth GPS Receiver
to your PDA
To establish a Bluetooth connection between your PDA and the Bluetooth GPS Receiver, complete the following steps:
1. Turn on the Bluetooth GPS Receiver.
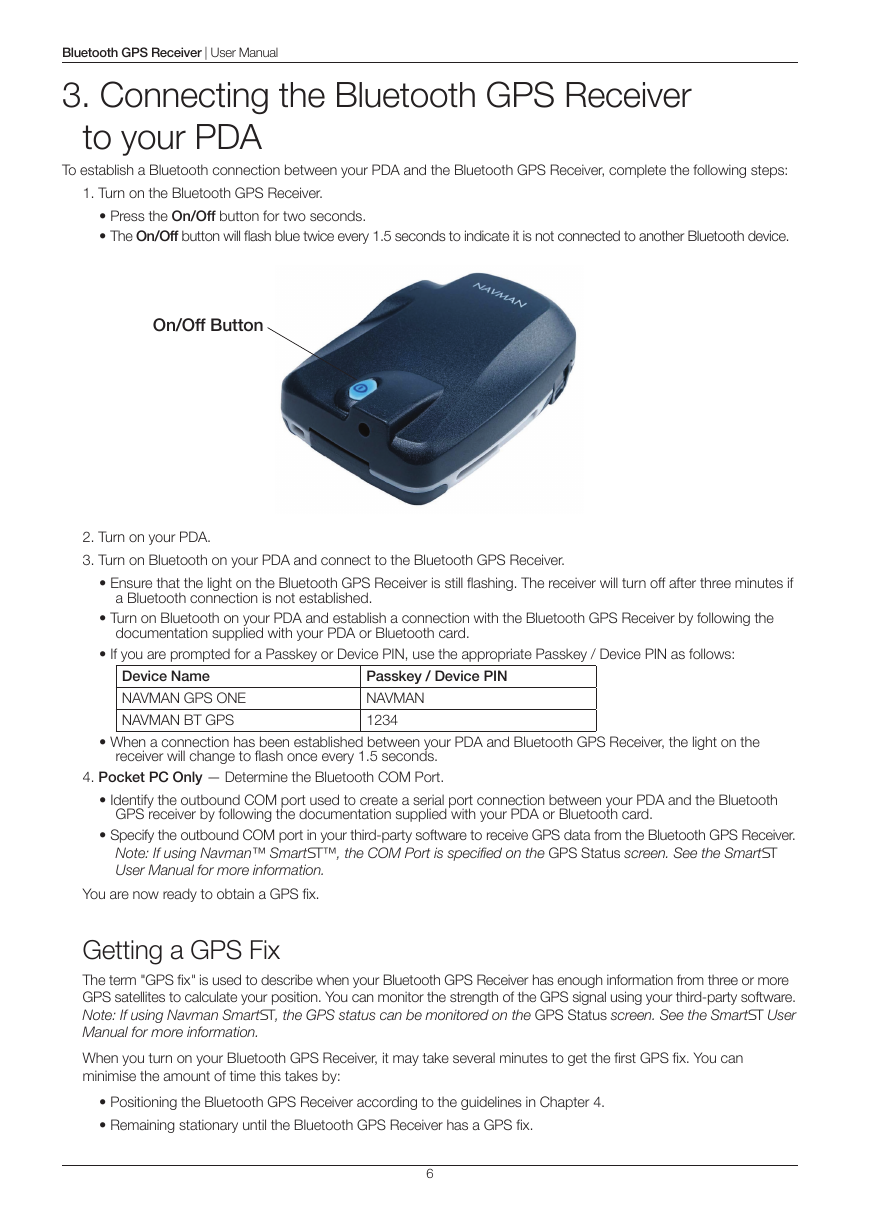
• Press the On/Off button for two seconds.
• The On/Off button will flash blue twice every 1.5 seconds to indicate it is not connected to another Bluetooth device.
On/Off Button
2. Turn on your PDA.
3. Turn on Bluetooth on your PDA and connect to the Bluetooth GPS Receiver.
• Ensure that the light on the Bluetooth GPS Receiver is still flashing. The receiver will turn off after three minutes if
a Bluetooth connection is not established.
• Turn on Bluetooth on your PDA and establish a connection with the Bluetooth GPS Receiver by following the
documentation supplied with your PDA or Bluetooth card.
• If you are prompted for a Passkey or Device PIN, use the appropriate Passkey / Device PIN as follows:
Device Name
NAVMAN GPS ONE
NAVMAN BT GPS
Passkey / Device PIN
NAVMAN
1234
• When a connection has been established between your PDA and Bluetooth GPS Receiver, the light on the
receiver will change to flash once every 1.5 seconds.
4. Pocket PC Only — Determine the Bluetooth COM Port.
• Identify the outbound COM port used to create a serial port connection between your PDA and the Bluetooth
GPS receiver by following the documentation supplied with your PDA or Bluetooth card.
• Specify the outbound COM port in your third-party software to receive GPS data from the Bluetooth GPS Receiver.
Note: If using Navman™ Smart™, the COM Port is specified on the GPS Status screen. See the Smart
User Manual for more information.
You are now ready to obtain a GPS fix.
Getting a GPS Fix
The term "GPS fix" is used to describe when your Bluetooth GPS Receiver has enough information from three or more
GPS satellites to calculate your position. You can monitor the strength of the GPS signal using your third-party software.
Note: If using Navman Smart, the GPS status can be monitored on the GPS Status screen. See the Smart User
Manual for more information.
When you turn on your Bluetooth GPS Receiver, it may take several minutes to get the first GPS fix. You can
minimise the amount of time this takes by:
• Positioning the Bluetooth GPS Receiver according to the guidelines in Chapter 4.
• Remaining stationary until the Bluetooth GPS Receiver has a GPS fix.
6
�
Bluetooth GPS Receiver | User Manual
4. Positioning the Bluetooth GPS Receiver
in a Vehicle
Use the following guides to choose a suitable position for the Bluetooth GPS Receiver:
• The receiver must have a good view of the sky and horizon.
• The receiver must not obstruct your view, or interfere with the operation of the vehicle or the vehicle safety equipment.
• The receiver must be accessible so that you can operate the On/Off button and replace the batteries.
• Avoid placing the receiver near sources of electrical interference or noise.
• Avoid locations subjected to excessive shock or vibration.
• The receiver must be within 10 m (33 ft) of your PDA.
• The receiver is not waterproof — mount it where it will not get wet (including condensation).
Note: If your vehicle is fitted with an athermic (heat reflecting) or a heated windscreen, you may need to purchase a
Navman external antenna to allow your Bluetooth GPS Receiver to receive GPS signals inside the vehicle. See page 11.
The Bluetooth GPS Receiver and your PDA are mounted separately in your vehicle. Follow these instructions carefully to
ensure proper installation. For security purposes and to avoid overheating, do not leave the Bluetooth GPS Receiver or
your PDA on the dash or attached to the windscreen while your vehicle is unattended, especially in strong sunlight.
Positioning your Receiver
Option One: Windscreen Suction Mount
You can position the Bluetooth GPS Receiver on the inside of your vehicle windscreen or back window using the
receiver windscreen suction mount and receiver cradle:
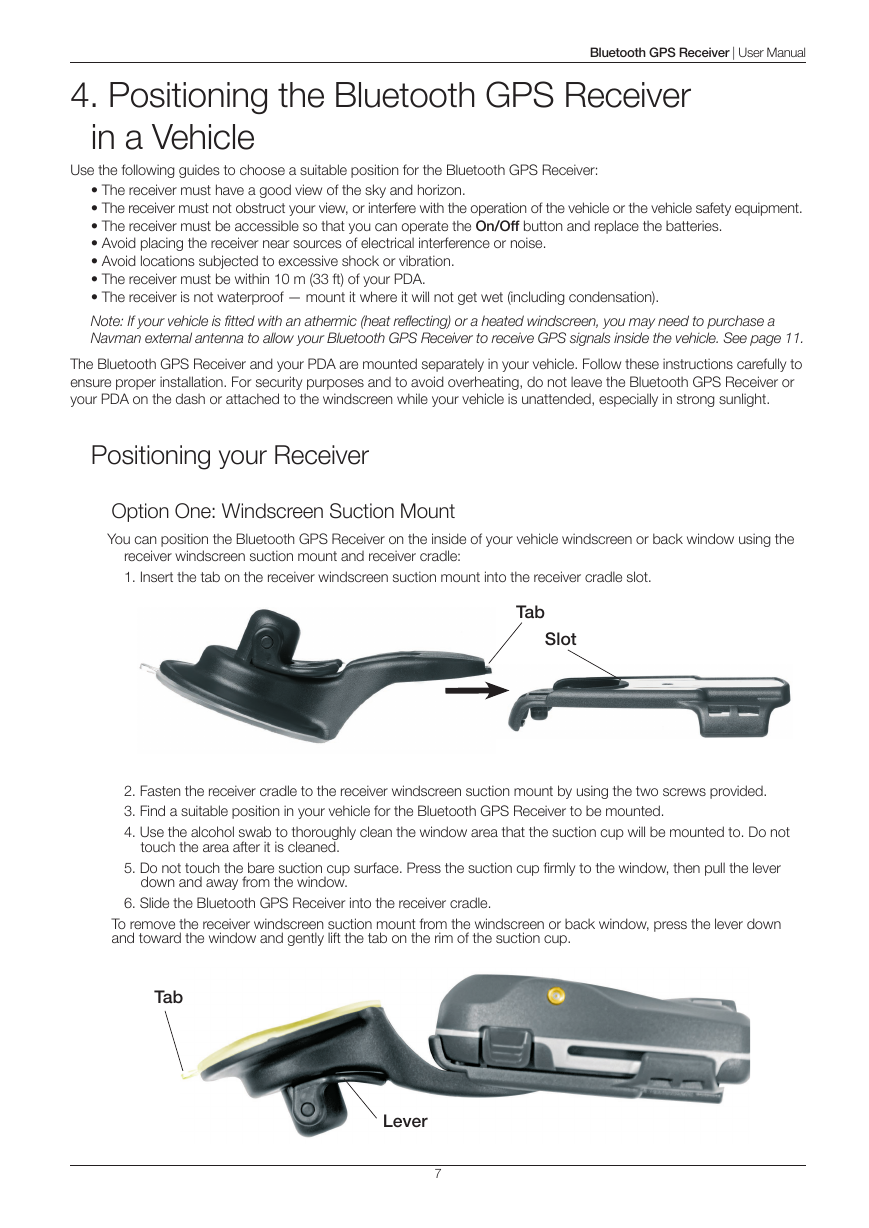
1. Insert the tab on the receiver windscreen suction mount into the receiver cradle slot.
Tab
Slot
2. Fasten the receiver cradle to the receiver windscreen suction mount by using the two screws provided.
3. Find a suitable position in your vehicle for the Bluetooth GPS Receiver to be mounted.
4. Use the alcohol swab to thoroughly clean the window area that the suction cup will be mounted to. Do not
touch the area after it is cleaned.
5. Do not touch the bare suction cup surface. Press the suction cup firmly to the window, then pull the lever
down and away from the window.
6. Slide the Bluetooth GPS Receiver into the receiver cradle.
To remove the receiver windscreen suction mount from the windscreen or back window, press the lever down
and toward the window and gently lift the tab on the rim of the suction cup.
Tab
Lever
7
�
Bluetooth GPS Receiver | User Manual
Option Two: Mounting Pad on Dashboard (Permanent)
You can attach the Bluetooth GPS Receiver to the dashboard using the receiver cradle and mounting pad:
Warning: This is a permanent solution – the mounting pad cannot be removed once fixed and will mark the
dashboard if forcibly removed.
1. Remove one of the backing layers from the receiver mounting pad.
2. Attach the sticky side of the mounting pad to the under-side of the receiver cradle.
3. Find a suitable position in your vehicle for the Bluetooth GPS Receiver to be mounted.
4. Use the alcohol swab to thoroughly clean the area of the dashboard that the cradle will be mounted to. Do
not touch the area after it is cleaned.
5. Remove the second backing layer from the mounting pad.
6. Press the cradle firmly to the dashboard for 30 seconds.
7. Slide the Bluetooth GPS Receiver into the receiver cradle.
Positioning your PDA
Option One: Windscreen Suction Mount
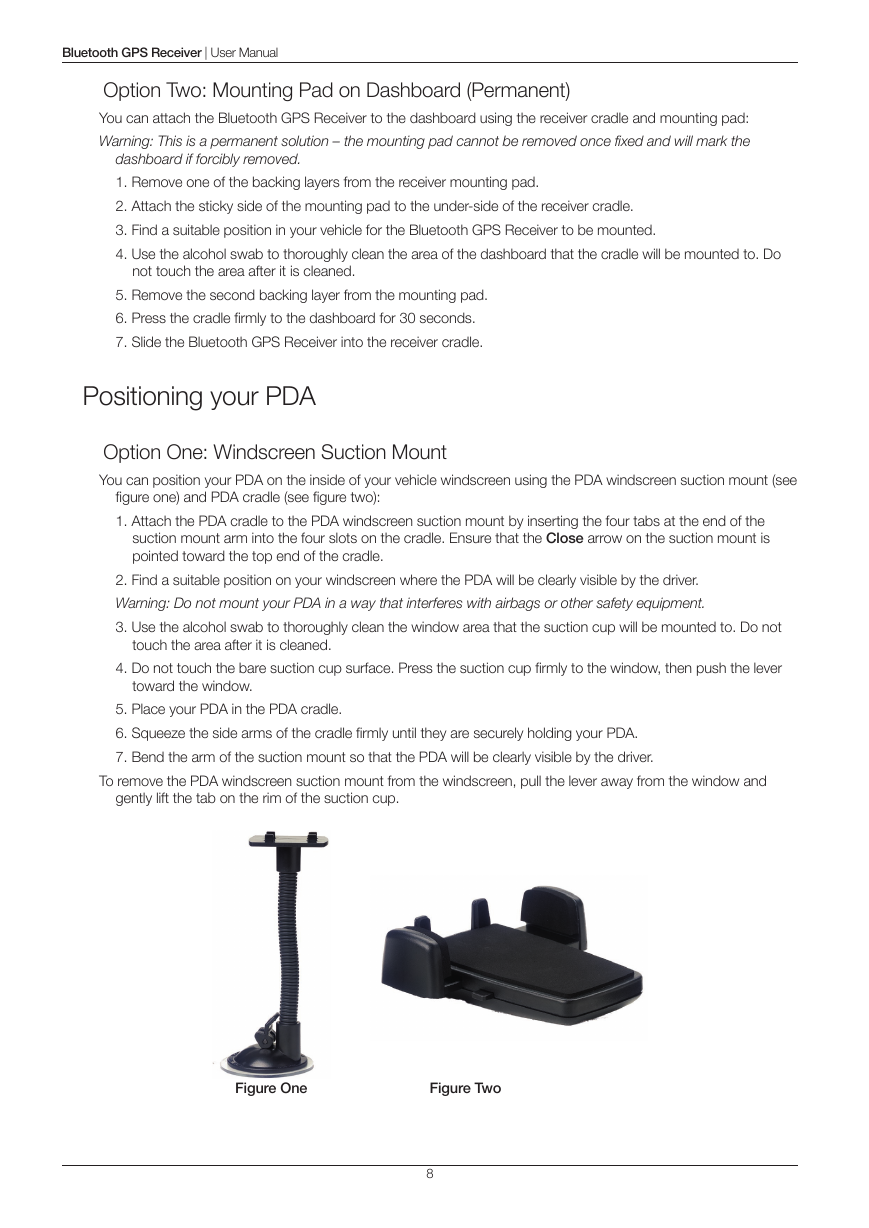
You can position your PDA on the inside of your vehicle windscreen using the PDA windscreen suction mount (see
figure one) and PDA cradle (see figure two):
1. Attach the PDA cradle to the PDA windscreen suction mount by inserting the four tabs at the end of the
suction mount arm into the four slots on the cradle. Ensure that the Close arrow on the suction mount is
pointed toward the top end of the cradle.
2. Find a suitable position on your windscreen where the PDA will be clearly visible by the driver.
Warning: Do not mount your PDA in a way that interferes with airbags or other safety equipment.
3. Use the alcohol swab to thoroughly clean the window area that the suction cup will be mounted to. Do not
touch the area after it is cleaned.
4. Do not touch the bare suction cup surface. Press the suction cup firmly to the window, then push the lever
toward the window.
5. Place your PDA in the PDA cradle.
6. Squeeze the side arms of the cradle firmly until they are securely holding your PDA.
7. Bend the arm of the suction mount so that the PDA will be clearly visible by the driver.
To remove the PDA windscreen suction mount from the windscreen, pull the lever away from the window and
gently lift the tab on the rim of the suction cup.
Figure One
Figure Two
8
�


 2023年江西萍乡中考道德与法治真题及答案.doc
 2012年重庆南川中考生物真题及答案.doc
 2013年江西师范大学地理学综合及文艺理论基础考研真题.doc
 2020年四川甘孜小升初语文真题及答案I卷.doc
 2020年注册岩土工程师专业基础考试真题及答案.doc
 2023-2024学年福建省厦门市九年级上学期数学月考试题及答案.doc
 2021-2022学年辽宁省沈阳市大东区九年级上学期语文期末试题及答案.doc
 2022-2023学年北京东城区初三第一学期物理期末试卷及答案.doc
 2018上半年江西教师资格初中地理学科知识与教学能力真题及答案.doc
 2012年河北国家公务员申论考试真题及答案-省级.doc
 2020-2021学年江苏省扬州市江都区邵樊片九年级上学期数学第一次质量检测试题及答案.doc
 2022下半年黑龙江教师资格证中学综合素质真题及答案.doc