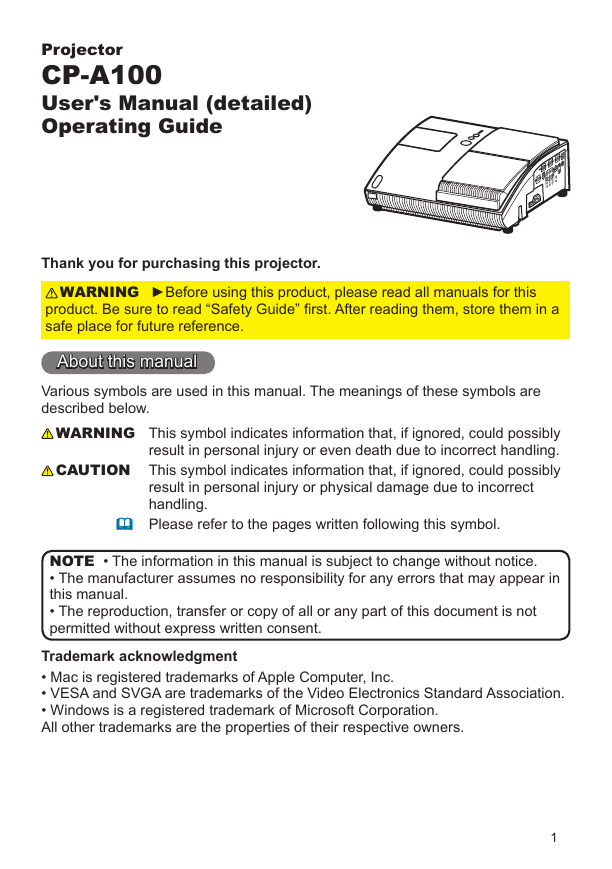
Projector
CP-A100
User's Manual (detailed)
Operating Guide
Thank you for purchasing this projector.
WARNING
►Before using this product, please read all manuals for this
product. Be sure to read “Safety Guide” first. After reading them, store them in a
safe place for future reference.
About this manual
Various symbols are used in this manual. The meanings of these symbols are
described below.
WARNING
CAUTION
This symbol indicates information that, if ignored, could possibly
result in personal injury or even death due to incorrect handling.
This symbol indicates information that, if ignored, could possibly
result in personal injury or physical damage due to incorrect
handling.
Please refer to the pages written following this symbol.
• The information in this manual is subject to change without notice.
NOTE
• The manufacturer assumes no responsibility for any errors that may appear in
this manual.
• The reproduction, transfer or copy of all or any part of this document is not
permitted without express written consent.
Trademark acknowledgment
• Mac is registered trademarks of Apple Computer, Inc.
• VESA and SVGA are trademarks of the Video Electronics Standard Association.
• Windows is a registered trademark of Microsoft Corporation.
All other trademarks are the properties of their respective owners.
�
�
Contents
Contents
About this manual . . . . . . . . . . . 1
Contents . . . . . . . . . . . . . . . . . . 2
Projector features . . . . . . . . . . . 3
Preparations . . . . . . . . . . . . . . . 3
Contents of package . . . . . . . . . . . . . 3
Part names . . . . . . . . . . . . . . . . 4
Projector . . . . . . . . . . . . . . . . . . . . . . 4
Control buttons . . . . . . . . . . . . . . . . . 5
Ports . . . . . . . . . . . . . . . . . . . . . . . . . 5
Remote control . . . . . . . . . . . . . . . . . 6
Setting up . . . . . . . . . . . . . . . . . 7
Arrangement . . . . . . . . . . . . . . . . . . . 7
Connecting with your devices . . . . . �0
Connecting with a power supply . . . ��
Using the security bar and slot . . . . �3
Using the cable cover . . . . . . . . . . . �3
Remote control . . . . . . . . . . . . 14
Preparing for the remote control . . . �4
Changing the frequency of remote control signal . �5
Using as a simple PC mouse & keyboard . �5
Power on/off . . . . . . . . . . . . . . 16
Turning on the power . . . . . . . . . . . �6
Turn off the power . . . . . . . . . . . . . . �7
Operating . . . . . . . . . . . . . . . . 18
Adjusting the volume . . . . . . . . . . . . �8
Temporarily muting the sound . . . . . �8
Selecting an input signal . . . . . . . . . �8
Searching an input signal . . . . . . . . �9
Selecting an aspect ratio . . . . . . . . . �9
Adjusting the projection position . . . �0
Adjusting the zoom . . . . . . . . . . . . . �0
Adjusting the picture position . . . . . �0
Adjusting the focus . . . . . . . . . . . . . ��
Using the automatic adjustment feature . ��
Correcting the keystone distortions . ��
Using the magnify feature . . . . . . . . ��
Freezing the screen . . . . . . . . . . . . �3
Temporarily blanking the screen . . . �3
Using the menu function . . . . . . . . . �4
EASY MENU . . . . . . . . . . . . . . . 26
Aspect, D-zoom, Keystone
picture moDe, Brightness, contrAst,
color, tint, shArpness, Whisper,
mirror, reset, Filter time,
lAnguAge, Go to Advanced Menu...
,
�
Brightness, contrAst, gAmmA,
color temp, color, tint,
shArpness, my memory
IMAGE Menu . . . . . . . . . . . . . . 31
Aspect, over scAn, v position,
h position, h phAse, h size,
Auto ADjust execute
INPUT Menu . . . . . . . . . . . . . . 33
progressive, viDeo nr, color spAce,
component, viDeo FormAt, FrAme locK,
computer in, resolution
SETUP Menu . . . . . . . . . . . . . . 36
PICTURE Menu . . . . . . . . . . . . 28
D-zoom, D-shiFt v, D-shiFt h,
Keystone
volume, speAKer, AuDio
, Whisper, mirror,
SCREEN Menu . . . . . . . . . . . . . 38
lAnguAge, menu position, BlAnK,
stArt up, MyScreen, MyScreen Lock,
messAge, source nAme
OPTION Menu . . . . . . . . . . . . . 42
Auto seArch, Auto on, Auto oFF,
lAmp time, Filter time, my Button,
service, security
NETWORK Menu . . . . . . . . . . . 55
setup, projector nAme, e-shot,
inFormAtion, service
C .C . (Closed Caption) Menu . . 60
DisplAy, moDe, chAnnel
Maintenance . . . . . . . . . . . . . . 61
Replacing the lamp . . . . . . . . . . . . . 6�
Maintaining the air-filter . . . . . . . . . . 63
Replacing the clock battery . . . . . . . 65
Caring for the mirror and lens . . . . . 66
Other care . . . . . . . . . . . . . . . . . . . . 67
Troubleshooting . . . . . . . . . . . 68
Related messages . . . . . . . . . . . . . 68
Regarding the indicator lamps . . . . 69
Shutting the projector down . . . . . . 70
Resetting all settings . . . . . . . . . . . . 70
Phenomena that may be easy
to be mistaken for machine defects . . 7�
Specifications . . . . . . . . . . . . . 74
�
Projector features / Preparations
Projector features
This product realizes the large projection image of various image signals, even if
in a small space. This product can offer you convenience and various uses by the
following features.
ü The unique lens and mirror system realizes ultra short distance projection,
which gives you more various way of use.
ü The motorized lens door offers you very simple use of the projector.
ü This projector can be controlled and monitored via LAN connection.
Preparations
Contents of package
Please see the “Checking the contents” section in the User’s Manual (concise)
which is a book. Your projector should come with the items shown there. Contact
immediately your dealer if anything is missing.
NOTE
• Keep the original packing materials, for future reshipment. Be sure
to use the original packing materials when moving the projector. Use special
caution for the lens.
3
�
Part names
Part names
Projector
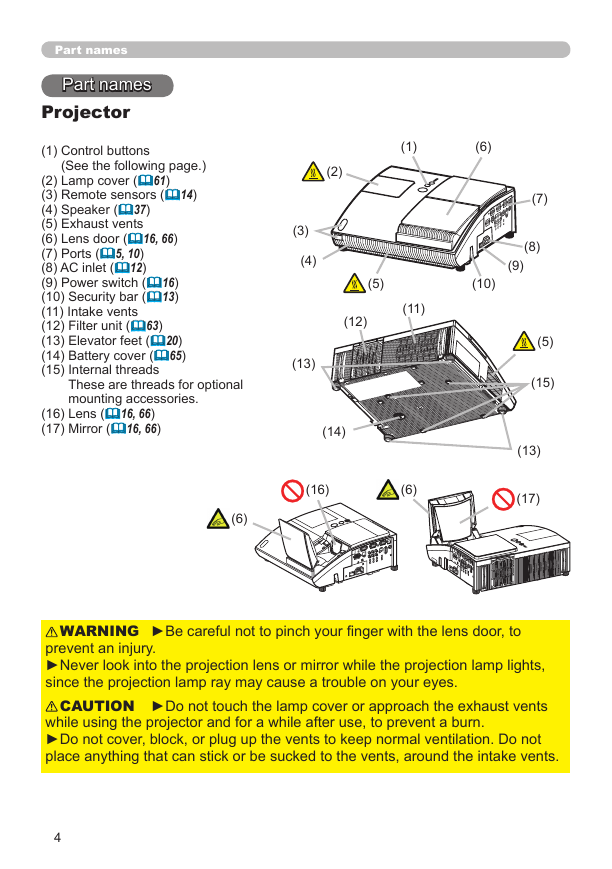
(1) Control buttons
(See the following page.)
(2) Lamp cover (61)
(3) Remote sensors (14)
(4) Speaker (37)
(5) Exhaust vents
(6) Lens door (16, 66)
(7) Ports (5, 10)
(8) AC inlet (12)
(9) Power switch (16)
(10) Security bar (13)
(11) Intake vents
(12) Filter unit (63)
(13) Elevator feet (20)
(14) Battery cover (65)
(15) Internal threads
These are threads for optional
mounting accessories.
(16) Lens (16, 66)
(17) Mirror (16, 66)
(14)
(16)
(6)
(6)
(1)
(6)
(2)
(5)
(12)
(11)
(10)
(3)
(4)
(13)
(7)
(8)
(9)
(5)
(15)
(13)
(17)
WARNING
►Be careful not to pinch your finger with the lens door, to
prevent an injury.
►Never look into the projection lens or mirror while the projection lamp lights,
since the projection lamp ray may cause a trouble on your eyes.
CAUTION
►Do not touch the lamp cover or approach the exhaust vents
while using the projector and for a while after use, to prevent a burn.
►Do not cover, block, or plug up the vents to keep normal ventilation. Do not
place anything that can stick or be sucked to the vents, around the intake vents.
4
�
Control buttons
(1) LAMP indicator (69)
(2) TEMP indicator (69)
(3) POWER indicator (16, 17, 69)
(4) STANDBY/ON button (16, 17)
(5) INPUT button (18)
(6) FOCUS +/- buttons
when no menu is displayed (21), or
Cursor ◄, ► buttons
when a menu is displayed (24).
(7) MENU buttons
when no menu is displayed (24), or
Cursor ▲, ▼ buttons
when a menu is displayed (24).
Ports (10, Technical's 3 to 6)
(1) Shutdown switch
(2) MONITOR OUT port
(3) Y, CB/PB, CR/PR
(Component video) ports
(4) COMPUTER IN2 port
(5) COMPUTER IN1 port
(6) LAN port
(7) CONTROL port
Part names
(1)
(2)
(3)
LAMP
TEMP
POWER
STANDBY/ON
INPUT
MENU
(6)
(4)
(5)
(7)
FOCUS -
+ FOCUS
(8) USB port (15)
(9) VIDEO port
(10) AUDIO IN3 (L,R) ports (37)
(11) AUDIO OUT port
(12) AUDIO IN1 port (37)
(13) AUDIO IN2 port (37)
(14) S-VIDEO port
(15) Security slot (13)
(1)
(2)
(3)
(4)
(5)
(6)
(7)
(8)
MONITOR OUT
COMPUTER IN2
COMPUTER IN1
LAN
1
CONTROL
USB
Y CB/PB CR/PR
VIDEO L R
AUDIO IN3
(10)
(9)
AUDIO
OUT
S-VIDEO
2
AUDIO IN
(15)
(11)
(12)
(13)
(14)
5
�
Part names
Remote control
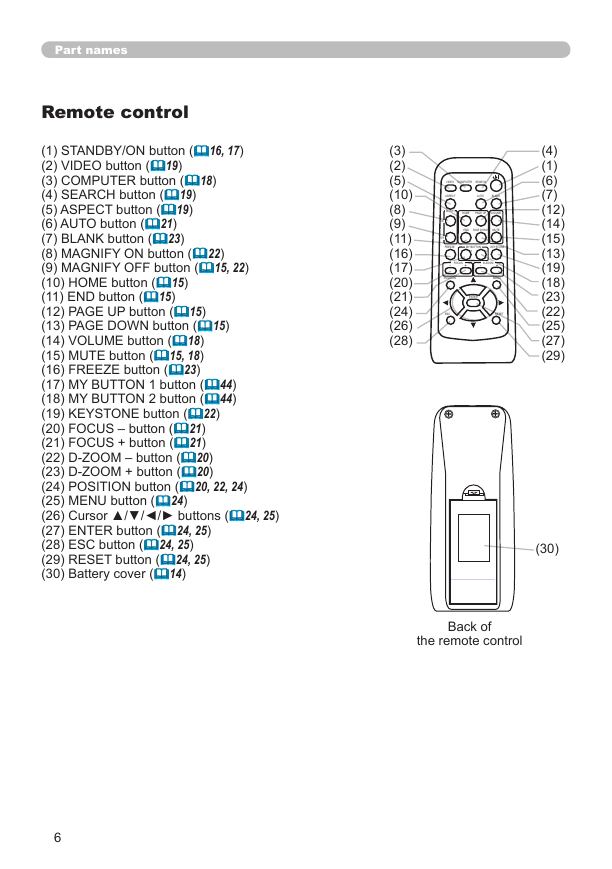
(1) STANDBY/ON button (16, 17)
(2) VIDEO button (19)
(3) COMPUTER button (18)
(4) SEARCH button (19)
(5) ASPECT button (19)
(6) AUTO button (21)
(7) BLANK button (23)
(8) MAGNIFY ON button (22)
(9) MAGNIFY OFF button (15, 22)
(10) HOME button (15)
(11) END button (15)
(12) PAGE UP button (15)
(13) PAGE DOWN button (15)
(14) VOLUME button (18)
(15) MUTE button (15, 18)
(16) FREEZE button (23)
(17) MY BUTTON 1 button (44)
(18) MY BUTTON 2 button (44)
(19) KEYSTONE button (22)
(20) FOCUS – button (21)
(21) FOCUS + button (21)
(22) D-ZOOM – button (20)
(23) D-ZOOM + button (20)
(24) POSITION button (20, 22, 24)
(25) MENU button (24)
(26) Cursor ▲/▼/◄/► buttons (24, 25)
(27) ENTER button (24, 25)
(28) ESC button (24, 25)
(29) RESET button (24, 25)
(30) Battery cover (14)
6
(3)
(2)
(5)
(10)
(8)
(9)
(11)
(16)
(17)
(20)
(21)
(24)
(26)
(28)
VIDEO COMPUTER SEARCH
ASPECT AUTO BLANK
MAGNIFY
HOME PAGE UP VOLUME
END PAGE DOWN MUTE
ON
OFF
FREEZE MY BUTTON KEYSTONE
1 2
FOCUS D-ZOOM
- + - +
POSITION MENU
ENTER
ESC RESET
(4)
(1)
(6)
(7)
(12)
(14)
(15)
(13)
(19)
(18)
(23)
(22)
(25)
(27)
(29)
(30)
Back of
the remote control
�
Setting up
Setting up
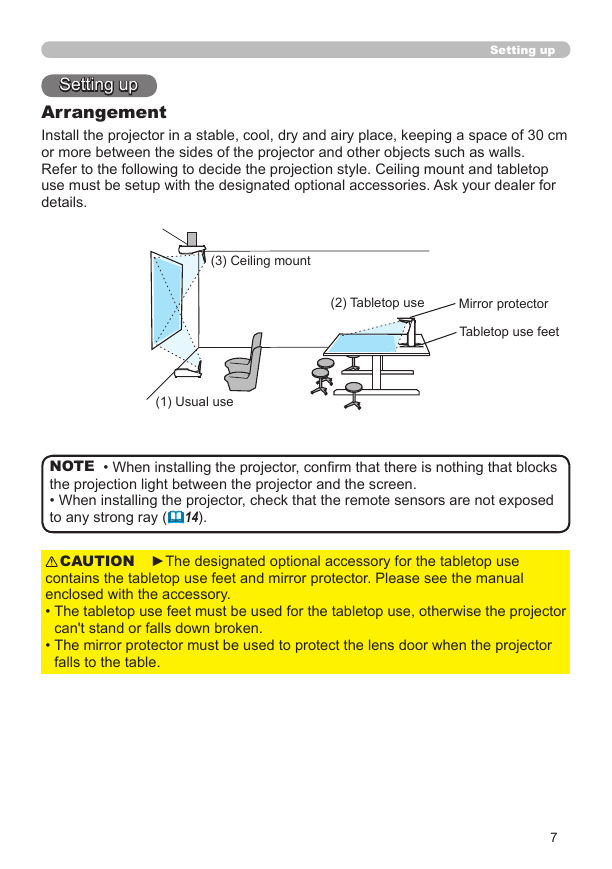
Arrangement
Install the projector in a stable, cool, dry and airy place, keeping a space of 30 cm
or more between the sides of the projector and other objects such as walls.
Refer to the following to decide the projection style. Ceiling mount and tabletop
use must be setup with the designated optional accessories. Ask your dealer for
details.
(3) Ceiling mount
(2) Tabletop use
Mirror protector
Tabletop use feet
(1) Usual use
• When installing the projector, confirm that there is nothing that blocks
NOTE
the projection light between the projector and the screen.
• When installing the projector, check that the remote sensors are not exposed
to any strong ray (14).
CAUTION
►The designated optional accessory for the tabletop use
contains the tabletop use feet and mirror protector. Please see the manual
enclosed with the accessory.
• The tabletop use feet must be used for the tabletop use, otherwise the projector
can't stand or falls down broken.
• The mirror protector must be used to protect the lens door when the projector
falls to the table.
7
�
Setting up
Arrangement (continued)
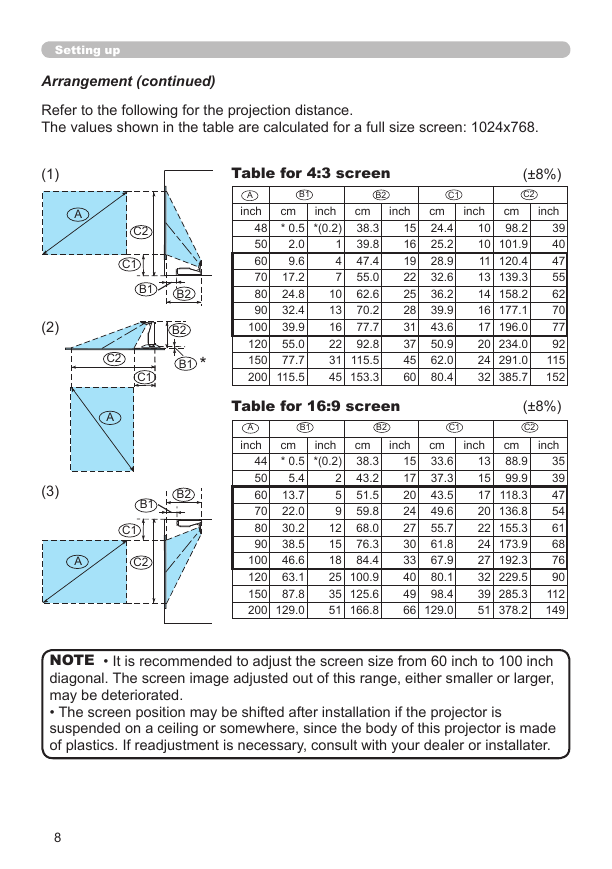
Refer to the following for the projection distance.
The values shown in the table are calculated for a full size screen: 1024x768.
(1)
A
C2
C1
B1
B2
B2
B1 *
C1
C2
A
B2
B1
C1
C2
A
(2)
(3)
Table for 4:3 screen
B2
B1
A
inch
48
2.0
50
9.6
60
17.2
70
24.8
80
32.4
90
�00
39.9
��0
55.0
�50
77.7
�00 115.5
cm inch
cm inch
* 0.5 *(0.2)
�5
38.3
�
�6
39.8
4
47.4
�9
7
��
55.0
�0
�5
62.6
�3
�8
70.2
3�
�6
77.7
��
92.8
37
45
3� 115.5
45 153.3
60
Table for 16:9 screen
A
inch
B1
B2
C1
cm inch
* 0.5 *(0.2)
44
50
5.4
60 13.7
70 22.0
80 30.2
90 38.5
100 46.6
120 63.1
150 87.8
200 129.0
cm inch
38.3
2 43.2
5 51.5
9 59.8
12 68.0
15 76.3
18 84.4
25 100.9
35 125.6
51 166.8
15 33.6
17 37.3
20 43.5
24 49.6
27 55.7
30 61.8
33 67.9
40 80.1
49 98.4
66 129.0
C1
(±8%)
C2
cm inch
cm inch
39
�0
24.4
98.2
40
�0 101.9
25.2
28.9
�� 120.4
47
55
�3 139.3
32.6
6�
�4 158.2
36.2
70
�6 177.1
39.9
77
�7 196.0
43.6
50.9
�0 234.0
9�
��5
�4 291.0
62.0
80.4
3� 385.7
�5�
cm inch
cm inch
(±8%)
C2
13 88.9
15 99.9
17 118.3
20 136.8
22 155.3
24 173.9
27 192.3
32 229.5
39 285.3
51 378.2
35
39
47
54
61
68
76
90
112
149
NOTE
• It is recommended to adjust the screen size from 60 inch to 100 inch
diagonal. The screen image adjusted out of this range, either smaller or larger,
may be deteriorated.
• The screen position may be shifted after installation if the projector is
suspended on a ceiling or somewhere, since the body of this projector is made
of plastics. If readjustment is necessary, consult with your dealer or installater.
8
�




 2023年江西萍乡中考道德与法治真题及答案.doc
 2012年重庆南川中考生物真题及答案.doc
 2013年江西师范大学地理学综合及文艺理论基础考研真题.doc
 2020年四川甘孜小升初语文真题及答案I卷.doc
 2020年注册岩土工程师专业基础考试真题及答案.doc
 2023-2024学年福建省厦门市九年级上学期数学月考试题及答案.doc
 2021-2022学年辽宁省沈阳市大东区九年级上学期语文期末试题及答案.doc
 2022-2023学年北京东城区初三第一学期物理期末试卷及答案.doc
 2018上半年江西教师资格初中地理学科知识与教学能力真题及答案.doc
 2012年河北国家公务员申论考试真题及答案-省级.doc
 2020-2021学年江苏省扬州市江都区邵樊片九年级上学期数学第一次质量检测试题及答案.doc
 2022下半年黑龙江教师资格证中学综合素质真题及答案.doc