logo资料库

RIO数码影音-Rio One说明书.pdf

第1页 / 共23页
第2页 / 共23页
第3页 / 共23页
第4页 / 共23页
第5页 / 共23页
第6页 / 共23页
第7页 / 共23页
第8页 / 共23页
资料共23页,剩余部分请下载后查看
Rio One User Guide
About the User Guide
Navigating and printing the Rio User Guide
Using Acrobat toolbar icons
Legal notices
Introduction
Using your Rio One
Using external flash memory cards
Inserting external flash memory cards
Ejecting external flash memory cards
Using the Rio software
Using RealJukebox
To learn more about using RealJukebox, from within the software:
Copying tracks to your Rio
Encoding a CD
Using iTunes (Mac)
Digital audio terms
ADPCM
Bitrate
CDDB
Codec
DRM, security
Encoding, or Ripping (a CD)
Firmware
Gracenote
MP3
Playlist
SDMI
Skin
USB
WMA
FAQ & troubleshooting
How do you put music on the Rio?
How much music will my Rio hold?
What are the differences between MP3 and WMA?
Can I use the Rio with Windows 95? I have the USB supplement pack.
The Rio is connected to the USB, why doesn’t the computer recognize it?
Where is the serial number located on the Rio?
The AA battery inside my Rio drains even if I haven’t used it for a while. What causes this?
Can I use any flash memory card to increase my Rio’s memory?
What brand replacement alkaline batteries do you recommend?
What does the Rio Hold feature do?
How do I upgrade the Rio firmware?
Checking your Rio’s firmware version
Downloading the firmware upgrade from the Rio Web site
Upgrading the Rio firmware—PC
Upgrading the Rio firmware—Mac
Why do I get an error when I click Read a CD to start the encoding process?
How can I get the best sound quality when encoding from a CD?
Warranty information
One Year Limited Warranty
Our warranty to you
How to obtain service under this warranty
Product failures not covered by this warranty
How to obtain out of warranty service
Limits of liability
Regulatory information
Federal Communications Commission (FCC)
Industry Canada
Customer care
Technical support
Hours of Operation
Email
Telephone
TDD
Fax
Web site
Solution Library
Customer service
Hours of Operation
Email
Telephone
Fax
Rio Product Support
With every Rio product you receive the following support services:
New Product Support
Extended Service Option
Premium Support Service
Index
About the User Guide Page 1 Rio One User Guide About the User Guide The Rio One User Guide includes the following information: Introduction Using your Rio Using the Rio software Understanding digital audio terms Frequently asked questions (FAQ) and troubleshooting Warranty Regulatory Customer care Index To learn more: • Refer to the Getting Started Guide for the basics on how to set up and start using your Rio One. Click the RealJukebox or iTunes software Help menus for detailed instructions on how to use the software to convert CD tracks into compressed digital audio formats, get audio from the Internet, or transfer tracks to your Rio One. Visit the Rio Web site. Navigating and printing the Rio User Guide The Rio One User Guide is in Adobe Acrobat (.PDF) file format. Important: We strongly recommend that you use Adobe Acrobat version 4.0— available on the Rio software CD—to view the Rio One User Guide. Click links (blue underlined text) to jump to another location in the document or to a location on the World Wide Web. Click the Index icon at the top right corner of any page (by the page number) to go to the index. Click page numbers in the Index to jump to a topic. Using Acrobat toolbar icons Click the Show/Hide Navigation Pane icon in the Acrobat toolbar to show a list of book- marks. Bookmarks are links to the contents of the User Guide. Click any bookmark to jump to the page in the User Guide that contains the topic. Click the Print icon in the Acrobat toolbar to print the User Guide. The size of the User Guide is optimized for printing.
About the User Guide Page 2 Legal notices Copyright © 2001 SONICblue Incorporated. All Rights Reserved. SONICblue Incorporated does not assume any responsibility for errors or omissions in this document or make any commitment to update the information contained herein. Rio is a registered trademark of RioPort, Inc. in the USA and/or other countries and is used under license. The RealPlayer and the RealJukebox are included under license from RealNetworks, Inc. Copyright 1999. RealNetworks, Inc. Patents pending. All rights reserved. This product is iTunes ready. iTunes is provided by Apple Computer, Inc. Copyright © 2001 Apple Computer, Inc. All rights reserved. iTunes is a trademark of Apple Computer, Inc. Microsoft, Windows Media, and the Windows Logo are trademarks or reg- istered trademarks of Microsoft Corporation in the United States and/or other countries. All other product names may be trademarks of the companies with which they are associated. First Edition, May 2001. Part Number 75550175-001.
Introduction Page 3 Introduction The Rio One provides the ultimate listening experience while you exercise, commute or relax. Create and mix your favorite selections on your PC or Mac for playback on your Rio One. Your player is similar in function to a portable cassette or CD player. However, it has no mov- ing parts, so it delivers skip-free music under any conditions. It is about the size of an audio cassette or pager and weighs only a few ounces. The Rio One interfaces with your computer through the USB port. Use the software included on the CD to: Organize digital audio tracks on your computer. Organize and download tracks to your Rio One. Record (encode) your audio CDs. Search for tracks on your computer or on the Internet. In addition, there are many cool accessories you can purchase separately to customize your Rio. Visit the Rio Web site for information about accessories for your Rio One. Sources on the Internet for digital audio content include: Riohome.com WindowsMedia.com
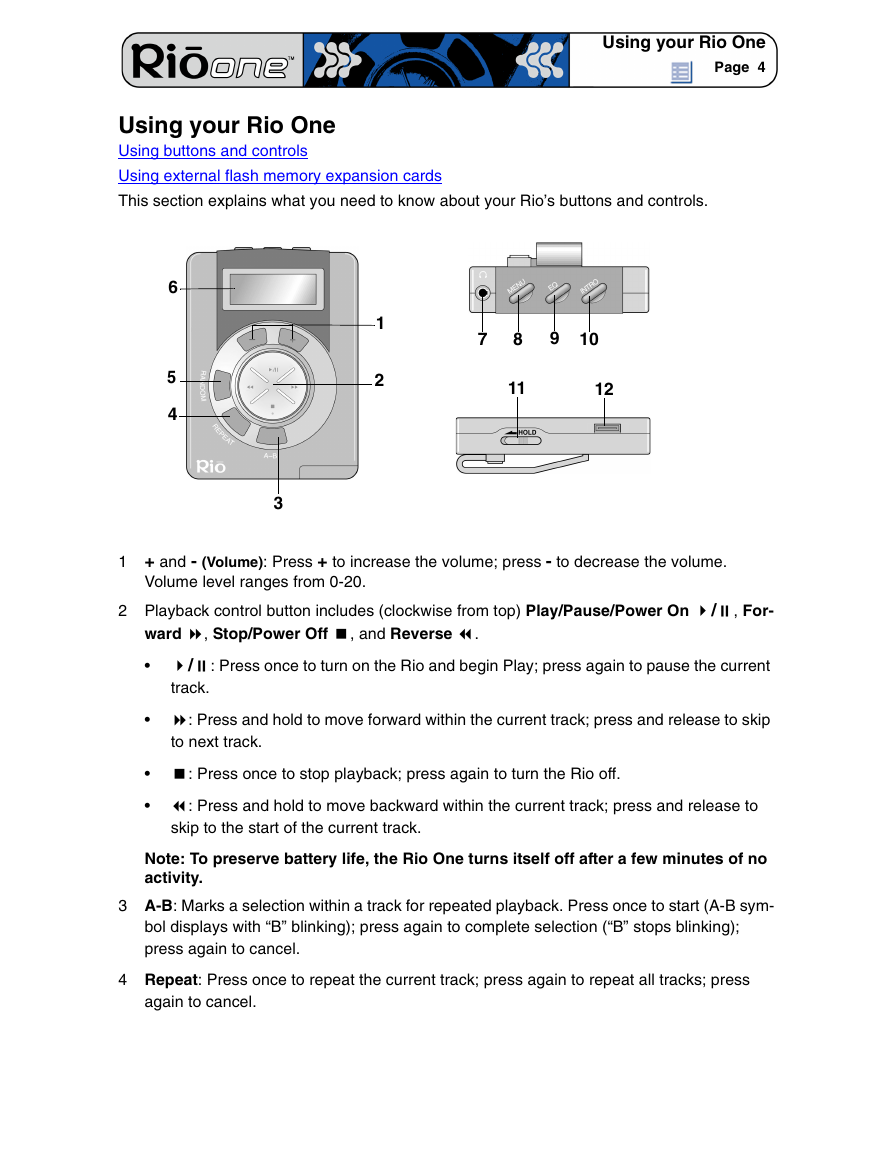
Using your Rio One Page 4 Using your Rio One Using buttons and controls Using external flash memory expansion cards This section explains what you need to know about your Rio’s buttons and controls. 1 2 7 8 9 10 11 12 6 5 4 3 1 + and - (Volume): Press + to increase the volume; press - to decrease the volume. Volume level ranges from 0-20. 2 Playback control button includes (clockwise from top) Play/Pause/Power On 4/;, For- ward 8, Stop/Power Off <, and Reverse 7. 4/;: Press once to turn on the Rio and begin Play; press again to pause the current track. 8: Press and hold to move forward within the current track; press and release to skip to next track. <: Press once to stop playback; press again to turn the Rio off. 7: Press and hold to move backward within the current track; press and release to skip to the start of the current track. Note: To preserve battery life, the Rio One turns itself off after a few minutes of no activity. 3 A-B: Marks a selection within a track for repeated playback. Press once to start (A-B sym- bol displays with “B” blinking); press again to complete selection (“B” stops blinking); press again to cancel. 4 Repeat: Press once to repeat the current track; press again to repeat all tracks; press again to cancel.
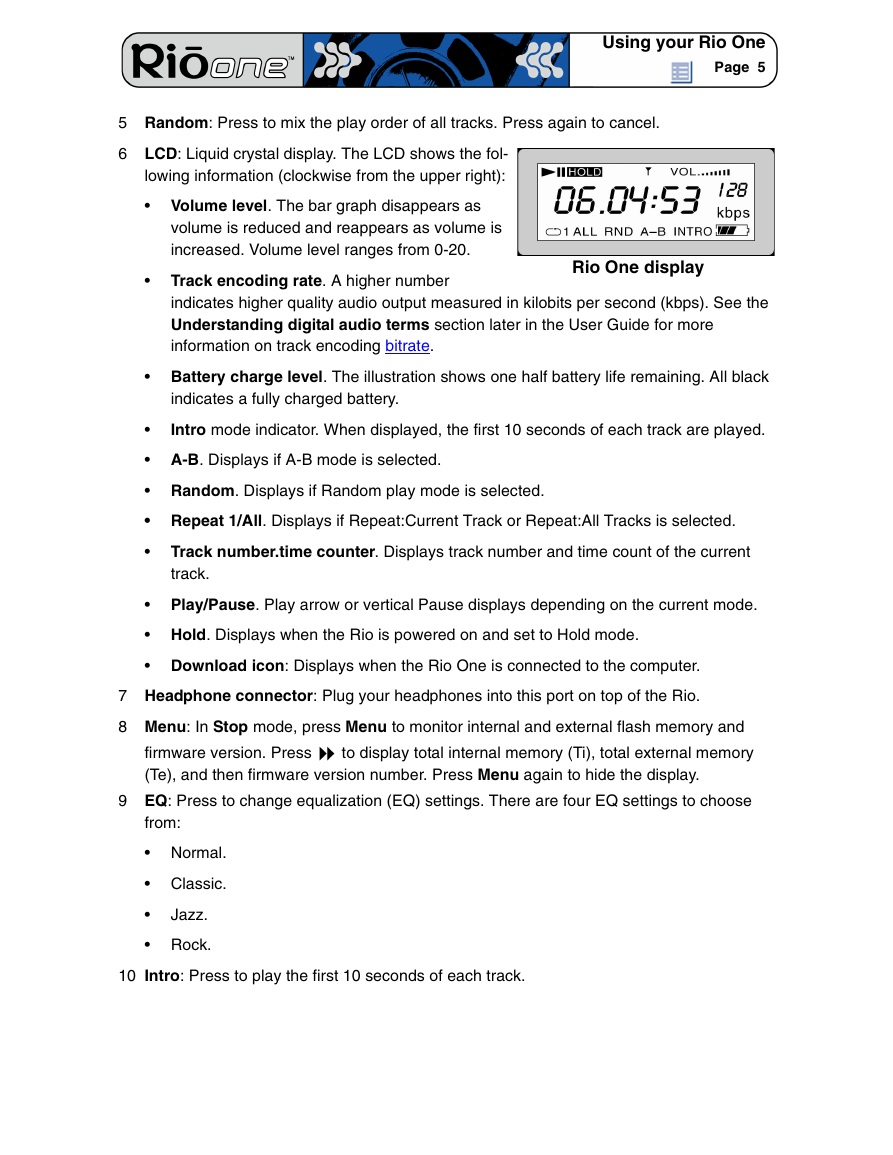
5 Random: Press to mix the play order of all tracks. Press again to cancel. Using your Rio One Page 5 6 LCD: Liquid crystal display. The LCD shows the fol- lowing information (clockwise from the upper right): Volume level. The bar graph disappears as volume is reduced and reappears as volume is increased. Volume level ranges from 0-20. Rio One display Track encoding rate. A higher number indicates higher quality audio output measured in kilobits per second (kbps). See the Understanding digital audio terms section later in the User Guide for more information on track encoding bitrate. Battery charge level. The illustration shows one half battery life remaining. All black indicates a fully charged battery. Intro mode indicator. When displayed, the first 10 seconds of each track are played. A-B. Displays if A-B mode is selected. Random. Displays if Random play mode is selected. Repeat 1/All. Displays if Repeat:Current Track or Repeat:All Tracks is selected. Track number.time counter. Displays track number and time count of the current track. Play/Pause. Play arrow or vertical Pause displays depending on the current mode. Hold. Displays when the Rio is powered on and set to Hold mode. Download icon: Displays when the Rio One is connected to the computer. 7 Headphone connector: Plug your headphones into this port on top of the Rio. 8 Menu: In Stop mode, press Menu to monitor internal and external flash memory and to display total internal memory (Ti), total external memory firmware version. Press (Te), and then firmware version number. Press Menu again to hide the display. 9 EQ: Press to change equalization (EQ) settings. There are four EQ settings to choose from: Normal. Classic. Jazz. Rock. 10 Intro: Press to play the first 10 seconds of each track.
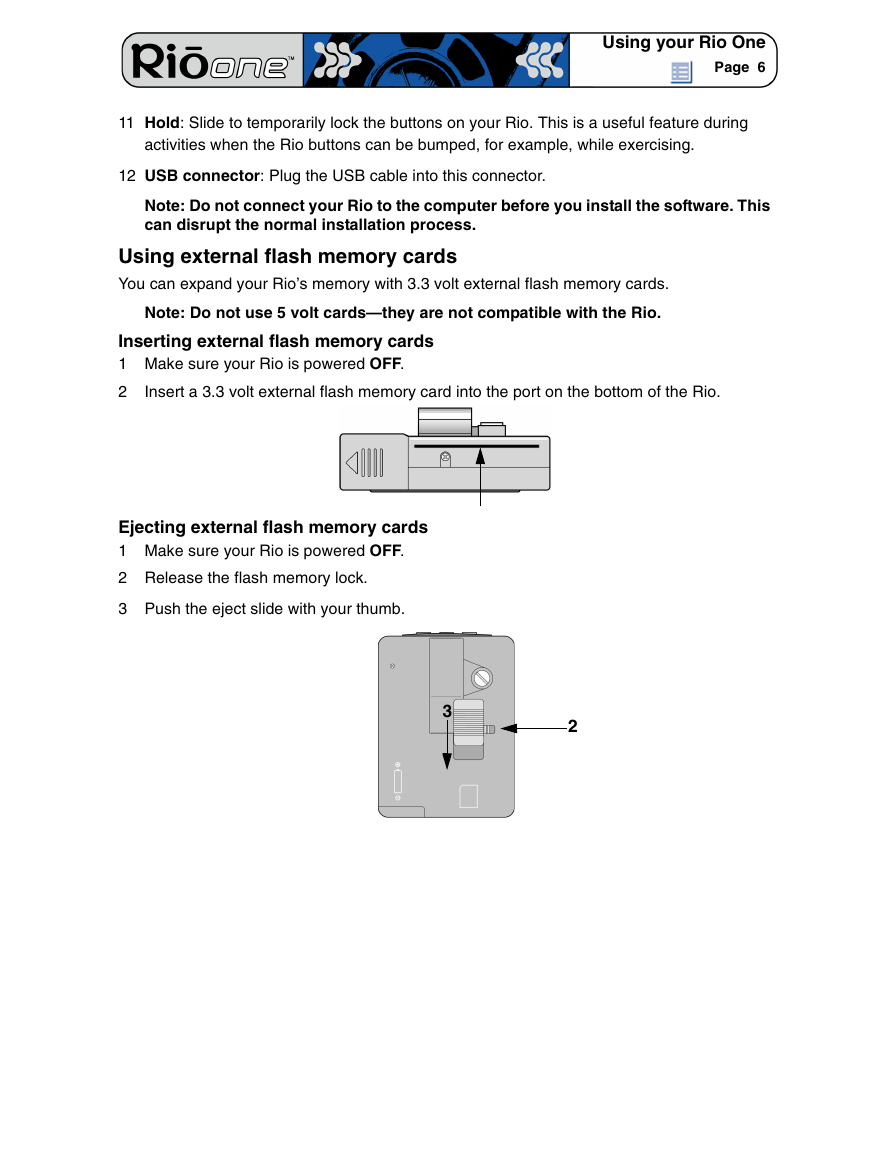
Using your Rio One Page 6 11 Hold: Slide to temporarily lock the buttons on your Rio. This is a useful feature during activities when the Rio buttons can be bumped, for example, while exercising. 12 USB connector: Plug the USB cable into this connector. Note: Do not connect your Rio to the computer before you install the software. This can disrupt the normal installation process. Using external flash memory cards You can expand your Rio’s memory with 3.3 volt external flash memory cards. Note: Do not use 5 volt cards—they are not compatible with the Rio. Inserting external flash memory cards 1 Make sure your Rio is powered OFF. 2 Insert a 3.3 volt external flash memory card into the port on the bottom of the Rio. Ejecting external flash memory cards 1 Make sure your Rio is powered OFF. 2 Release the flash memory lock. 3 Push the eject slide with your thumb. 3 2
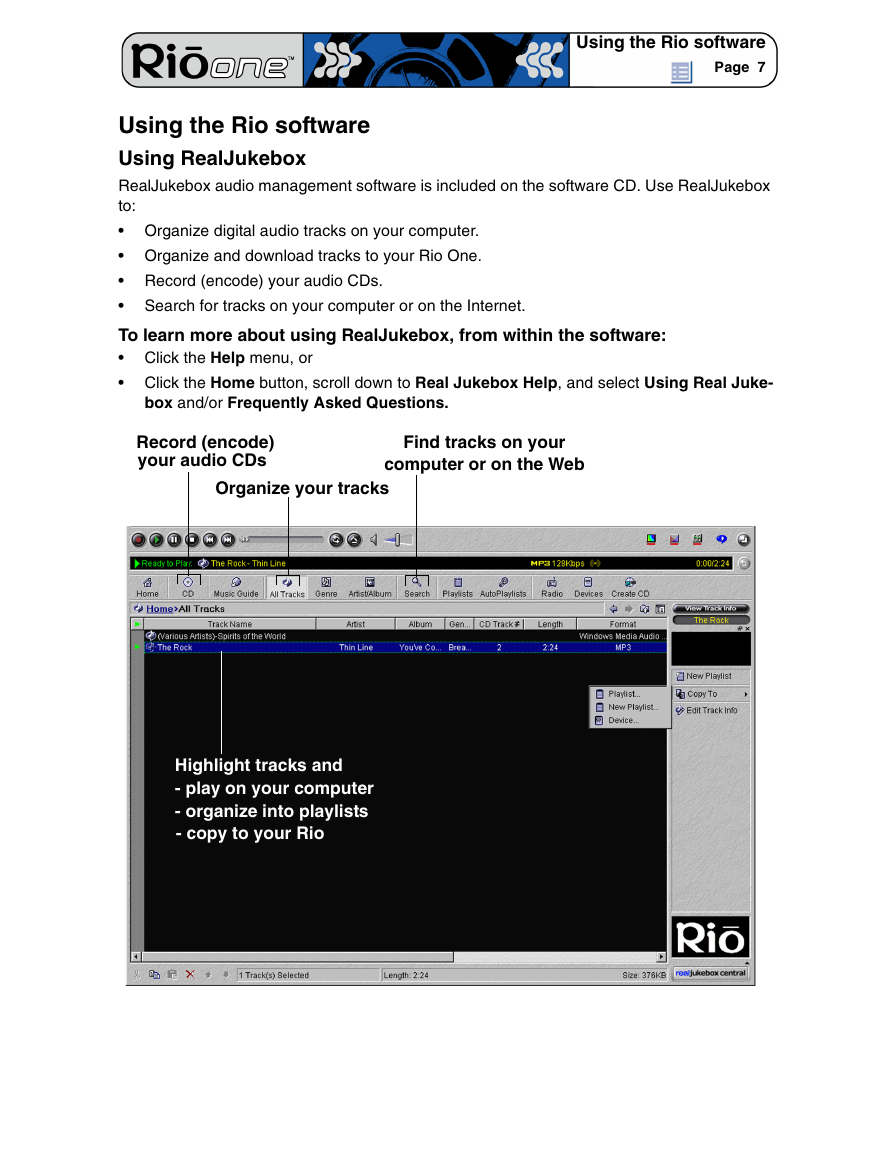
Using the Rio software Page 7 Using the Rio software Using RealJukebox RealJukebox audio management software is included on the software CD. Use RealJukebox to: Organize digital audio tracks on your computer. Organize and download tracks to your Rio One. Record (encode) your audio CDs. Search for tracks on your computer or on the Internet. To learn more about using RealJukebox, from within the software: Click the Help menu, or Click the Home button, scroll down to Real Jukebox Help, and select Using Real Juke- box and/or Frequently Asked Questions. Record (encode) your audio CDs Find tracks on your computer or on the Web Organize your tracks Highlight tracks and - play on your computer - organize into playlists - copy to your Rio
Using the Rio software Page 8 Copying tracks to your Rio 1 Plug the USB cable into the USB port on your Rio. 2 Plug the other end of the cable into the USB port on your computer. 3 Click the All Tracks button on the Real Jukebox software. 4 Click the desired track(s). 5 Click the right mouse button and select Copy to Device or click Copy to > Device in the right column on the window. Click OK on the dialog box. 6 Click Copy Files in the right column on the window. Encoding a CD 1 Put an audio CD in your computer’s CD-ROM drive. 2 Click the CD button. 3 The software prompts you and fills in track titles and other information via the Gracenote CDDB Web site. 4 Check the desired track(s)—click the check box to the left of the song title or click Check All in the right column on the window. 5 Recording begins...use the convenient playback controls at the top of the window to record, play, pause, and so on.
分享到:
收藏