Operation Manual
For the safe use of your camera, be sure to read the Safety Precautions thoroughly before use.
�
Using These Manuals
The two manuals included are for your Caplio 300G.
Please read this first:
Quick Start guide (printed manual)
This booklet is designed to help you enjoy your Caplio 300G
right away by providing quick explanations: "Getting Ready to
Shoot", "Shooting Images", "Viewing Images", and
"Connecting to Your PC."
Before using your camera, first read this manual.
Please read as needed:
Operation Manual (this manual).
This explains how to use all the functions of your Caplio 300G.
To get the most out of your Caplio 300G, please read it through once and refer to it whenever necessary.
Meaning of Symbols
The following symbols are used in this guide:
Important
This indicates important information
and restrictions.
Note
This indicates supplementary
explanations and useful tips on
camera operations.
Terms
This indicates an explanation of a
technical term.
Reference
This indicates page(s) relevant to a
particular function.
"p.xx" is used to refer you to pages in
this manual.
�
Table of Contents
Using These Manuals ................................................2
Meaning of Symbols ..................................................2
Chapter 1 Using Your Camera
Section 1 Getting Started
Checking that everything is Packed...........................6
Names of Parts ..........................................................7
How to Use the Mode Dial .........................................8
Inserting the Batteries................................................9
Using the Rechargeable Battery..............................10
Inserting the rechargeable battery.....................10
Removing the rechargeable battery ..................10
Using the AC Adaptor ..............................................11
Setting up the AC adaptor .................................11
Removing the AC adaptor .................................12
Turning the Power On/Off ........................................13
To turn the camera On ......................................13
To turn the camera Off ......................................13
Setting the Date and Time .......................................14
Inserting the SD Memory Card ................................15
Inserting the SD Memory Card..........................15
Removing the SD Memory Card........................16
How to Use the LCD Monitor ...................................17
Screen Examples when Shooting Pictures........17
The Screen During Playback.............................20
Switching the Screen Display............................21
Button Functions......................................................22
Screens....................................................................23
The Basics of the Shooting Menu/Playback Menu 27
The Basics of the Setup Screen........................28
Section 2 Basic Shooting
How to Hold the Camera..........................................30
How to Focus...........................................................31
Shooting Still Images ...............................................33
Check the Focus and Shoot ..............................33
(Half-press)........................................................33
Capture the Moment Shooting (Full-press) .......34
When the Subject is not Centered on Your Composition
(Focus Lock).......................................................35
Shooting with Scenery-Matching .............................36
Combination of Scene Mode and Function..............38
Shooting with Multi-Shot ..........................................39
Making Multi-Shot Settings (CONT. MODE) .....40
Shooting with Multi-Shot....................................41
Shooting with S Multi-Shot ................................41
Shooting with M Multi-Shot................................41
Shooting Movies ......................................................42
Shooting with the Zoom ...........................................43
Shooting with the Digital Zoom ................................44
Shooting Close-ups (Macro Photo)..........................45
Section 3 Using Special Features for Improved Pho-
tography
Using the Flash........................................................ 47
Using the Self-Timer................................................ 49
Changing the Exposure (EXPOSURE COMP.)....... 50
Using Natural and Artificial Lighting
(WHITE BALANCE)............................................ 52
Choosing Picture Quality Mode/Image Size
(PIC QUALITY/SIZE).......................................... 55
About Picture Quality Mode .............................. 55
About Image Size.............................................. 55
Changing Picture Quality Mode/Image Size of a
Still Image ..................................................... 56
Changing the Image Size of a Movie ................ 57
Manual Focus Shooting (FOCUS)........................... 58
Manual Focus Shooting .................................... 58
Shooting at a Fixed Distance ............................ 59
Changing the Light Metering (PHOTOMETRY)....... 60
Sensitivity Settings (ISO SETTING) ........................ 62
Changing the Edge Quality of Still Images
(SHARPNESS)................................................... 63
Shooting Consecutively with Different Exposures
(AUTO BRACKET)............................................. 64
Setting the Exposure Time (TIME EXPOSURE) ..... 66
Shooting Pictures Automatically at Set Intervals
(INTERVAL) ....................................................... 67
Inserting the Date into a Still Image (DATE IMPRINT). 69
Returning the Shooting Menu Settings to their Defaults
(RESTORE DEFAULTS).................................... 70
Displaying the Grid Guide on the LCD Monitor ....... 71
Changing Shading for Shooting Text (DENSITY).... 72
Section 4 Viewing Still Images and Movies
Viewing the Photo You Just Took............................ 74
Displaying an Enlarged View of the Still Image
Displayed ...................................................... 75
Deleting the Displayed Still Image or Movie...... 76
Viewing a Still Image or Movie ................................ 77
Viewing Still Images Recorded on an SD Memory
Card .............................................................. 77
Viewing Still Images Recorded on Internal Memory78
Viewing Movies ................................................. 79
Viewing at a Glance................................................. 80
Enlarged Viewing..................................................... 81
Showing Photos in Order Automatically
(SLIDE SHOW) .................................................. 82
Viewing on a Television........................................... 83
Section 5 Deleting Still Images and Movies
Deleting Unwanted Still Images or Movies.............. 85
Deleting One Still Image ................................... 85
Deleting All Frames at Once ............................. 86
�
Section 6 Changing Camera Settings
Deleting Multiple Frames at Once .....................87
Write-protecting Your Images (PROTECT)..............88
Protecting the Displayed Still Image..................88
Protecting All Still Images..................................90
Protecting Multiple Still Images or Movies at Once91
Copying the Contents of Internal Memory to a Memory
Card (COPY TO CARD) .....................................92
Using a Printing Service (PRINT) ............................93
Setting DPOF for the Still Image Displayed.......93
Setting DPOF for All Still Images.......................94
Setting DPOF for Multiple Still Images ..............95
Getting the SD Memory Card Ready for Use
(CARD FORMAT)...............................................97
Formatting Internal Memory (IN FORMAT)..............98
Changing Power-Save Mode Settings
(POWER SAVE) .................................................99
Changing Auto Power-Off Settings
(AUTO POWER OFF) ......................................100
Beep at Recording (BEEP SOUND) ......................101
Changing File Name Settings (SEQUENTIAL NO.)102
Changing Image Confirmation Time
(LCD CONFIRM.) .............................................103
Adjusting the Brightness of the LCD Monitor
(LCD BRIGHTNESS)........................................104
Changing the Display Language (LANGUAGE) ....105
Changing the Playback Method for Viewing on TV
(VIDEO OUT MODE)........................................106
Chapter 2 Playing back Images on a Com-
puter (Pictures/Movies)
Section 1 Downloading Images to a Computer
(For Windows)
Using the Software Provided .................................108
Software and OS Applicability Table ...............108
System Requirements............................................109
Preparing to Download Images to Your Computer 110
Installation..............................................................111
For Windows 98/98SE/Me/2000......................111
Uninstalling the Software.................................112
(For Windows 98/98SE/Me/2000) ...................112
For Windows XP..............................................113
Uninstalling the Software.................................114
(For Windows XP) ...........................................114
Installing Acrobat Reader.......................................115
Connecting the Camera to a Computer .................116
Downloading Pictures to Your Computer...............117
For Windows 98/98SE/Me/2000......................117
For Windows XP..............................................118
How to Use the RICOH Gate L..............................120
The RICOH Gate L Window ............................120
How to Use the Optional settings ....................121
How to Use the Background Illustration Settings.122
For Downloading Images Directly to Your Computer
from an SD Memory Card ................................ 123
Images in a PC Card....................................... 123
Section 2 Downloading Images to a Computer
(For Macintosh)
Using the Software Provided ................................. 125
Software and OS Applicability Table............... 125
System Requirements ........................................... 126
Preparing to Download Images to Your Computer 127
Installation ............................................................. 128
For Mac OS 8.6 to 9.2.2.................................. 128
For Mac OS X 10.1.2 to 10.2 .......................... 129
Uninstalling the Software
(For Mac OS 8.6 to 9.2.2) ........................... 130
Uninstalling the Software
(For Mac OS X 10.1.2 to 10.2).................... 130
Connecting the Camera to a Computer................. 131
Downloading Pictures to Your Computer .............. 132
For Mac OS 8.6 to 9.2.2.................................. 133
For Mac OS X 10.1.2 to 10.2 .......................... 134
The RICOH Gate L Window............................ 135
How to Use the Optional Settings ................... 136
Section 3 Displaying Thumbnail Images
(How to Use DU-10)
Starting and Exiting DU-10 .................................... 138
DU-10 Window................................................ 138
Exiting DU-10 .................................................. 138
Thumbnail Display Description .............................. 139
Switching the Ordering of Images ......................... 140
Changing the Display Size .................................... 141
Viewing Images in a slide show............................. 142
To View a slide show ...................................... 142
Using Auto slide show..................................... 143
How to Use the slide show Dialog Box ........... 143
Viewing Image Information .................................... 144
Using the File Menu ........................................ 144
Using the Shortcut Menu................................. 144
Displaying the Viewer Screen................................ 145
Viewer Screen................................................. 145
Appendices
A. Specifications................................................... 147
B. Optional Accessories ....................................... 149
C. Using the Accessory Shoe............................... 149
D. SD Memory Card Recording Capacities.......... 150
E. Using Your Camera Abroad ............................. 150
F. Cautions on Use............................................... 151
G. Care and Storage ............................................ 152
H. Troubleshooting ............................................... 153
I. Error Messages ................................................. 159
J. About the Warranty and Servicing.................... 160
Ricoh Service Offices ............................................ 163
�
Chapter 1 Using Your Camera
Section 1 Getting Started
This section explains how to get your camera ready, from taking it
out of the package to preparing to shoot.
�
Checking that everything is Packed
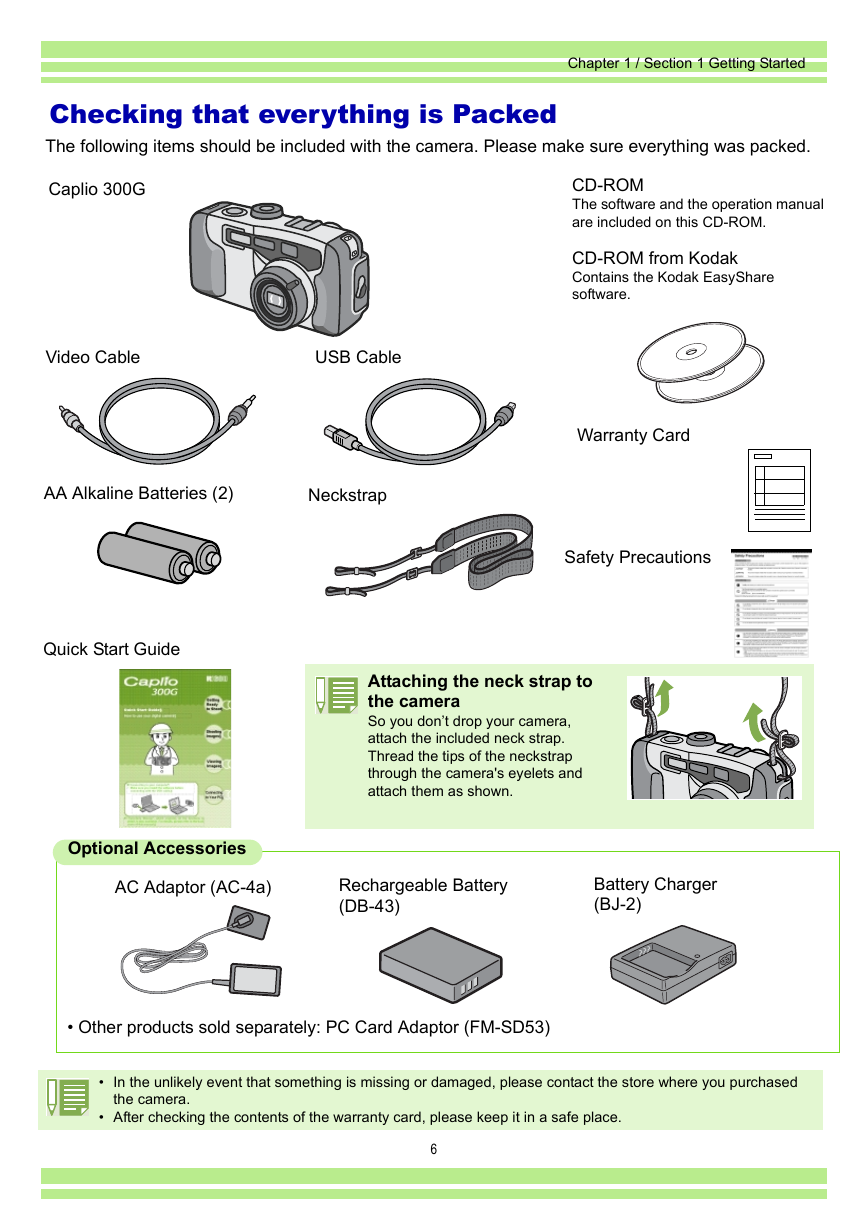
The following items should be included with the camera. Please make sure everything was packed.
Chapter 1 / Section 1 Getting Started
Caplio 300G
Video Cable
USB Cable
AA Alkaline Batteries (2)
Neckstrap
Quick Start Guide
CD-ROM
The software and the operation manual
are included on this CD-ROM.
CD-ROM from Kodak
Contains the Kodak EasyShare
software.
Warranty Card
Safety Precautions
Attaching the neck strap to
the camera
So you don’t drop your camera,
attach the included neck strap.
Thread the tips of the neckstrap
through the camera's eyelets and
attach them as shown.
Optional Accessories
AC Adaptor (AC-4a)
Rechargeable Battery
(DB-43)
Battery Charger
(BJ-2)
Other products sold separately: PC Card Adaptor (FM-SD53)
In the unlikely event that something is missing or damaged, please contact the store where you purchased
the camera.
After checking the contents of the warranty card, please keep it in a safe place.
6
�
Names of Parts
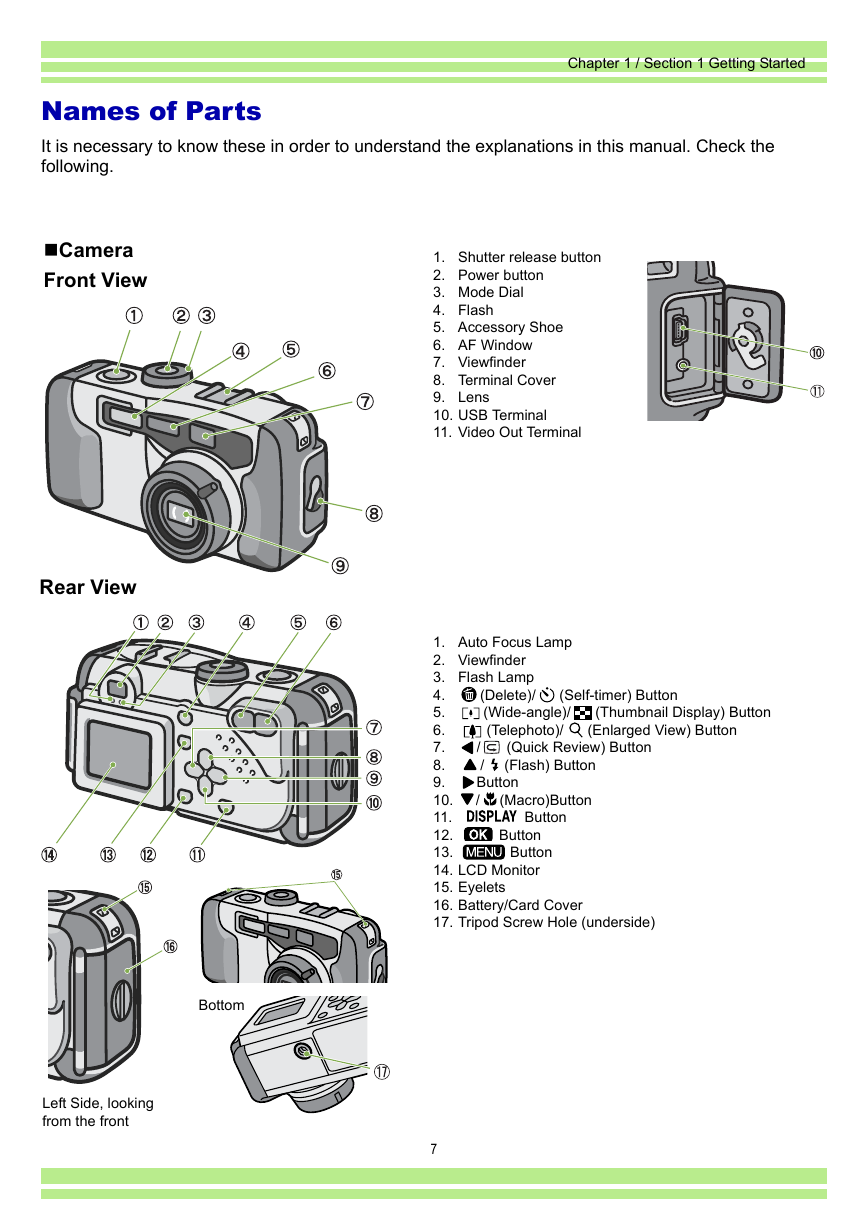
It is necessary to know these in order to understand the explanations in this manual. Check the
following.
Chapter 1 / Section 1 Getting Started
TCamera
Front View
Rear View
Rear View
1. Shutter release button
2. Power button
3. Mode Dial
4. Flash
5. Accessory Shoe
6. AF Window
7. Viewfinder
8. Terminal Cover
9. Lens
10. USB Terminal
11. Video Out Terminal
(Self-timer) Button
(Thumbnail Display) Button
(Enlarged View) Button
/
/
Button
/
(Quick Review) Button
(Flash) Button
1. Auto Focus Lamp
2. Viewfinder
3. Flash Lamp
4.
(Delete)/
(Wide-angle)/
5.
6.
(Telephoto)/
7.
8.
9.
10.
11.
12.
13.
14. LCD Monitor
15. Eyelets
16. Battery/Card Cover
17. Tripod Screw Hole (underside)
Button
Button
(Macro)Button
Button
Bottom
Left Side, looking
from the front
7
�
Chapter 1 / Section 1 Getting Started
How to Use the Mode Dial
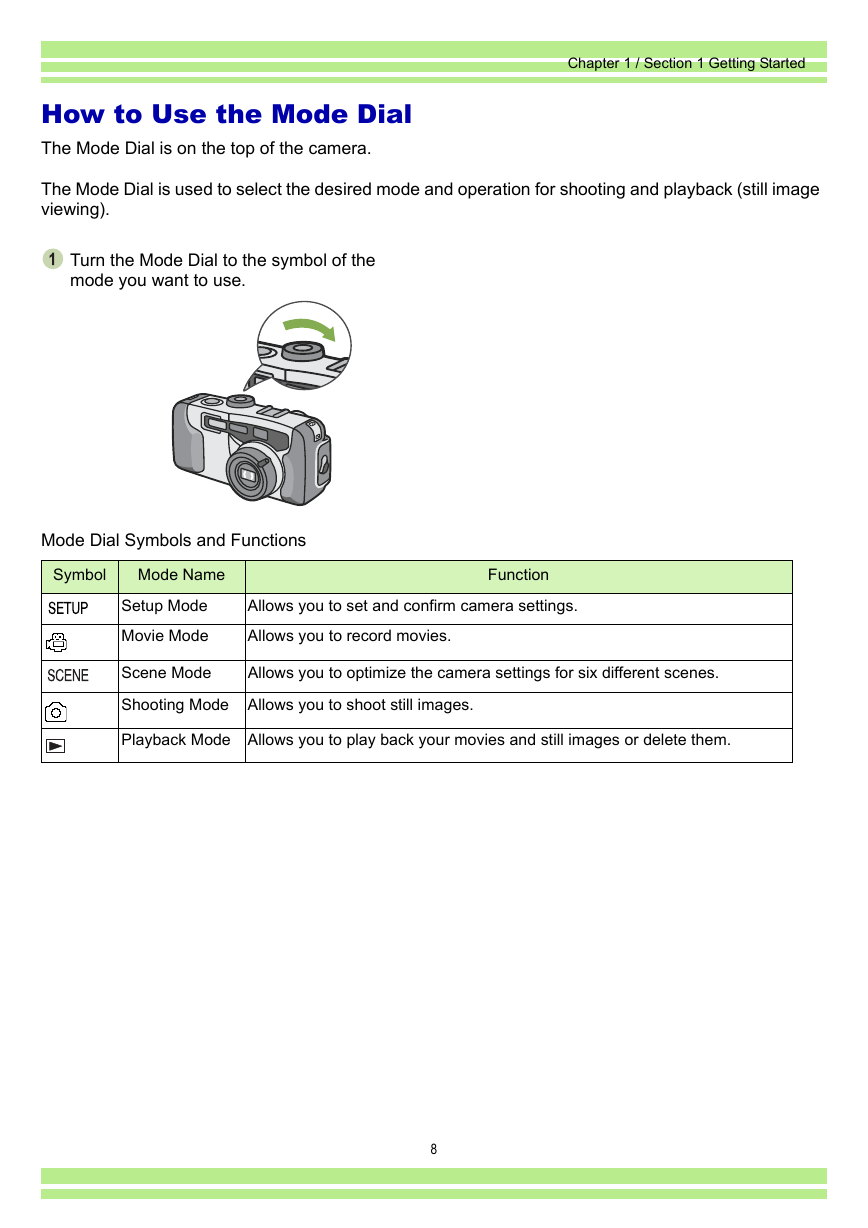
The Mode Dial is on the top of the camera.
The Mode Dial is used to select the desired mode and operation for shooting and playback (still image
viewing).
Turn the Mode Dial to the symbol of the
mode you want to use.
Mode Dial Symbols and Functions
Symbol
Mode Name
Function
Setup Mode
Movie Mode
Allows you to set and confirm camera settings.
Allows you to record movies.
Scene Mode
Shooting Mode Allows you to shoot still images.
Allows you to optimize the camera settings for six different scenes.
Playback Mode Allows you to play back your movies and still images or delete them.
8
�


 2023年江西萍乡中考道德与法治真题及答案.doc
 2012年重庆南川中考生物真题及答案.doc
 2013年江西师范大学地理学综合及文艺理论基础考研真题.doc
 2020年四川甘孜小升初语文真题及答案I卷.doc
 2020年注册岩土工程师专业基础考试真题及答案.doc
 2023-2024学年福建省厦门市九年级上学期数学月考试题及答案.doc
 2021-2022学年辽宁省沈阳市大东区九年级上学期语文期末试题及答案.doc
 2022-2023学年北京东城区初三第一学期物理期末试卷及答案.doc
 2018上半年江西教师资格初中地理学科知识与教学能力真题及答案.doc
 2012年河北国家公务员申论考试真题及答案-省级.doc
 2020-2021学年江苏省扬州市江都区邵樊片九年级上学期数学第一次质量检测试题及答案.doc
 2022下半年黑龙江教师资格证中学综合素质真题及答案.doc