OFFICEJET/OFFICEJET PRO
Fax Getting Started Guide
传真使用入门指南
Pedoman Untuk Memulai Penggunaan Faks
คู
มือการเริ
่มตนใชงานโทรสาร
傳真準備開始手冊
팩스 사용 안내서
ファックス入門ガイド
�
9
Copyright Information
© 2009 Copyright Hewlett-Packard Development Company, L.P.
Edition 2, 2/200
Reproduction, adaptation or translation without prior written permission is
prohibited, except as allowed under the copyright laws.
The information contained herein is subject to change without notice.
The only warranties for HP products and services are set forth in the express
warranty statements accompanying such products and services.
Nothing herein should be construed as constituting an additional warranty.
HP shall not be liable for technical or editorial errors or omissions contained
herein.
Trademark credits
Microsoft® and Windows® are U.S. registered trademarks of Microsoft
Corporation.
�
Contents
Set up the fax ............................................................................................................... 4
Step 1: Identify the type of phone system you are using (parallel or serial) ....................... 4
Step 2: Determine the type of phone line (dedicated or shared) ...................................... 5
Step 3: Manage and configure fax settings .................................................................. 6
Step 4: Test fax setup ................................................................................................ 7
Set the answer mode (Auto Answer) (optional).................................................................. 7
Change the answer ring pattern for distinctive ring (optional) ............................................. 8
Set up speed-dial entries (optional).................................................................................. 8
Set up HP Digital Fax (Fax to PC or Fax to Mac) ............................................................... 9
Solve fax problems...................................................................................................... 10
Hewlett-Packard limited warranty statement .................................................................... 13
h
s
i
l
g
n
E
Safety Information
Always follow basic safety precautions when using this product
to reduce risk of injury from fire or electric shock.
1. Read and understand all instructions in the documentation that
comes with the device.
2. Use only a grounded electrical outlet when connecting this
product to a power source. If you do not know whether the outlet
is grounded, check with a qualified electrician.
3. Observe all warnings and instructions marked on the product.
4. Unplug this product from wall outlets before cleaning.
5. Do not install or use this product near water, or when you are wet.
6.
7.
Install the product securely on a stable surface.
Install the product in a protected location where no one can step
on
or trip over the line cord, and the line cord cannot be damaged.
If the product does not operate normally, see Maintain and
troubleshoot.
There are no user-serviceable parts inside. Refer servicing to
qualified service personnel.
8.
9.
10. Use only the external power adapter/battery provided with the
device.
Note: Ink from the cartridges is used in the printing process in a
number of different ways, including in the initialization process, which
prepares the device and cartridges for printing, and in printhead
servicing, which keeps print nozzles clear and ink flowing smoothly. In
addition, some residual ink is left in the cartridge after it is used. For
more information see www.hp.com/go/inkusage.
Contents
3
�
Set up the fax
This getting started guide provides
instructions for setting up the fax.
For more information about fax features
available with your HP Officejet/
Officejet Pro device, see the electronic
user guide available on your computer
after you install the software—either from the HP
Solution Center Software (Windows) or the Help Viewer
(Mac OS). (The user guide is also available online at
www.hp.com/support.)
If you do not use the supplied cord or
CAUTION:
adapter to connect from the telephone wall jack to your
HP Officejet/Officejet Pro device, you might not be able
to fax successfully.
This special phone cord is different from the phone
cords you might already have in your home or office.
If the supplied phone cord is too short, see the “Solve
fax problems” on page 10.
Step 1: Identify the type of phone system you are using
(parallel or serial)
NOTE: Before setting up the fax, connect the
HP Officejet/Officejet Pro device and install the
software.
NOTE: The instructions for fax setup differ depending
on whether you have a serial- or parallel-type phone
system.
To begin setting up the HP Officejet/Officejet Pro device
for faxing, determine whether your country/region’s
phone system uses a parallel or serial system.
If you do not see your country/region listed in the
following sections, you probably have a serial-type
phone system. If you are unsure which kind of telephone
system you have (serial or parallel), check with your
telephone company.
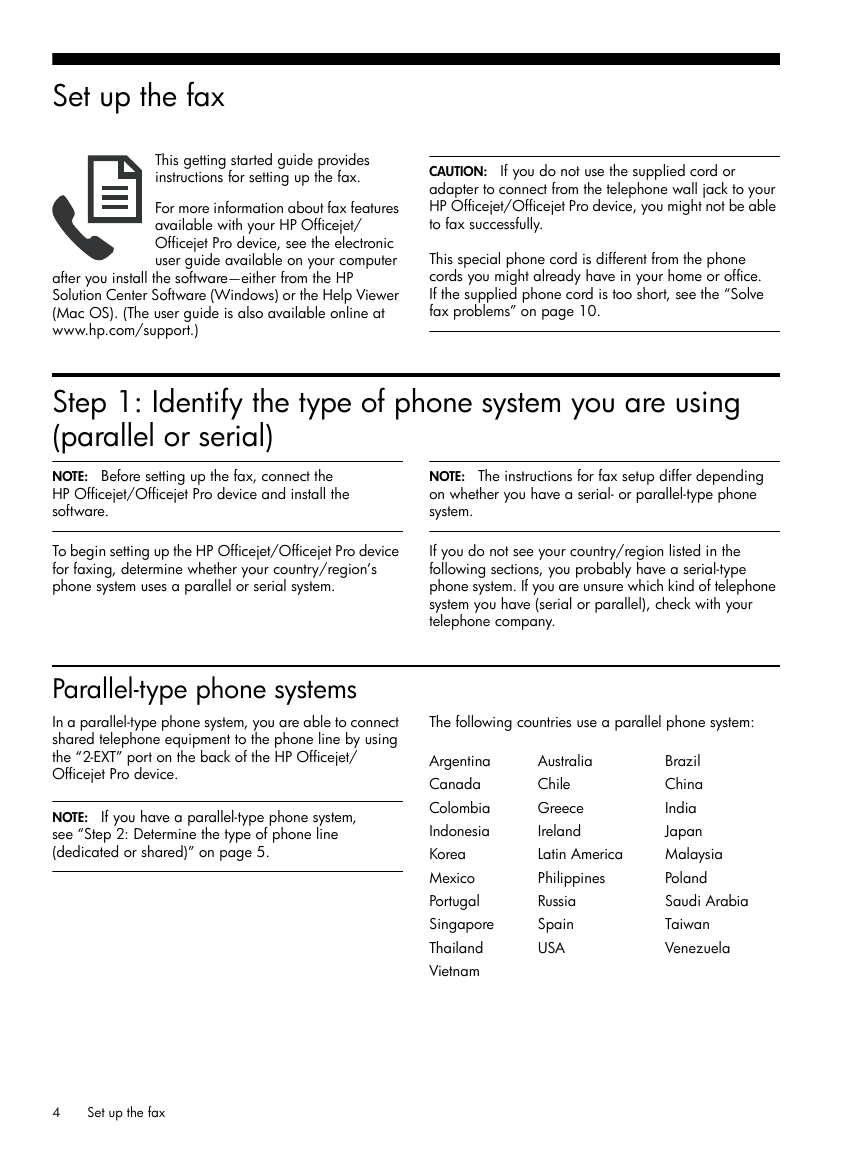
Parallel-type phone systems
In a parallel-type phone system, you are able to connect
shared telephone equipment to the phone line by using
the “2-EXT” port on the back of the HP Officejet/
Officejet Pro device.
If you have a parallel-type phone system,
NOTE:
see “Step 2: Determine the type of phone line
(dedicated or shared)” on page 5.
The following countries use a parallel phone system:
Argentina
Canada
Colombia
Indonesia
Korea
Mexico
Portugal
Singapore
Thailand
Vietnam
Australia
Chile
Greece
Ireland
Latin America
Philippines
Russia
Spain
USA
Brazil
China
India
Japan
Malaysia
Poland
Saudi Arabia
Taiwan
Venezuela
4
Set up the fax
�
Serial-type phone systems
In a serial-type phone system, the connector type on
your shared telephone equipment (modems, phones,
and answering machines) does not allow a physical
connection to the “2-EXT” port on the HP Officejet/
Officejet Pro device. Instead, all equipment must be
connected at the telephone wall jack.
In some countries/regions that use serial-type
NOTE:
phone systems, an adapter is provided that enables you
to connect other telecom devices to the wall jack where
you plug in the HP Officejet/Officejet Pro device.
h
s
i
l
g
n
E
For information on setting up the HP Officejet/Officejet
Pro device for faxing using a serial-type phone system,
see the Fax Configuration Web site for your country/
region.
Austria
Belgium (Dutch)
Belgium (French)
Denmark
Finland
France
Germany
Ireland
Italy
Norway
Netherlands
Portugal
Spain
Sweden
Switzerland (French)
Switzerland (German)
United Kingdom
www.hp.com/at/faxconfig
www.hp.be/nl/faxconfig
www.hp.be/fr/faxconfig
www.hp.dk/faxconfig
www.hp.fi/faxconfig
www.hp.com/fr/faxconfig
www.hp.com/de/faxconfig
www.hp.com/ie/faxconfig
www.hp.com/it/faxconfig
www.hp.no/faxconfig
www.hp.nl/faxconfig
www.hp.pt/faxconfig
www.hp.es/faxconfig
www.hp.se/faxconfig
www.hp.com/ch/fr/faxconfig
www.hp.com/ch/de/faxconfig
www.hp.com/uk/faxconfig
NOTE: After you set up the HP Officejet/Officejet Pro
device for faxing, see “Step 3: Manage and configure
fax settings” on page 6.
Step 2: Determine the type of phone line (dedicated or
shared)
If you have determined that you use a parallel-type
phone system, determine if the HP Officejet/Officejet
Pro device will have its own phone line (dedicated
phone line) or if it will share the phone line with another
device (shared phone line).
If you are going to connect another device to the
HP Officejet/Officejet Pro device, you will need to
change settings such as how many rings to allow before
picking up, whether you have a distinctive ring service,
and whether to automatically answer the phone line.
NOTE: You cannot receive faxes automatically if you
have a voice mail service at the same phone number
you use for fax calls. You must receive faxes manually;
this means you must be available to respond in person
to incoming fax calls. If you want to receive faxes
automatically instead, contact your telephone company
to subscribe to a distinctive ring service, or to obtain a
separate phone line for faxing.
To change the Auto Answer setting, see the electronic
user guide available on the computer after installing the
software.
Set up the fax
5
�
Dedicated phone line
Use this section if you plan on using the following type
of phone line for the fax:
• Dedicated phone line (no other devices, such as
a phone or answering machine, share the line).
• Dedicated phone line without devices sharing the
line but with a subscription to a distinctive ring
service.
• Private Branch Exchange (PBX) or an Integrated
Services Digital Network (ISDN) line. For more
information about PBX and ISDN lines, see the
electronic user guide available on the computer
after installing the software.
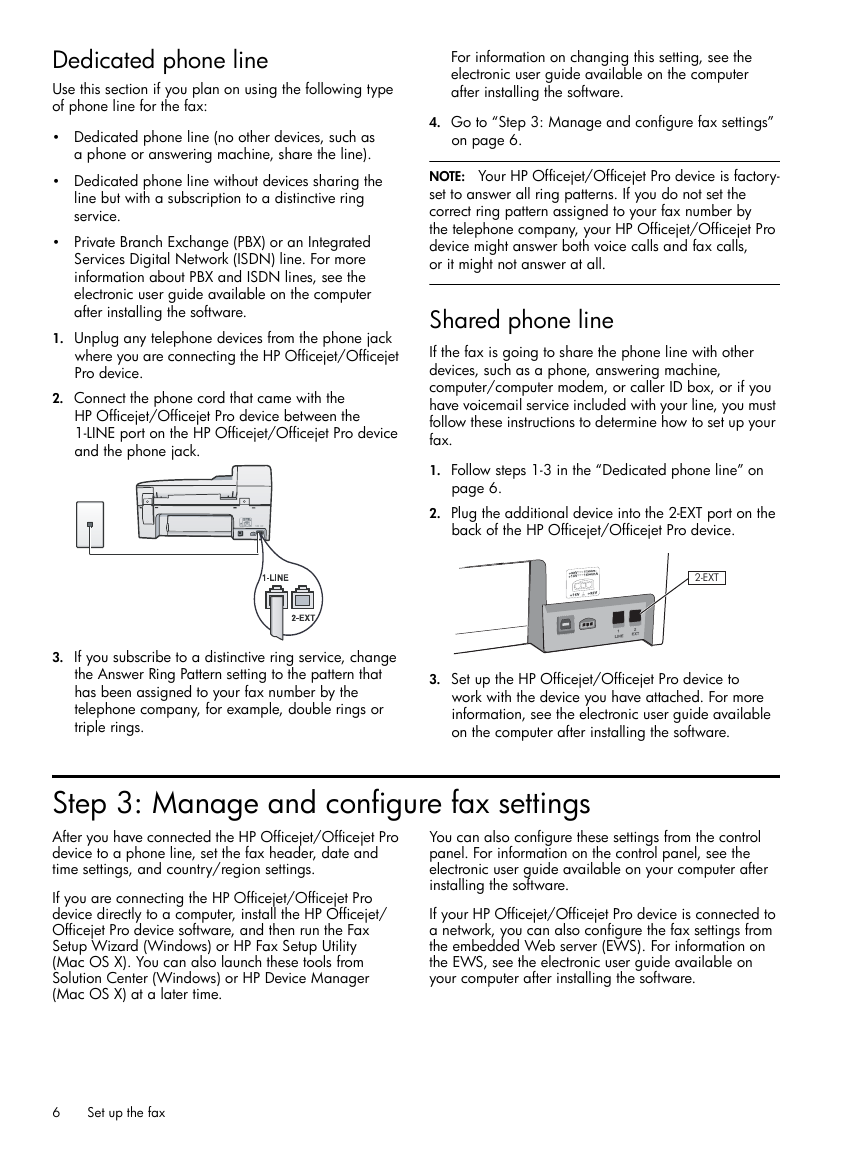
1. Unplug any telephone devices from the phone jack
where you are connecting the HP Officejet/Officejet
Pro device.
2. Connect the phone cord that came with the
HP Officejet/Officejet Pro device between the
1-LINE port on the HP Officejet/Officejet Pro device
and the phone jack.
For information on changing this setting, see the
electronic user guide available on the computer
after installing the software.
4. Go to “Step 3: Manage and configure fax settings”
on page 6.
NOTE: Your HP Officejet/Officejet Pro device is factory-
set to answer all ring patterns. If you do not set the
correct ring pattern assigned to your fax number by
the telephone company, your HP Officejet/Officejet Pro
device might answer both voice calls and fax calls,
or it might not answer at all.
Shared phone line
If the fax is going to share the phone line with other
devices, such as a phone, answering machine,
computer/computer modem, or caller ID box, or if you
have voicemail service included with your line, you must
follow these instructions to determine how to set up your
fax.
1. Follow steps 1-3 in the “Dedicated phone line” on
page 6.
2. Plug the additional device into the 2-EXT port on the
back of the HP Officejet/Officejet Pro device.
2-EXT
3.
If you subscribe to a distinctive ring service, change
the Answer Ring Pattern setting to the pattern that
has been assigned to your fax number by the
telephone company, for example, double rings or
triple rings.
3. Set up the HP Officejet/Officejet Pro device to
work with the device you have attached. For more
information, see the electronic user guide available
on the computer after installing the software.
Step 3: Manage and configure fax settings
After you have connected the HP Officejet/Officejet Pro
device to a phone line, set the fax header, date and
time settings, and country/region settings.
If you are connecting the HP Officejet/Officejet Pro
device directly to a computer, install the HP Officejet/
Officejet Pro device software, and then run the Fax
Setup Wizard (Windows) or HP Fax Setup Utility
(Mac OS X). You can also launch these tools from
Solution Center (Windows) or HP Device Manager
(Mac OS X) at a later time.
You can also configure these settings from the control
panel. For information on the control panel, see the
electronic user guide available on your computer after
installing the software.
If your HP Officejet/Officejet Pro device is connected to
a network, you can also configure the fax settings from
the embedded Web server (EWS). For information on
the EWS, see the electronic user guide available on
your computer after installing the software.
6
Set up the fax
�
Step 4: Test fax setup
Test your fax setup to check the status of the
HP Officejet/Officejet Pro device and to make sure it is
set up properly for faxing. The test does the following:
• Tests the fax hardware
• Verifies the correct type of phone cord is connected
to the HP Officejet/Officejet Pro device
• Checks that the phone cord is plugged into the
correct port
• Checks for a dial tone
• Checks for an active phone line
• Tests the status of your phone line connection
The HP Officejet/Officejet Pro device prints a report
with the results of the test. If the test fails, review the
report for information on how to fix the problem and
rerun the test. For additional troubleshooting
information, see “Solve fax problems” on page 10.
To test fax setup
1. Set up the HP Officejet/Officejet Pro device for
faxing according to your particular home or office
setup instructions.
2. Make sure the printing supplies are installed, and
that full-size paper is loaded in the input tray before
starting the test.
3. From the control panel, press the
4. Select Tools, and then select Run Fax Test.
(Setup button).
The HP Officejet/Officejet Pro device displays the
status of the test on the display and prints a report.
5. Review the report.
• If the test passes and you are still having
problems faxing, check the fax settings listed in
the report to verify the settings are correct.
A blank or incorrect fax setting can cause
problems faxing.
• If the test fails, use the report to fix the problems
and rerun the test.
h
s
i
l
g
n
E
Set the answer mode (Auto Answer) (optional)
The answer mode determines whether the device
answers incoming calls:
• Turn on the Auto Answer setting if you want the
device to answer faxes automatically. The device
answers all incoming calls and faxes.
• Turn off the Auto Answer setting if you want to
receive faxes manually. You must be available to.
To set the answer mode to manual
or automatic
Press Auto Answer to turn the light on or off,
as appropriate for your setup.
When the Auto Answer light is on, the device answers
calls automatically. When the light is off, the it does not
answer calls.
Set the answer mode (Auto Answer) (optional)
7
�
Change the answer ring pattern for distinctive ring
(optional)
NOTE: Check with your local service provider for the
above service before using the feature.
Many phone companies offer a distinctive ring feature
that allows you to have several phone numbers on one
phone line.
When you subscribe to this service, each number is
assigned a different ring pattern. You can set up the
device to answer incoming calls that have a specific ring
pattern.
For more information, see the electronic user guide
available on the computer after installing the software.
To change the answer ring pattern
for distinctive ring
1. Verify that the device is set to answer fax calls
automatically.
2. Press the
3. Select Advanced Fax Setup, and then select
(Setup button).
Distinctive Ring.
4. Select an option, and then press OK.
5. When the phone rings with the ring pattern assigned
to your fax line, the device answers the call and
receives the fax.
Set up speed-dial entries (optional)
prefix. Type the name using the numeric keypad,
and then press OK.
• To delete one entry or all entries: Select Delete
Speed Dial and press the arrow keys to move to
the speed-dial entry that you want to delete, and
then press OK.
You can store fax numbers or groups of fax numbers
as speed-dial entries. If the HP Officejet/Officejet Pro
device has one-touch speed-dial buttons on the control
panel, they are associated with the corresponding
speed-dial entries. This lets you dial those numbers
quickly by using the control panel.
If your HP Officejet/Officejet Pro device is
NOTE:
connected to a network, you can also set up speed-dial
entries using the embedded Web server.
For information on setting up and using speed-dial
entries, see the electronic user guide available on the
computer after installing the software.
To set up speed-dial entries
1. From the control panel, press the
2. Select Speed Dial Setup and do one of the following:
(Setup button).
• To add or change an entry: Select Individual
Speed Dial or Group Speed Dial and press the
arrow keys to move to an unused entry number,
or type a number on the keypad. Type the fax
number, and then press OK. Include any pauses
or other required numbers, such as an area
code, an access code for numbers outside a
PBX system (usually a 9 or 0), or a long-distance
8
Change the answer ring pattern for distinctive ring (optional)
�





 2023年江西萍乡中考道德与法治真题及答案.doc
 2012年重庆南川中考生物真题及答案.doc
 2013年江西师范大学地理学综合及文艺理论基础考研真题.doc
 2020年四川甘孜小升初语文真题及答案I卷.doc
 2020年注册岩土工程师专业基础考试真题及答案.doc
 2023-2024学年福建省厦门市九年级上学期数学月考试题及答案.doc
 2021-2022学年辽宁省沈阳市大东区九年级上学期语文期末试题及答案.doc
 2022-2023学年北京东城区初三第一学期物理期末试卷及答案.doc
 2018上半年江西教师资格初中地理学科知识与教学能力真题及答案.doc
 2012年河北国家公务员申论考试真题及答案-省级.doc
 2020-2021学年江苏省扬州市江都区邵樊片九年级上学期数学第一次质量检测试题及答案.doc
 2022下半年黑龙江教师资格证中学综合素质真题及答案.doc