Table of Content
Buttons & Ports ........................................................................................................... 2
Charging Battery ......................................................................................................... 3
Installing Memory Card ............................................................................................... 3
Transferring Files ........................................................................................................ 3
Turning On/Off ............................................................................................................ 3
Unlocking the Screen .................................................................................................. 4
Home Screen .............................................................................................................. 4
Accessing Internet ...................................................................................................... 6
Using the Virtual Keyboard ......................................................................................... 7
Playing Music .............................................................................................................. 7
Playing Video .............................................................................................................. 8
Viewing Photos ........................................................................................................... 9
Using the Camcorder/Camera .................................................................................. 11
Sending/Receiving E-mails ....................................................................................... 11
Other Applications ..................................................................................................... 13
Managing Apps ......................................................................................................... 13
Managing Tasks ........................................................................................................ 14
Troubleshooting ........................................................................................................ 14
Safety Precautions ................................................................................................. 14
1
�
This device
W/kg. The s
on page 18
or using it
approved a
maintain a d
compliance
the product
it.
meets applicab
specific maximu
of this user guid
while worn on
accessory such
distance of 0.5
with RF expos
may be transmi
ble national SAR
um SAR values
de. When carry
n your body, e
as a holster
cm from the bo
sure requiremen
tting even if you
R limits of 2.0
can be found
ying the device
either use an
or otherwise
ody to ensure
nts. Note that
u are not using
olonged expos
ayer may dama
lume safely. Us
obile Limited an
ure to music a
age the listene
se only headph
d its affiliates.
Pro
pla
vol
Mo
at full volume
r's hearing. Se
hones recomme
on the music
et your device
ended by TCT
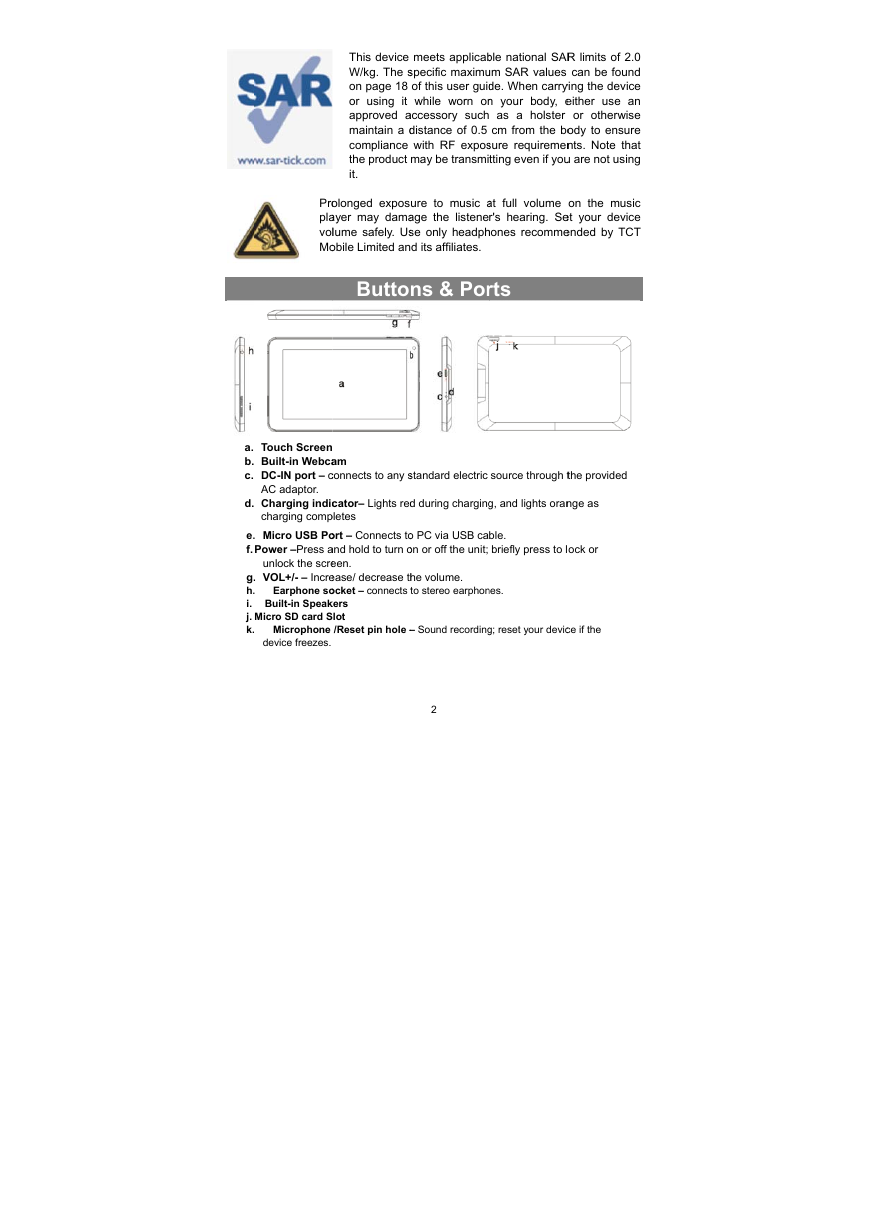
Butto
ns & Por
rts
standard electric
source through t
the provided
d during charging
g, and lights oran
nge as
o PC via USB ca
on or off the unit;
ble.
briefly press to l
ock or
he volume.
to stereo earphon
nes.
– Sound recording
g; reset your devic
ce if the
d.
a.
b.
c.
Touch Screen
am
Built-in Webca
DC-IN port – c
connects to any s
AC adaptor.
Charging indic
charging comp
. Micro USB Po
e.
Power –Press a
f.
unlock the scre
. VOL+/- – Incre
g.
.
h.
Earphone so
Built-in Speak
i.
j.
Micro SD card S
k.
Microphone
device freezes.
cator– Lights red
pletes
ort – Connects to
and hold to turn o
een.
ease/ decrease th
ocket – connects t
kers
lot
/Reset pin hole –
2
�
Note: Pressing the Reset button will only turn off the device. To turn on the
device , user needs to press and hold the Power button.
Charging Battery
The device has a built-in rechargeable battery. No extra battery installation is required.
Just charge the device when it indicates low battery.
To charge the battery, connect the device to any standard wall outlet via the DC-IN
port using the power adaptor. It takes about 5 hours to fully charge the battery. When
the battery is fully charged, the charge indicator should light up in orange. During
charging, the indicator lights up in red.
Note:
a. You are strongly recommended to charge the battery immediately when the device indicates the battery
is lower than 15%!
b. For extended battery life, it is suggested NOT to use the device when it is charging.
c. For maximum performance, lithium-ion batteries need to be used often. If you don’t use the device
often, be sure to recharge the battery at least once per month.
d. Be sure to use only the dedicated power adaptor provided with the unit for charging.
Installing Memory Card
This device can read files directly from memory card.
To use a memory card, find the card slot on the device and then insert the memory
card into the slot in the correct orientation. To access the files stored in the memory
card, enter the Explorer mode by tapping the Explorer icon and select the “SD Card”
directory.
Transferring Files
Before reading or playing files, you may need to transfer media files from a computer
to the device.
(1) Connect the device to a computer with the supplied USB cable. Two removable
disks will be added to the computer, respectively referring to the internal flash
memory and the SD card.
(2) Once the connection is done, turn on the USB storage.
(3) Open a removable disk, then copy files from the PC to it.
Note:
Since pre-installed applications and Android OS occupies a considerable part of capacity – about 2.0GB, it
is normal that you see huge difference between available memory space and total capacity.
Turning On/Off
To turn on the device, press and hold the Power button on the unit until you see the
boot-up screen then release. It may take a few minutes to start up the system, please
wait before you proceed.
3
�
rn off the devic
er Off”, tap on “P
For the sake of po
there is no touc
out). You can brief
ce, press and h
Power Off” and th
ower saving, this
ch action for a w
fly press the Powe
old the Power b
button until you
hen tap on “OK”.
device may slee
while (depending
er button to wake
ep with the screen
on the actual se
it up.
see the option
n display locked
etting of Screen
locking t
the Scre
een
The sc
screen
creen will be locke
n by dragging the
ed after the devic
righ
lock icon
e is idle for a few
htwards before yo
seconds. You nee
u continue to use
ed to unlock the
the device.
To tu
“Powe
Tip: F
when
Timeo
Un
Hom
me Screen
n
Go to
application
page
Go t
Sear
to Google
rch page
City
World
er
Weathe
forecas
st
Default
to
Shortcut
application
n
Return
Wi-Fi
i
Time
Battery
level
Go to Home
screen
Recently us
sed
applications
Scre
mode
en
e
The
The H
Slide y
extended Ho
Home Screen cons
your finger left or
ome Screen
sists five separate
right on the scree
e screens for posit
en to go to the exte
ioning the shortcu
ended screens.
uts, widgets etc..
4
�
Cust
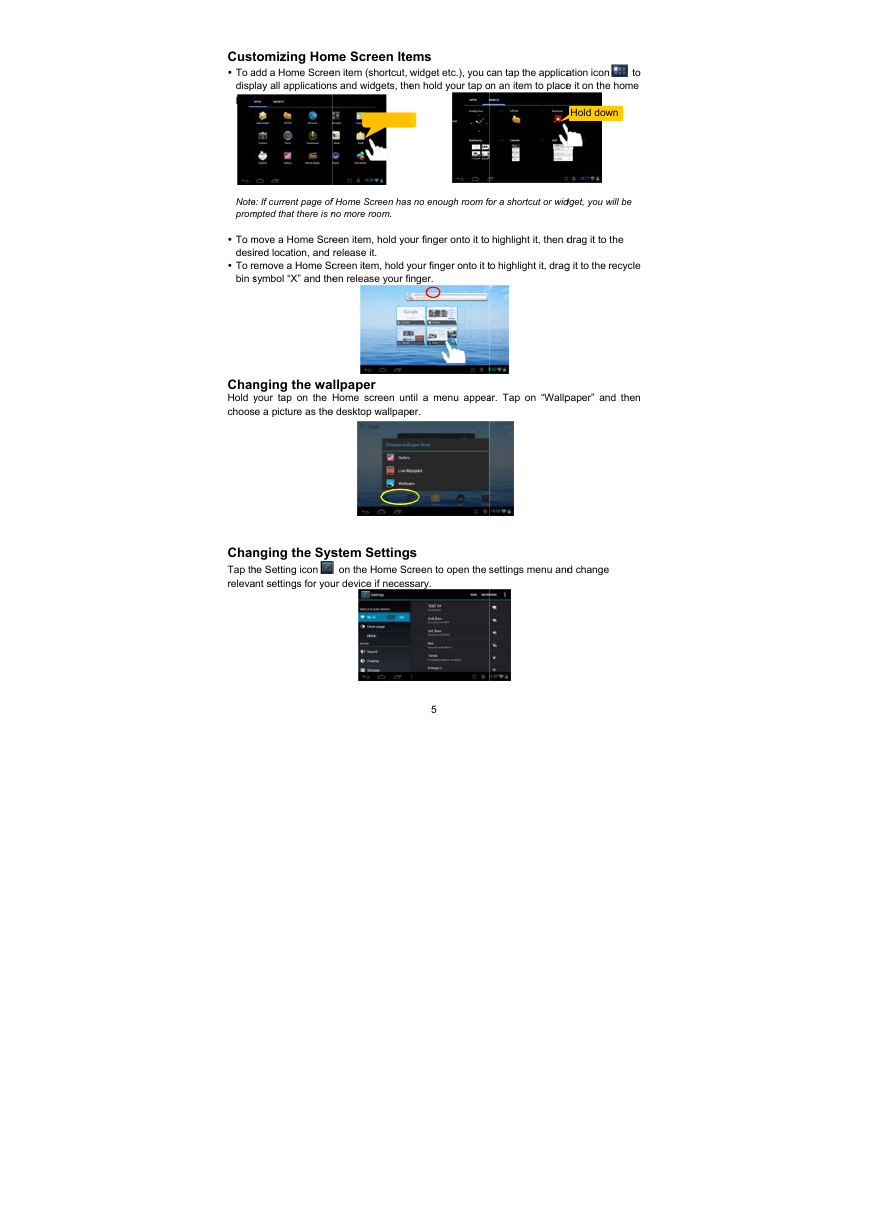
To a
disp
page
tomizing Hom
add a Home Scree
lay all applications
e.
me Screen Ite
en item (shortcut, w
s and widgets, the
ems
widget etc.), you c
en hold your tap o
can tap the applica
on an item to place
ation icon
to
e it on the home
Hold down
Hold down
Note
prom
e: If current page of
mpted that there is n
f Home Screen has
no more room.
To m
desi
To re
bin s
move a Home Scre
red location, and
emove a Home Sc
symbol “X” and the
een item, hold you
release it.
creen item, hold y
en release your fi
s no enough room fo
or a shortcut or wid
dget, you will be
ur finger onto it to
highlight it, then d
drag it to the
your finger onto it t
nger.
to highlight it, drag
g it to the recycle
Chan
Hold y
choos
nging the wa
your tap on the
se a picture as the
llpaper
Home screen unt
e desktop wallpape
til a menu appea
er.
ar. Tap on “Wallp
paper” and then
Chan
Tap th
releva
nging the Sys
he Setting icon
ant settings for you
stem Settings
s
creen to open the
on the Home Sc
sary.
ur device if necess
settings menu and
d change
5
�
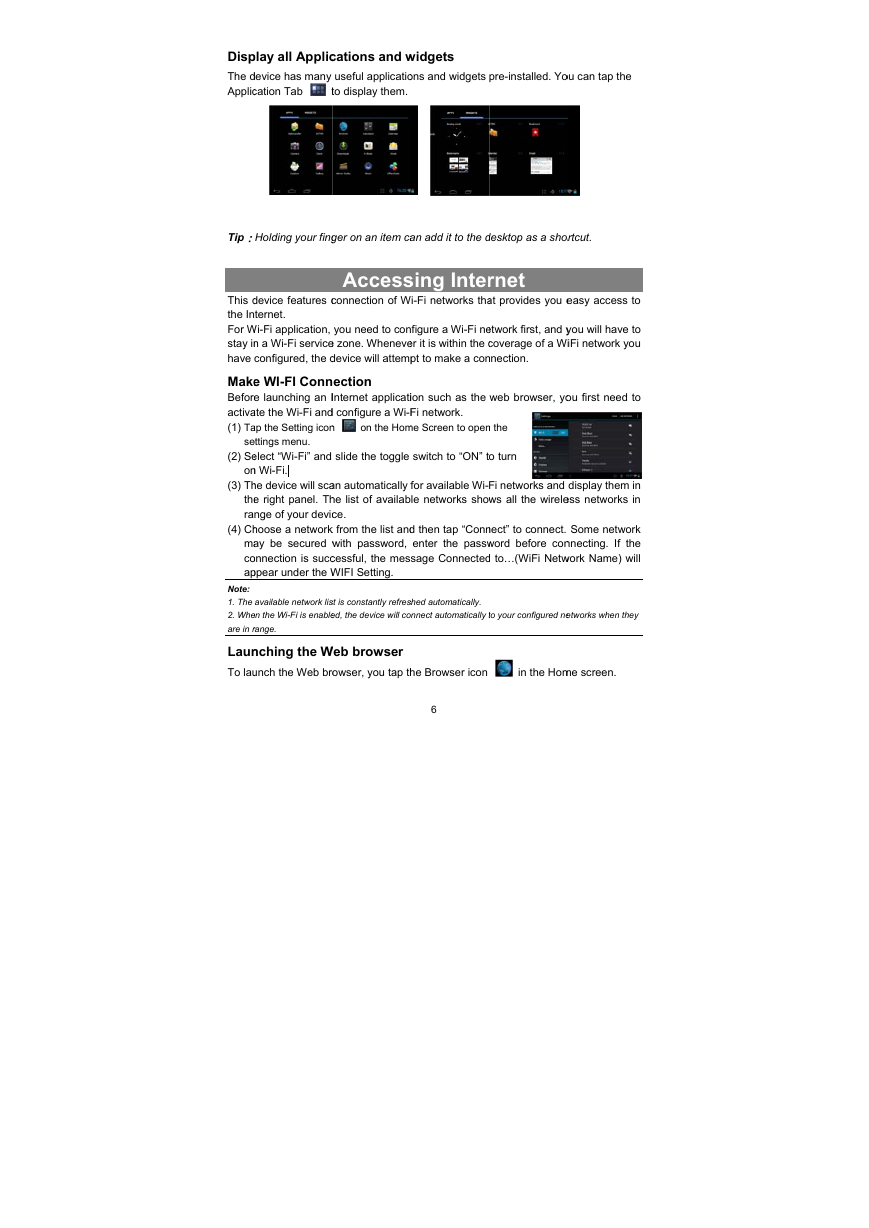
Disp
The d
Applic
cations and w
play all Applic
useful applicatio
device has many
t
to display them.
cation Tab
widgets
ons and widgets
pre-installed. Yo
ou can tap the
Tip:
Holding your fing
ger on an item ca
an add it to the d
desktop as a shor
rtcut.
Access
connection of W
sing Inter
i-Fi networks tha
rnet
at provides you e
easy access to
slide the toggle
device features c
ternet.
This d
the In
you need to con
For W
Wi-Fi application,
stay in
n a Wi-Fi service
e zone. Wheneve
have
configured, the d
device will attemp
Make
e WI-FI Conn
ection
Before
e launching an I
Internet applicati
activa
ate the Wi-Fi and
d configure a Wi-F
(1) Ta
on the Hom
ap the Setting icon
n
ettings menu.
se
(2) Se
elect “Wi-Fi” and
on
n Wi-Fi.
(3) Th
he device will sca
e right panel. Th
the
nge of your devic
ra
hoose a network
(4) Ch
ma
ay be secured w
co
onnection is succ
ap
ppear under the W
Note:
available network lis
1. The
en the Wi-Fi is enable
2. Whe
range.
are in r
nching the W
Laun
unch the Web bro
To lau
an automatically f
he list of availab
ce.
k from the list and
with password,
cessful, the mess
WIFI Setting.
st is constantly refres
ed, the device will co
Web browser
owser, you tap th
figure a Wi-Fi ne
er it is within the c
pt to make a con
etwork first, and y
coverage of a Wi
nnection.
you will have to
iFi network you
web browser, yo
ou first need to
ion such as the
Fi network.
me Screen to open
n the
switch to “ON” t
o turn
for available Wi-
le networks show
Fi networks and
ws all the wirele
display them in
ess networks in
d then tap “Conn
enter the passw
sage Connected
nect” to connect.
word before con
d to…(WiFi Netw
Some network
nnecting. If the
work Name) will
shed automatically.
nnect automatically t
to your configured ne
etworks when they
he Browser icon
in the Hom
me screen.
6
�
splay context me
enus, tap
To dis
.
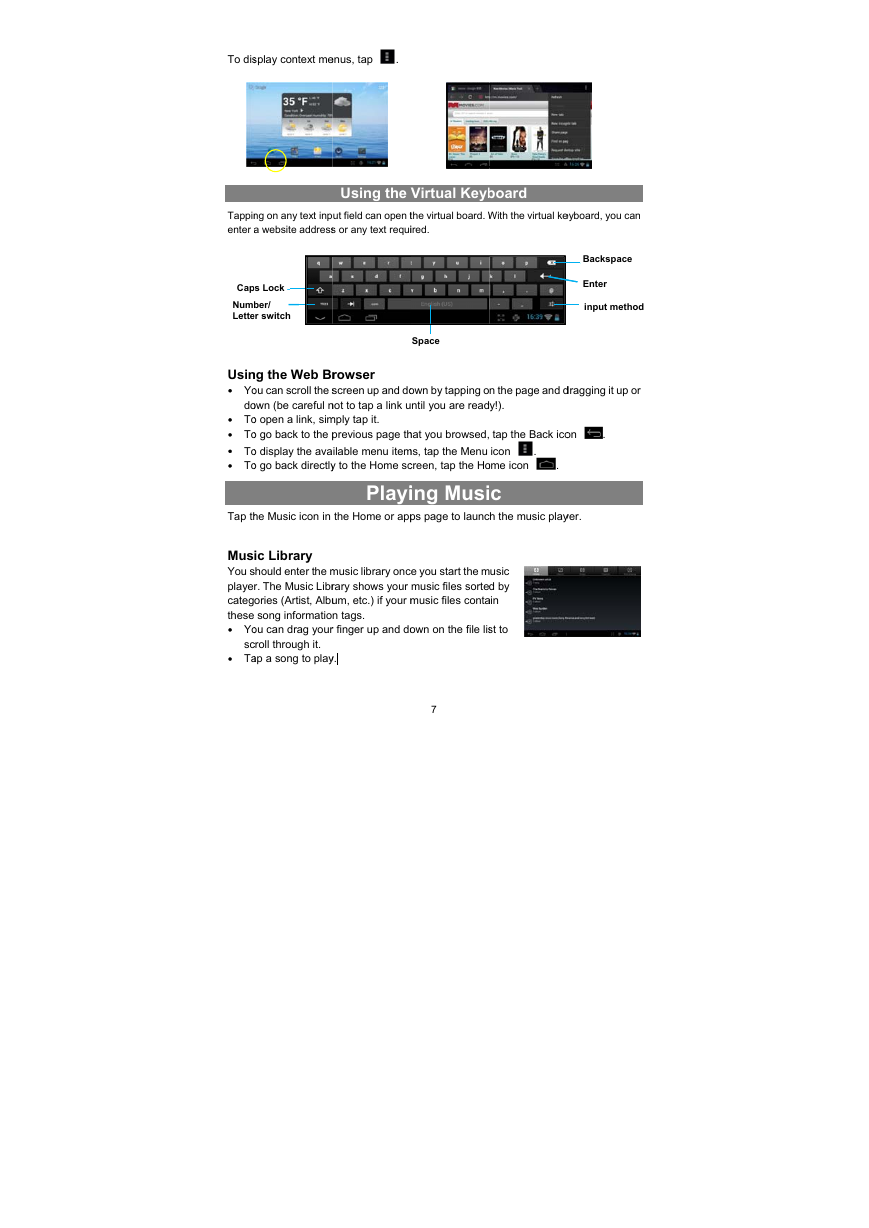
Tappin
enter a
ng on any text inp
a website address
Using the V
ut field can open t
s or any text requi
Virtual Keyb
the virtual board. W
ired.
board
With the virtual ke
eyboard, you can
Backspace
Enter
input method
own by tapping o
ntil you are read
n the page and d
y!).
dragging it up or
on
.
.
hat you browsed,
ms, tap the Menu
creen, tap the Ho
ing Musi
ps page to launc
tap the Back ico
icon
ome icon
c
h the music play
.
yer.
Cap
Num
Lette
ps Lock
ber/
er switch
Space
ng the Web Br
Usin
Yo
ou can scroll the s
do
own (be careful n
To
o open a link, sim
To
o go back to the p
To
o display the ava
To
o go back directly
rowser
screen up and do
not to tap a link u
mply tap it.
previous page th
ilable menu item
y to the Home sc
Playi
the Home or app
he Music icon in
Tap th
Mus
ic Library
should enter the m
You s
r. The Music Libr
playe
ories (Artist, Albu
categ
these
song informatio
Yo
ou can drag your
sc
croll through it.
Ta
ap a song to play
y.
music library onc
rary shows your
um, etc.) if your m
n tags.
r finger up and do
e you start the m
music files sorte
music files conta
usic
d by
ain
own on the file lis
st to
7
�
Artist
Album
Songs
Playlists
Lis
t music files by a
artist.
Lis
t music files by a
album.
Lis
t all music files.
Lis
t your favorite so
ongs.
Go
o to the Now Play
ying screen.
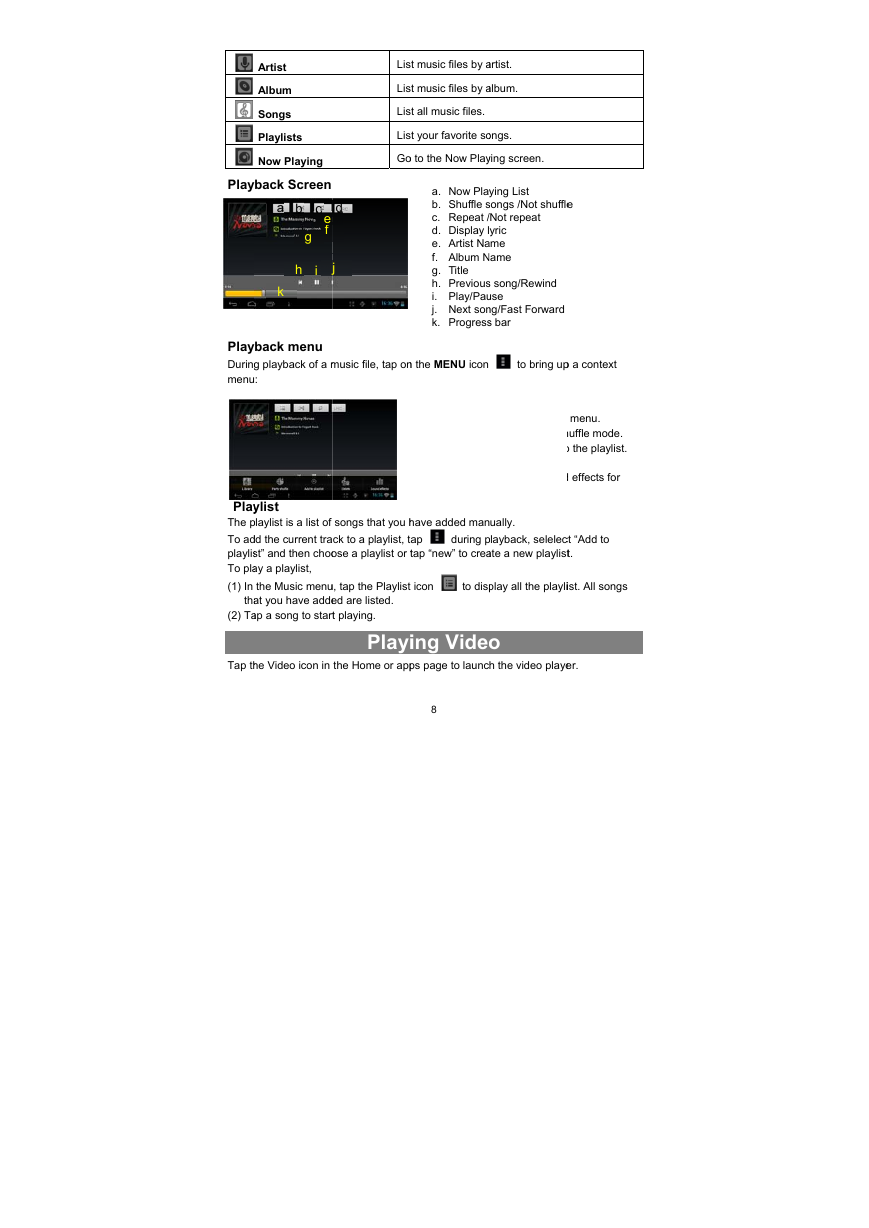
a. Now Pla
b. Shuffle s
c. Repeat /
d. Display l
e. Artist Na
f. Album N
g. Title
h. Previous
i. Play/Pau
j. Next son
k. Progress
ying List
songs /Not shuffle
e
/Not repeat
yric
ame
ame
s song/Rewind
use
ng/Fast Forward
s bar
d
g
Now Playing
a b c
e
f
Play
yback Screen
Play
yback menu
During
g playback of a m
:
menu
h
k
j
j
i
music file, tap on
n the MENU icon
to bring up
p a context
Library– return
Party Shuffle –
Add to playlist
Delete – delete
Sound Effects
the music playb
to music library
– select Party Sh
t – add a song to
e a song.
– Set the sound
back.
menu.
huffle mode.
o the playlist.
d effects for
ylist
Play
playlist is a list of
The p
dd the current tra
To ad
st” and then choo
playlis
ay a playlist,
To pla
the Music menu
(1) In
tha
at you have adde
ap a song to start
(2) Ta
u, tap the Playlist
ed are listed.
t playing.
songs that you h
ck to a playlist, ta
ose a playlist or t
have added man
ap
during p
tap “new” to crea
ually.
playback, selelect
ate a new playlist
ct “Add to
t.
icon
to disp
play all the playli
ist. All songs
Tap th
he Video icon in
Playi
the Home or app
ing Video
o
h the video playe
ps page to launc
er.
8
�




 2023年江西萍乡中考道德与法治真题及答案.doc
 2012年重庆南川中考生物真题及答案.doc
 2013年江西师范大学地理学综合及文艺理论基础考研真题.doc
 2020年四川甘孜小升初语文真题及答案I卷.doc
 2020年注册岩土工程师专业基础考试真题及答案.doc
 2023-2024学年福建省厦门市九年级上学期数学月考试题及答案.doc
 2021-2022学年辽宁省沈阳市大东区九年级上学期语文期末试题及答案.doc
 2022-2023学年北京东城区初三第一学期物理期末试卷及答案.doc
 2018上半年江西教师资格初中地理学科知识与教学能力真题及答案.doc
 2012年河北国家公务员申论考试真题及答案-省级.doc
 2020-2021学年江苏省扬州市江都区邵樊片九年级上学期数学第一次质量检测试题及答案.doc
 2022下半年黑龙江教师资格证中学综合素质真题及答案.doc