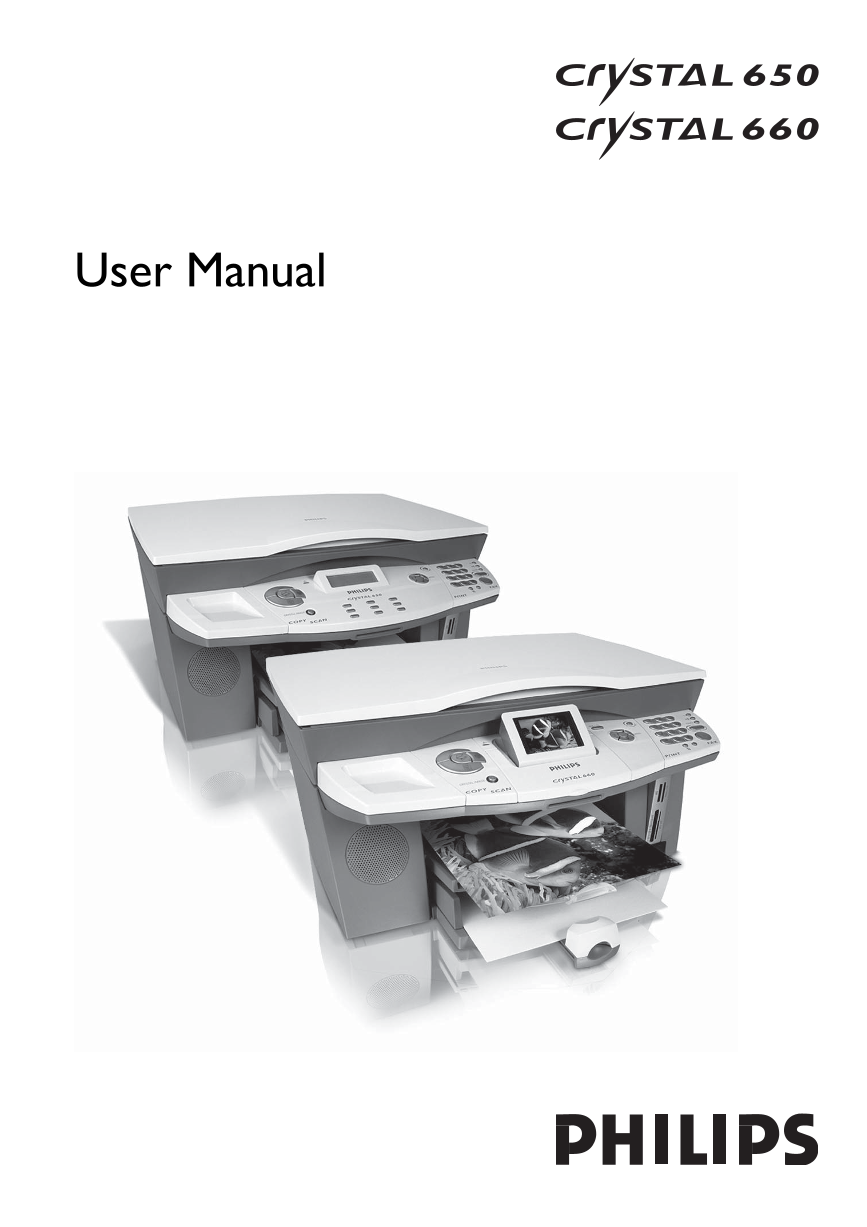
User Manual
Dear Customer! About this User Manual
In purchasing this multifunction machine, you have Please read the user manual carefully and follow the
decided on a quality PHILIPS product. The features of safety instructions to ensure proper operation of your
your machine meet the many needs that arise in modern multifunction machine.
home office environments. You can use your machine to Symbols Used and Basic Terms:
scan, print, copy and fax—both in black-and-white and
ÆWarns about improper operations that could
in colour. lead to injuries, errors or damage to the ma-
As a fully functional photo printer, your machine has chine or refers to features that are specific to a
the card slots required for all typical photo storage me- country or machine type.
dia as well as an option for directly connecting a digital ²Indicates tips for effective use of your
camera. multifunction machine and helps to avoid
The image and text enhancement function Crystal Im- possible difficulties in the execution of individual
age ensures the best possible printing and copying qual- functions.
ity for your black-and-white and colour documents. Document: Original that is copied, scanned or trans-
Crystal Image also helps you to retouch annoying “red mitted as a fax or Text2Fax, SMS, MMS
eye” effects in your flash photographs (red eye reduc- message* with your machine.
tion). Paper: Printing medium that you insert into
the paper tray and onto which your
The Crystal 660 offers you the convenience of a fold- multifunction machine prints.
out illuminated colour display for menu operation and Pre-Printed material: Printed paper (e.g. stationary,
photo selection. postcards) onto which you can print with
You can connect the multifunction machine to your your machine.
PC (Microsoft Windows 98 SE · 2000 (SP 3) · ME · Menu: Settings options for functions that are
XP). Install the included software package and use the shown on the display for selection.
multifunction machine as a (network) printer. In addi- Photo memory media: Data storage media that is
tion, you can send and receive faxes via the PC, manage compatible with the multifunction ma-
the telephone book, scan, edit and save documents and chine (e.g. digital cameras, memory cards,
send SMS messages . mobile devices).
* Starting mode: Machine operating mode.
A WLAN adapter can be connected for wireless PC com- Stand-by mode: Energy-saving mode for times when
munication. You can also send files to the multifunction the multifunction machine is not in use.
machine for printing from all devices with an Infra-
red interface or Bluetooth functionality (e.g. camera This user manual describe two machine types of the
*
phones, handhelds). (WLAN and Bluetooth are op- same series—the Crystal 650 and the Crystal 660. For
tional and function only with an original adapter avail- simpler orientation, the user manual is divided into
able through our order service (see back page of this two sections. In the Machine Functions section you
user manual). More information is available on our will find the functions that can be operated directly on
homepage: . . . the machine; the PC Functions section explains the
www fax philips com settings that can be performed via the PC. Please note
The Crystal 660 has a built-in modem with which you that a general view of both machines was selected for
can send and receive Text2Fax / SMS / MMS messages* the diagrams. In the section Machine Functions /
without using a PC. Panel with Display you will find the correct diagram for
Your multifunction machine prints using state-of-the- your machine. Please note that the availability of cer-
art inkjet technology. Two free ink cartridges are provid- tain functions depends on the specific model. Functions
ed with your machine (black and colour). Install these that only apply to one of the two machine types or are
and you can immediately try out the many features of subject to country-specific deviations are marked with a
your multifunction machine. Have fun! star “*” and are explained at the bottom of the page.
We constantly strive to implement improvements and
innovations. It is possible that individual functions are
not yet activated for your machine firmware. Update the
firmware of your machine (see section PC Functions /
Using Companion Suite IH / Firmware Update).
Introduction * SMS—Crystal 660 (depending on country and network)
MMS—Crystal 660 (depending on country and network) 3
Text2Fax—Crystal 660 (depending on country and network)
Infrared-interface—Crystal 660
Introduction
Trademarks General Notice: The mentioned references in this manual
All rights reserved. No part of this publication may be repro- are trademarks of the respective companies. The lack of the
duced, stored in a retrieval system, or transmitted in any form trademarks ® and ™ does not justify the assumption that these
or by any means, electronic, mechanical, photocopying, re- dedicated terminologies are free trademarks. Other product
cording, or otherwise, without the prior written permission names used herein are for identification purposes only and
of SAGEM SA. The information contained herein is designed may be trademarks of their respective owners. SAGEM SA
only for use with this product. disclaims any and all rights in those marks.
SAGEM is not responsible for any use of this information as
applied to other machines.
Neither SAGEM SA nor its affiliates shall be liable to the As an Energy Star Program Par-
purchaser of this product or third parties for damages, losses, ticipant, SAGEM Communication
costs, or expenses incurred by the purchaser or third parties as Austria GmbH has determined that
a result of accident, misuse, or abuse of this product or unau- this product meets the Energy Star
thorized modifications, repairs, or alterations to this product, guidelines for energy efficiency.
or failure to strictly comply with SAGEM SA operating and
maintenance instructions.
SAGEM SA shall not be liable for any damages or problems The term PictBridge® and the PictBridge
arising from the use of any options or any consumable prod- logo are registered trademarks of CIPA
ucts other than those designated as original SAGEM products (Camera and Imaging Products Associa-
or SAGEM approved products. tion).
SAGEM SA shall not be held liable for any damage resulting
from electromagnetic interference that occurs from the use of
any interface cables other than those designated as SAGEM
products.
SAGEM CRYSTAL® is a registered trademark of SAGEM SA
and CRYSTAL 650/660™ are trademarks of SAGEM SA.
Microsoft® and Windows® are registered trademarks of Notes on Statutory Limitations, Data
Microsoft Corporation. Protection and Legal Validity
Apple® and Macintosh® are registered trademarks of Apple
¿The reproduction of certain documents (e.g. by scanning,
Computer, Inc. printing, copying) is prohibited in many countries. The
Intel® and Pentium® are trademarks of Intel Corporation. list of such documents below is not intended to be complete,
CompactFlash® is a registered trademark of SunDisk Corpora- it only offers a general overview. In case of doubt, consult your
tion. legal advisor.
MEMORY STICK® is a registered trademark of Sony Cor- • Passports (personal identification)
poration.
• Entrance and exit visa papers (immigration papers)
SmartMedia™ is a trademark of Toshiba Corporation.
Secure Digital® is a registered trademark of Toshiba Corpora- • Military service documents
tion. • Bank notes, travel checks, payment orders
Microdrive® is a registered trademark of Hitachi Global Stor- • Postage stamps, tax stamps (stamped or unstamped)
age Technologies. • Loan papers, certificates of deposit, bonds
MultiMedia Card® is a registered trademark of Siemens AG • Documents protected by copyright
and/or Infineon Technologies AG; MultiMedia Card™ is a
trademark of MultiMedia Card Association. ¿Follow the statutory regulations of your country with
xD-Picture Card™ is a trademark of Fuji Photo Film Co., Ltd. regard to the legal validity of fax transmissions—particu-
larly in connection with the validity of signatures, meeting
DPOF® is a registered trademark of Fuji Photo Film Co., Ltd. delivery deadlines or disadvantages resulting from the loss of
The Bluetooth word mark and logos are owned by the quality in the transmission, etc.
Bluetooth SIG, Inc. and any use of such marks by SAGEM
SA is under license. ¿Take care to maintain the statutory regulations of your
country regarding telecommunications secrecy and data
IrDA® is a registered trademark of Infrared Data Association.
privacy.
USB™ is a trademark of USB Implementers Forum, Inc.
4 Introduction
Content 8. Fax Y . . . . . . . . . . . . . . . . . . . . . . . . 35
Sending Black & White Faxes . . . . . . . . . . . . . . . . . . . . . . . . . . . .35
Sending Colour Faxes . . . . . . . . . . . . . . . . . . . . . . . . . . . . . 35
Safety Instructions . . . . . . . . . . . . . . . . . . . . . . . . . . . . . . . . . . . . . .6 Manually Sending Faxes (Speaker) . . . . . . . . . . . . . . . . . . . . . . . .35
Setting Special Transmission Options . . . . . . . . . . . . . . . . . . . . . .36
Machine Functions . . . . .8 Printing a Transmission Report . . . . . . . . . . . . . . . . . . . . . . . . . . .36
Receiving Faxes . . . . . . . . . . . . . . . . . . . . . . . . . . . . . . . . . . . . . . .36
Description of the Multifunction Machine . . . . . . . . . . . . . . . . . . .8 Setting Advanced Reception Options . . . . . . . . . . . . . . . . . . . . . .36
Panel with Display—Crystal 650 . . . . . . . . . . . . . . . . . . . . . . . . . .9 Clearing the Message Memory . . . . . . . . . . . . . . . . . . . . . . . . . . .37
Panel with Display—Crystal 660 . . . . . . . . . . . . . . . . . . . . . . . . .10 Deactivating Automatic Fax Printout . . . . . . . . . . . . . . . . . . . . . .37
1. Installation . . . . . . . . . . . . . . . . . . . . 12 Polling Faxes . . . . . . . . . . . . . . . . . . . . . . . . . . . . . . . . . . . . . . . . .37
Changing the Fax Settings . . . . . . . . . . . . . . . . . . . . . . . . . . . . . . .38
Package Contents . . . . . . . . . . . . . . . . . . . . . . . . . . . . . . . . . . . . .12
Setting Up the Multifunction Machine . . . . . . . . . . . . . . . . . . . . .12 9. SMS » * . . . . . . . . . . . . . . . . . . . 39
Loading Printing Media . . . . . . . . . . . . . . . . . . . . . . . . . . . . . . . . .12 SMS Requirements . . . . . . . . . . . . . . . . . . . . . . . . . . . . . . . . . . . .39
Loading Documents . . . . . . . . . . . . . . . . . . . . . . . . . . . . . . . . . . .14 Sending SMS Messages . . . . . . . . . . . . . . . . . . . . . . . . . . . . . . . . .39
Positioning Printing Media and Documents . . . . . . . . . . . . . . . . .15 Receiving SMS Messages . . . . . . . . . . . . . . . . . . . . . . . . . . . . . . . .39
Connecting the Telephone Cord . . . . . . . . . . . . . . . . . . . . . . . . .15 Clearing the Message Memory . . . . . . . . . . . . . . . . . . . . . . . . . . .40
Connecting the Power Cord . . . . . . . . . . . . . . . . . . . . . . . . . . . .16 Sending SMS Messages to E-mail or Fax . . . . . . . . . . . . . . . . . . . .40
Country Selection . . . . . . . . . . . . . . . . . . . . . . . . . . . . . . . . . . . . .16 Setting Advanced Transmission Options . . . . . . . . . . . . . . . . . . . .40
Language Selection . . . . . . . . . . . . . . . . . . . . . . . . . . . . . . . . . . . .16 Changing the SMS Settings . . . . . . . . . . . . . . . . . . . . . . . . . . . . . .41
Entering Telephone Number and Name . . . . . . . . . . . . . . . . . . . .16
Entering the Dateand Time . . . . . . . . . . . . . . . . . . . . . . . . . . . . . .17 10. MMS » * . . . . . . . . . . . . . . . . . . . 43
Inserting Cartridges . . . . . . . . . . . . . . . . . . . . . . . . . . . . . . . . . . .17 MMS Requirements . . . . . . . . . . . . . . . . . . . . . . . . . . . . . . . . . . . .43
Aligning Cartridges . . . . . . . . . . . . . . . . . . . . . . . . . . . . . . . . . . . .18 Sending MMS Messages . . . . . . . . . . . . . . . . . . . . . . . . . . . . . . . . .43
Connecting Additional Devices . . . . . . . . . . . . . . . . . . . . . . . . . .18 Receiving MMS Messages . . . . . . . . . . . . . . . . . . . . . . . . . . . . . . .44
Clearing the Message Memory . . . . . . . . . . . . . . . . . . . . . . . . . . .45
2. Settings . . . . . . . . . . . . . . . . . . . . . . . 20 Changing the MMS Settings . . . . . . . . . . . . . . . . . . . . . . . . . . . . .45
Entering the Date and Time . . . . . . . . . . . . . . . . . . . . . . . . . . . . .20
Entering Telephone Number and Name . . . . . . . . . . . . . . . . . . . .20 11. Text2Fax » * . . . . . . . . . . . . . . . 47
Setting Country and Language . . . . . . . . . . . . . . . . . . . . . . . . . . .20 Sending Text2Fax . . . . . . . . . . . . . . . . . . . . . . . . . . . . . . . . . . . . . .47
ISDN Connection . . . . . . . . . . . . . . . . . . . . . . . . . . . . . . . . . . . . .20
Private Branch Exchange (PABX) . . . . . . . . . . . . . . . . . . . . . . . . .20 12. Troubleshooting . . . . . . . . . . . . . . . . 48
Calling Line Identification (CLIP) . . . . . . . . . . . . . . . . . . . . . . . . .21 Removing a Paper Jam . . . . . . . . . . . . . . . . . . . . . . . . . . . . . . . . .48
Energy Saving Mode . . . . . . . . . . . . . . . . . . . . . . . . . . . . . . . . . . .21 Changing Cartridges . . . . . . . . . . . . . . . . . . . . . . . . . . . . . . . . . . .48
Inserting Photo Cartridge . . . . . . . . . . . . . . . . . . . . . . . . . . . . . . .49
3. Crystal Image µ . . . . . . . . . . . . . . . 22 Fixing Printing Problems . . . . . . . . . . . . . . . . . . . . . . . . . . . . . . . .50
Using Crystal Image . . . . . . . . . . . . . . . . . . . . . . . . . . . . . . . . . . .22 Displaying the Ink Level . . . . . . . . . . . . . . . . . . . . . . . . . . . . . . . .50
Activating Crystal Image . . . . . . . . . . . . . . . . . . . . . . . . . . . . . . . .22 Printing the Journal . . . . . . . . . . . . . . . . . . . . . . . . . . . . . . . . . . . .50
Deactivating Crystal Image . . . . . . . . . . . . . . . . . . . . . . . . . . . . . .22 Editing Jobs . . . . . . . . . . . . . . . . . . . . . . . . . . . . . . . . . . . . . . . . . .50
Printing photos with Crystal Image . . . . . . . . . . . . . . . . . . . . . . .22 Locking the Machine . . . . . . . . . . . . . . . . . . . . . . . . . . . . . . . . . . .51
Cleaning and Care . . . . . . . . . . . . . . . . . . . . . . . . . . . . . . . . . . . .51
4. Copier K . . . . . . . . . . . . . . . . . . . . . 23 Service Codes . . . . . . . . . . . . . . . . . . . . . . . . . . . . . . . . . . . . . . . .52
Making Copies with the Factory Settings . . . . . . . . . . . . . . . . . . .23 Power Cycling . . . . . . . . . . . . . . . . . . . . . . . . . . . . . . . . . . . . . . . .52
Making Copies with Custom Settings . . . . . . . . . . . . . . . . . . . . .23
Changing the Copy Settings . . . . . . . . . . . . . . . . . . . . . . . . . . . . .24 PC Functions . . . . . . . .53
5. Photo Printer . . . . . . . . . . . . . . . . . . . . 25 PC Requirements . . . . . . . . . . . . . . . . . . . . . . . . . . . . . . . . . . . . .53
Requirements . . . . . . . . . . . . . . . . . . . . . . . . . . . . . . . . . . . . . . . .25 Wireless Network Requirements . . . . . . . . . . . . . . . . . . . . . . . .53
Using Photo storage media . . . . . . . . . . . . . . . . . . . . . . . . . . . . . .25
Reading Image Files . . . . . . . . . . . . . . . . . . . . . . . . . . . . . . . . . . . .27 1. Installing the Driver and Software . 53
Printing DPOF Files . . . . . . . . . . . . . . . . . . . . . . . . . . . . . . . . . . .27
Printing Image Files from the Photo Menu . . . . . . . . . . . . . . . . . .28 2. Networks . . . . . . . . . . . . . . . . . . . . . 57
PictBridge-Directly Printing Files . . . . . . . . . . . . . . . . . . . . . . . . .29 Wireless Networks . . . . . . . . . . . . . . . . . . . . . . . . . . . . . . . . . . .57
Slideshow . . . . . . . . . . . . . . . . . . . . . . . . . . . . . . . . . . . . . . . . . . .29 Setting Up Wireless Networks (WLAN) . . . . . . . . . . . . . . . . . . .57
Transferring a Scan to a Memory Card . . . . . . . . . . . . . . . . . . . .29
Reanalysing Image Files . . . . . . . . . . . . . . . . . . . . . . . . . . . . . . . . .30 3. Using COMPANION SUITE IH . . . . . . . . 60
Removing Storage Media . . . . . . . . . . . . . . . . . . . . . . . . . . . . . . .30 Telephone Book . . . . . . . . . . . . . . . . . . . . . . . . . . . . . . . . . . . . . .60
Editing Memory Card Contents on the PC . . . . . . . . . . . . . . . . .30 Faxing . . . . . . . . . . . . . . . . . . . . . . . . . . . . . . . . . . . . . . . . . . . . . .61
Changing Printer Settings . . . . . . . . . . . . . . . . . . . . . . . . . . . . . . .30 SMS . . . . . . . . . . . . . . . . . . . . . . . . . . . . . . . . . . . . . . . . . . . . . . . .63
Printing . . . . . . . . . . . . . . . . . . . . . . . . . . . . . . . . . . . . . . . . . . . . .64
6. Telephone Book m . . . . . . . . . . . . . 31 Scanning Á . . . . . . . . . . . . . . . . . . . . . . . . . . . . . . . . . . . . . . . . .65
Creating Entries . . . . . . . . . . . . . . . . . . . . . . . . . . . . . . . . . . . . . .31 Displaying the Ink Level . . . . . . . . . . . . . . . . . . . . . . . . . . . . . . . .67
Creating Groups . . . . . . . . . . . . . . . . . . . . . . . . . . . . . . . . . . . . . .31 Firmware Update . . . . . . . . . . . . . . . . . . . . . . . . . . . . . . . . . . . . .67
Editing Entries and Groups . . . . . . . . . . . . . . . . . . . . . . . . . . . . . .31
Deleting Entries and Groups . . . . . . . . . . . . . . . . . . . . . . . . . . . .31 4. Uninstalling the Driver and Software
Searching for Entries . . . . . . . . . . . . . . . . . . . . . . . . . . . . . . . . . . .31 69
Using the Telephone Book . . . . . . . . . . . . . . . . . . . . . . . . . . . . . .32
Speed Dialling (A—I) * . . . . . . . . . . . . . . . . . . . . . . . . . . . . . . . . .32
Printing the Telephone Book. . . . . . . . . . . . . . . . . . . . . . . . . . . . .32 Appendix . . . . . . . . . . .71
Chain Dialling (Combining Numbers) . . . . . . . . . . . . . . . . . . . . .32
Glossary . . . . . . . . . . . . . . . . . . . . . . . . . . . . . . . . . . . . . . . . . . . .71
7. Fax Switch . . . . . . . . . . . . . . . . . . . . 33 Abbreviations . . . . . . . . . . . . . . . . . . . . . . . . . . . . . . . . . . . . . . . .73
Setting SM Modes . . . . . . . . . . . . . . . . . . . . . . . . . . . . . . . . . . .33 List of Functions . . . . . . . . . . . . . . . . . . . . . . . . . . . . . . . . . . . . . .74
Activating the Timer U . . . . . . . . . . . . . . . . . . . . . . . . . . . . . . . 33 Technical Data . . . . . . . . . . . . . . . . . . . . . . . . . . . . . . . . . . . . . . . .75
Setting the Fax Reception Mode . . . . . . . . . . . . . . . . . . . . . . . . .33 Warranty . . . . . . . . . . . . . . . . . . . . . . . . . . . . . . . . . . . . . . . . . . . .76
Using External Telephones (Easylink) . . . . . . . . . . . . . . . . . . . . . .34 Environment . . . . . . . . . . . . . . . . . . . . . . . . . . . . . . . . . . . . . . . . .77
Using an External Answering Machine . . . . . . . . . . . . . . . . . . . . .34
Table of Contents * Speed dialling—Crystal 650
SMS—Crystal 660 (depending on country and network) 5
MMS—Crystal 660 (depending on country and network)
Text2Fax—Crystal 660 (depending on country and network)
Table of Contents
Safety Instructions Power Supply
In order to avoid possible dangers, damage or malfunc- Check whether the mains voltage specified on the
tions, please heed the following safety instructions for ¿type plate of your multifunction machine matches
the setup and operation of your fax machine. the mains voltage available at the setup location. In case
of doubt, consult your electrical company. Only use the
S etup Location supplied power cord.
Set up your machine so that the socket is easily ac-
¿The multifunction machine should rest stably and ¿cessible because your multifunction machine does
securely on a flat, smooth and vibration-free sur- not have an on/off button. Lay all cables out of the way
face. If your machine sits at an angle, proper function- to prevent tripping.
ing cannot be guaranteed. Do not place the machine
on beds, blankets, pillows, sofas, carpets or other soft In the event of a power failure, your multifunction
surfaces due to the danger of overheating and the result- ¿machine will not function (saved data is retained).
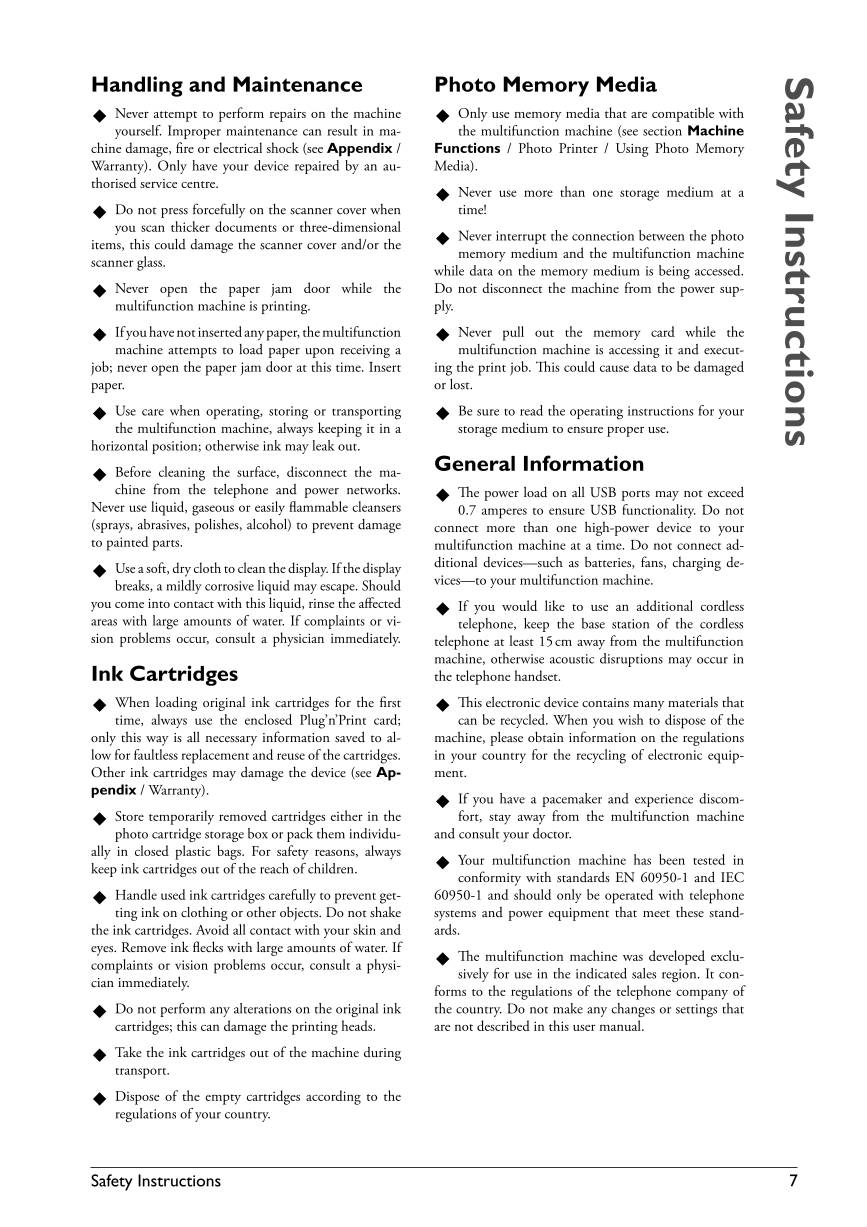
ing risk of fire. Ensure sufficient air circulation around Never touch the telephone and/or power cord if the
the machine and do not cover the machine. Do not ¿insulation is damaged until you have first discon-
operate the machine in enclosed boxes, cabinets, cup- nected the telephone and power plugs from the net-
boards, etc. The distance to other machines or objects work.
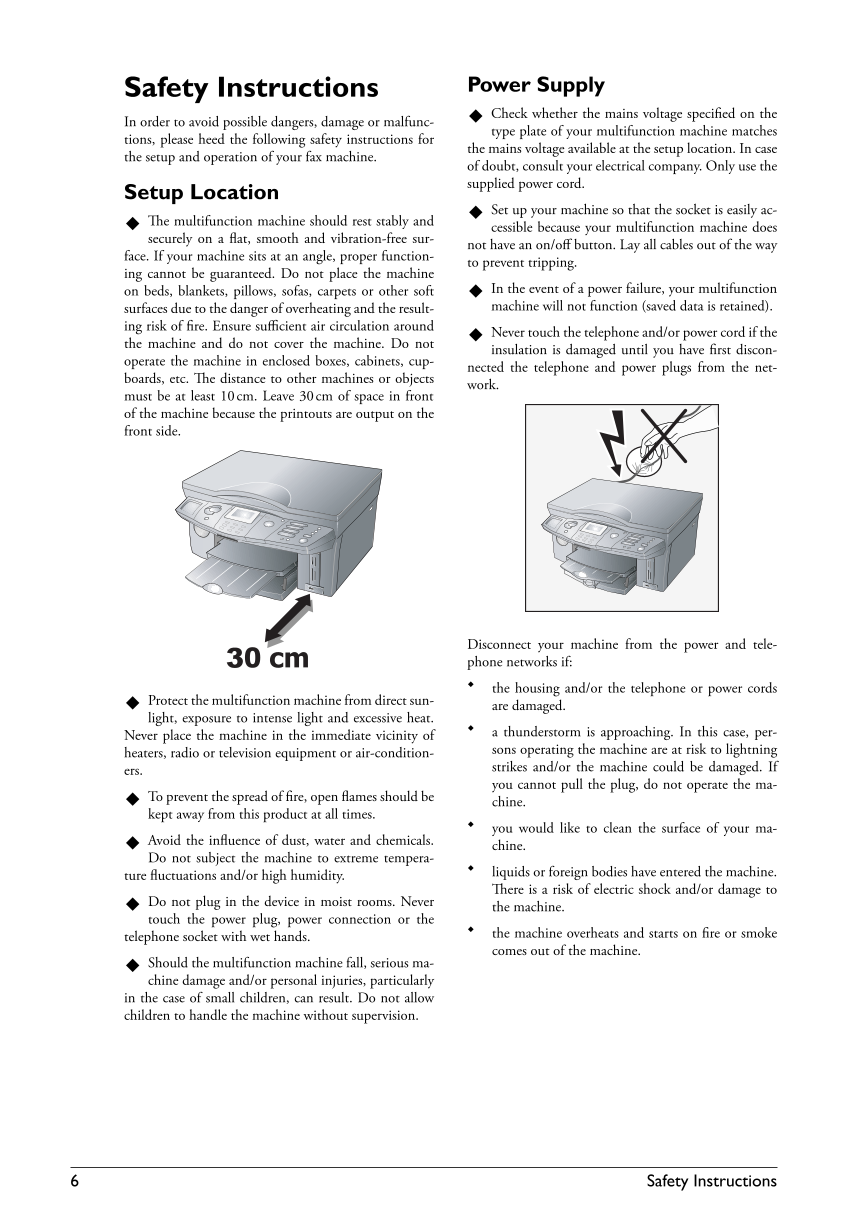
must be at least 10 cm. Leave 30 cm of space in front
of the machine because the printouts are output on the
front side.
Disconnect your machine from the power and tele-
phone networks if:
¿ the housing and/or the telephone or power cords
¿Protect the multifunction machine from direct sun- are damaged.
light, exposure to intense light and excessive heat.
Never place the machine in the immediate vicinity of ¿ a thunderstorm is approaching. In this case, per-
heaters, radio or television equipment or air-condition- sons operating the machine are at risk to lightning
ers. strikes and/or the machine could be damaged. If
you cannot pull the plug, do not operate the ma-
¿To prevent the spread of fire, open flames should be chine.
kept away from this product at all times.
¿ you would like to clean the surface of your ma-
¿Avoid the influence of dust, water and chemicals. chine.
Do not subject the machine to extreme tempera-
ture fluctuations and/or high humidity. ¿ liquids or foreign bodies have entered the machine.
There is a risk of electric shock and/or damage to
¿Do not plug in the device in moist rooms. Never the machine.
touch the power plug, power connection or the
tele phone socket with wet hands. ¿ the machine overheats and starts on fire or smoke
comes out of the machine.
¿Should the multifunction machine fall, serious ma-
chine damage and/or personal injuries, particularly
in the case of small children, can result. Do not allow
children to handle the machine without supervision.
6 Safety Instructions
H andling and Maintenance Photo Memory Media
¿Never attempt to perform repairs on the machine Only use memory media that are compatible with
yourself. Improper maintenance can result in ma- ¿the multifunction machine (see section Machine
chine damage, fire or electrical shock (see Appendix / Functions / Photo Printer / Using Photo Memory
Warranty). Only have your device repaired by an au- Media).
thorised service centre. Never use more than one storage medium at a
¿Do not press forcefully on the scanner cover when ¿time!
you scan thicker documents or three-dimensional
items, this could damage the scanner cover and/or the ¿Never interrupt the connection between the photo
scanner glass. memory medium and the multifunction machine
while data on the memory medium is being accessed.
¿Never open the paper jam door while the Do not disconnect the machine from the power sup-
multifunction machine is printing. ply.
¿If you have not inserted any paper, the multifunction Never pull out the memory card while the
machine attempts to load paper upon receiving a ¿multifunction machine is accessing it and execut-
job; never open the paper jam door at this time. Insert ing the print job. This could cause data to be damaged
paper. or lost.
¿Use care when operating, storing or transporting Be sure to read the operating instructions for your
the multifunction machine, always keeping it in a ¿storage medium to ensure proper use.
horizontal position; otherwise ink may leak out.
¿Before cleaning the surface, disconnect the ma- G eneral Information
chine from the telephone and power networks. The power load on all USB ports may not exceed
Never use liquid, gaseous or easily flammable cleansers ¿0.7 amperes to ensure USB functionality. Do not
(sprays, abrasives, polishes, alcohol) to prevent damage connect more than one high-power device to your
to painted parts. multifunction machine at a time. Do not connect ad-
Use a soft, dry cloth to clean the display. If the display ditional devices—such as batteries, fans, charging de-
¿breaks, a mildly corrosive liquid may escape. Should vices—to your multifunction machine.
you come into contact with this liquid, rinse the affected If you would like to use an additional cordless
areas with large amounts of water. If complaints or vi- ¿tele phone, keep the base station of the cordless
sion problems occur, consult a physician immediately. tele phone at least 15 cm away from the multifunction
machine, otherwise acoustic disruptions may occur in
Ink Cartridges the telephone handset.
¿When loading original ink cartridges for the first This electronic device contains many materials that
time, always use the enclosed Plug’n’Print card; ¿can be recycled. When you wish to dispose of the
only this way is all necessary information saved to al- machine, please obtain information on the regulations
low for faultless replacement and reuse of the cartridges. in your country for the recycling of electronic equip-
Other ink cartridges may damage the device (see Ap- ment.
pendix / Warranty). If you have a pacemaker and experience discom-
¿Store temporarily removed cartridges either in the ¿fort, stay away from the multifunction machine
photo cartridge storage box or pack them individu- and consult your doctor.
ally in closed plastic bags. For safety reasons, always
keep ink cartridges out of the reach of children. ¿Your multifunction machine has been tested in
conformity with standards EN 60950-1 and IEC
¿Handle used ink cartridges carefully to prevent get- 60950-1 and should only be operated with telephone
ting ink on clothing or other objects. Do not shake systems and power equipment that meet these stand-
the ink cartridges. Avoid all contact with your skin and ards.
eyes. Remove ink flecks with large amounts of water. If
complaints or vision problems occur, consult a physi- The multifunction machine was developed exclu-
cian immediately. ¿sively for use in the indicated sales region. It con-
forms to the regulations of the telephone company of
¿Do not perform any alterations on the original ink the country. Do not make any changes or settings that
cartridges; this can damage the printing heads. are not described in this user manual.
¿Take the ink cartridges out of the machine during
transport.
¿Dispose of the empty cartridges according to the
regulations of your country.
Safety Instructions 7
Safety Instructions
Machine Functions
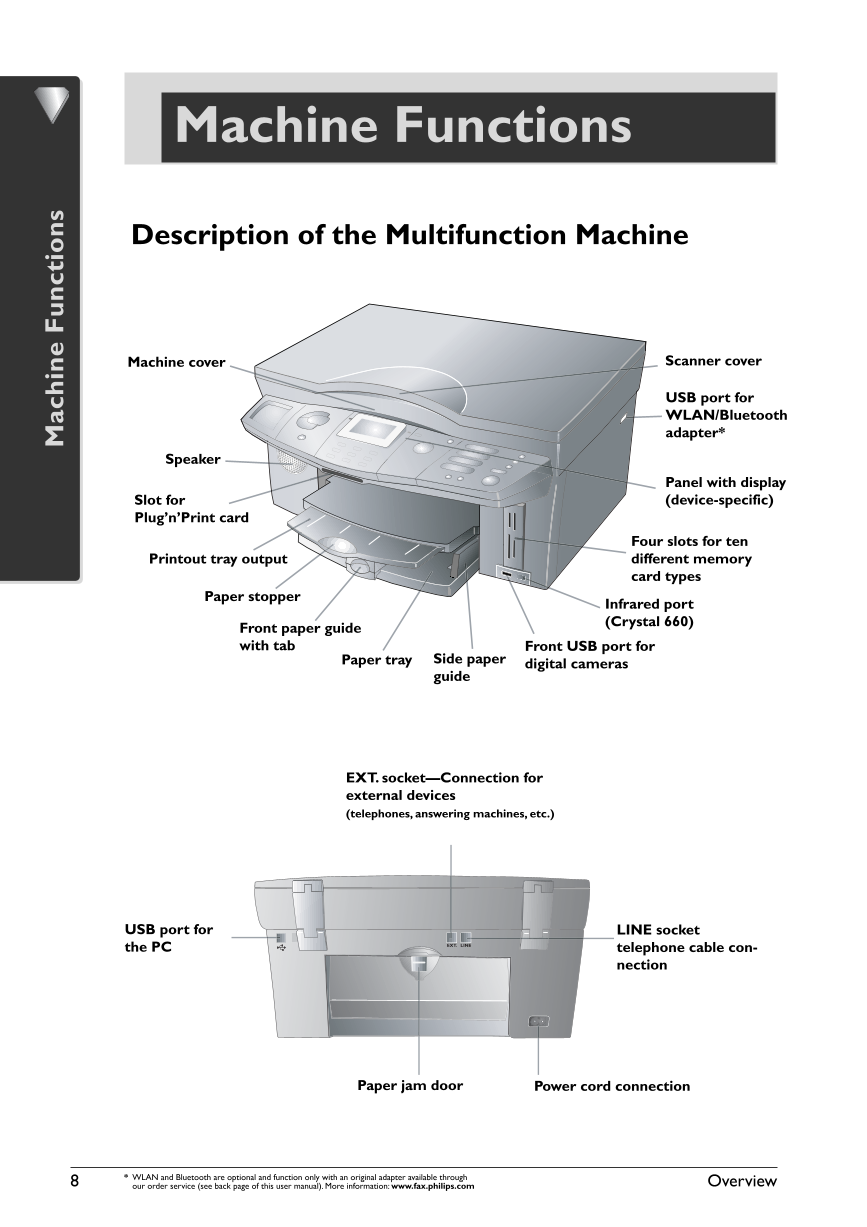
Description of the Multifunction Machine
Machine cover Scanner cover
USB port for
WLAN/Bluetooth
adapter*
Speaker
Panel with display
Slot for (device-specific)
Plug’n’Print card
Four slots for ten
Printout tray output different memory
card types
Paper stopper Infrared port
Front paper guide (Crystal 660)
with tab Front USB port for
Paper tray Side paper digital cameras
guide
EXT. socket—Connection for
external devices
(telephones, answering machines, etc.)
USB port for LINE socket
the PC telephone cable con-
nection
Paper jam door Power cord connection
8 * WLAN and Bluetooth are optional and function only with an original adapter available through
our order service (see back page of this user manual). More information: www.fax.philips.com Overview
Machine Functions



 2023年江西萍乡中考道德与法治真题及答案.doc
 2012年重庆南川中考生物真题及答案.doc
 2013年江西师范大学地理学综合及文艺理论基础考研真题.doc
 2020年四川甘孜小升初语文真题及答案I卷.doc
 2020年注册岩土工程师专业基础考试真题及答案.doc
 2023-2024学年福建省厦门市九年级上学期数学月考试题及答案.doc
 2021-2022学年辽宁省沈阳市大东区九年级上学期语文期末试题及答案.doc
 2022-2023学年北京东城区初三第一学期物理期末试卷及答案.doc
 2018上半年江西教师资格初中地理学科知识与教学能力真题及答案.doc
 2012年河北国家公务员申论考试真题及答案-省级.doc
 2020-2021学年江苏省扬州市江都区邵樊片九年级上学期数学第一次质量检测试题及答案.doc
 2022下半年黑龙江教师资格证中学综合素质真题及答案.doc