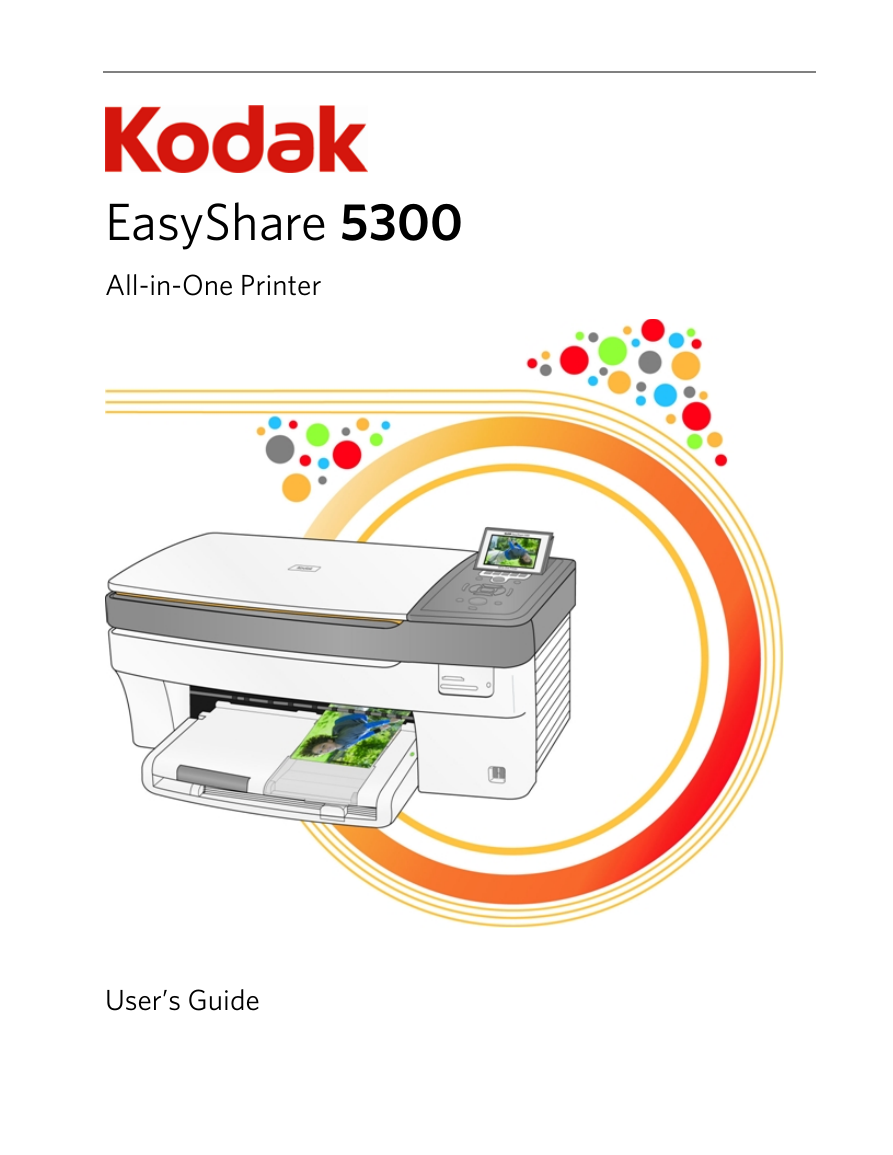
EasyShare 5300
All-in-One Printer
User’s Guide
�
Eastman Kodak Company
Rochester, New York 14650
© Eastman Kodak Company, 2007
Kodak and EasyShare are trademarks of Eastman Kodak Company.
The Bluetooth word mark and logos are owned by the Bluetooth SIG, Inc. and any use of such marks is under license.
©1989-2007 I.R.I.S. (Image Recognition Integrated Systems), All Rights Reserved
P/N 1K2099
�
Table of Contents
Product Overview.................................................................................................................................... 1
Main Components.............................................................................................................................................. 1
Control Panel Layout......................................................................................................................................... 2
Status Lights........................................................................................................................................................ 3
LCD Display Screen........................................................................................................................................... 8
Memory Card Slots and USB Port ................................................................................................................. 9
Getting Started .......................................................................................................................................11
Connect Power .................................................................................................................................................. 11
Install the Printhead ......................................................................................................................................... 11
Install Ink Cartridges........................................................................................................................................13
Install the Duplexer ......................................................................................................................................... 14
Startup .................................................................................................................................................................15
Menus ................................................................................................................................................................. 16
Demo Sheet....................................................................................................................................................... 19
Transfer Photos ............................................................................................................................................... 20
Configuring Settings....................................................................................................................................... 20
Handling and Loading Paper............................................................................................................... 25
The Scanner Glass ...........................................................................................................................................25
Load Main Tray ................................................................................................................................................26
Load Photo Tray ...............................................................................................................................................28
Load Envelopes.................................................................................................................................................29
Load Labels....................................................................................................................................................... 30
Print .........................................................................................................................................................31
Print Photos from a Camera..........................................................................................................................32
Print Photos from the Control Panel ...........................................................................................................32
Index Print..........................................................................................................................................................33
Print Photos from a Proofsheet ....................................................................................................................34
Tagged Photos (DPOF) ..................................................................................................................................34
Bluetooth Printing ............................................................................................................................................35
Panoramic photos............................................................................................................................................36
Print with Computer........................................................................................................................................36
Layouts ...............................................................................................................................................................36
Setting Print Options........................................................................................................................................51
Previewing Photos ...........................................................................................................................................52
Copy........................................................................................................................................................ 57
Copy with Control Panel ................................................................................................................................57
User’s Guide
i
�
Table of Contents
Scan ........................................................................................................................................................ 65
Scan with Control Panel................................................................................................................................. 65
Maintenance ......................................................................................................................................... 69
General Care.....................................................................................................................................................69
Clean the Scanner Glass................................................................................................................................69
Clean the Scanner Lid.....................................................................................................................................70
Format Memory Card.....................................................................................................................................70
Print Diagnostic Sheet....................................................................................................................................70
Firmware Upgrade ........................................................................................................................................... 71
Ink Cartridges .................................................................................................................................................... 71
Printhead ........................................................................................................................................................... 74
Support .................................................................................................................................................. 79
Contact Kodak.................................................................................................................................................. 79
Limited Warranty ............................................................................................................................................ 79
Telephone Customer Support.......................................................................................................................81
Messages........................................................................................................................................................... 83
Troubleshooting...............................................................................................................................................86
Appendix ............................................................................................................................................... 97
All-in-One Specifications .............................................................................................................................. 97
Computer Requirements............................................................................................................................... 97
Paper Types ......................................................................................................................................................98
Safety................................................................................................................................................................100
Regulatory Compliance................................................................................................................................. 101
Glossary................................................................................................................................................105
Index......................................................................................................................................................107
ii
Kodak EasyShare 5300 AiO
�
1 Product Overview
Product Overview
The Kodak EasyShare 5300 All-in-One (AiO) Printer allows you to print, copy, and scan photos or
documents. Many functions can be operated directly from the Control Panel. You can buy optional
accessories to enhance your Kodak EasyShare AiO experience.
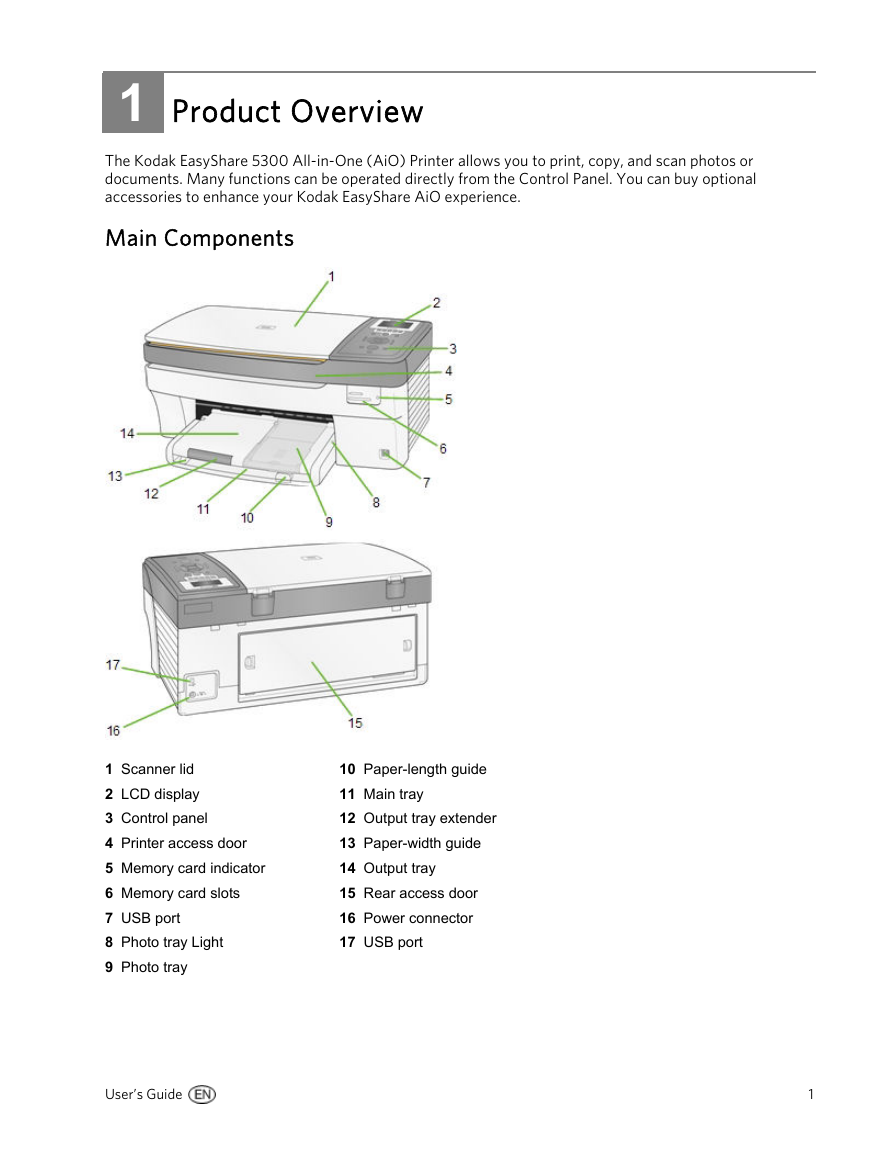
Main Components
1 Scanner lid
2 LCD display
3 Control panel
4 Printer access door
5 Memory card indicator
6 Memory card slots
7 USB port
8 Photo tray Light
9 Photo tray
10 Paper-length guide
11 Main tray
12 Output tray extender
13 Paper-width guide
14 Output tray
15 Rear access door
16 Power connector
17 USB port
User’s Guide
1
�
Chapter 1
Control Panel Layout
Number Name
1
2
3
4
5
6
7
8
9
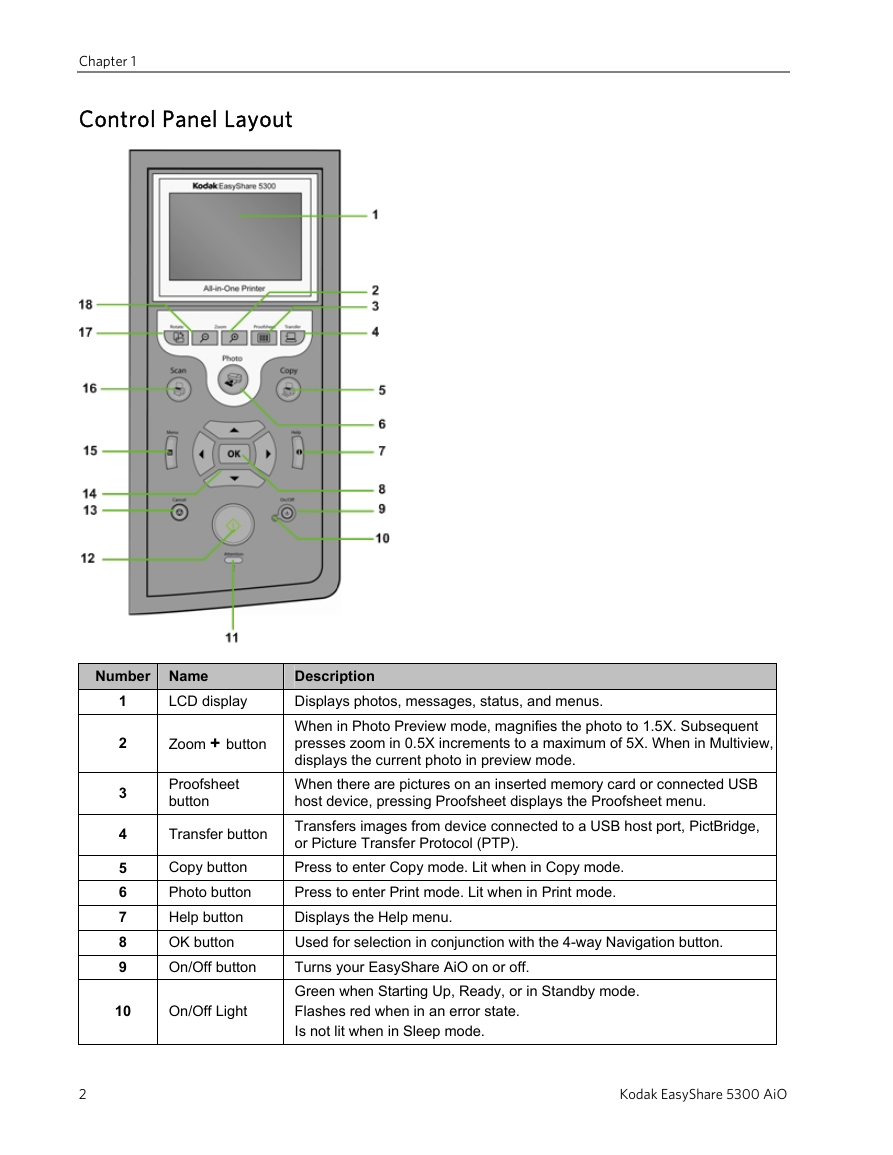
LCD display
Zoom + button
Proofsheet
button
Transfer button
Copy button
Photo button
Help button
OK button
On/Off button
10
On/Off Light
Description
Displays photos, messages, status, and menus.
When in Photo Preview mode, magnifies the photo to 1.5X. Subsequent
presses zoom in 0.5X increments to a maximum of 5X. When in Multiview,
displays the current photo in preview mode.
When there are pictures on an inserted memory card or connected USB
host device, pressing Proofsheet displays the Proofsheet menu.
Transfers images from device connected to a USB host port, PictBridge,
or Picture Transfer Protocol (PTP).
Press to enter Copy mode. Lit when in Copy mode.
Press to enter Print mode. Lit when in Print mode.
Displays the Help menu.
Used for selection in conjunction with the 4-way Navigation button.
Turns your EasyShare AiO on or off.
Green when Starting Up, Ready, or in Standby mode.
Flashes red when in an error state.
Is not lit when in Sleep mode.
2
Kodak EasyShare 5300 AiO
�
Product Overview
Number Name
11
12
13
14
15
16
17
18
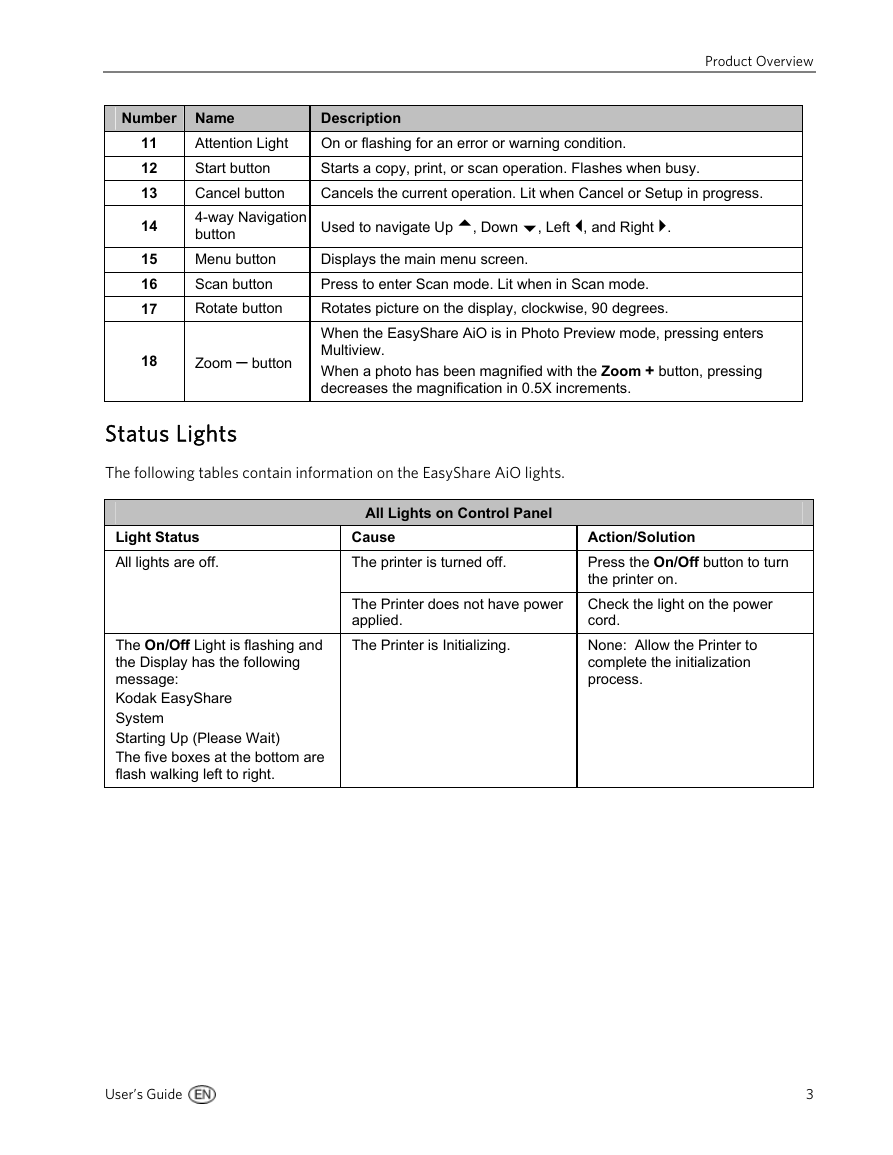
Attention Light
Start button
Cancel button
4-way Navigation
button
Menu button
Scan button
Rotate button
Zoom – button
Description
On or flashing for an error or warning condition.
Starts a copy, print, or scan operation. Flashes when busy.
Cancels the current operation. Lit when Cancel or Setup in progress.
Used to navigate Up , Down , Left , and Right .
Displays the main menu screen.
Press to enter Scan mode. Lit when in Scan mode.
Rotates picture on the display, clockwise, 90 degrees.
When the EasyShare AiO is in Photo Preview mode, pressing enters
Multiview.
When a photo has been magnified with the Zoom + button, pressing
decreases the magnification in 0.5X increments.
Status Lights
The following tables contain information on the EasyShare AiO lights.
All Lights on Control Panel
Cause
The printer is turned off.
The Printer does not have power
applied.
The Printer is Initializing.
Action/Solution
Press the On/Off button to turn
the printer on.
Check the light on the power
cord.
None: Allow the Printer to
complete the initialization
process.
Light Status
All lights are off.
The On/Off Light is flashing and
the Display has the following
message:
Kodak EasyShare
System
Starting Up (Please Wait)
The five boxes at the bottom are
flash walking left to right.
User’s Guide
3
�
Chapter 1
Light Status
Power cord light is off.
Power cord light is on.
Power Light on Power Cord
Cause
The printer to power supply cord
is not properly connected to the
Power Supply.
The power supply to your wall
outlet cord is not properly
connected to your wall outlet.
You do not have the appropriate
power available at your wall
outlet.
There may be an issue with the
power supply.
The power cord and power
supply are properly connected
and ready to supply power to the
printer.
Action/Solution
Reseat the printer to power
supply cord.
Reseat the Power Supply to your
Wall Outlet Cord.
Test your wall outlet by plugging
a known working device into you
wall outlet. Have your wall outlet
checked by a qualified
electrician.
Visit Kodak.com for additional
troubleshooting steps or contact
your local Kodak Call Center.
Ensure that the power cord is
properly plugged into the back of
the printer.
4
Kodak EasyShare 5300 AiO
�



 2023年江西萍乡中考道德与法治真题及答案.doc
 2012年重庆南川中考生物真题及答案.doc
 2013年江西师范大学地理学综合及文艺理论基础考研真题.doc
 2020年四川甘孜小升初语文真题及答案I卷.doc
 2020年注册岩土工程师专业基础考试真题及答案.doc
 2023-2024学年福建省厦门市九年级上学期数学月考试题及答案.doc
 2021-2022学年辽宁省沈阳市大东区九年级上学期语文期末试题及答案.doc
 2022-2023学年北京东城区初三第一学期物理期末试卷及答案.doc
 2018上半年江西教师资格初中地理学科知识与教学能力真题及答案.doc
 2012年河北国家公务员申论考试真题及答案-省级.doc
 2020-2021学年江苏省扬州市江都区邵樊片九年级上学期数学第一次质量检测试题及答案.doc
 2022下半年黑龙江教师资格证中学综合素质真题及答案.doc