这是最全的 HPGL 文件格式,因为在网上找到的,大部分都只有一部分,不完整,所以找
了个英文完整版的。
Using HPGL as a drawing interchange media
(Don't!Unfortunately many DOS/Windows insist on doing so)
Written by Paul Bourke
September 1992
This document isalso available in Russian , thanks to Sergey Paramonov.
(You will need the Russian font set!)
Introduction
HPGL is the HPgraphics language designed for specifying 2D graphical information for
the HPrange of plotters. It was not intended as an interchange format but somesoftware
suppliers use it as such. At least it is efficient and easy to writeand read. This short note
describes those aspects of the format which may beused to describe geometry. The
language itself has a large number ofinstructions, most of the ones not touched on here
relate directly to plotterdevices, for a full description of the language the HPGL description
is normallyprovided with an HPGL compatable plotter.
Basics
HPGL commandsare basically two uppercase character instructions followed by any
arguments,and finally ending in the separator character which is a semicolon by
default.The arguments are normally separated by commas. String arguments are
normallyterminated by carriage return.
In what follows,all the standard HPGL commands are listed, those which are likely to be
usefulfor data interchange will be discussed at the end of this document.
Optionalarguments for any command are shown in brackets.
�
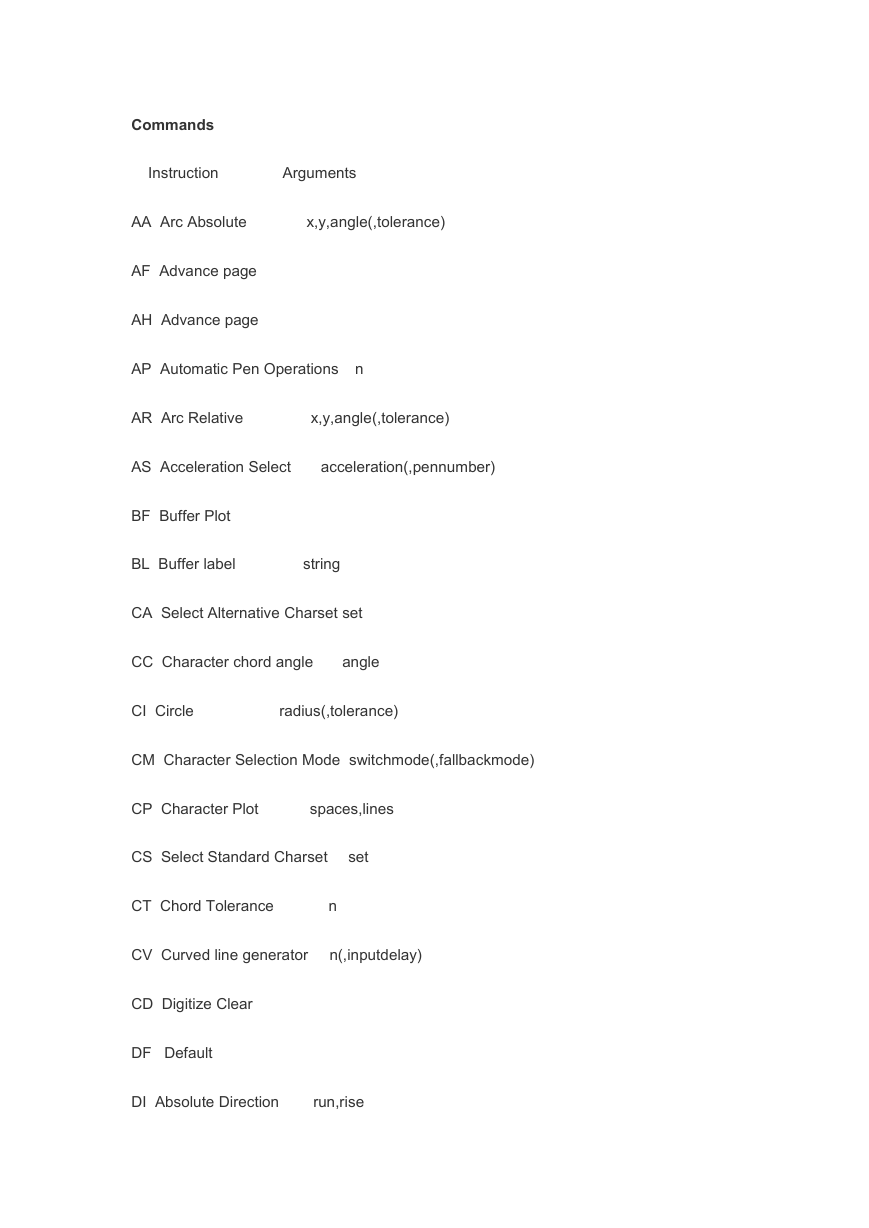
Commands
Instruction
Arguments
AA Arc Absolute
x,y,angle(,tolerance)
AF Advance page
AH Advance page
AP Automatic Pen Operations n
AR Arc Relative
x,y,angle(,tolerance)
AS Acceleration Select
acceleration(,pennumber)
BF Buffer Plot
BL Buffer label
string
CA Select Alternative Charset set
CC Character chord angle
angle
CI Circle
radius(,tolerance)
CM Character Selection Mode switchmode(,fallbackmode)
CP Character Plot
spaces,lines
CS Select Standard Charset
set
CT Chord Tolerance
n
CV Curved line generator
n(,inputdelay)
CD Digitize Clear
DF Default
DI Absolute Direction
run,rise
�
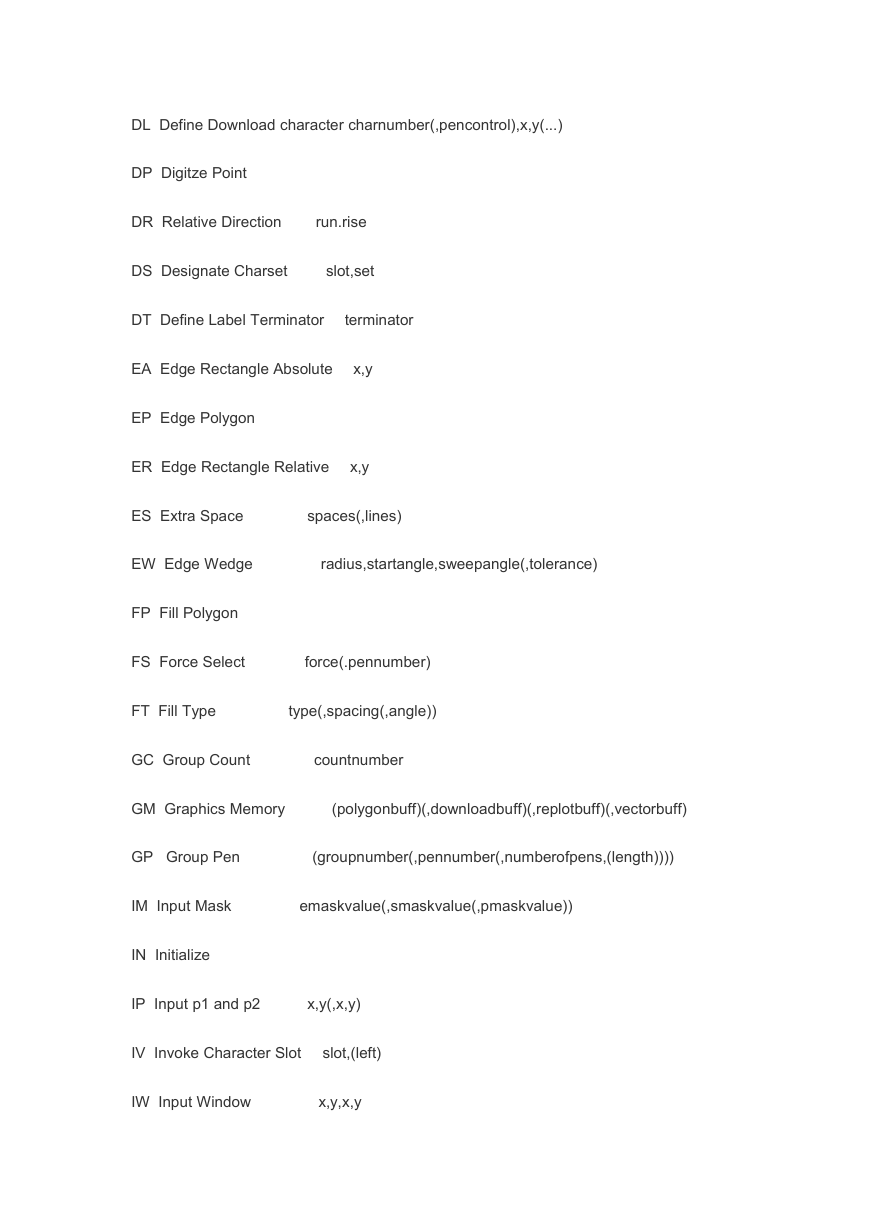
DL Define Download character charnumber(,pencontrol),x,y(...)
DP Digitze Point
DR Relative Direction
run.rise
DS Designate Charset
slot,set
DT Define Label Terminator
terminator
EA Edge Rectangle Absolute
x,y
EP Edge Polygon
ER Edge Rectangle Relative
x,y
ES Extra Space
spaces(,lines)
EW Edge Wedge
radius,startangle,sweepangle(,tolerance)
FP Fill Polygon
FS Force Select
force(.pennumber)
FT Fill Type
type(,spacing(,angle))
GC Group Count
countnumber
GM Graphics Memory
(polygonbuff)(,downloadbuff)(,replotbuff)(,vectorbuff)
GP Group Pen
(groupnumber(,pennumber(,numberofpens,(length))))
IM Input Mask
emaskvalue(,smaskvalue(,pmaskvalue))
IN Initialize
IP Input p1 and p2
x,y(,x,y)
IV Invoke Character Slot
slot,(left)
IW Input Window
x,y,x,y
�
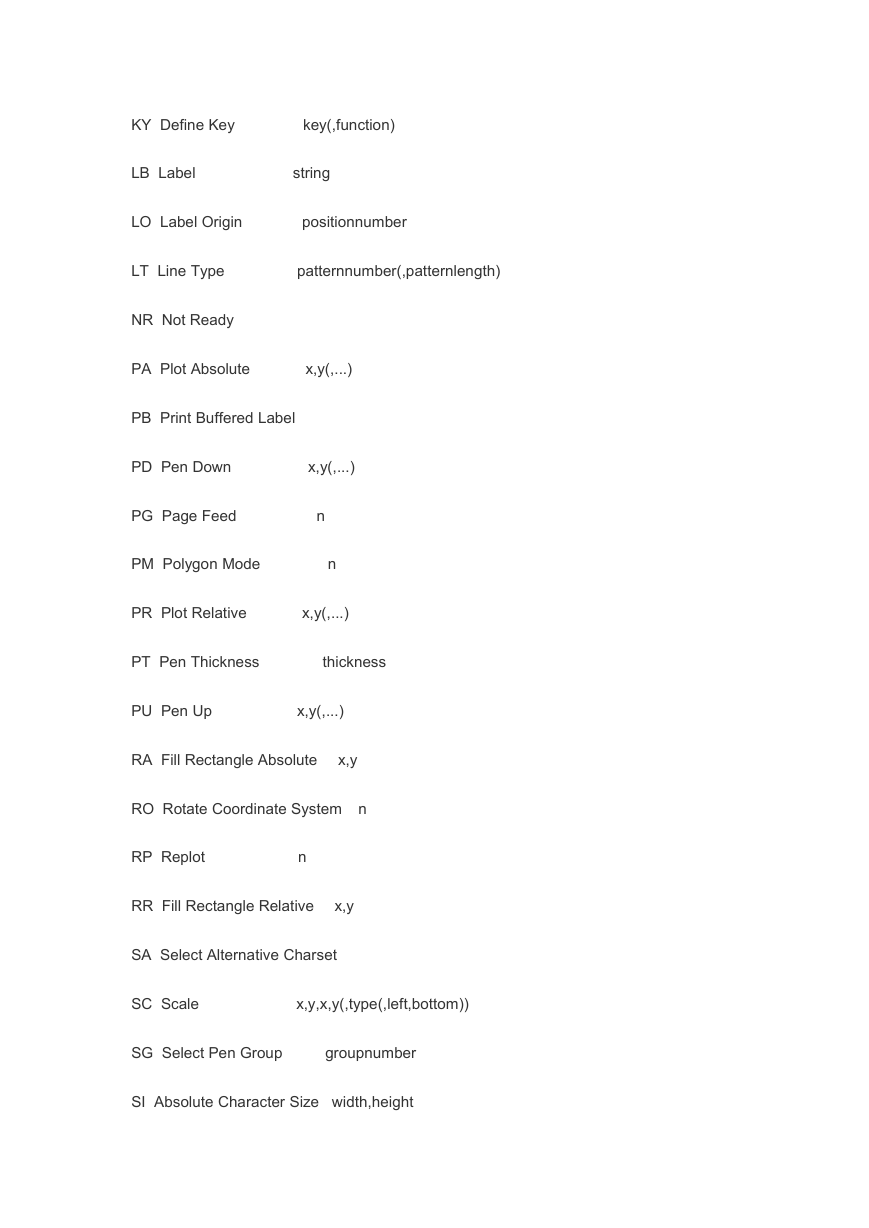
KY Define Key
key(,function)
LB Label
string
LO Label Origin
positionnumber
LT Line Type
patternnumber(,patternlength)
NR Not Ready
PA Plot Absolute
x,y(,...)
PB Print Buffered Label
PD Pen Down
x,y(,...)
PG Page Feed
PM Polygon Mode
n
n
PR Plot Relative
x,y(,...)
PT Pen Thickness
thickness
PU Pen Up
x,y(,...)
RA Fill Rectangle Absolute
x,y
RO Rotate Coordinate System n
RP Replot
n
RR Fill Rectangle Relative
x,y
SA Select Alternative Charset
SC Scale
x,y,x,y(,type(,left,bottom))
SG Select Pen Group
groupnumber
SI Absolute Character Size width,height
�
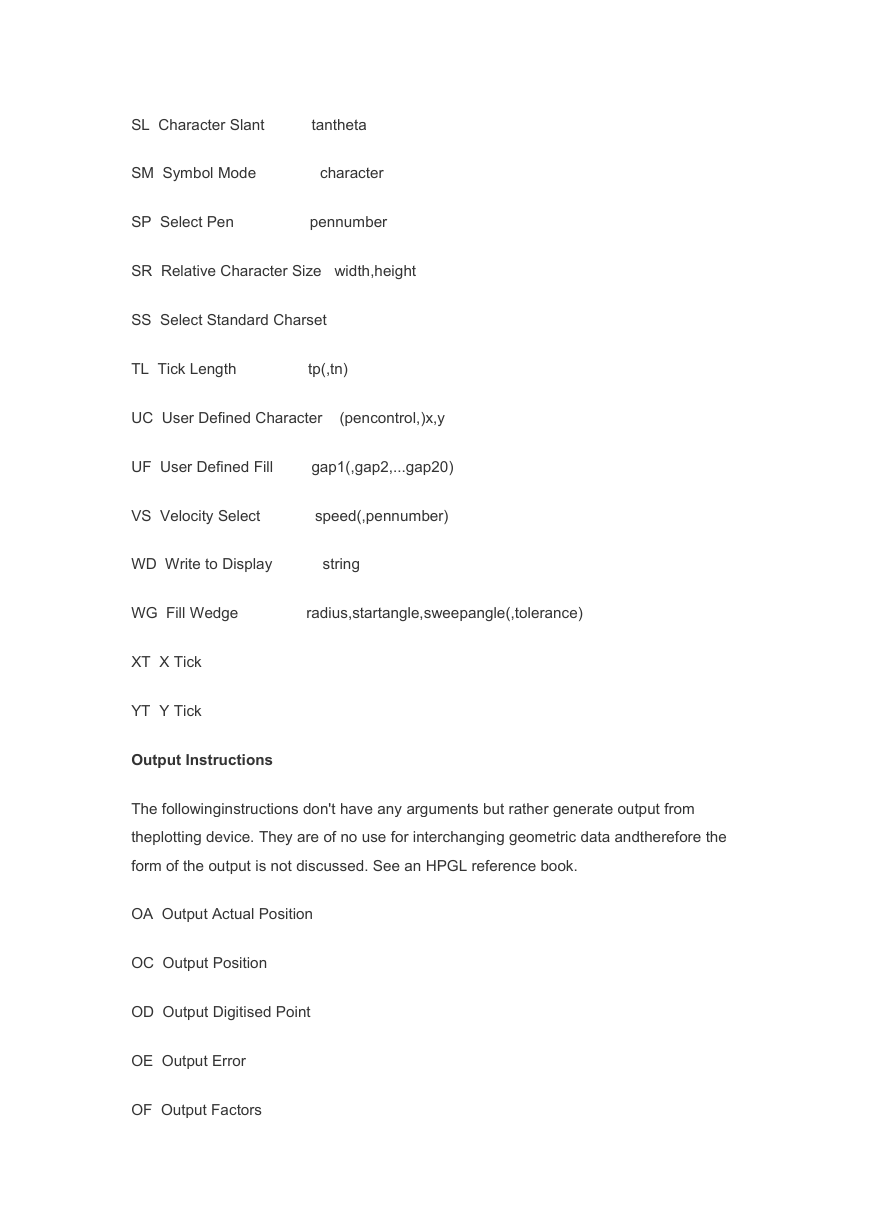
SL Character Slant
tantheta
SM Symbol Mode
character
SP Select Pen
pennumber
SR Relative Character Size width,height
SS Select Standard Charset
TL Tick Length
tp(,tn)
UC User Defined Character
(pencontrol,)x,y
UF User Defined Fill
gap1(,gap2,...gap20)
VS Velocity Select
speed(,pennumber)
WD Write to Display
string
WG Fill Wedge
radius,startangle,sweepangle(,tolerance)
XT X Tick
YT Y Tick
Output Instructions
The followinginstructions don't have any arguments but rather generate output from
theplotting device. They are of no use for interchanging geometric data andtherefore the
form of the output is not discussed. See an HPGL reference book.
OA Output Actual Position
OC Output Position
OD Output Digitised Point
OE Output Error
OF Output Factors
�
OG Output Group Count
OH Output HardClip Limits
OI Output Identification
OK Output Key
OL Output Label Length
OO Output Options
OP Output p1 and p2
OS Output Status
OT Output Carousel Type
OW Output Window
Escape sequnces
The followingescape sequences are generally only applicable when connected through a
serialinterface to a physical plotter, they have nothing to do with data interchangeand so
their arguments will not be listed nor will the form of the output mostof them create .
esc@ Set Plotter Configuration
escA Output Identification
escB Output Buffer Space
escE Output Extended error
escH Set Handshake Mode 1
escI Set Handshake Mode 2
escJ Abort Device Control
escK Abort Graphics
�
escL Output Buffer Size When Empty
escM Set Output Mode
escN Set Extended Output and Handshake Mode
escO Output Extended Status
escP Set Handshake Mode
escQ Set Monitor Mode
escR Reset
escS Output Configurable Memory
escT Allocate Configurable Memory
escU End Flush Mode
escY Plotter On
esc( Plotter On
escZ Plotter Off
esc) Plotter Off
Useful Commands with examples
Since plottersare very basic line drawing hardware devices it is not surprising that the
mostcommonly used commands are those that draw lines from one point to another.
This operationis controlled by 4 commands,
PA - plot absolute
PR - plot relative
PU - pen up
PD - pen down
�
Pen up and downdictate when a line is actually being created, the plot commands do
themovement between points.
For example todraw a line from (1,0) to (2,0) might be specified as follows
PU;PA1,0;PD;Pr1,0;PU;
There are twobasic attributes that can be assigned to a line, as expected they are
actuallyapplied to the pens of the plotting device. They are:
SP - pen number
PT - pen thickness
The pen numbernormally acts as an indexed colour system, most commonly there are
only 8 pens(colour) available.
The othergeometry that can be specified is
AR - arc relative
CI - circle
EA - edge rectangle absolute
ER - edge rectangle relative
EP - edge polygon
EW - edge wedge
LB - label
There are alarge number of settings for controlling text, these and further details of
theabove instructions will be left to the reader to experiment with or read in thefull HPGL
manuals.
�



 2023年江西萍乡中考道德与法治真题及答案.doc
 2012年重庆南川中考生物真题及答案.doc
 2013年江西师范大学地理学综合及文艺理论基础考研真题.doc
 2020年四川甘孜小升初语文真题及答案I卷.doc
 2020年注册岩土工程师专业基础考试真题及答案.doc
 2023-2024学年福建省厦门市九年级上学期数学月考试题及答案.doc
 2021-2022学年辽宁省沈阳市大东区九年级上学期语文期末试题及答案.doc
 2022-2023学年北京东城区初三第一学期物理期末试卷及答案.doc
 2018上半年江西教师资格初中地理学科知识与教学能力真题及答案.doc
 2012年河北国家公务员申论考试真题及答案-省级.doc
 2020-2021学年江苏省扬州市江都区邵樊片九年级上学期数学第一次质量检测试题及答案.doc
 2022下半年黑龙江教师资格证中学综合素质真题及答案.doc