i200 Series Scanners
Image
Processing
Guide
A-61520
Image Processing Guide for i200 Series Scanners
Overview This documentation introduces concepts that may be new to many
users. The Kodak i200 Series Scanners provide the ability to process
scanned images to improve their quality. Using these features the
scanner can sometimes make the scanned image look better than the
original document. Basic image processing concepts are reviewed in
this chapter to help you take advantage of these powerful features.
Image processing refers to several separate features of the scanner
that allow you to automatically adjust each image in a certain way that
may improve the resulting images. Common examples of image
processing features are correcting any skew in the fed document,
cutting the edges of the image off to remove any unneeded border or
cleaning up extraneous “noise” on the image. The idea is to do this
automatically so you can get better images with a minimum amount of
rework.
The information that follows describes the image processing features
by walking you through the Scan Validation Tool. The same options
should be available on the user interface of the software application you
are using (i.e., Kodak Capture Software). All fields on the Scan
Validation Tool are described in this document.
Common terms Following are a few common terms that are used throughout this
document:
Bi-tonal or Binary — black-and-white.
Simplex — indicates that only one side of the document (the front side)
will be scanned, creating a single page image.
Duplex — indicates that both sides of the document will be scanned,
creating two page images.
Cameras — it is important to understand the concept of “cameras”.
The Kodak i250 Scanner is a simplex scanner. The camera has the
ability to separate color and bi-tonal/binary data simultaneously. This
means it scans one-sided documents; a front color image and a front bi-
tonal/binary image, allowing you to capture one side of a document
either in color/grayscale or black-and-white. Effectively the means you
have two cameras on the i250 Scanner; front color and front bi-tonal.
The Kodak i260 and i280 Scanner are a duplex scanners. The cameras
have the ability to separate color and bi-tonal/binary data
simultaneously. This means it scans both sides of a two-sided
document; a front color image, a rear color image, a front bi-tonal/
binary image, and a rear bi-tonal/binary image, allowing you to capture
both sides of a document in either color/grayscale, black-and-white, or
a combination of color and black-and-white. Effectively this means that
you have four cameras on the i260 and i280 Scanners; front color, rear
color, front bi-tonal and rear bi-tonal.
A-61520 April 2005 1
When you use the Kodak Scan Validation Tool, you will need to select
which camera(s) you want to use to scan your document to get the
desired results. You can use the following examples as a guide when
making camera selections.
Making camera When you launch the Kodak Scan Validation Tool, you will be making
selections selections on the dialog boxes to set up your images for scanning test
documents. Both TWAIN and ISIS have camera selection boxes that
refer to the cameras within the scanners. Following are some examples
of choosing the correct camera for the desired results. For the purpose
of these examples, the TWAIN Datasource has been used.
Example 1: scanning a two-sided color document both sides in
color
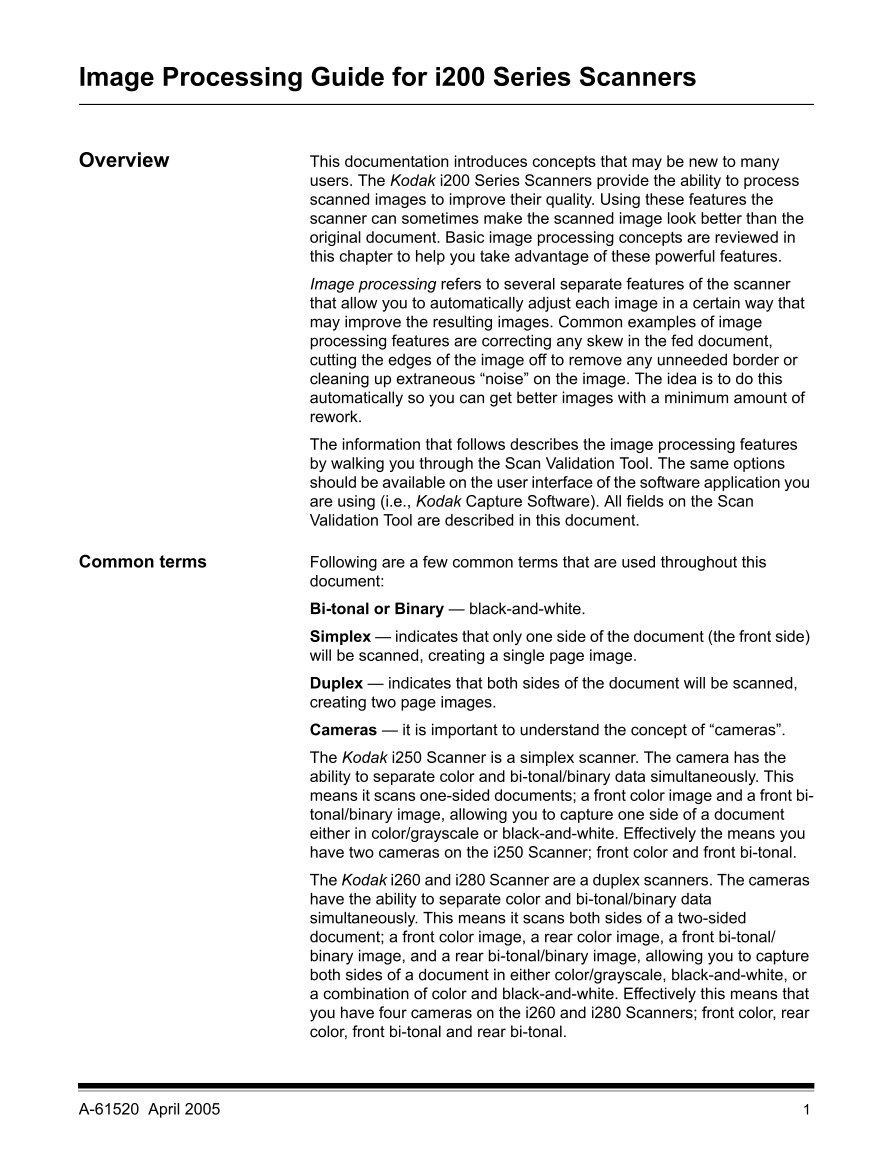
If you want to scan a two-sided color document, make your camera
selections as follows:
Camera selection Result - Side 1 Result - Side 2
• Select both Front Color and Rear Color. Depending on which
camera (in this example, Front Color) is highlighted, will depend on
which side of the document is scanned first. The result is two images
in color.
Example 2: scanning a two-sided color document, front side only
in bi-tonal
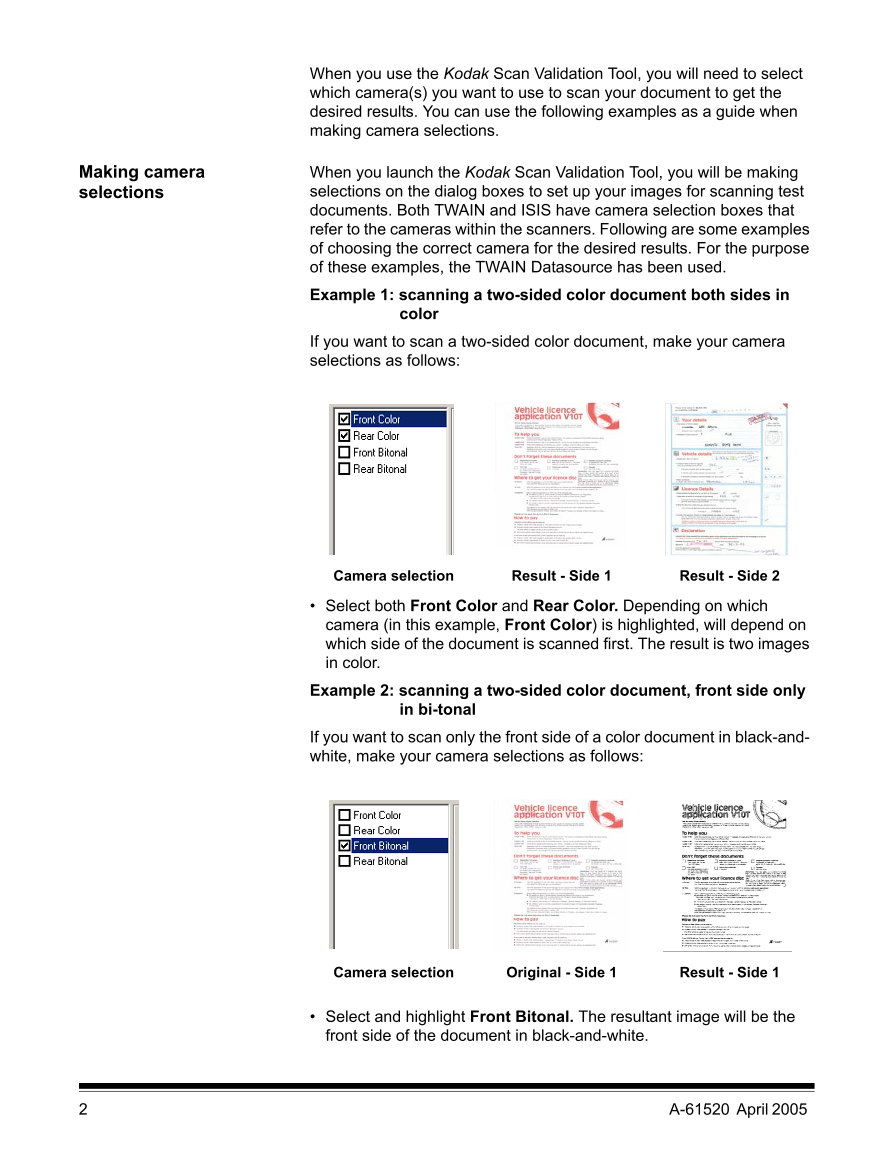
If you want to scan only the front side of a color document in black-and-
white, make your camera selections as follows:
Camera selection Original - Side 1 Result - Side 1
• Select and highlight Front Bitonal. The resultant image will be the
front side of the document in black-and-white.
2 A-61520 April 2005
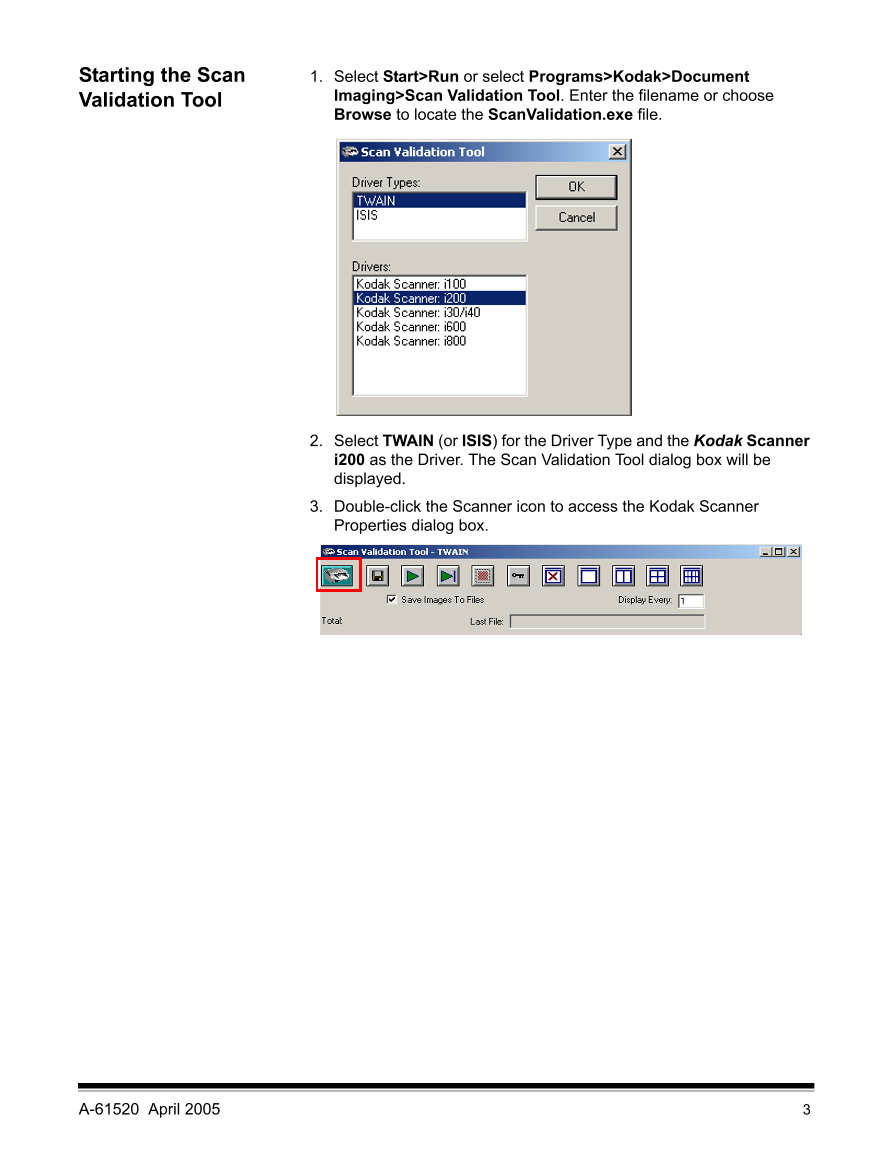
Starting the Scan 1. Select Start>Run or select Programs>Kodak>Document
Validation Tool Imaging>Scan Validation Tool. Enter the filename or choose
Browse to locate the ScanValidation.exe file.
2. Select TWAIN (or ISIS) for the Driver Type and the Kodak Scanner
i200 as the Driver. The Scan Validation Tool dialog box will be
displayed.
3. Double-click the Scanner icon to access the Kodak Scanner
Properties dialog box.
A-61520 April 2005 3
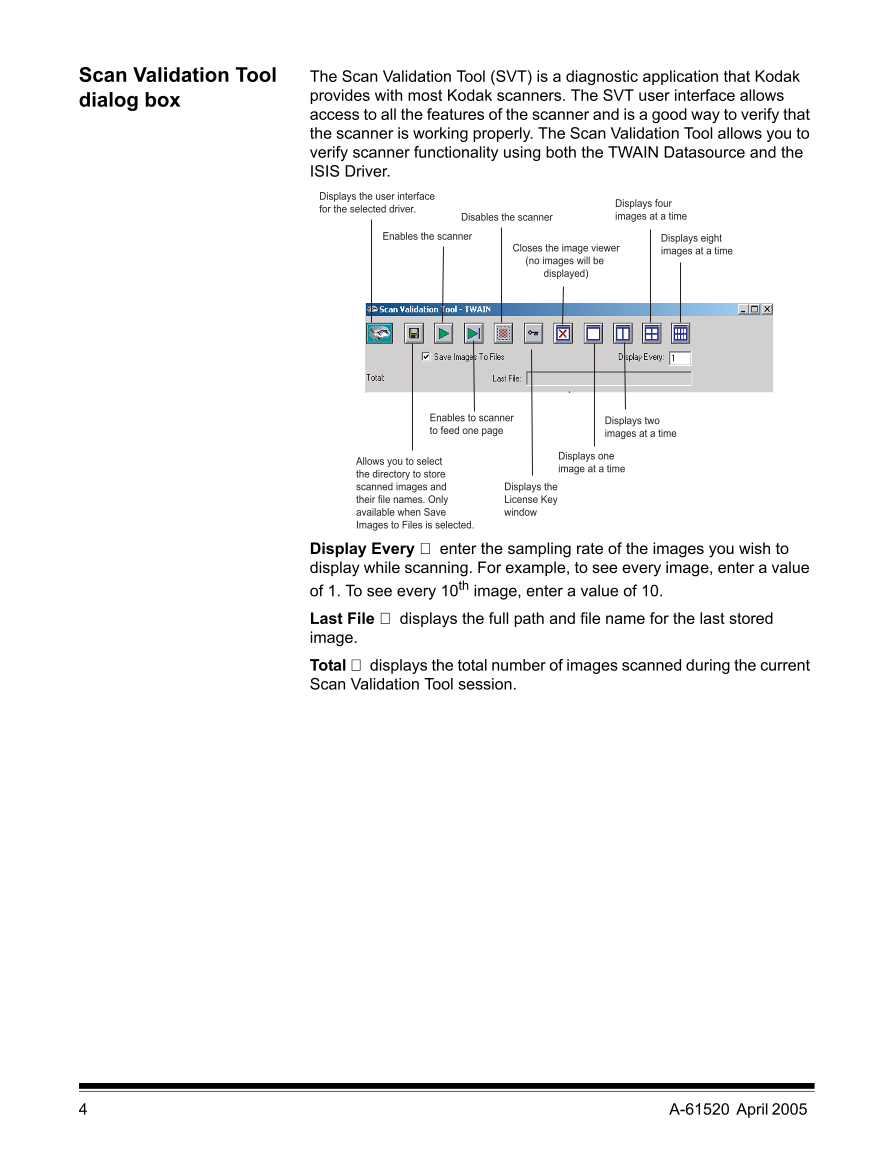
Scan Validation Tool The Scan Validation Tool (SVT) is a diagnostic application that Kodak
dialog box provides with most Kodak scanners. The SVT user interface allows
access to all the features of the scanner and is a good way to verify that
the scanner is working properly. The Scan Validation Tool allows you to
verify scanner functionality using both the TWAIN Datasource and the
ISIS Driver.
Displays the user interface
Displays four
for the selected driver.
Disables the scanner images at a time
Enables the scanner Displays eight
Closes the image viewer images at a time
(no images will be
displayed)
Enables to scanner Displays two
to feed one page images at a time
Displays one
Allows you to select
image at a time
the directory to store
scanned images and Displays the
their file names. Only License Key
available when Save window
Images to Files is selected.
Display Every enter the sampling rate of the images you wish to
display while scanning. For example, to see every image, enter a value
of 1. To see every 10th image, enter a value of 10.
Last File displays the full path and file name for the last stored
image.
Total displays the total number of images scanned during the current
Scan Validation Tool session.
4 A-61520 April 2005
Using the TWAIN The TWAIN Datasource is a piece of software that communicates with
Datasource your scanner. It is provided by Kodak with the i200 Series Scanners.
Many scanning applications support the TWAIN standard and this
datasource can be used to interface with these applications.
This section provides descriptions of the scanner features using options
on the TWAIN tabs and how to set these options. If you are using the
TWAIN Datasource, follow the procedures in this section to set up your
scanner. If you are using the ISIS Driver, see the section entitled,
“Using the ISIS Driver” later in this document.
For the purpose of this manual, all displayed dialog boxes assume the
features available on the Kodak i260 and i280 Scanners (duplex
scanners). If you have a Kodak i250 Scanner (simplex scanner) all
options are limited to simplex scanning only.
Kodak Scanner The Kodak Scanner Properties dialog box allows you to review and
Properties dialog box configure the scanner’s settings. It consists of several tabbed windows
each of which will be described within this chapter.
Click on each tab to set all the desired values. You do not have to click
OK until you have made all selections on all of the tabs.
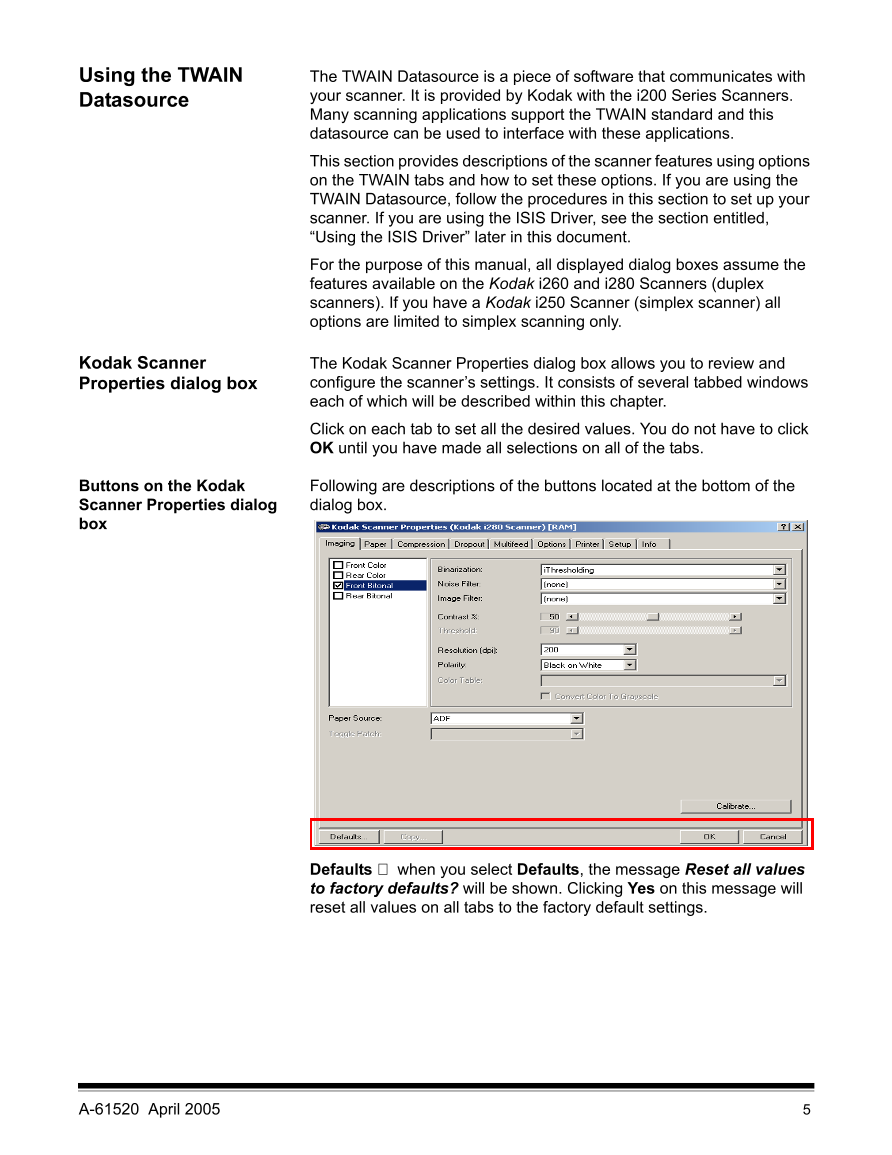
Buttons on the Kodak Following are descriptions of the buttons located at the bottom of the
Scanner Properties dialog dialog box.
box
Defaults when you select Defaults, the message Reset all values
to factory defaults? will be shown. Clicking Yes on this message will
reset all values on all tabs to the factory default settings.
A-61520 April 2005 5
Copy copies the settings of the front camera to the rear camera for
the selected camera (bi-tonal, color or grayscale). For example, if you
have Front Bi-tonal highlighted, these values will be copied to the
Rear Bi-tonal camera. If you have Front Color highlighted, these
values will be copied to the Rear Color camera. This option is only
available for the Kodak i260 and i280 Scanners.
OK saves the values set on all tabs.
Cancel closes the dialog box without saving any changes.
The Imaging tab The Imaging tab allows you to define several image processing values
that can be applied to your scanner.
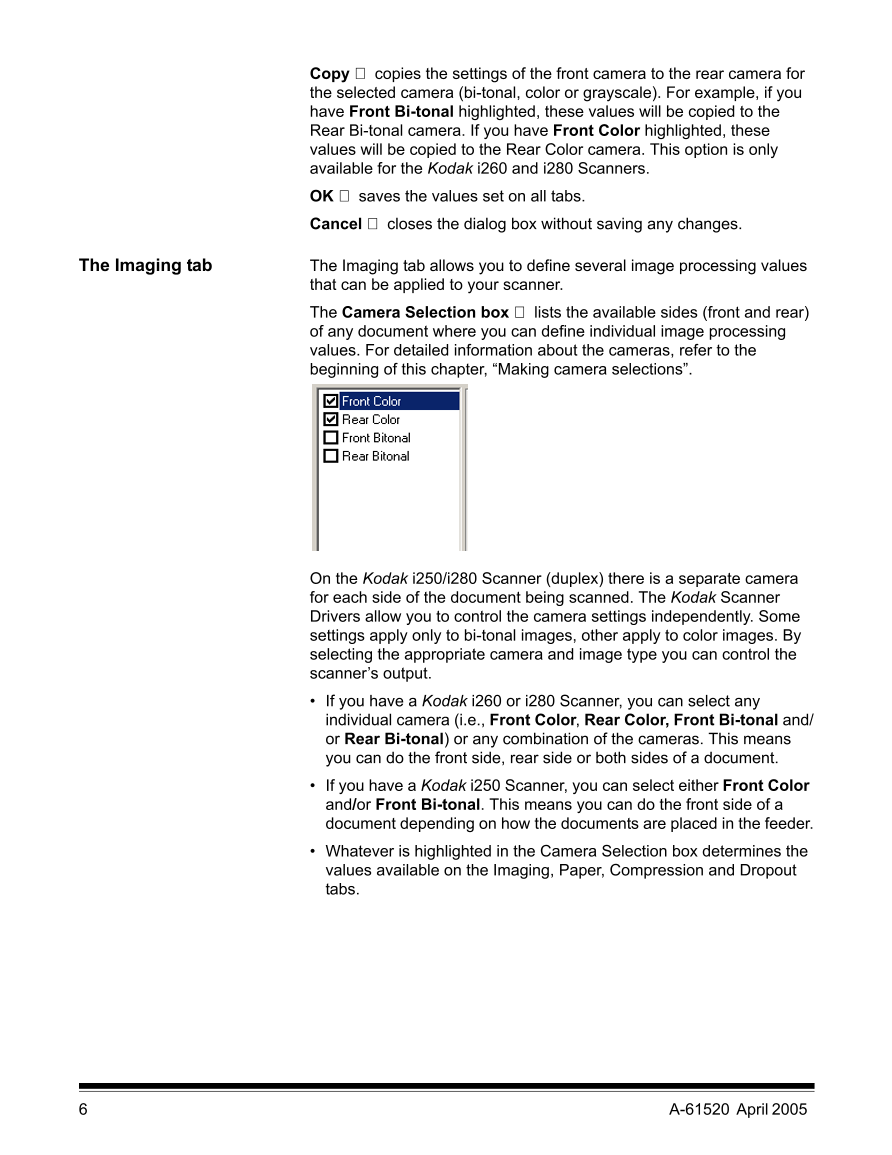
The Camera Selection box lists the available sides (front and rear)
of any document where you can define individual image processing
values. For detailed information about the cameras, refer to the
beginning of this chapter, “Making camera selections”.
On the Kodak i250/i280 Scanner (duplex) there is a separate camera
for each side of the document being scanned. The Kodak Scanner
Drivers allow you to control the camera settings independently. Some
settings apply only to bi-tonal images, other apply to color images. By
selecting the appropriate camera and image type you can control the
scanner’s output.
• If you have a Kodak i260 or i280 Scanner, you can select any
individual camera (i.e., Front Color, Rear Color, Front Bi-tonal and/
or Rear Bi-tonal) or any combination of the cameras. This means
you can do the front side, rear side or both sides of a document.
• If you have a Kodak i250 Scanner, you can select either Front Color
and/or Front Bi-tonal. This means you can do the front side of a
document depending on how the documents are placed in the feeder.
• Whatever is highlighted in the Camera Selection box determines the
values available on the Imaging, Paper, Compression and Dropout
tabs.
6 A-61520 April 2005
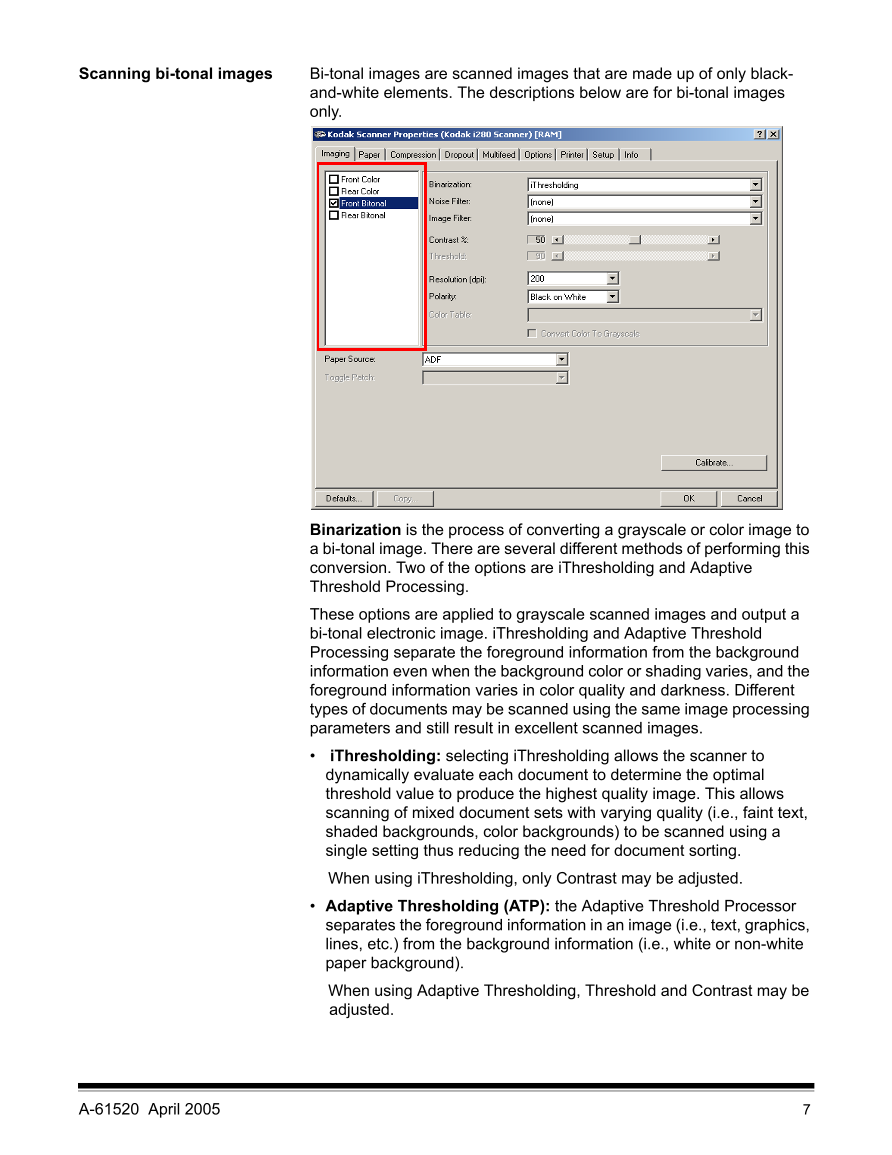
Scanning bi-tonal images Bi-tonal images are scanned images that are made up of only black-
and-white elements. The descriptions below are for bi-tonal images
only.
Binarization is the process of converting a grayscale or color image to
a bi-tonal image. There are several different methods of performing this
conversion. Two of the options are iThresholding and Adaptive
Threshold Processing.
These options are applied to grayscale scanned images and output a
bi-tonal electronic image. iThresholding and Adaptive Threshold
Processing separate the foreground information from the background
information even when the background color or shading varies, and the
foreground information varies in color quality and darkness. Different
types of documents may be scanned using the same image processing
parameters and still result in excellent scanned images.
• iThresholding: selecting iThresholding allows the scanner to
dynamically evaluate each document to determine the optimal
threshold value to produce the highest quality image. This allows
scanning of mixed document sets with varying quality (i.e., faint text,
shaded backgrounds, color backgrounds) to be scanned using a
single setting thus reducing the need for document sorting.
When using iThresholding, only Contrast may be adjusted.
• Adaptive Thresholding (ATP): the Adaptive Threshold Processor
separates the foreground information in an image (i.e., text, graphics,
lines, etc.) from the background information (i.e., white or non-white
paper background).
When using Adaptive Thresholding, Threshold and Contrast may be
adjusted.
A-61520 April 2005 7


 V2版本原理图(Capacitive-Fingerprint-Reader-Schematic_V2).pdf
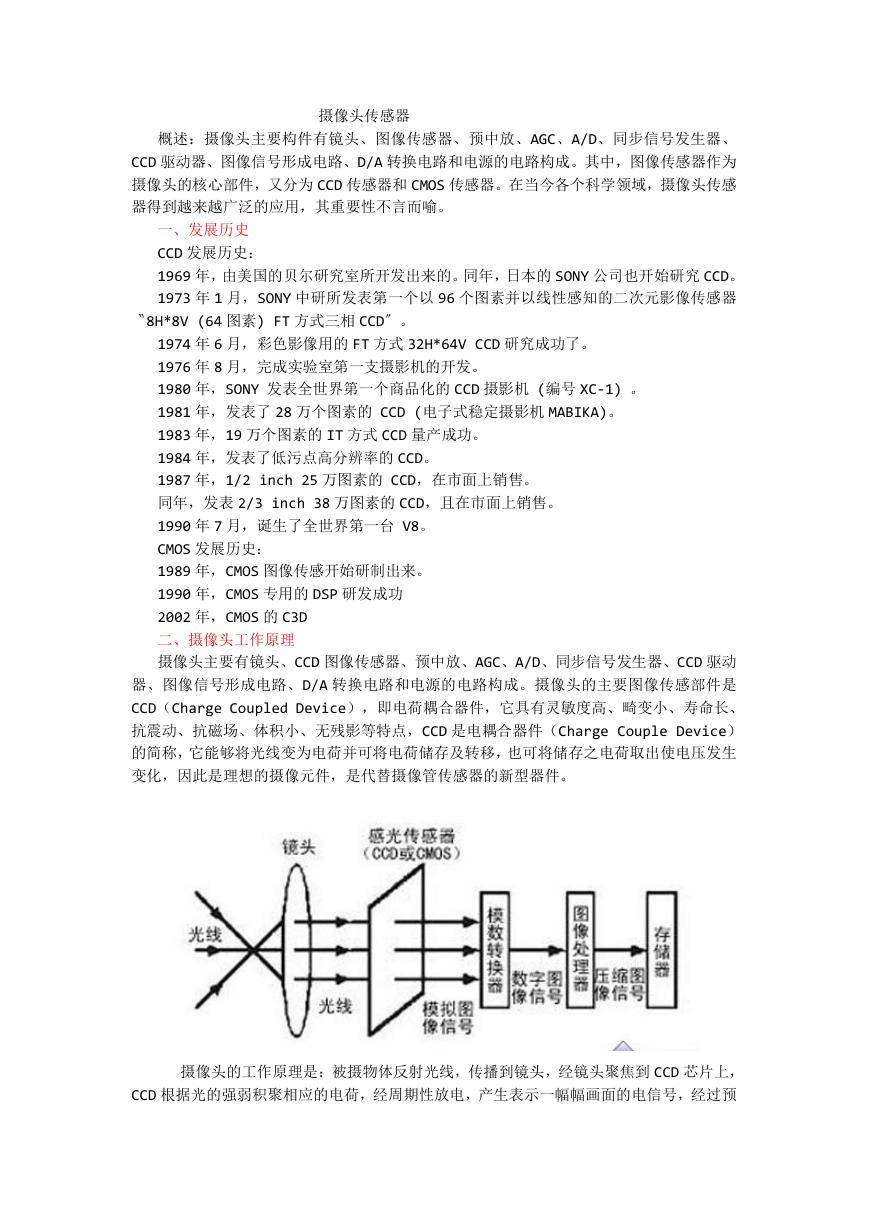 摄像头工作原理.doc
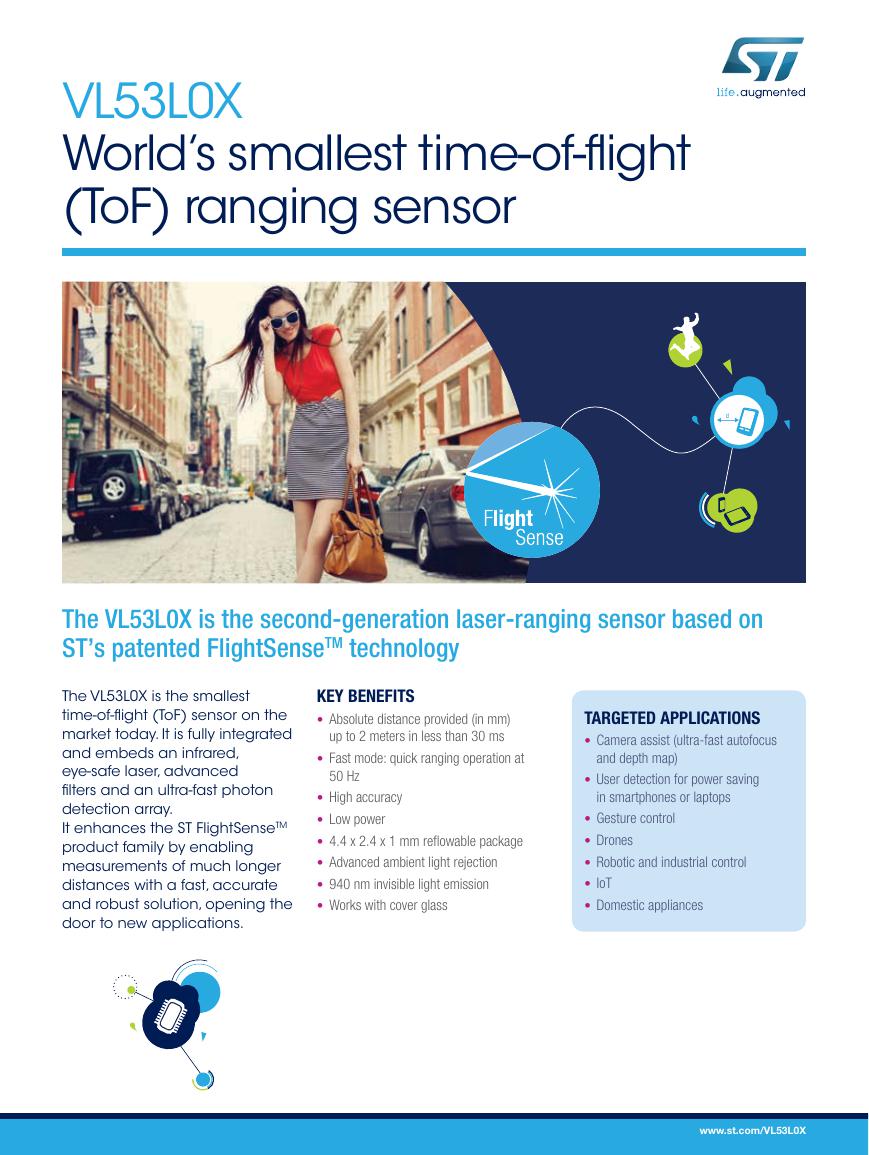 VL53L0X简要说明(En.FLVL53L00216).pdf
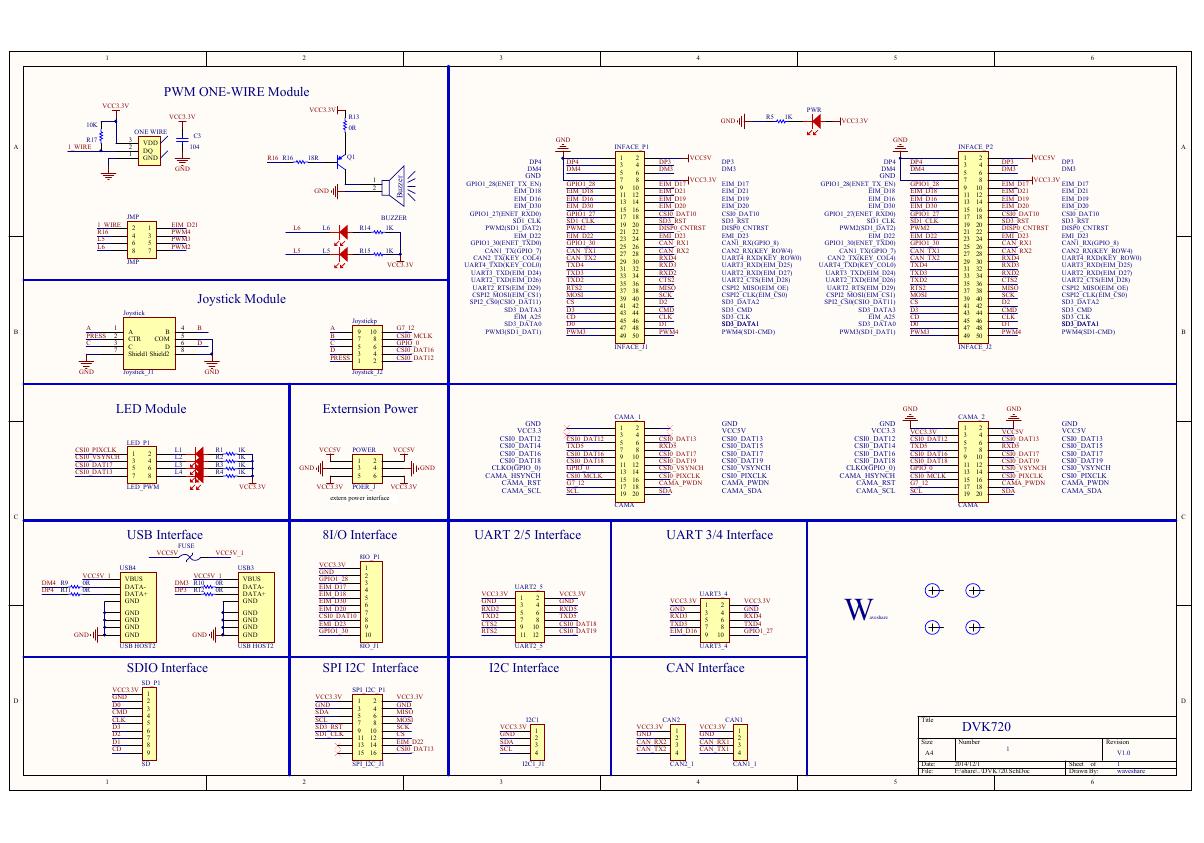 原理图(DVK720-Schematic).pdf
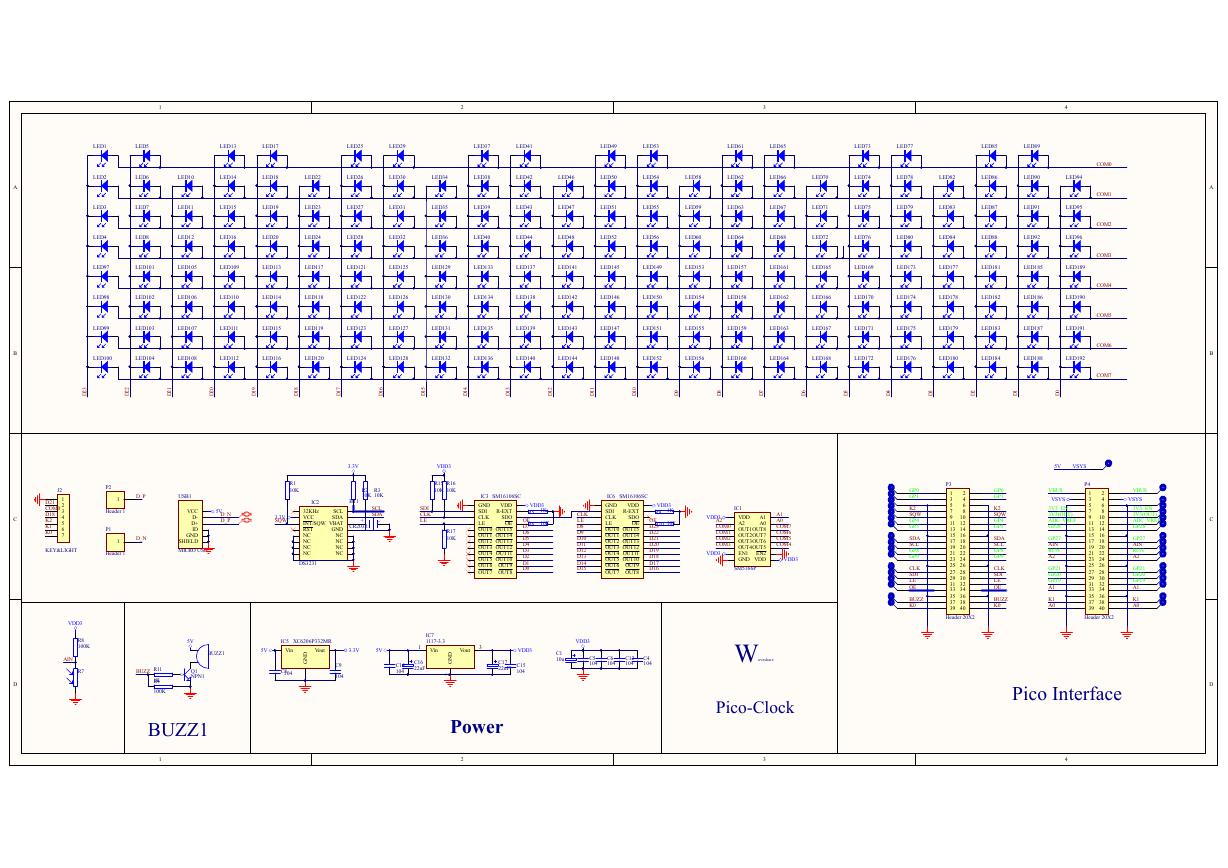 原理图(Pico-Clock-Green-Schdoc).pdf
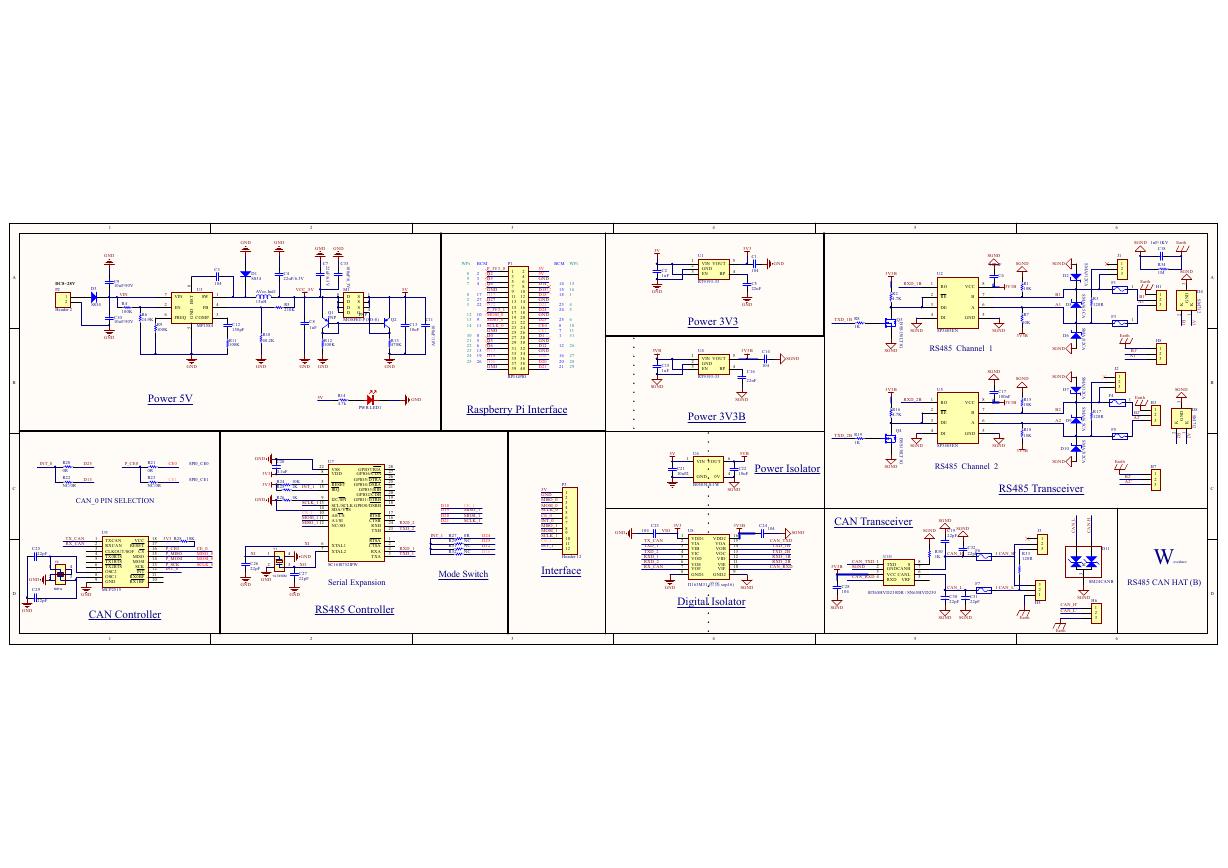 原理图(RS485-CAN-HAT-B-schematic).pdf
 File:SIM7500_SIM7600_SIM7800 Series_SSL_Application Note_V2.00.pdf
 ADS1263(Ads1262).pdf
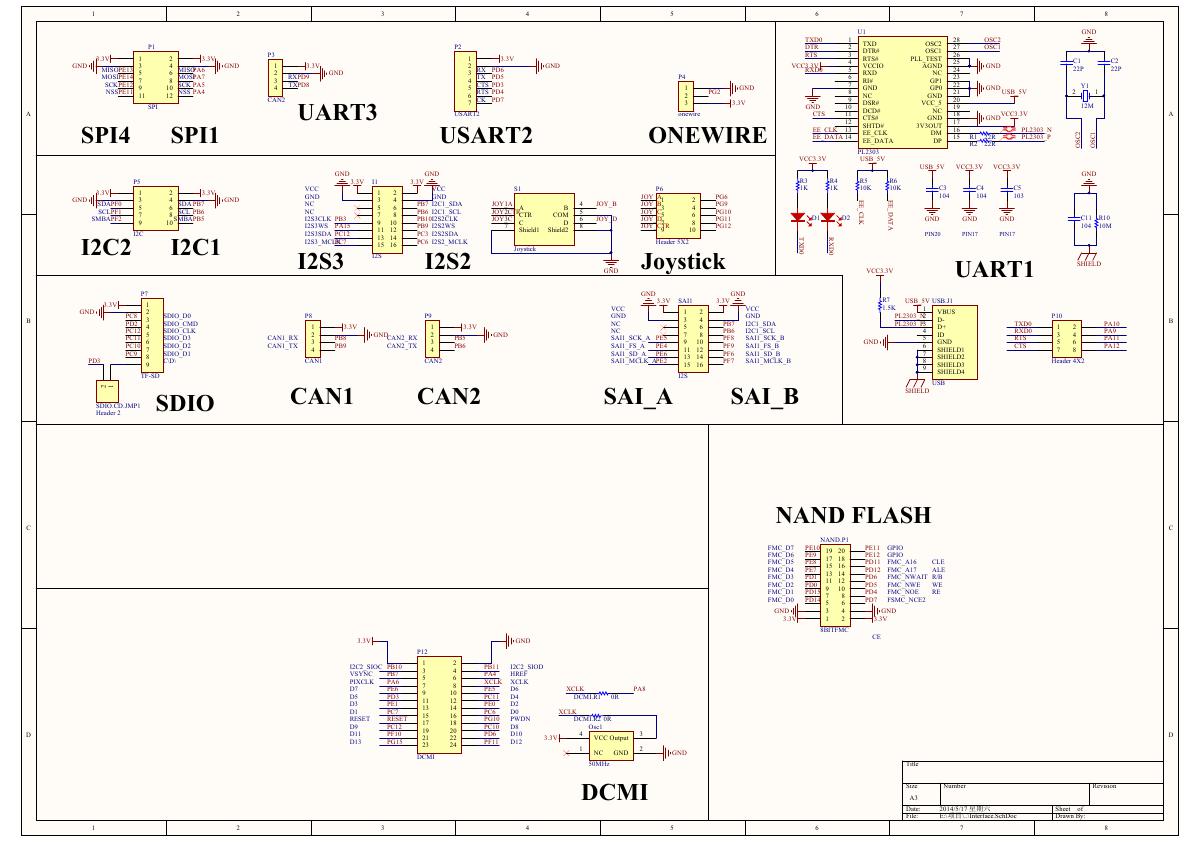 原理图(Open429Z-D-Schematic).pdf
 用户手册(Capacitive_Fingerprint_Reader_User_Manual_CN).pdf
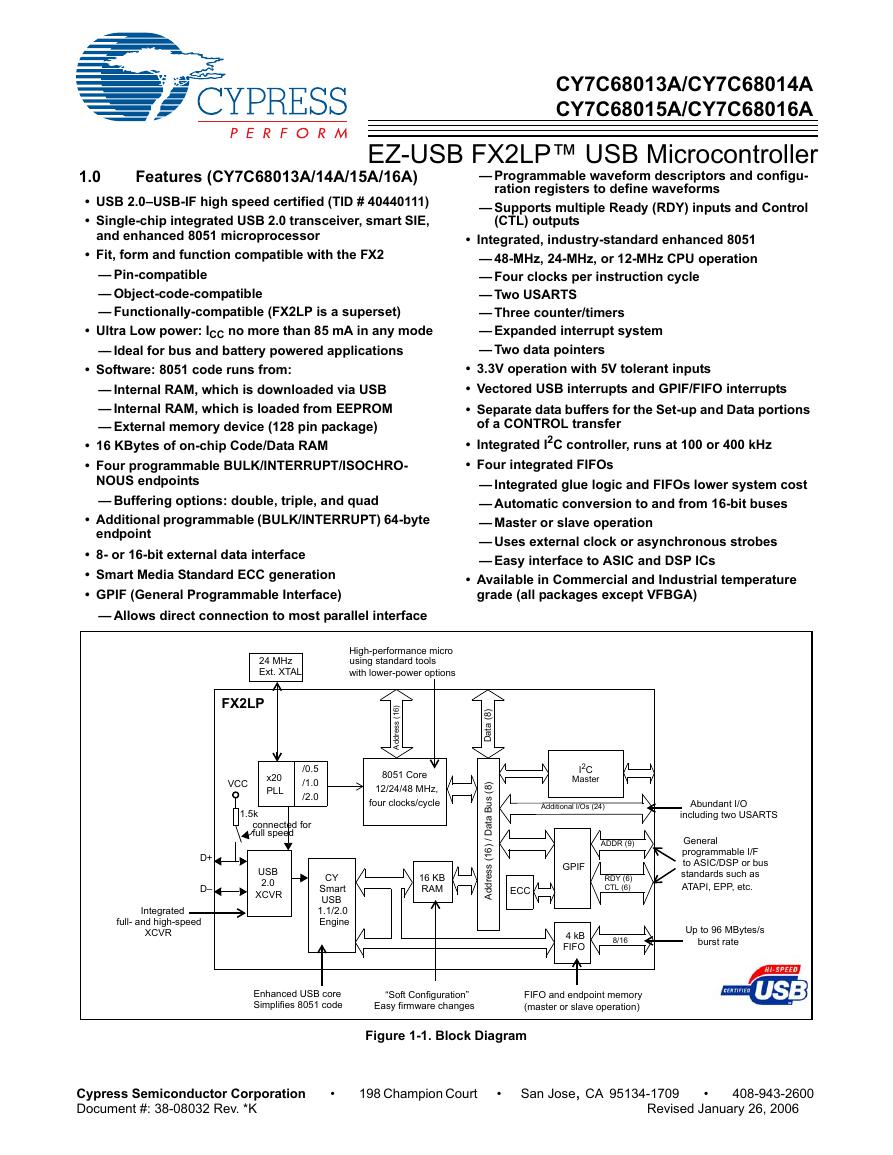 CY7C68013A(英文版)(CY7C68013A).pdf
 TechnicalReference_Dem.pdf