logo资料库

爱普泰克数码摄像机-H100说明书.pdf

第1页 / 共27页
第2页 / 共27页
第3页 / 共27页
第4页 / 共27页
第5页 / 共27页
第6页 / 共27页
第7页 / 共27页
第8页 / 共27页
资料共27页,剩余部分请下载后查看
Digital Camcorder
English
Table of Contents
Getting Started
Parts of the camcorder
Loading/Removing battery
Using SD/MMC card (optional)
Charging battery - using adapter
Charging battery - using PC
Attaching the strap
Basic Operations
Powering the camcorder on and off
Switching mode
Setting time
Setting language
Recording a video clip
OSD display - recording video
Taking a still picture
OSD display - Camcorder mode
Recording a voice clip
OSD display - Voice Recorder mode
Playback
Playing files
OSD display - My Works mode
Locking a file / Copying files
Music Player
Copy MP3 files * (select model only)
Playing music * (select model only)
Viewing display on a TV
Connecting the camcorder to TV
Recording TV program or DVD
Connecting the camcorder to TV or DVD player * (select model only)
Advanced Operations
Using menu
Menu items in Settings mode - 1
Menu items in Settings mode - 2
Menu items in Camcorder mode - 1
Menu items in Camcorder mode - 2
Menu items in My Works mode
Menu items in Voice Recorder mode
Menu items in Music Player mode
Menu items in Movie Recorder mode
Copy files to PC
Connecting the camcorder to PC
File folder of the removable disk
Appendix
Troubleshooting
Battery power indicator table
Capacity table
Battery life table
Specifications
System requirement
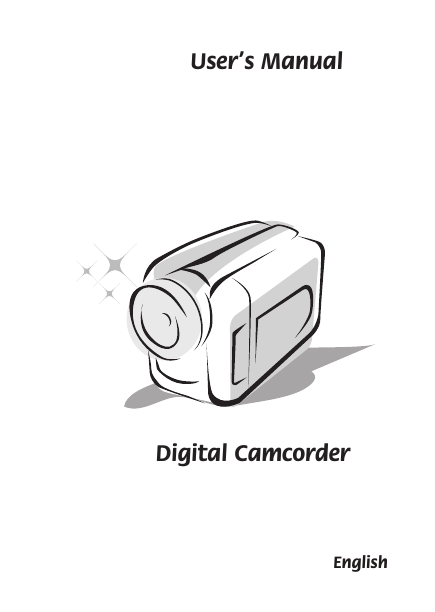
User’s Manual Digital Camcorder English
Table of Contents Getting Started ...................................................................................... 3 Parts of the camcorder ......................................................................................3 Loading/Removing battery .................................................................................4 Using SD/MMC card (optional) ..........................................................................4 Charging battery - using adapter .......................................................................5 Charging battery - using PC ..............................................................................5 Attaching the strap .............................................................................................6 Basic Operations .................................................................................. 7 Powering the camcorder on and off ...................................................................7 Switching mode .................................................................................................7 Setting time ........................................................................................................8 Setting language ................................................................................................8 Recording a video clip .......................................................................................9 OSD display - recording video ...........................................................................9 Taking a still picture .........................................................................................10 OSD display - Camcorder mode ......................................................................10 Recording a voice clip......................................................................................11 OSD display - Voice Recorder mode ...............................................................11 Playback .............................................................................................. 2 Playing files......................................................................................................12 OSD display - My Works mode ........................................................................13 Locking a file / Copying files ............................................................................13 Music Player........................................................................................ 4 Copy MP3 files * (select model only) ...............................................................14 Playing music * (select model only) .................................................................14 Viewing display on a TV ..................................................................... 5 Connecting the camcorder to TV .....................................................................15 Recording TV program or DVD ......................................................... 6 Connecting the camcorder to TV or DVD player * (select model only) ............16 
Table of Contents Advanced Operations ........................................................................ 7 Using menu......................................................................................................17 ) - 1 .............................................................17 Menu items in Settings mode ( ) - 2 .............................................................18 Menu items in Settings mode ( ) - 1 ........................................................19 Menu items in Camcorder mode ( Menu items in Camcorder mode ( ) - 2 ........................................................20 ) ..............................................................21 Menu items in My Works mode ( ) .......................................................21 Menu items in Voice Recorder mode ( Menu items in Music Player mode ( ) .................................................................22 Menu items in Movie Recorder mode ( ) ...........................................................22 Copy files to PC .................................................................................. 23 Connecting the camcorder to PC.....................................................................23 File folder of the removable disk ......................................................................23 Appendix ............................................................................................. 24 Troubleshooting ...............................................................................................24 Battery power indicator table ...........................................................................24 Capacity table ..................................................................................................25 Battery life table ...............................................................................................25 Specifications...................................................................................................26 System requirement.........................................................................................26 2
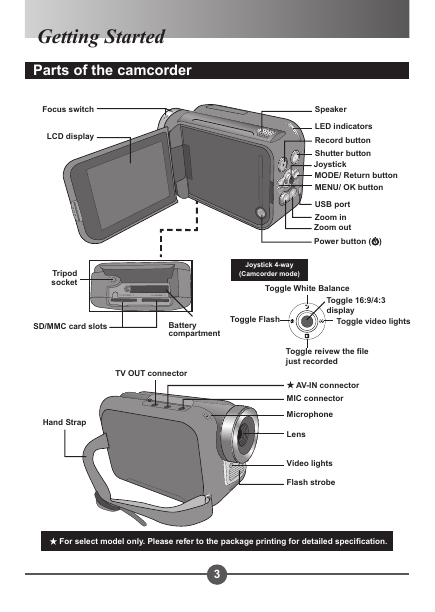
Getting Started Parts of the camcorder Focus switch LCD display Speaker LED indicators Record button Shutter button Joystick MODE/ Return button MENU/ OK button USB port Zoom in Zoom out Power button ( ) Tripod socket Joystick 4-way (Camcorder mode) Toggle White Balance SD/MMC card slots Battery compartment Toggle Flash Toggle 16:9/4: display Toggle video lights TV OUT connector Hand Strap Toggle reivew the file just recorded AV-IN connector MIC connector Microphone Lens Video lights Flash strobe For select model only. Please refer to the package printing for detailed specification. 
Loading/Removing battery  2 3  Slide the battery compartment cover open as indicated. 2 Insert the Li-ion battery into the battery compartment as indicated. Note that the 4 metallic contacts on the battery must be aligned with those in the compartment. 3 Make sure the drop prevention lever clicks into place. Replace the compartment cover. 4 To remove the battery, push the drop prevention lever downward and take out the battery pack. Using SD/MMC card (optional) In addition to the internal built-in memory, your camcorder can store data on a Secure Digital (SD) card or a MultiMedia card (MMC). To insert a memory card, gently push the card until the card reaches the bottom of the slot (make sure the beveled corner is correctly aligned). When a card is successfully inserted, you will see the storage icon changes on the LCD. To remove the memory card, gently push the card and it will pop up. Then pull the card out of the slot. There are 2 card slots. Depending on which card slot is being used, the storage icon will change accordingly: : using internal memory : using card slot  : using card slot 2 4
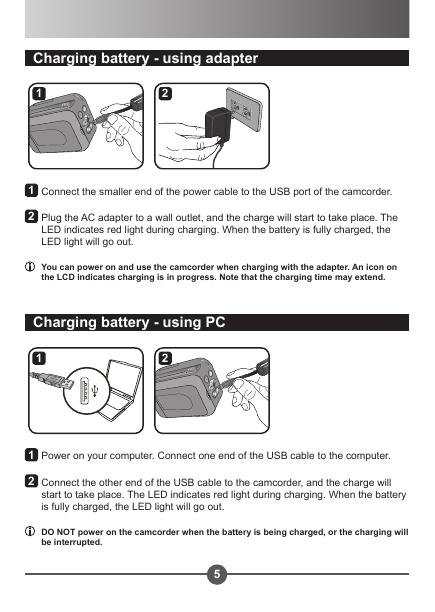
Charging battery - using adapter  2  Connect the smaller end of the power cable to the USB port of the camcorder. 2 Plug the AC adapter to a wall outlet, and the charge will start to take place. The LED indicates red light during charging. When the battery is fully charged, the LED light will go out. You can power on and use the camcorder when charging with the adapter. An icon on the LCD indicates charging is in progress. Note that the charging time may extend. Charging battery - using PC  2  Power on your computer. Connect one end of the USB cable to the computer. 2 Connect the other end of the USB cable to the camcorder, and the charge will start to take place. The LED indicates red light during charging. When the battery is fully charged, the LED light will go out. DO NOT power on the camcorder when the battery is being charged, or the charging will be interrupted. 5
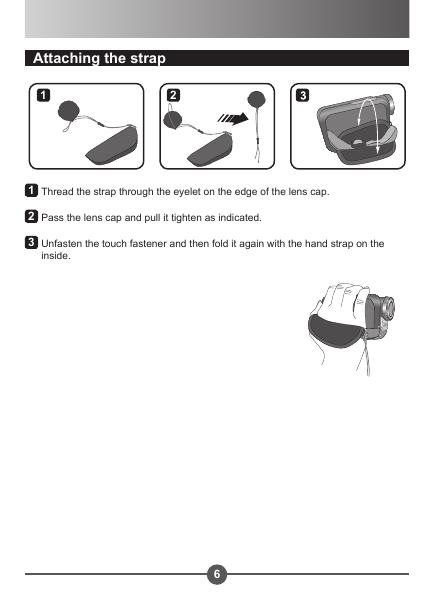
Attaching the strap  2  Thread the strap through the eyelet on the edge of the lens cap. 2 Pass the lens cap and pull it tighten as indicated. 3 Unfasten the touch fastener and then fold it again with the hand strap on the inside. 6
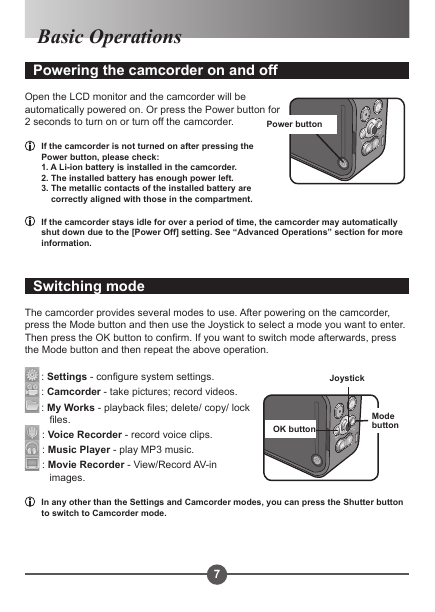
Basic Operations Powering the camcorder on and off Open the LCD monitor and the camcorder will be automatically powered on. Or press the Power button for 2 seconds to turn on or turn off the camcorder. Power button If the camcorder is not turned on after pressing the Power button, please check: . A Li-ion battery is installed in the camcorder. 2. The installed battery has enough power left. 3. The metallic contacts of the installed battery are correctly aligned with those in the compartment. If the camcorder stays idle for over a period of time, the camcorder may automatically shut down due to the [Power Off] setting. See “Advanced Operations” section for more information. Switching mode The camcorder provides several modes to use. After powering on the camcorder, press the Mode button and then use the Joystick to select a mode you want to enter. Then press the OK button to confirm. If you want to switch mode afterwards, press the Mode button and then repeat the above operation. : Settings - configure system settings. : Camcorder - take pictures; record videos. : My Works - playback files; delete/ copy/ lock files. : Voice Recorder - record voice clips. : Music Player - play MP3 music. : Movie Recorder - View/Record AV-in images. Joystick OK button Mode button In any other than the Settings and Camcorder modes, you can press the Shutter button to switch to Camcorder mode. 7
分享到:
收藏