Getting Started
Knowing your camcorder parts
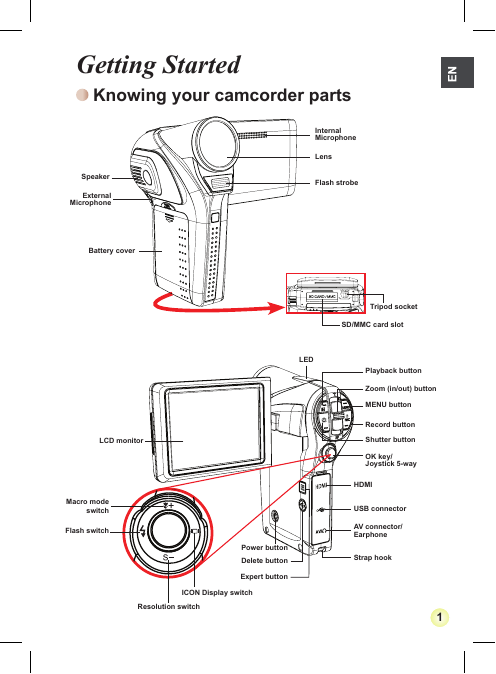
Speaker
External
Microphone
Battery cover
LCD monitor
Macro mode
switch
Flash switch
Power button
Delete button
Expert button
ICON Display switch
Resolution switch
Internal
Microphone
Lens
Flash strobe
Tripod socket
SD/MMC card slot
LED
Playback button
Zoom (in/out) button
MENU button
Record button
Shutter button
OK key/
Joystick 5-way
HDMI
USB connector
AV connector/
Earphone
Strap hook
�
�
Installing the battery
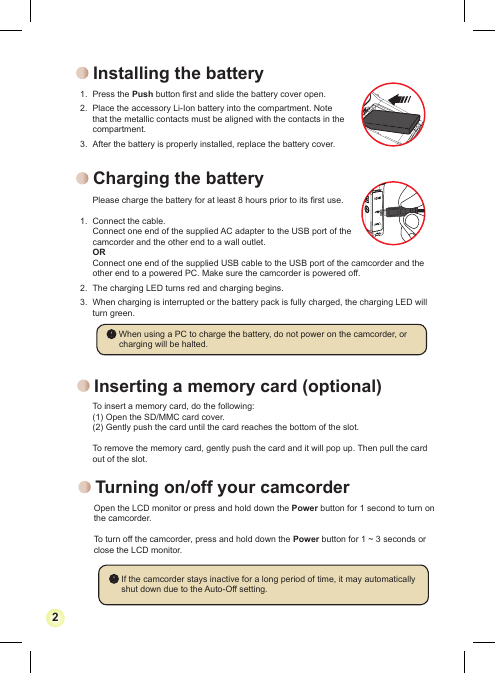
1. Press the Push button first and slide the battery cover open.
2. Place the accessory Li-Ion battery into the compartment. Note
that the metallic contacts must be aligned with the contacts in the
compartment.
3. After the battery is properly installed, replace the battery cover.
Charging the battery
Please charge the battery for at least 8 hours prior to its first use.
1. Connect the cable.
Connect one end of the supplied AC adapter to the USB port of the
camcorder and the other end to a wall outlet.
OR
Connect one end of the supplied USB cable to the USB port of the camcorder and the
other end to a powered PC. Make sure the camcorder is powered off.
2. The charging LED turns red and charging begins.
3. When charging is interrupted or the battery pack is fully charged, the charging LED will
turn green.
When using a PC to charge the battery, do not power on the camcorder, or
charging will be halted.
Inserting a memory card (optional)
To insert a memory card, do the following:
(1) Open the SD/MMC card cover.
(2) Gently push the card until the card reaches the bottom of the slot.
To remove the memory card, gently push the card and it will pop up. Then pull the card
out of the slot.
Turning on/off your camcorder
Open the LCD monitor or press and hold down the Power button for 1 second to turn on
the camcorder.
To turn off the camcorder, press and hold down the Power button for 1 ~ 3 seconds or
close the LCD monitor.
If the camcorder stays inactive for a long period of time, it may automatically
shut down due to the Auto-Off setting.
�
�
Setting language
1. Power on the camcorder.
2. Press the MENU button to enter the Setting screen.
3. Use the Joystick to select the Language item, and then Press OK to confirm.
4. Move the Joystick up/down to select a language.
5. When done, press OK to confirm the setting.
Open the LCD monitor or press and hold down the Power button for 1 second to turn on
�
�
Basic Operations
Recording a video clip
1. Select the video resolution in different scenarios.
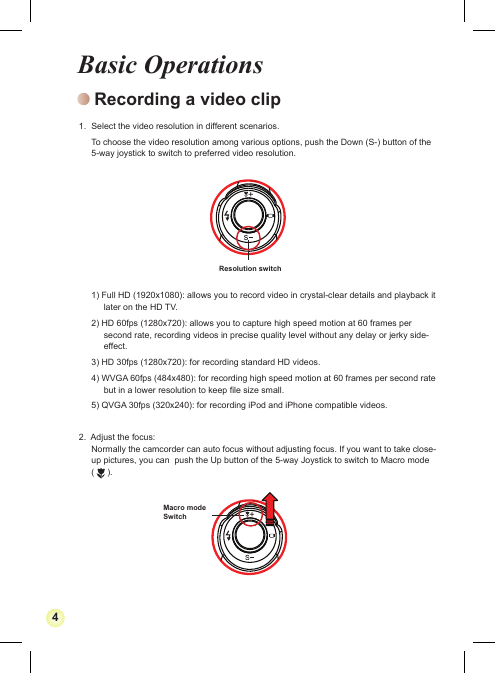
To choose the video resolution among various options, push the Down (S-) button of the
5-way joystick to switch to preferred video resolution.
Resolution switch
1) Full HD (1920x1080): allows you to record video in crystal-clear details and playback it
later on the HD TV.
2) HD 60fps (1280x720): allows you to capture high speed motion at 60 frames per
second rate, recording videos in precise quality level without any delay or jerky side-
effect.
3) HD 30fps (1280x720): for recording standard HD videos.
4) WVGA 60fps (484x480): for recording high speed motion at 60 frames per second rate
but in a lower resolution to keep file size small.
5) QVGA 30fps (320x240): for recording iPod and iPhone compatible videos.
2. Adjust the focus:
Normally the camcorder can auto focus without adjusting focus. If you want to take close-
up pictures, you can push the Up button of the 5-way Joystick to switch to Macro mode
(
).
Macro mode
Switch
��
�
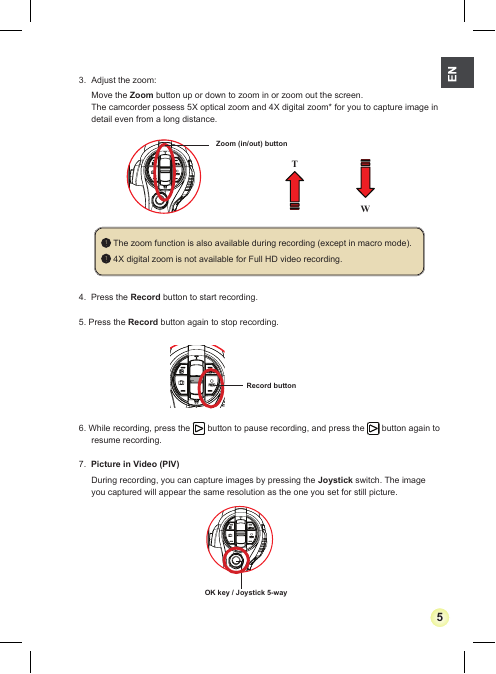
3. Adjust the zoom:
Move the Zoom button up or down to zoom in or zoom out the screen.
The camcorder possess 5X optical zoom and 4X digital zoom* for you to capture image in
detail even from a long distance.
Zoom (in/out) button
T
W
The zoom function is also available during recording (except in macro mode).
4X digital zoom is not available for Full HD video recording.
4. Press the Record button to start recording.
5. Press the Record button again to stop recording.
Record button
6. While recording, press the
button to pause recording, and press the
button again to
resume recording.
7. Picture in Video (PIV)
During recording, you can capture images by pressing the Joystick switch. The image
you captured will appear the same resolution as the one you set for still picture.
OK key / Joystick 5-way
55
�
Taking a still picture
1. Adjust the focus:
Normally the camcorder can auto focus without adjusting focus. If you want to take
close-up pictures, you can push the Up button to switch to Macro mode (
).
2. Zooming:
Move the Zoom button up or down to zoom in or zoom out the screen.
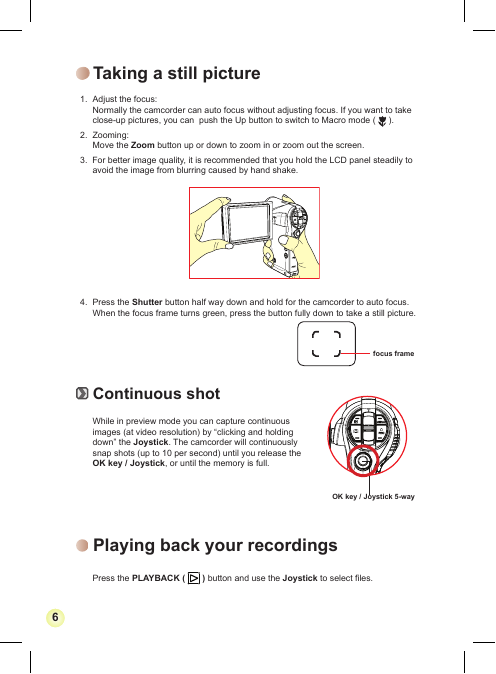
3. For better image quality, it is recommended that you hold the LCD panel steadily to
avoid the image from blurring caused by hand shake.
4. Press the Shutter button half way down and hold for the camcorder to auto focus.
When the focus frame turns green, press the button fully down to take a still picture.
Continuous shot
While in preview mode you can capture continuous
images (at video resolution) by “clicking and holding
down” the Joystick. The camcorder will continuously
snap shots (up to 10 per second) until you release the
OK key / Joystick, or until the memory is full.
focus frame
OK key / Joystick 5-way
Playing back your recordings
Press the PLAYBACK (
) button and use the Joystick to select files.
��
�
Specifications
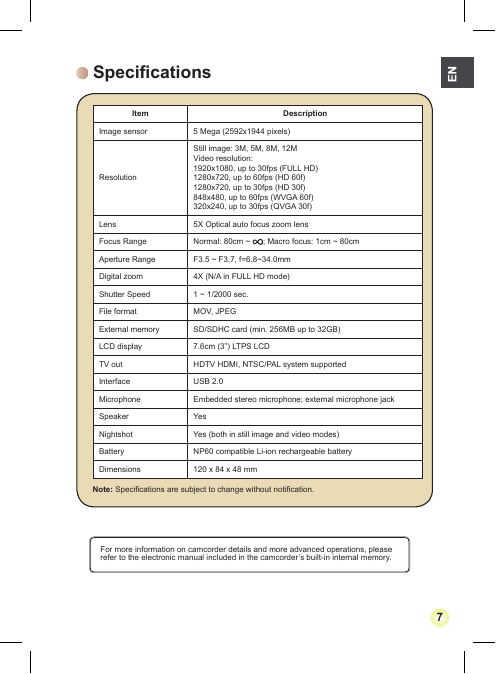
Item
Description
Image sensor
5 Mega (2592x1944 pixels)
Resolution
Still image: 3M, 5M, 8M, 12M
Video resolution:
1920x1080, up to 30fps (FULL HD)
1280x720, up to 60fps (HD 60f)
1280x720, up to 30fps (HD 30f)
848x480, up to 60fps (WVGA 60f)
320x240, up to 30fps (QVGA 30f)
Lens
5X Optical auto focus zoom lens
Focus Range
Normal: 80cm ~
; Macro focus: 1cm ~ 80cm
Aperture Range
F3.5 ~ F3.7, f=6.8~34.0mm
Digital zoom
Shutter Speed
File format
4X (N/A in FULL HD mode)
1 ~ 1/2000 sec.
MOV, JPEG
External memory
SD/SDHC card (min. 256MB up to 32GB)
LCD display
7.6cm (3”) LTPS LCD
TV out
Interface
HDTV HDMI, NTSC/PAL system supported
USB 2.0
Microphone
Embedded stereo microphone; external microphone jack
Speaker
Nightshot
Battery
Yes
Yes (both in still image and video modes)
NP60 compatible Li-ion rechargeable battery
Dimensions
120 x 84 x 48 mm
Note: Specifications are subject to change without notification.
For more information on camcorder details and more advanced operations, please
refer to the electronic manual included in the camcorder’s built-in internal memory.
�
�
�


 2023年江西萍乡中考道德与法治真题及答案.doc
 2012年重庆南川中考生物真题及答案.doc
 2013年江西师范大学地理学综合及文艺理论基础考研真题.doc
 2020年四川甘孜小升初语文真题及答案I卷.doc
 2020年注册岩土工程师专业基础考试真题及答案.doc
 2023-2024学年福建省厦门市九年级上学期数学月考试题及答案.doc
 2021-2022学年辽宁省沈阳市大东区九年级上学期语文期末试题及答案.doc
 2022-2023学年北京东城区初三第一学期物理期末试卷及答案.doc
 2018上半年江西教师资格初中地理学科知识与教学能力真题及答案.doc
 2012年河北国家公务员申论考试真题及答案-省级.doc
 2020-2021学年江苏省扬州市江都区邵樊片九年级上学期数学第一次质量检测试题及答案.doc
 2022下半年黑龙江教师资格证中学综合素质真题及答案.doc