Eメ
ール
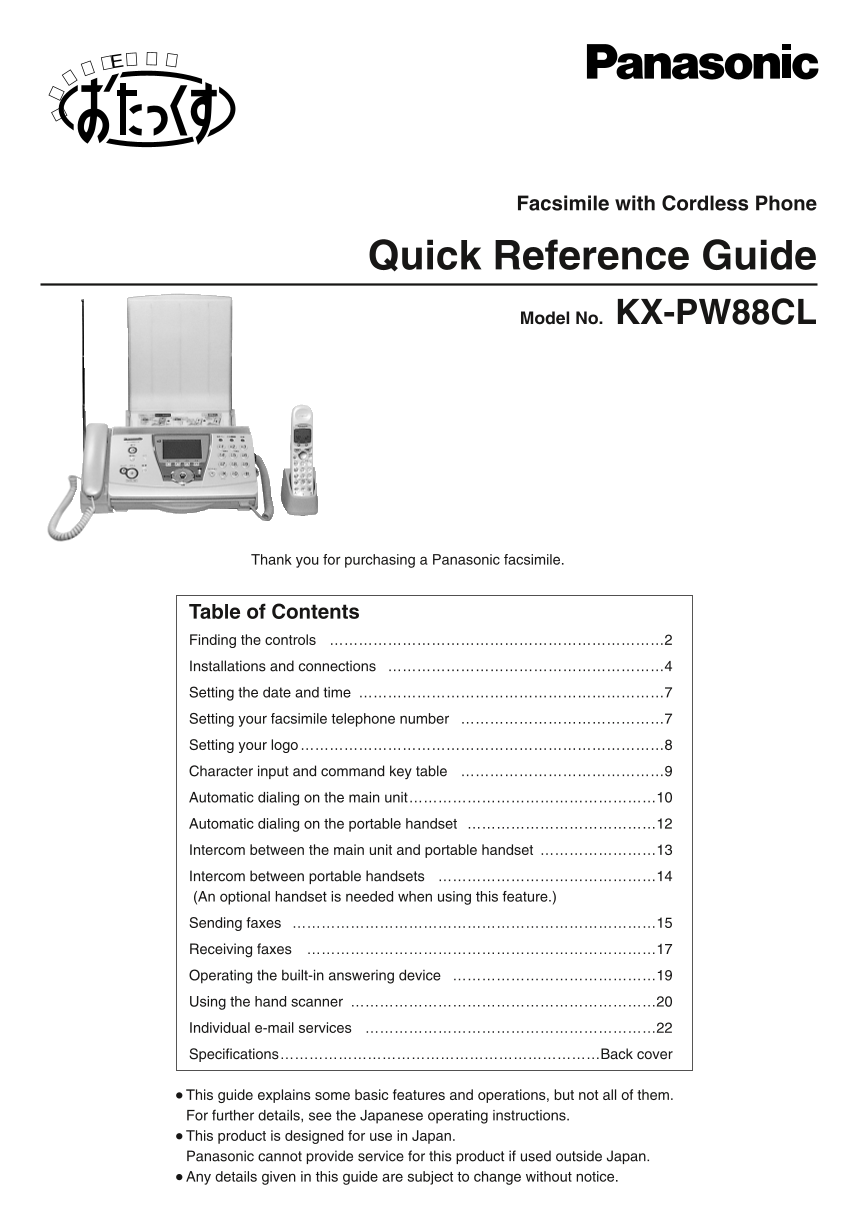
Facsimile with Cordless Phone
Quick Reference Guide
Model No. KX-PW88CL
Thank you for purchasing a Panasonic facsimile.
Table of Contents
Finding the controls ……………………………………………………………2
Installations and connections …………………………………………………4
Setting the date and time ………………………………………………………7
Setting your facsimile telephone number ……………………………………7
Setting your logo…………………………………………………………………8
Character input and command key table ……………………………………9
Automatic dialing on the main unit……………………………………………10
Automatic dialing on the portable handset …………………………………12
Intercom between the main unit and portable handset ……………………13
Intercom between portable handsets ………………………………………14
(An optional handset is needed when using this feature.)
Sending faxes …………………………………………………………………15
Receiving faxes ………………………………………………………………17
Operating the built-in answering device ……………………………………19
Using the hand scanner ………………………………………………………20
Individual e-mail services ……………………………………………………22
Specifications…………………………………………………………Back cover
� This guide explains some basic features and operations, but not all of them.
For further details, see the Japanese operating instructions.
� This product is designed for use in Japan.
Panasonic cannot provide service for this product if used outside Japan.
� Any details given in this guide are subject to change without notice.
Finding the controls
Main unit (control panel)
1 2 3 4 5
KX-PW88CL-W
メモリー残 インク残 呼出音切 カナ 1 2 3
6 クリアー 選択 登録 文字切替
操作案内 スキャナー 留守電 印字倍率
キャッチ ミュート 通話録音 保留
消去 削除 前の用件 次の用件 4 5 6
7
7 8 9
8
9 0
10 11 12 13 14 15 16 17 18
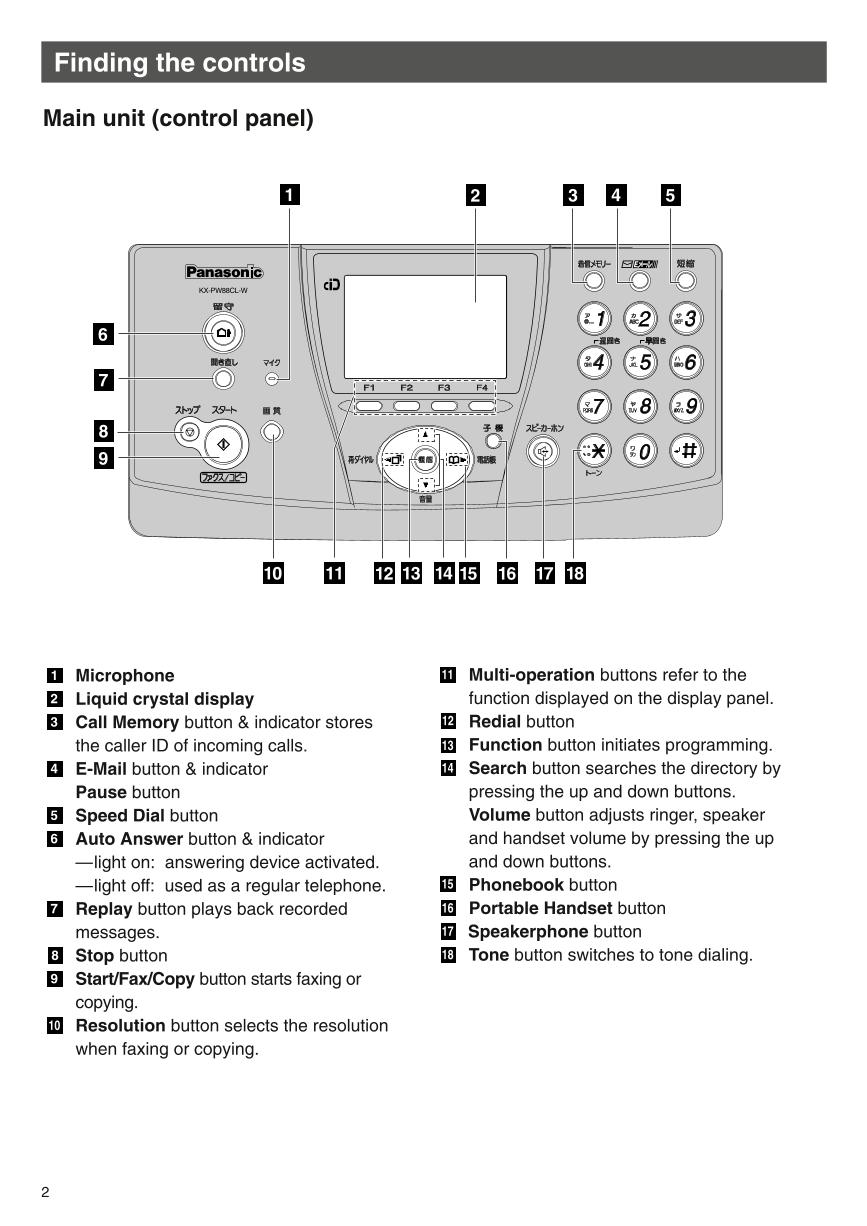
1 Microphone 11 Multi-operation buttons refer to the
2 Liquid crystal display function displayed on the display panel.
3 Call Memory button & indicator stores 12 Redial button
the caller ID of incoming calls. 13 Function button initiates programming.
4 E-Mail button & indicator 14 Search button searches the directory by
Pause button pressing the up and down buttons.
5 Speed Dial button Volume button adjusts ringer, speaker
6 Auto Answer button & indicator and handset volume by pressing the up
—light on: answering device activated. and down buttons.
—light off: used as a regular telephone. 15 Phonebook button
7 Replay button plays back recorded 16 Portable Handset button
messages. 17 Speakerphone button
8 Stop button 18 Tone button switches to tone dialing.
9 Start/Fax/Copy button starts faxing or
copying.
10 Resolution button selects the resolution
when faxing or copying.
2
Finding the controls
Portable handset
Speaker LCD (with back light)
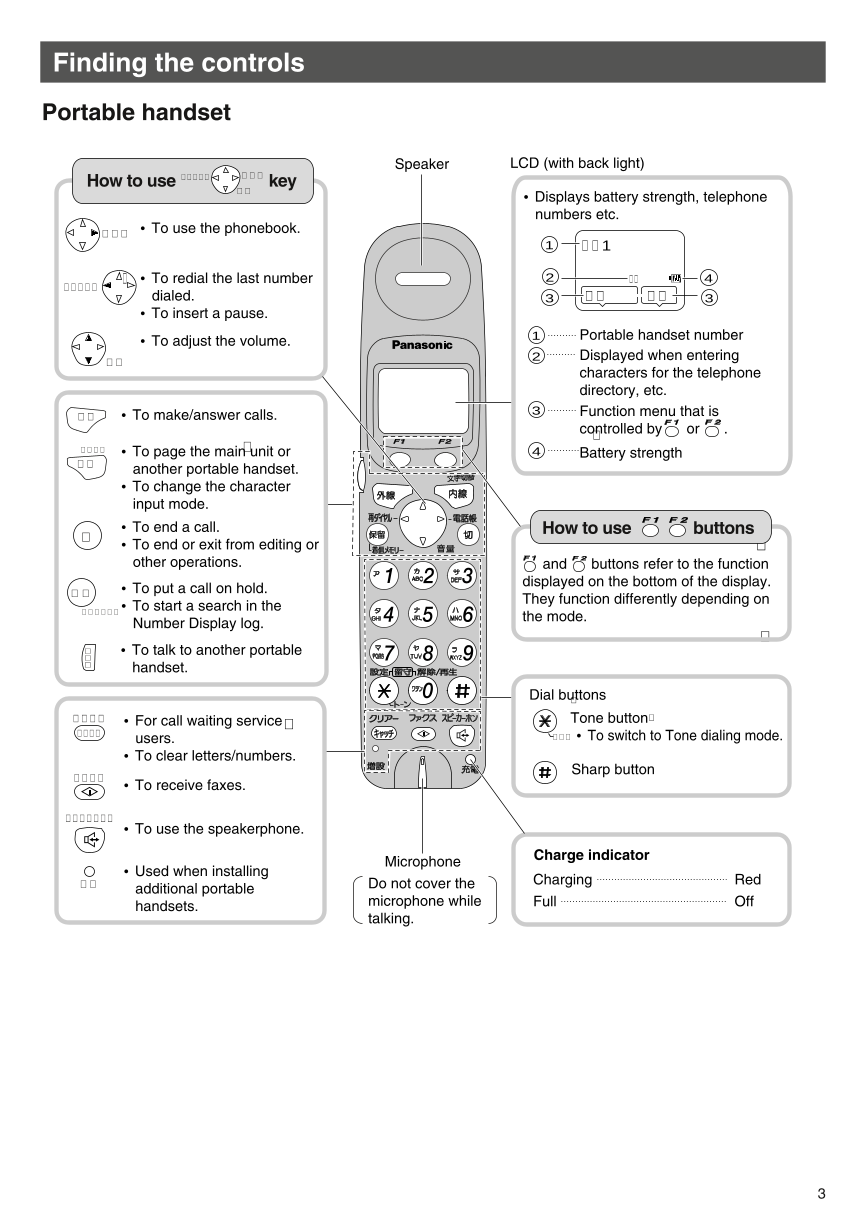
How to use 再 ダ イ ヤ ル 電 話 帳 key
音量
● Displays battery strength, telephone
numbers etc.
●
電話帳 To use the phonebook.
1 コ キ 1
� ● To redial the last number 2 プライベートカナ 4
再ダイヤル
dialed. 3 登録 機能 3
● To insert a pause.
● To adjust the volume. 1 Portable handset number
音量 2 Displayed when entering
characters for the telephone
directory, etc.
外線 ● To make/answer calls. 3 Function menu that is
co�ntrolled by or .
文字切替 ● To page the main� unit or 4 Battery strength
内線 another portable handset.
● To change the character
input mode.
● To end a call.
切 How to use buttons
● To end or exit from editing or �
other operations. and buttons refer to the function
● To put a call on hold. displayed on the bottom of the display.
保留
● They function differently depending on
着信メモリー To start a search in the
Number Display log. the mode.
�
ト ● To talk to another portable
ー
ク handset.
Dial bu�ttons
クリアー ● For call waiting service � Tone button�
キャッチ users. トーン ● To switch to Tone dialing mode.
● To clear letters/numbers.
Sharp button
ファクス
● To receive faxes.
スピーカーホン
● To use the speakerphone.
Microphone Charge indicator
● Used when installing
増設 Do not cover the Charging Red
additional portable
handsets. microphone while Full Off
talking.
3
Installations and connections
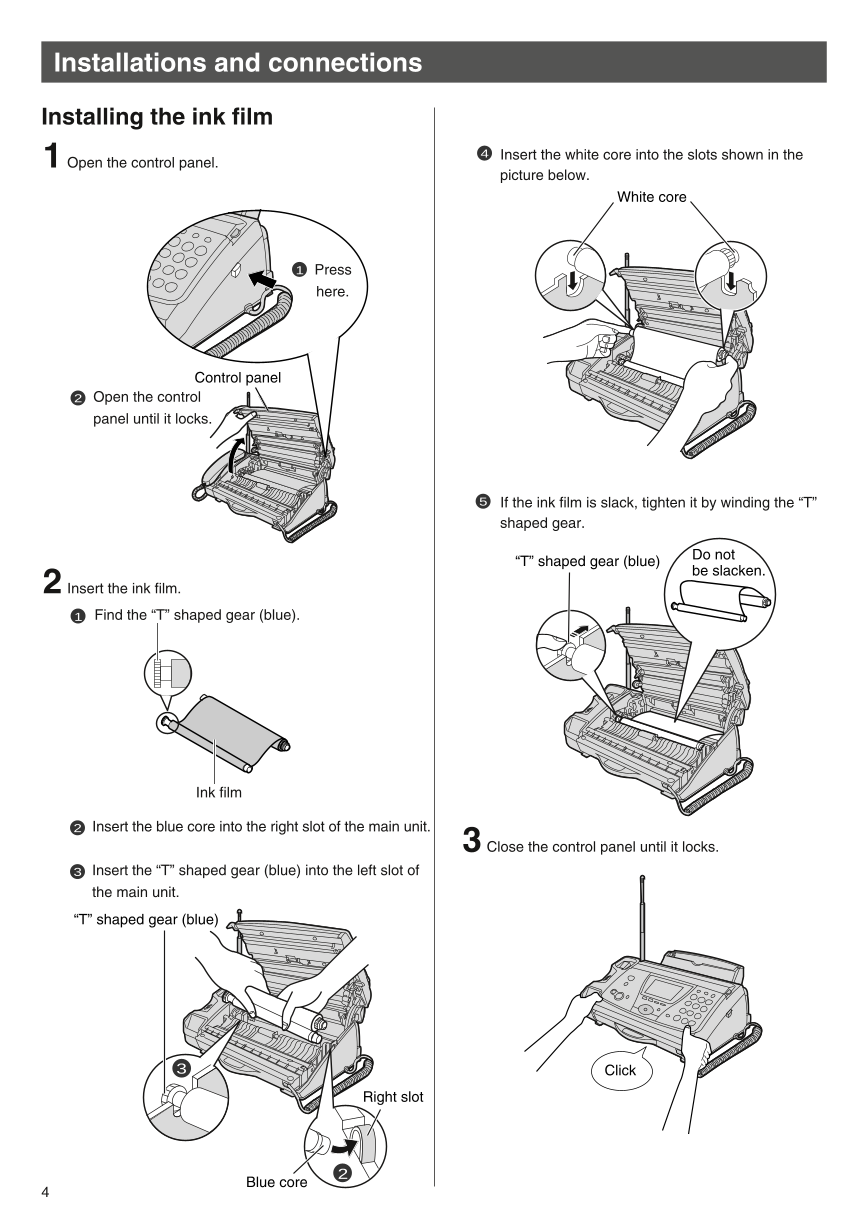
Installing the ink film
1 4
Open the control panel. Insert the white core into the slots shown in the
picture below.
White core
1 Press
here.
Control panel
2 Open the control
panel until it locks.
5 If the ink film is slack, tighten it by winding the “T”
shaped gear.
“T” shaped gear (blue) Do not
2 be slacken.
Insert the ink film.
1 Find the “T” shaped gear (blue).
Ink film
2 Insert the blue core into the right slot of the main unit. 3 Close the control panel until it locks.
3 Insert the “T” shaped gear (blue) into the left slot of
the main unit.
“T” shaped gear (blue)
3
Right slot
Blue core 2
4
Installations and connections
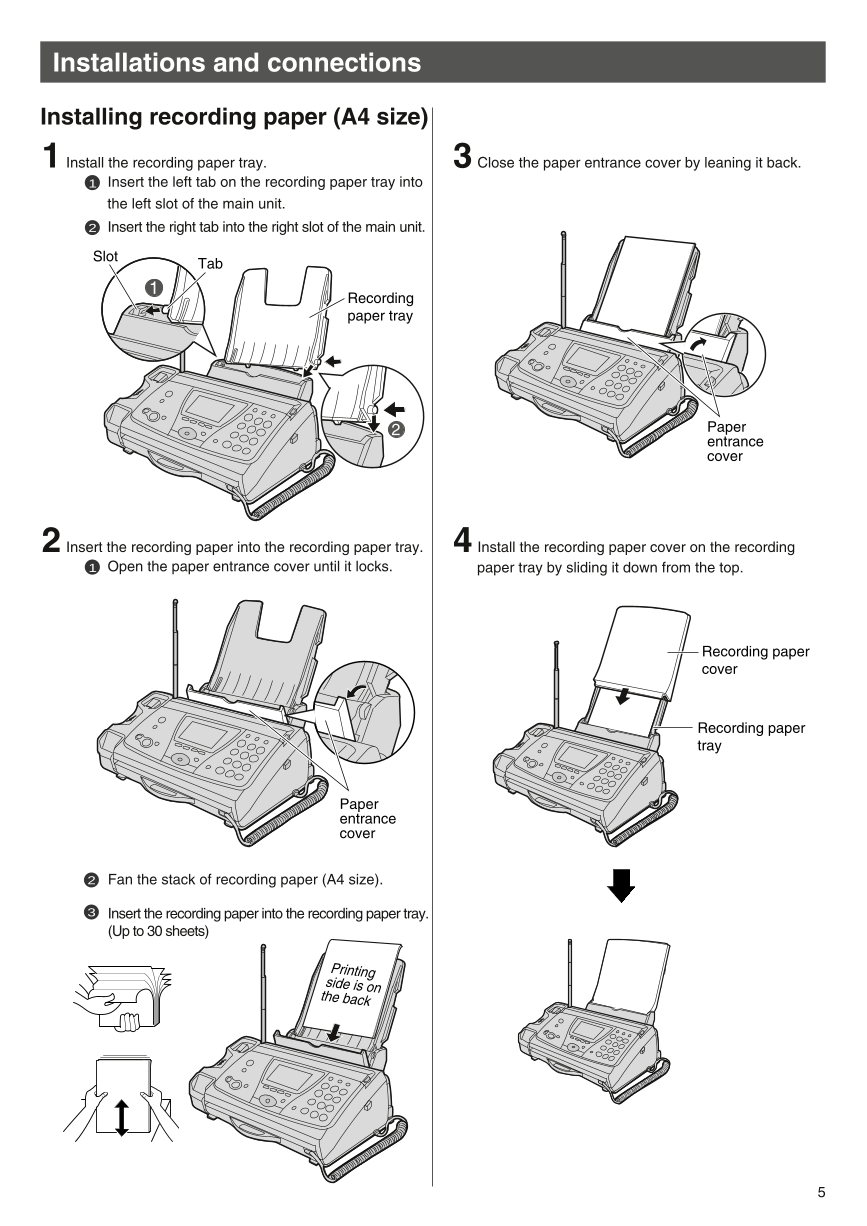
Installing recording paper (A4 size)
1 Install the recording paper tray. 3 Close the paper entrance cover by leaning it back.
1 Insert the left tab on the recording paper tray into
the left slot of the main unit.
2 Insert the right tab into the right slot of the main unit.
Slot Tab
1
Recording
paper tray
2 Paper
entrance
cover
2 Insert the recording paper into the recording paper tray. 4 Install the recording paper cover on the recording
1 Open the paper entrance cover until it locks. paper tray by sliding it down from the top.
Recording paper
cover
Recording paper
tray
Paper
entrance
cover
2 Fan the stack of recording paper (A4 size).
3 Insert the recording paper into the recording paper tray.
(Up to 30 sheets)
Printing
side is o
t n
h
e back
5
Installations and connections
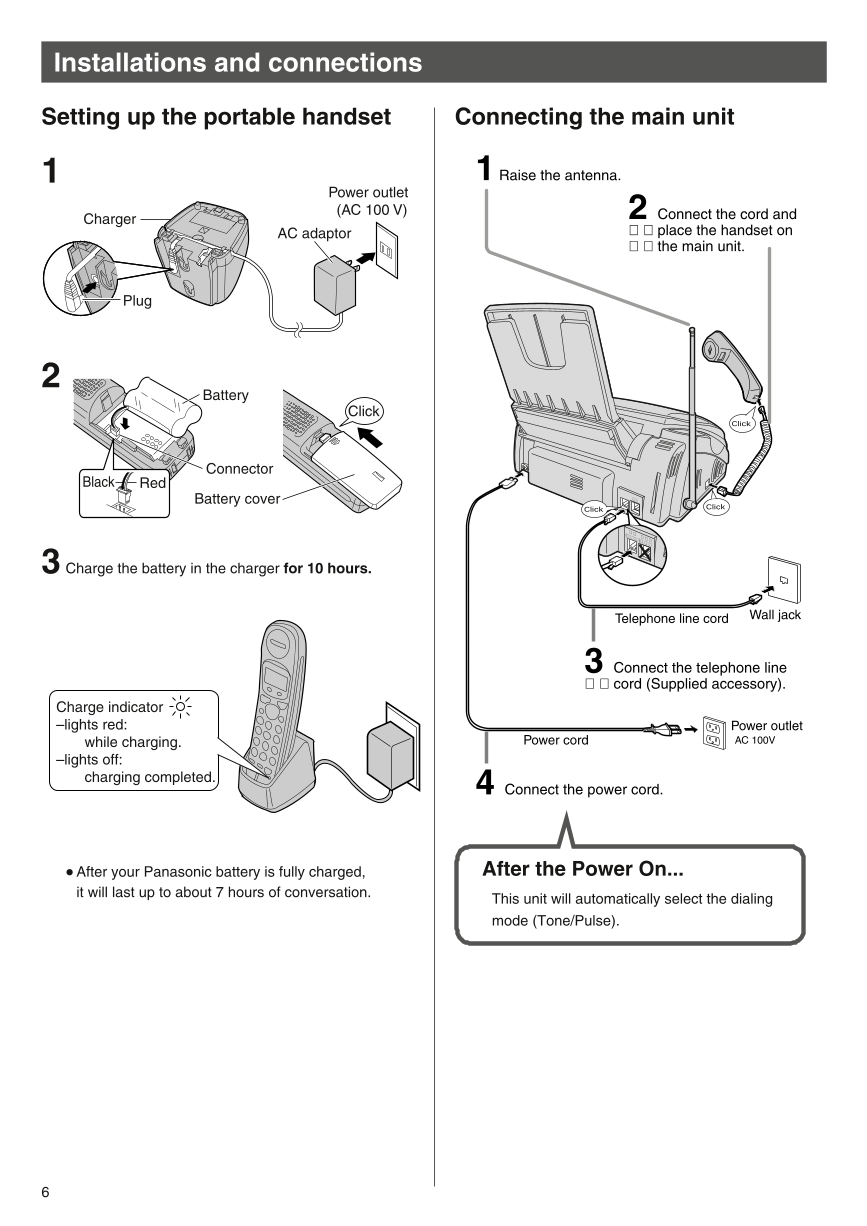
Setting up the portable handset Connecting the main unit
1 1 Raise the antenna.
Power outlet
(AC 100 V)
Charger 2 Connect the cord and
AC adaptor place the handset on
the main unit.
Plug
2
Battery
Click
Click
Connector
Black Red
Battery cover 停
電電話用機
Click Click
回
(電 線
話回線 停
へ)電電話用機
3 Charge the battery in the charger for 10 hours.
Telephone line cord Wall jack
3 Connect the telephone line
cord (Supplied accessory).
Charge indicator
–lights red: Power outlet
while charging. Power cord AC 100V
–lights off:
charging completed. 4 Connect the power cord.
� After your Panasonic battery is fully charged, After the Power On...
it will last up to about 7 hours of conversation. This unit will automatically select the dialing
mode (Tone/Pulse).
6
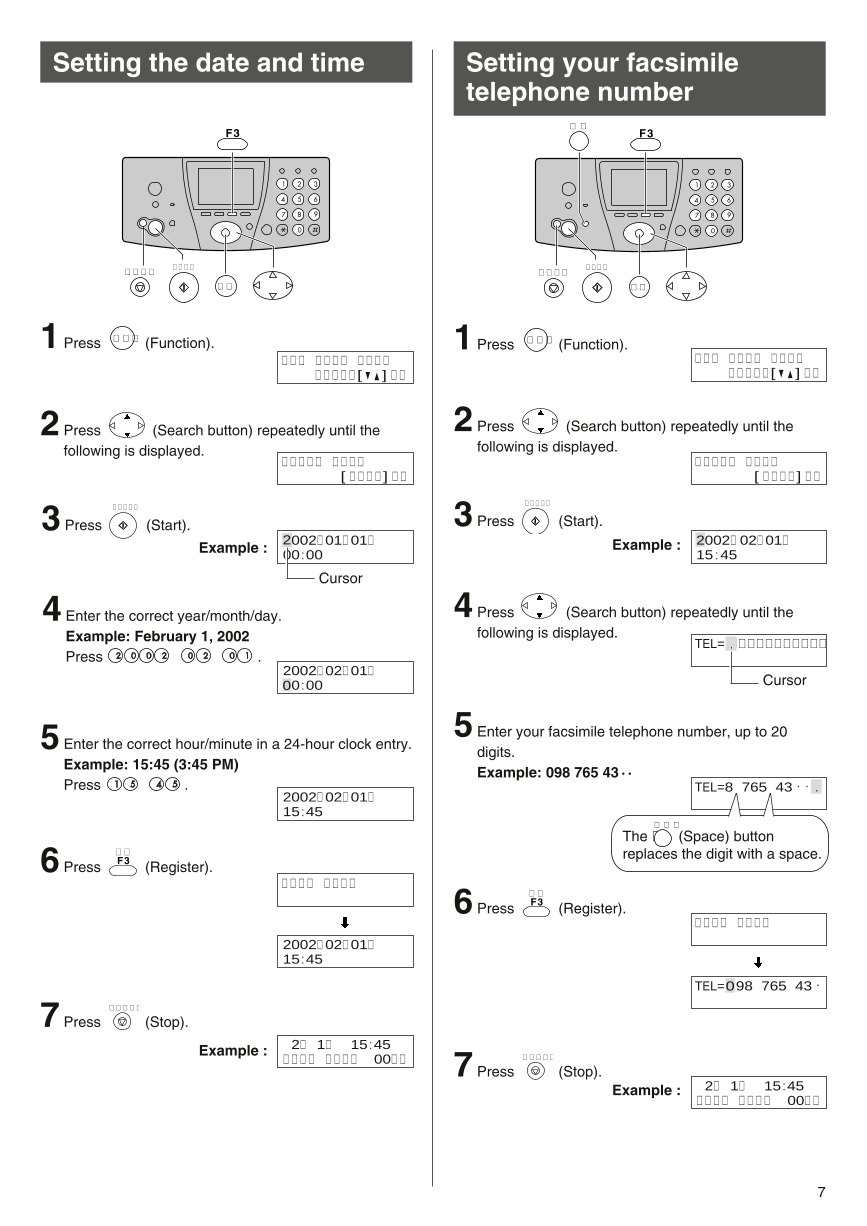
Setting the date and time Setting your facsimile
telephone number
画質
F3 F3
ストップ スタート スタート
ストップ
機能 機能
1 Press 機能� (Function). 1 Press 機能� (Function).
キノウアトウロクアモード キノウアトウロクアモード
ア センタクハ [▼▲] オス ア センタクハ [▼▲] オス
2 Press (Search button) repeatedly until the 2 Press (Search button) repeatedly until the
following is displayed. following is displayed.
サイショノセセッテイ サイショノセセッテイ
カイセシシシシ [ スタート ] オス カイセシシシシ [ スタート ] オス
スタート�
3 スタート�
Press (Start). 3 Press (Start).
Example : 2002年01月01日 Example : 2002年02月01日
00:00 15 : 45
Cursor
4 Enter the correct year/month/day. 4 Press (Search button) repeatedly until the
Example: February 1, 2002 following is displayed.
TEL= .. ..........
Press .
2002年02月01日
00:00 Cursor
5 5 Enter your facsimile telephone number, up to 20
Enter the correct hour/minute in a 24-hour clock entry. digits.
Example: 15:45 (3:45 PM) Example: 098 765 43 · ·
Press . TEL=80765043 . . .
2002年02月01日
15:45
画質�
The (Space) button
6 登録
F3 replaces the digit with a space.
Press (Register).
トウロクアシマシタ
6 登録
Press F3 (Register).
トウロクアシマシタ
2002年02月01日
15:45
TEL=0980765043 .
7 ストップ�
Press (Stop).
Example : 02月01日0015:45
ヨウケン0ロクオン0000ケン 7 ストップ�
Press (Stop).
Example : 02月01日0015:45
ヨウケン0ロクオン0000ケン
7
Setting your logo
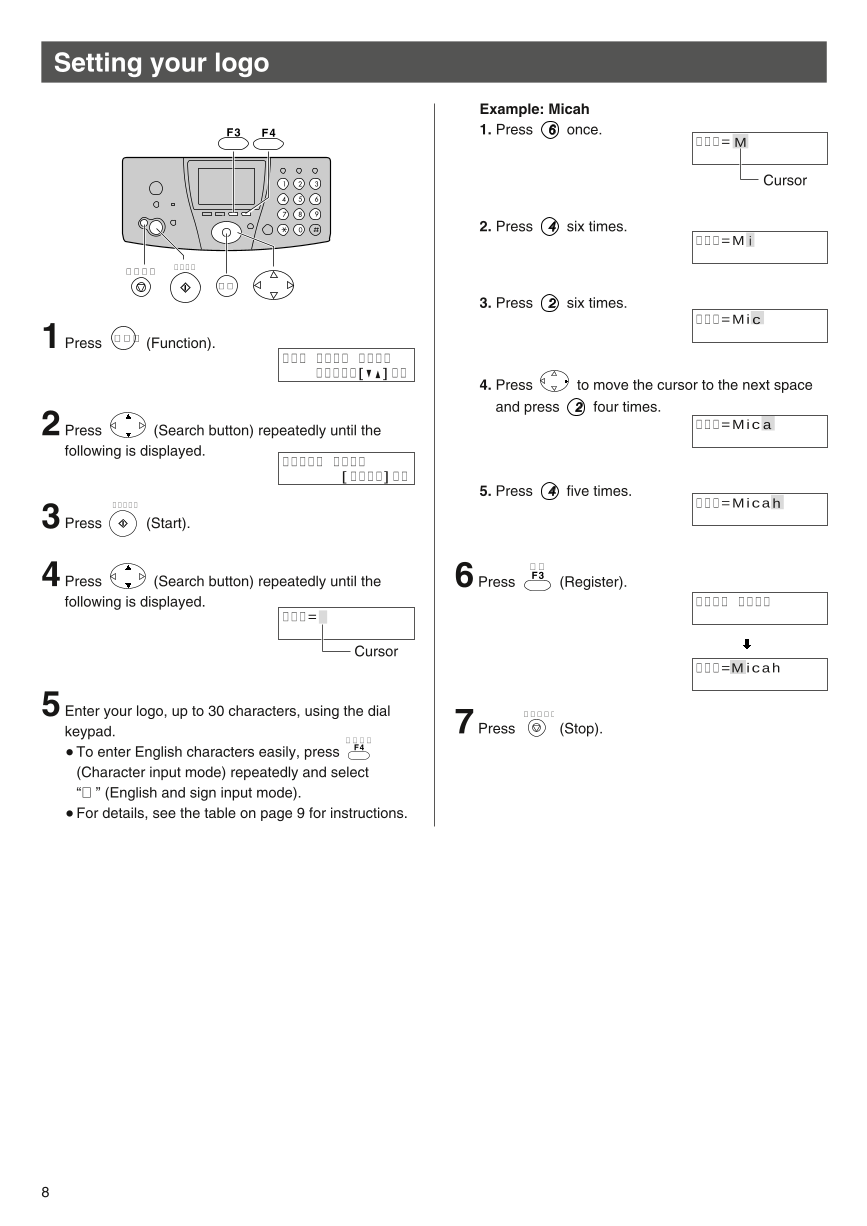
Example: Micah
F3 F4 1. Press once.
ナマエ= M
Cursor
2. Press six times.
ナマエ=M i
ストップ スタート
機能
3. Press six times.
ナマエ=Mi c
1 Press 機能� (Function).
キノウアトウロクアモード
ア センタクハ [▼▲] オス
4. Press to move the cursor to the next space
and press four times.
2 Press (Search button) repeatedly until the ナマエ=Mic a
following is displayed.
サイショノセセッテイ
カイセシシシシ [ スタート ] オス
5. Press five times.
3 スタート� ナマエ=Micah
Press (Start).
4 登録
Press (Search button) repeatedly until the 6 Press F3 (Register).
following is displayed. トウロクアシマシタ
ナマエ=
Cursor
ナマエ=Micah
5 Enter your logo, up to 30 characters, using the dial 7 ストップ�
keypad. Press (Stop).
文字切替�
� To enter English characters easily, press F4
(Character input mode) repeatedly and select
“英” (English and sign input mode).
� For details, see the table on page 9 for instructions.
8


 2023年江西萍乡中考道德与法治真题及答案.doc
 2012年重庆南川中考生物真题及答案.doc
 2013年江西师范大学地理学综合及文艺理论基础考研真题.doc
 2020年四川甘孜小升初语文真题及答案I卷.doc
 2020年注册岩土工程师专业基础考试真题及答案.doc
 2023-2024学年福建省厦门市九年级上学期数学月考试题及答案.doc
 2021-2022学年辽宁省沈阳市大东区九年级上学期语文期末试题及答案.doc
 2022-2023学年北京东城区初三第一学期物理期末试卷及答案.doc
 2018上半年江西教师资格初中地理学科知识与教学能力真题及答案.doc
 2012年河北国家公务员申论考试真题及答案-省级.doc
 2020-2021学年江苏省扬州市江都区邵樊片九年级上学期数学第一次质量检测试题及答案.doc
 2022下半年黑龙江教师资格证中学综合素质真题及答案.doc