1億人のファクス
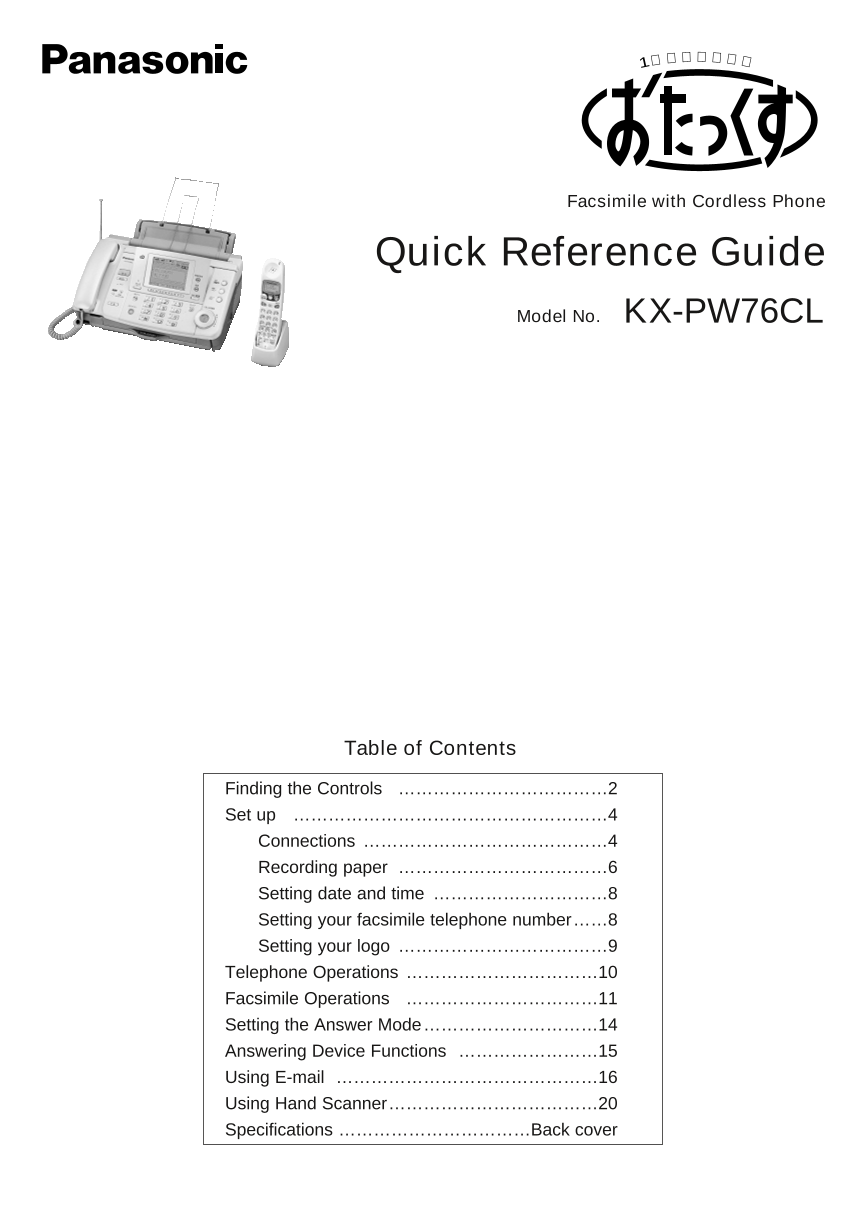
Facsimile with Cordless Phone
Quick Reference Guide
Model No. KX-PW76CL
Table of Contents
Finding the Controls ………………………………2
Set up ………………………………………………4
Connections ……………………………………4
Recording paper ………………………………6
Setting date and time …………………………8
Setting your facsimile telephone number……8
Setting your logo ………………………………9
Telephone Operations ……………………………10
Facsimile Operations ……………………………11
Setting the Answer Mode…………………………14
Answering Device Functions ……………………15
Using E-mail ………………………………………16
Using Hand Scanner………………………………20
Specifications ……………………………Back cover
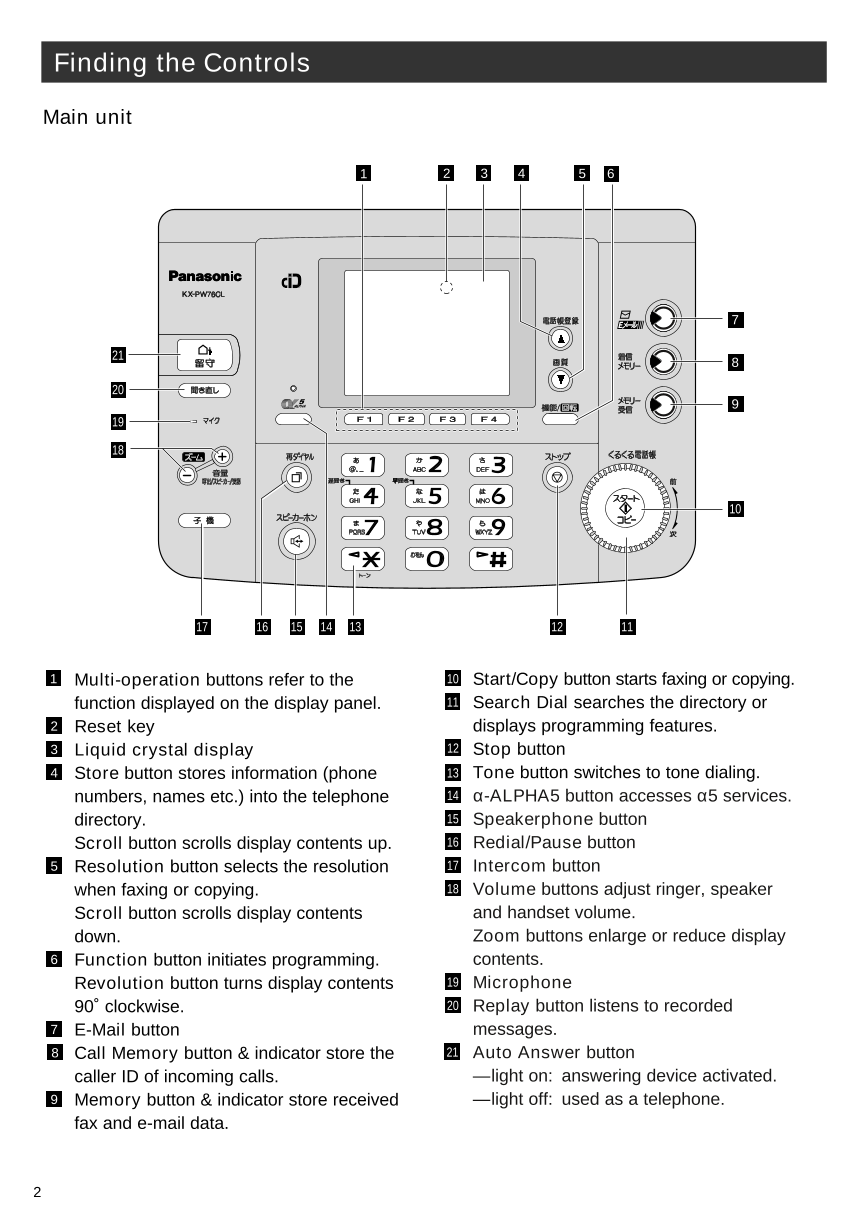
Finding the Controls
Main unit
1 2 3 4 5 6
7
21 8
20
9
19
18
10
17 16 15 14 13 12 11
1 Multi-operation buttons refer to the 10 Start/Copy button starts faxing or copying.
function displayed on the display panel. 11 Search Dial searches the directory or
2 Reset key displays programming features.
3 Liquid crystal display 12 Stop button
4 Store button stores information (phone 13 Tone button switches to tone dialing.
numbers, names etc.) into the telephone 14 α-ALPHA5 button accesses α5 services.
directory. 15 Speakerphone button
Scroll button scrolls display contents up. 16 Redial/Pause button
5 Resolution button selects the resolution 17 Intercom button
when faxing or copying. 18 Volume buttons adjust ringer, speaker
Scroll button scrolls display contents and handset volume.
down. Zoom buttons enlarge or reduce display
6 Function button initiates programming. contents.
Revolution button turns display contents 19 Microphone
90˚ clockwise. 20 Replay button listens to recorded
7 E-Mail button messages.
8 Call Memory button & indicator store the 21 Auto Answer button
caller ID of incoming calls. —light on: answering device activated.
9 Memory button & indicator store received —light off: used as a telephone.
fax and e-mail data.
2
Portable Handset
Display (ex)
子機1 In use/charge indicator
displays battery strength, When receiving a call� flashes red�
telephone numbers etc. プライベートかな� When charging� lights red�
Displays battery When charging complete lights green
子機1� Handset number� strength
(Handset 1)�
プライベート� Displayed when receiving
くるくる� Search dial, for telephone numbers
(Private)� private massage or fax. 電 話 帳 � stored in memory.
英� Displayed when entering For referring to telephone numbers
(English) characters for the telephone when using Number Display Service.
directory.
再ダイヤル�
To radial the last number dialed.
To make/answer calls. To insert a pause.
To end call. 着信メモリー�
To end storing and other To put a call on hold.
operations. To start the search for telephone
numbers when using Number
かな/英� Display Service.
To page the main unit.
To change the enter mode.
To change from pulse to tone
dialing.
音量�
To adjust the volume.
機能�
変換� To make the handset ring first.
To change Hiragana into Kanji. プライベート�To operate the answering device.
To use the private message and
fax features.
キャッチ�
/クリア�
For Call Waiting Service users.
To clear letters/numbers. 登録/修正・確定� ファクス�
To receive faxes.
登録/修正・確定�
To store names and telephone スピーカーホン�
numbers in the search dial. To use the speakerphone.
To edit/delete names and
telephone numbers in the search
dial. Used when installing additional
増設�
To set quick call. handsets.
Operation indicator
Hand Scanner (Shows the condition of the scanner) Battery indicator
(Shows the amount of
battery power left)
Memory indicator
(To show the amount of memory being used)
Delete button
(To delete the scanning contents) To start or stop scanning
Resolution switch Scanning width switch
3
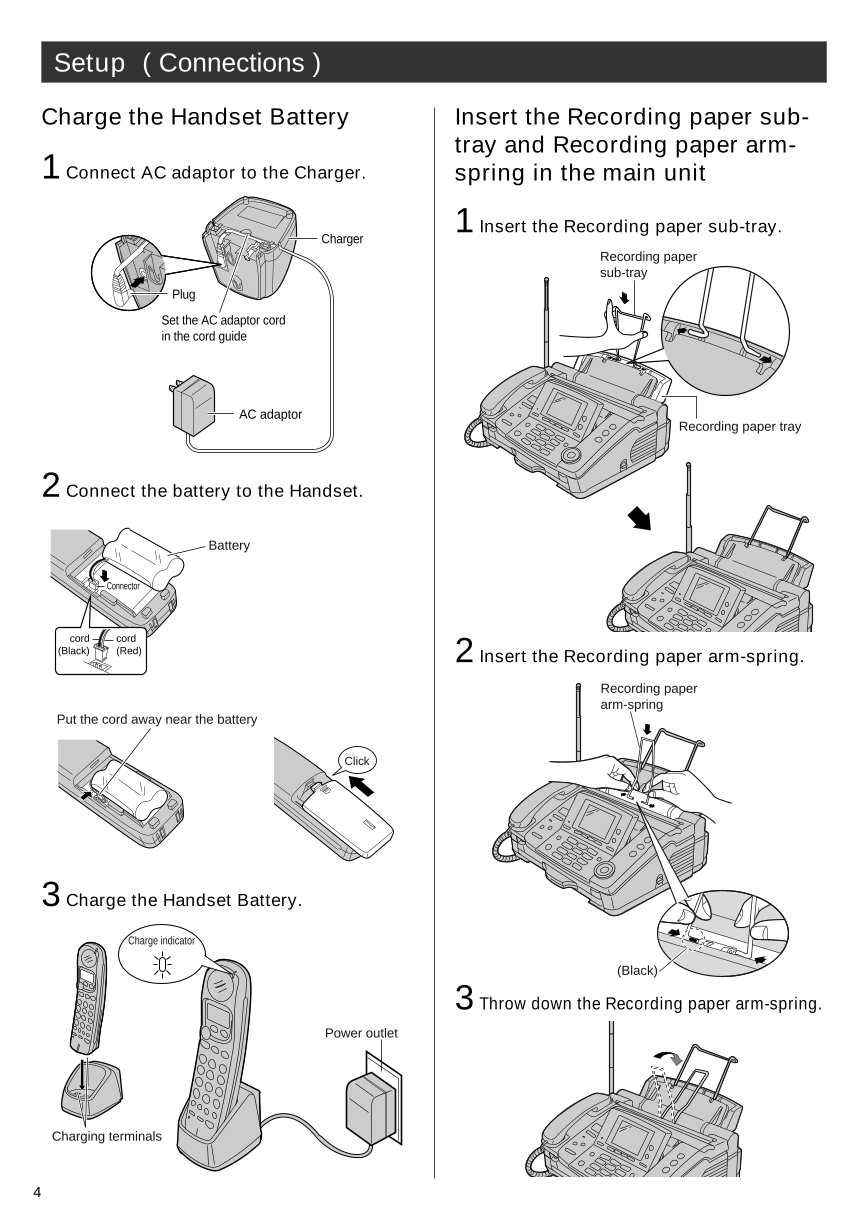
Setup ( Connections )
Charge the Handset Battery Insert the Recording paper sub-
tray and Recording paper arm-
1 Connect AC adaptor to the Charger. spring in the main unit
1 Insert the Recording paper sub-tray.
Charger
Recording paper
sub-tray
Plug
Set the AC adaptor cord
in the cord guide
AC adaptor
Recording paper tray
2 Connect the battery to the Handset.
Battery
Connector
cord cord
(Black) (Red) 2 Insert the Recording paper arm-spring.
Recording paper
arm-spring
Put the cord away near the battery
Click
3 Charge the Handset Battery.
Charge indicator
(Black)
3 Throw down the Recording paper arm-spring.
Power outlet
Charging terminals
4
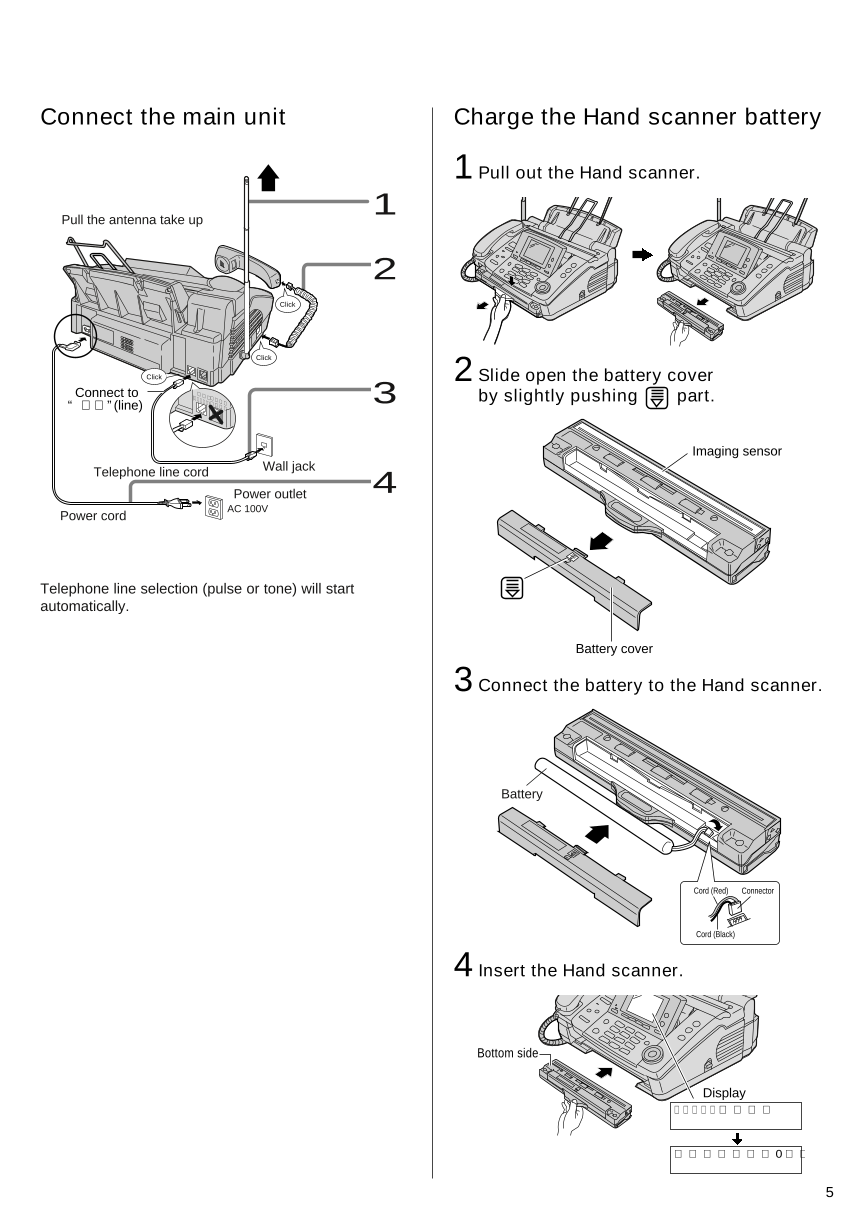
Connect the main unit Charge the Hand scanner battery
1 Pull out the Hand scanner.
1
Pull the antenna take up
2
Click
Click
Click 2 Slide open the battery cover
Connect to 回
(電 線
話回 �停線へ 電用� 3 by slightly pushing part.
“回線”(line) )電話機�
Imaging sensor
Telephone line cord Wall jack
Power outlet 4
AC 100V
Power cord
Telephone line selection (pulse or tone) will start
automatically.
Battery cover
3 Connect the battery to the Hand scanner.
Battery
Cord (Red) Connector
Cord (Black)
4 Insert the Hand scanner.
Bottom side
Display
ス キ ャ ナ ー 設 定 中 �
読 取 枚 数 0枚 �
5
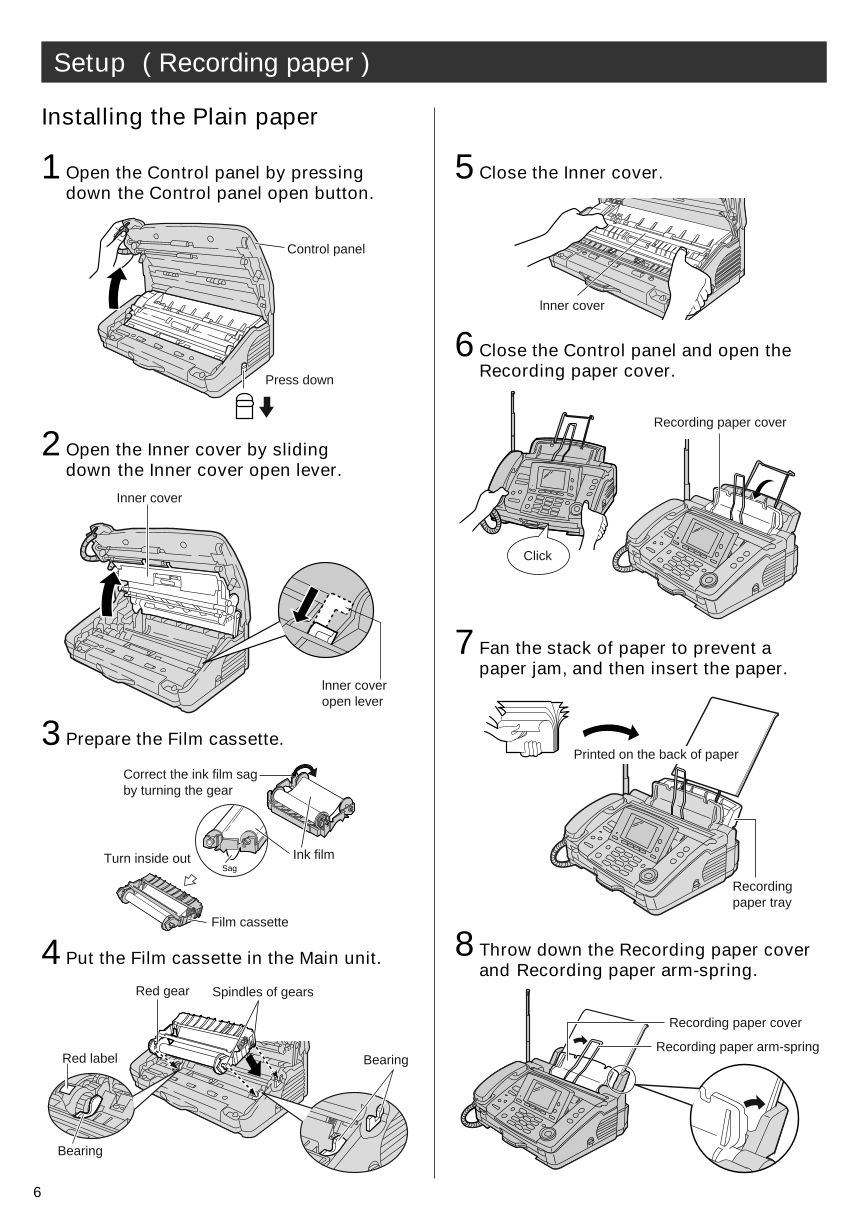
Setup ( Recording paper )
Installing the Plain paper
1 Open the Control panel by pressing 5 Close the Inner cover.
down the Control panel open button.
Control panel
lnner cover
6 Close the Control panel and open the
Recording paper cover.
Press down
Recording paper cover
2 Open the Inner cover by sliding
down the Inner cover open lever.
Inner cover
Click
7 Fan the stack of paper to prevent a
paper jam, and then insert the paper.
lnner cover
open lever
3 Prepare the Film cassette.
Printed on the back of paper
Correct the ink film sag
by turning the gear
Turn inside out Ink film
Sag
Recording
paper tray
Film cassette
4 Put the Film cassette in the Main unit. 8 Throw down the Recording paper cover
and Recording paper arm-spring.
Red gear Spindles of gears
Recording paper cover
Recording paper arm-spring
Red label Bearing
Bearing
6
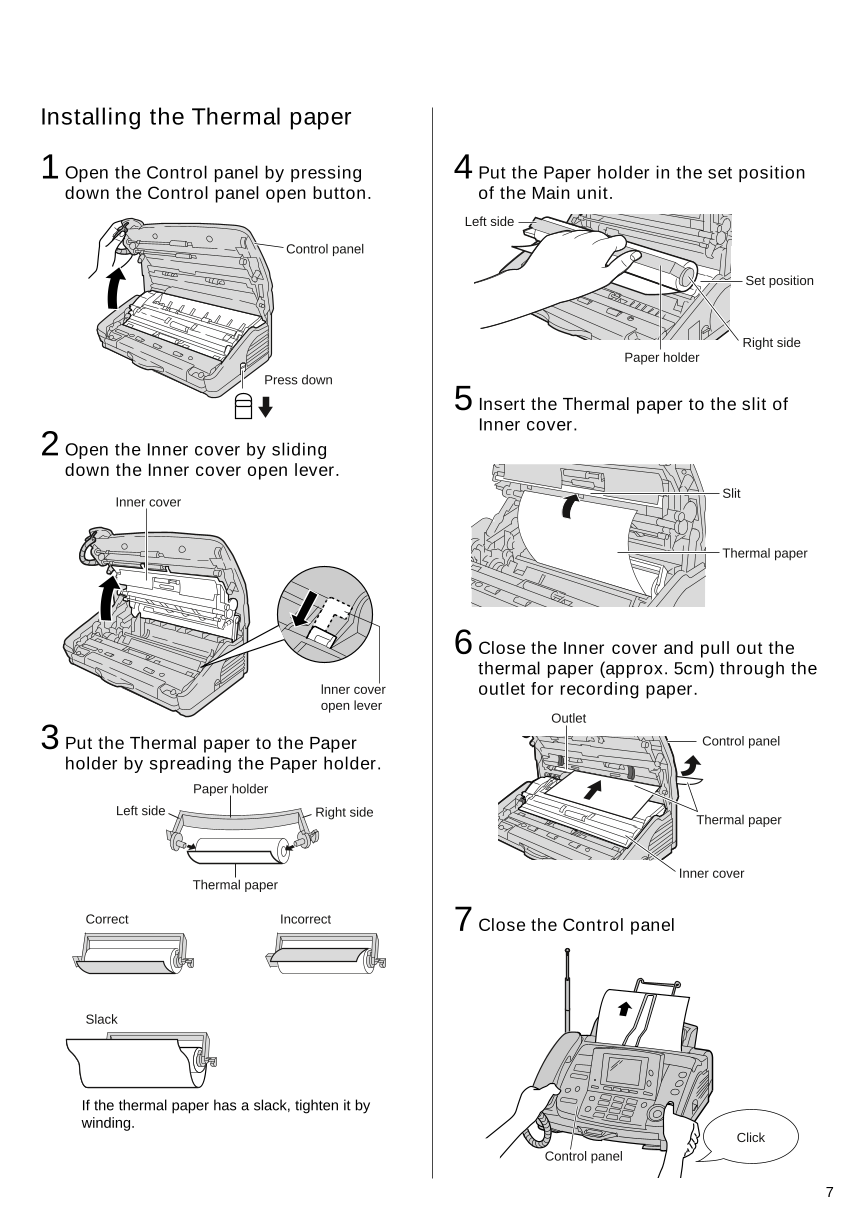
Installing the Thermal paper
1 Open the Control panel by pressing 4 Put the Paper holder in the set position
down the Control panel open button. of the Main unit.
Left side
Control panel
Set position
Right side
Paper holder
Press down
5 Insert the Thermal paper to the slit of
Inner cover.
2 Open the Inner cover by sliding
down the Inner cover open lever.
Slit
Inner cover
Thermal paper
6 Close the Inner cover and pull out the
thermal paper (approx. 5cm) through the
lnner cover outlet for recording paper.
open lever
Outlet
3 Put the Thermal paper to the Paper Control panel
holder by spreading the Paper holder.
Paper holder
Left side Right side
Thermal paper
Inner cover
Thermal paper
Correct Incorrect 7 Close the Control panel
Slack
If the thermal paper has a slack, tighten it by
winding.
Click
Control panel
7
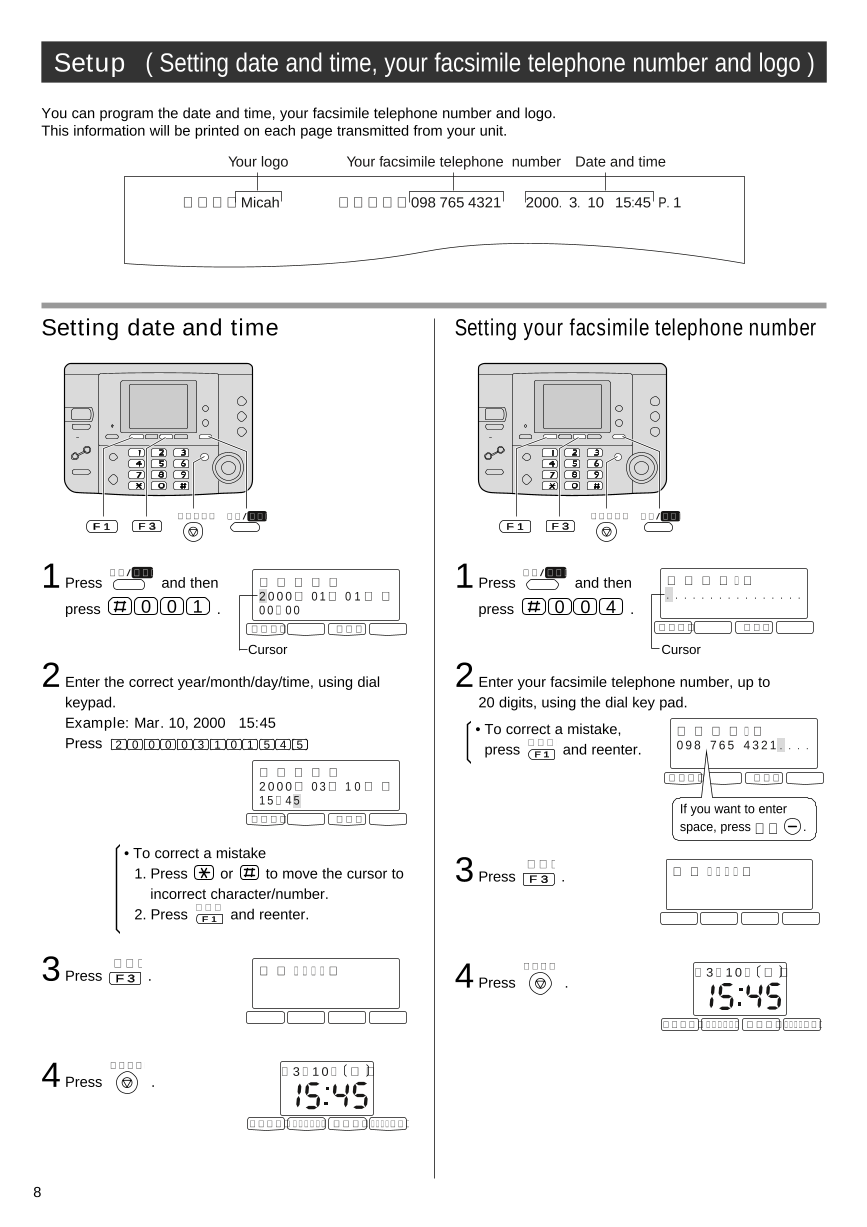
Setup ( Setting date and time, your facsimile telephone number and logo )
You can program the date and time, your facsimile telephone number and logo.
This information will be printed on each page transmitted from your unit.
Your logo Your facsimile telephone number Date and time
発信元�Micah 電話番号:098 765 4321 2000. 3. 10 15:45 P. 1
Setting date and time Setting your facsimile telephone number
ストップ� 機能/ 回転� ストップ� 機能/ 回転�
F 1 F 3 F 1 F 3
1 機能/ 回転� 機能/ 回転�
Press and then 日 付 時 刻 � 1 Press and then 電 話 番 号 ?�
20 0 0年 01月 0 1 日 � . . . . . . . . . . . . . . . .
press 0 0 1 . 0 0: 0 0 press 0 0 4 .
クリア� 登録� クリア� 登録�
Cursor Cursor
2 Enter the correct year/month/day/time, using dial 2 Enter your facsimile telephone number, up to
keypad. 20 digits, using the dial key pad.
Example: Mar. 10, 2000 15:45 • To correct a mistake, 電 話 番 号 ?�
Press 2 0 0 0 0 3 1 0 1 5 4 05 クリア�
press 0 9 8 7 6 5 4 3 2 1 . . . .
F 1 and reenter.
日 付 時 刻 � クリア� 登録�
20 0 0年 03月 1 0 日 �
15:4 5
If you want to enter
クリア� 登録�
space, press 音量 .
• To correct a mistake
登録�
1. Press or to move the cursor to 3 Press . 登 録 し ま し た�
F 3
incorrect character/number.
クリア�
2. Press F 1 and reenter.
3 登録� ストップ�
Press 登 録 し ま し た�
F 3 . 4 3月1 0 日 金 �
Press .
操作案内�スキャナー� 留守電�ファクス一覧�
4 ストップ� 3月1 0 日 金 �
Press .
操作案内�スキャナー� 留守電�ファクス一覧�
8



 2023年江西萍乡中考道德与法治真题及答案.doc
 2012年重庆南川中考生物真题及答案.doc
 2013年江西师范大学地理学综合及文艺理论基础考研真题.doc
 2020年四川甘孜小升初语文真题及答案I卷.doc
 2020年注册岩土工程师专业基础考试真题及答案.doc
 2023-2024学年福建省厦门市九年级上学期数学月考试题及答案.doc
 2021-2022学年辽宁省沈阳市大东区九年级上学期语文期末试题及答案.doc
 2022-2023学年北京东城区初三第一学期物理期末试卷及答案.doc
 2018上半年江西教师资格初中地理学科知识与教学能力真题及答案.doc
 2012年河北国家公务员申论考试真题及答案-省级.doc
 2020-2021学年江苏省扬州市江都区邵樊片九年级上学期数学第一次质量检测试题及答案.doc
 2022下半年黑龙江教师资格证中学综合素质真题及答案.doc