4-253-637-11(1)
Micro Hi-Fi
Component System
Operating Instructions
Owner’s Record
The model and serial numbers are located on the rear of the unit. Record the
serial number in the space provided below. Refer to them whenever you call
upon your Aiwa dealer regarding this product.
Model No. ______________ Serial No. ______________
XR-EM550
XR-EM330
XR-EM220
©2004 Sony Corporation
�
WARNING
To prevent fire or shock hazard, do not
expose the unit to rain or moisture.
To prevent fire, do not cover the ventilation of the
apparatus with news papers, table-cloths, curtains, etc.
And don’t place lighted candles on the apparatus.
To prevent fire or shock hazard, do not place objects
filled with liquids, such as vases, on the apparatus.
Do not install the appliance in a confined space,
such as a bookcase or built-in cabinet.
This appliance is
classified as a CLASS 1
LASER product. This
marking is located on the
rear exterior.
Don’t throw away the battery with
general house waste, dispose of it
correctly as chemical waste.
Except for European model
ENERGY STAR® is a U.S.
registered mark. As an ENERGY
STAR® partner, Sony Corporation
has determined that this product
meets the ENERGY STAR®
guidelines for energy efficiency.
2GB
�
Table of Contents
How to use this manual...........................4
Playable discs..........................................4
Timer
Getting Started
Hooking up the system............................6
Setting the clock......................................8
CD/MP3 – Play
Loading a disc .........................................9
Playing a disc ..........................................9
— Normal Play/Shuffle Play
Playing repeatedly.................................10
— Repeat Play
Creating your own program ..................11
— Program Play
Tuner
Falling asleep to music ......................... 18
— Sleep Timer
Waking up to music.............................. 19
— Play Timer
Timer recording radio programs........... 20
— Rec Timer
Display
Turning off the display ......................... 21
— Power Saving Mode
Viewing information about the disc in the
display ............................................ 21
Optional Components
Hooking up optional components......... 22
Presetting radio stations ........................12
Listening to the radio ............................13
Troubleshooting
Problems and remedies......................... 23
Messages............................................... 25
Additional Information
Precautions............................................ 27
Specifications........................................ 28
List of button locations and reference
pages............................................... 31
— Preset Tuning
— Manual Tuning
Using the Radio Data System (RDS)....14
(European model XR-EM550
only)
Tape – Play
Loading a tape.......................................15
Playing a tape........................................15
Tape – Recording
Recording your favorite CD tracks on a
tape..................................................16
— CD-TAPE Synchro Recording
Recording on a tape manually...............17
— Manual Recording
Sound Adjustment
Adjusting the sound ..............................18
3GB
�
How to use this manual
The instructions in this manual are for model
XR-EM550, XR-EM330 and XR-EM220.
Check your model number by looking at the
front panel. In this manual, XR-EM550 is
used for illustration purposes unless stated
otherwise. Any difference in operation is
clearly indicated in the text, for example,
“XR-EM550 only”.
This manual mainly explains operations using
the remote, but the same operations can also
be performed using the buttons on the system
having the same or similar names.
Playable discs
You can play back the following discs on this
system. Other discs cannot be played back.
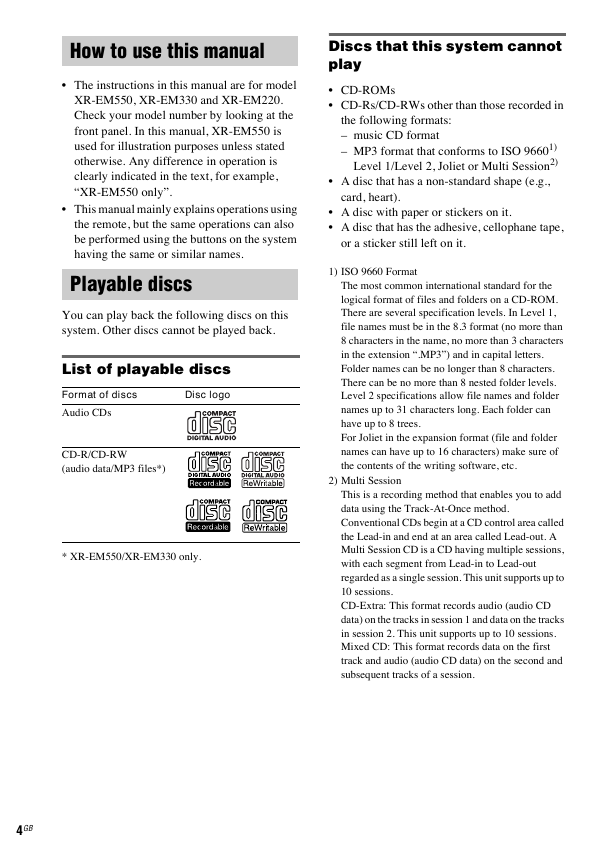
List of playable discs
Format of discs
Audio CDs
Disc logo
CD-R/CD-RW
(audio data/MP3 files*)
* XR-EM550/XR-EM330 only.
Discs that this system cannot
play
CD-ROMs
CD-Rs/CD-RWs other than those recorded in
the following formats:
– music CD format
– MP3 format that conforms to ISO 96601)
Level 1/Level 2, Joliet or Multi Session2)
A disc that has a non-standard shape (e.g.,
card, heart).
A disc with paper or stickers on it.
A disc that has the adhesive, cellophane tape,
or a sticker still left on it.
1) ISO 9660 Format
The most common international standard for the
logical format of files and folders on a CD-ROM.
There are several specification levels. In Level 1,
file names must be in the 8.3 format (no more than
8 characters in the name, no more than 3 characters
in the extension “.MP3”) and in capital letters.
Folder names can be no longer than 8 characters.
There can be no more than 8 nested folder levels.
Level 2 specifications allow file names and folder
names up to 31 characters long. Each folder can
have up to 8 trees.
For Joliet in the expansion format (file and folder
names can have up to 16 characters) make sure of
the contents of the writing software, etc.
2) Multi Session
This is a recording method that enables you to add
data using the Track-At-Once method.
Conventional CDs begin at a CD control area called
the Lead-in and end at an area called Lead-out. A
Multi Session CD is a CD having multiple sessions,
with each segment from Lead-in to Lead-out
regarded as a single session. This unit supports up to
10 sessions.
CD-Extra: This format records audio (audio CD
data) on the tracks in session 1 and data on the tracks
in session 2. This unit supports up to 10 sessions.
Mixed CD: This format records data on the first
track and audio (audio CD data) on the second and
subsequent tracks of a session.
4GB
�
Notes on CD-R and CD-RW
Some CD-Rs or CD-RWs cannot be played
on this system depending upon the recording
quality or physical condition of the disc, or
the characteristics of the recording device.
Furthermore, the disc will not play if it has not
been correctly finalized. For more
information, see the operating instructions for
the recording device.
Discs recorded on CD-R/CD-RW drives may
not be played back because of scratches, dirt,
recording condition or the driver’s
characteristics.
CD-R and CD-RW discs recorded in multi-
session that have not ended by “closing the
session” are not supported.
The system may be unable to play MP3
format files that do not have the extension
“.MP3”.
Attempting to play non-MP3 format files that
have the extension “.MP3” may result in noise
or malfunction.
With formats other than ISO 9660 Level 1 and
2, folder names or file names may not be
displayed correctly.
The following discs take a longer time to start
playback.
– a disc recorded with complicated tree
structure.
– a disc recorded in Multi Session.
– a disc to which data can be added (non-
finalized disc).
Music discs encoded with
copyright protection
technologies
This product is designed to playback discs that
conform to the Compact Disc (CD) standard.
Recently, various music discs encoded with
copyright protection technologies are marketed
by some record companies. Please be aware that
among those discs, there are some that do not
conform to the CD standard and may not be
playable by this product.
Cautions when playing a disc
that is recorded in Multi
Session
If the disc begins with a CD-DA session, it is
recognized as a CD-DA (audio) disc, and
MP3 sessions are played back without sound.
If the disc begins with an MP3 session, it is
recognized as an MP3 disc, and CD-DA
sessions are played back without sound.
The playback range of an MP3 disc is
determined by the tree structure of files
produced by analyzing of the disc.
A disc with a mixed CD format will be
recognized as a CD-DA (audio) disc.
5GB
�
Getting Started
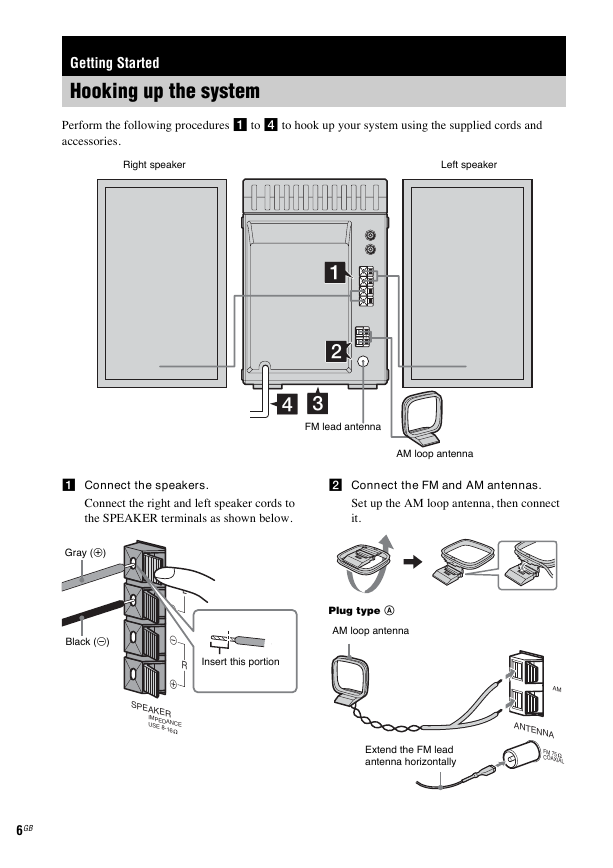
Hooking up the system
Perform the following procedures 1 to 4 to hook up your system using the supplied cords and
accessories.
Right speaker
Left speaker
1
2
4 3
FM lead antenna
AM loop antenna
1 Connect the speakers.
2 Connect the FM and AM antennas.
Connect the right and left speaker cords to
the SPEAKER terminals as shown below.
Set up the AM loop antenna, then connect
it.
Gray (3)
Black (#)
L
R
#
#
3
SPEAKER
IMPEDANCE
USE 8-16
6GB
Plug type A
AM loop antenna
Insert this portion
AM
ANTENNA
FM 75
COAXIAL
Extend the FM lead
antenna horizontally
�
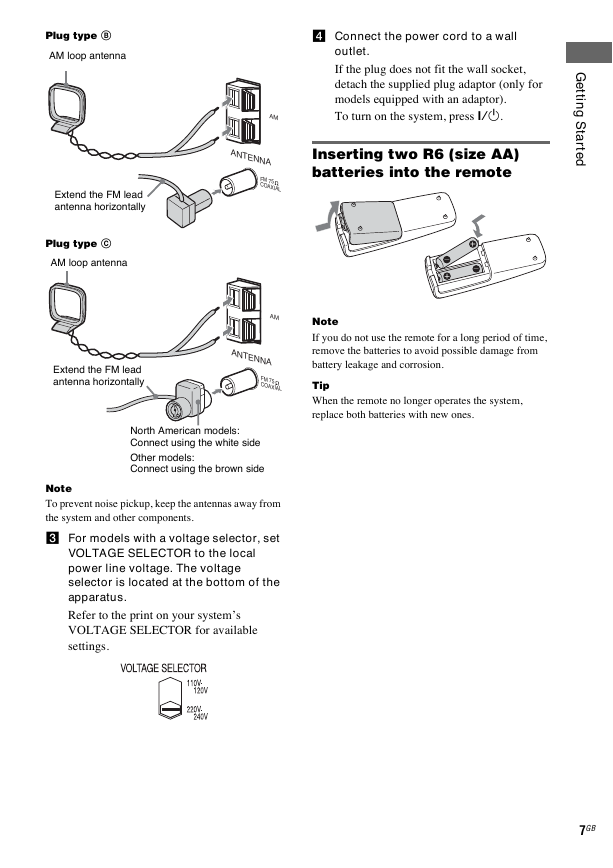
Plug type B
AM loop antenna
Extend the FM lead
antenna horizontally
Plug type C
AM loop antenna
Extend the FM lead
antenna horizontally
4 Connect the power cord to a wall
outlet.
If the plug does not fit the wall socket,
detach the supplied plug adaptor (only for
models equipped with an adaptor).
To turn on the system, press ?/1.
Inserting two R6 (size AA)
batteries into the remote
G
e
t
t
i
n
g
S
t
a
r
t
e
d
AM
ANTENNA
FM 75
COAXIAL
AM
ANTENNA
FM 75
COAXIAL
Note
If you do not use the remote for a long period of time,
remove the batteries to avoid possible damage from
battery leakage and corrosion.
Tip
When the remote no longer operates the system,
replace both batteries with new ones.
North American models:
Connect using the white side
Other models:
Connect using the brown side
Note
To prevent noise pickup, keep the antennas away from
the system and other components.
3 For models with a voltage selector, set
VOLTAGE SELECTOR to the local
power line voltage. The voltage
selector is located at the bottom of the
apparatus.
Refer to the print on your system’s
VOLTAGE SELECTOR for available
settings.
7GB
�
Setting the clock
Use buttons on the remote for the operation.
1 Press ?/1 to turn on the system.
2 Press CLOCK/TIMER SET.
3 Press ./> repeatedly to set the
4 Press ENTER.
5 Press ./> repeatedly to set the
6 Press ENTER.
minute.
hour.
The clock starts working.
To adjust the clock
1 Press CLOCK/TIMER SET.
2 Press ./> until “CLOCK” appears,
then press ENTER.
3 Do the same procedures as step 3 to 6
above.
Note
The clock is not displayed in Power Saving Mode
(page 21).
8GB
�


 2023年江西萍乡中考道德与法治真题及答案.doc
 2012年重庆南川中考生物真题及答案.doc
 2013年江西师范大学地理学综合及文艺理论基础考研真题.doc
 2020年四川甘孜小升初语文真题及答案I卷.doc
 2020年注册岩土工程师专业基础考试真题及答案.doc
 2023-2024学年福建省厦门市九年级上学期数学月考试题及答案.doc
 2021-2022学年辽宁省沈阳市大东区九年级上学期语文期末试题及答案.doc
 2022-2023学年北京东城区初三第一学期物理期末试卷及答案.doc
 2018上半年江西教师资格初中地理学科知识与教学能力真题及答案.doc
 2012年河北国家公务员申论考试真题及答案-省级.doc
 2020-2021学年江苏省扬州市江都区邵樊片九年级上学期数学第一次质量检测试题及答案.doc
 2022下半年黑龙江教师资格证中学综合素质真题及答案.doc