IF405
USER MANUAL
© 2012 All Rights Reserved.
Windows and the Windows logo are registered trademarks of Microsoft Corporation.
All other trademarks are the property of their respective companies.
�
Introduction .................................................................................................................................. 2
Getting to Know Your Camera ...................................................................................................... 2
What’s Included ............................................................................................................................ 3
Parts of the Camera ..................................................................................................................... 4
Initial Camera Setup ..................................................................................................................... 5
Main Camera Modes .................................................................................................................... 8
Camera Technical Specifications .................................................................................................. 9
Computer System Requirements ............................................................................................... 10
Powering the Camera On/Off ...................................................................................................... 11
Changing Camera Mode ............................................................................................................ 12
Navigating the Menus ................................................................................................................. 13
Photo Capture Mode .................................................................................................................. 14
Photo Playback Mode ................................................................................................................ 19
Video Capture Mode .................................................................................................................. 23
Video Playback Mode ................................................................................................................. 24
Navigating the Menus ................................................................................................................. 25
Status Icon Description ............................................................................................................... 26
Menu Options ............................................................................................................................. 27
Installing the Software ................................................................................................................ 30
Connecting the Camera to the Computer ................................................................................... 31
Getting Photos and Videos from your Camera to Your Computer .............................................. 31
Get Started! ................................................................................................................................ 32
Transferring Images from my Camera to my Computer Manually .............................................. 33
Camera Maintenance ................................................................................................................. 34
Warranty Card ............................................................................................................................ 35
Technical Support ....................................................................................................................... 37
Troubleshooting .......................................................................................................................... 37
E-Waste / FCC Declaration ........................................................................................................ 38
1
�
Thank you for purchasing this camera. Everything you need to take quality digital photos and
videos is included with your camera.
Polaroid makes capturing those special moments as easy as possible.
Please read this manual carefully first in order to get the most out of your digital camera.
Note: Your camera requires a Micro SD Memory card (up to 32GB) for normal use.
Micro SD Memory cards are not included and need to be purchased separately.
Important:
- Do not open the battery door underwater.
- Close the battery door properly for best water sealing.
- Rinse the camera with clean water after use and keep dry for storage.
Waterproof up to 10 ft.
10.0 MP Resolution Sensor
Digital Still Camera
Digital Video Camcorder
Built-in Flash
5x digital zoom
Dual LCD: 2.7 + 1.8" TFT color display
Micro SD card support
2x AAA Alkaline Batteries
2
�
1. Digital Camera
2. USB cable
3. Polaroid Instant Memories
Software Installation CD
4. Wrist Strap
Note: Micro SD Memory Card and batteries not included.
3
�
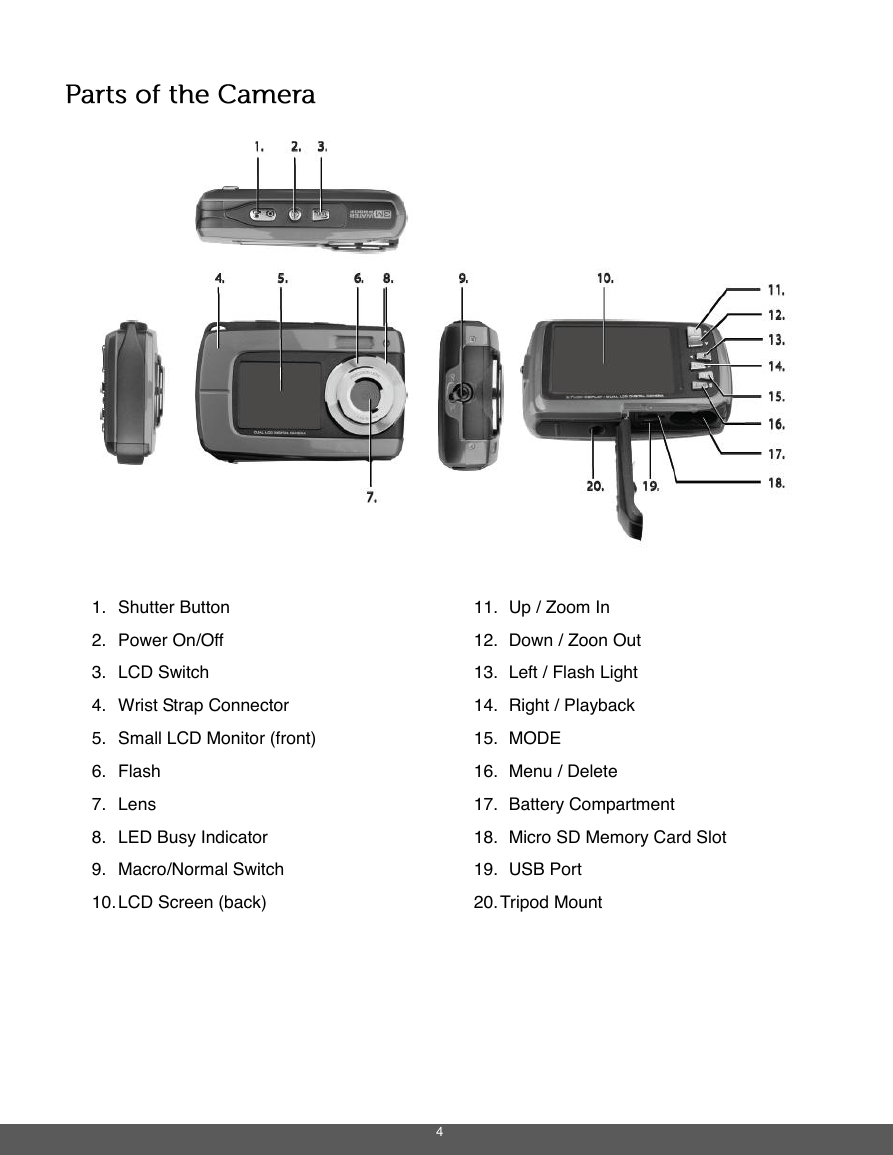
1. Shutter Button
2. Power On/Off
3. LCD Switch
4. Wrist Strap Connector
11. Up / Zoom In
12. Down / Zoon Out
13. Left / Flash Light
14. Right / Playback
5. Small LCD Monitor (front)
15. MODE
6. Flash
7. Lens
16. Menu / Delete
17. Battery Compartment
8. LED Busy Indicator
18. Micro SD Memory Card Slot
9. Macro/Normal Switch
10. LCD Screen (back)
19. USB Port
20. Tripod Mount
4
�
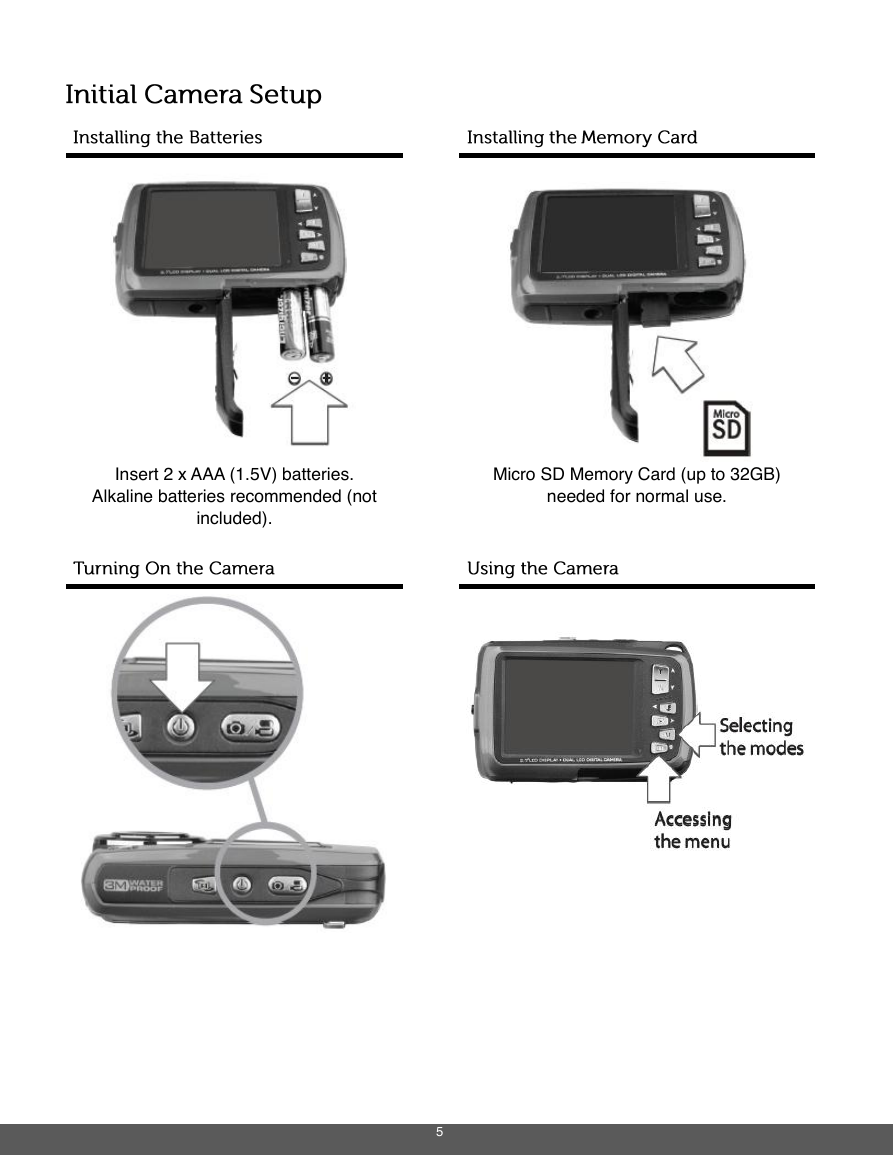
Micro SD Memory Card (up to 32GB)
needed for normal use.
5
Insert 2 x AAA (1.5V) batteries.
Alkaline batteries recommended (not
included).
�
When powering the camera ON for the first time the camera will take you through the INITIAL
CAMERA SETUP.
1) Batteries
Make sure the batteries have been inserted properly into your digital camera, according to
the polarity shown inside the battery compartment.
Use 2x AAA (1.5V) batteries. Alkaline batteries are recommended. (Batteries not included.)
Note:
Remove the batteries from the camera when not in use for an extended period.
Do not mix alkaline and non-alkaline batteries.
Some features, such as Flash, will not work if the battery power level is low.
When the battery power is low the battery icon turns red and the camera will
automatically turn off a few seconds later.
The energy status of the power is displayed on LCD as shown below:
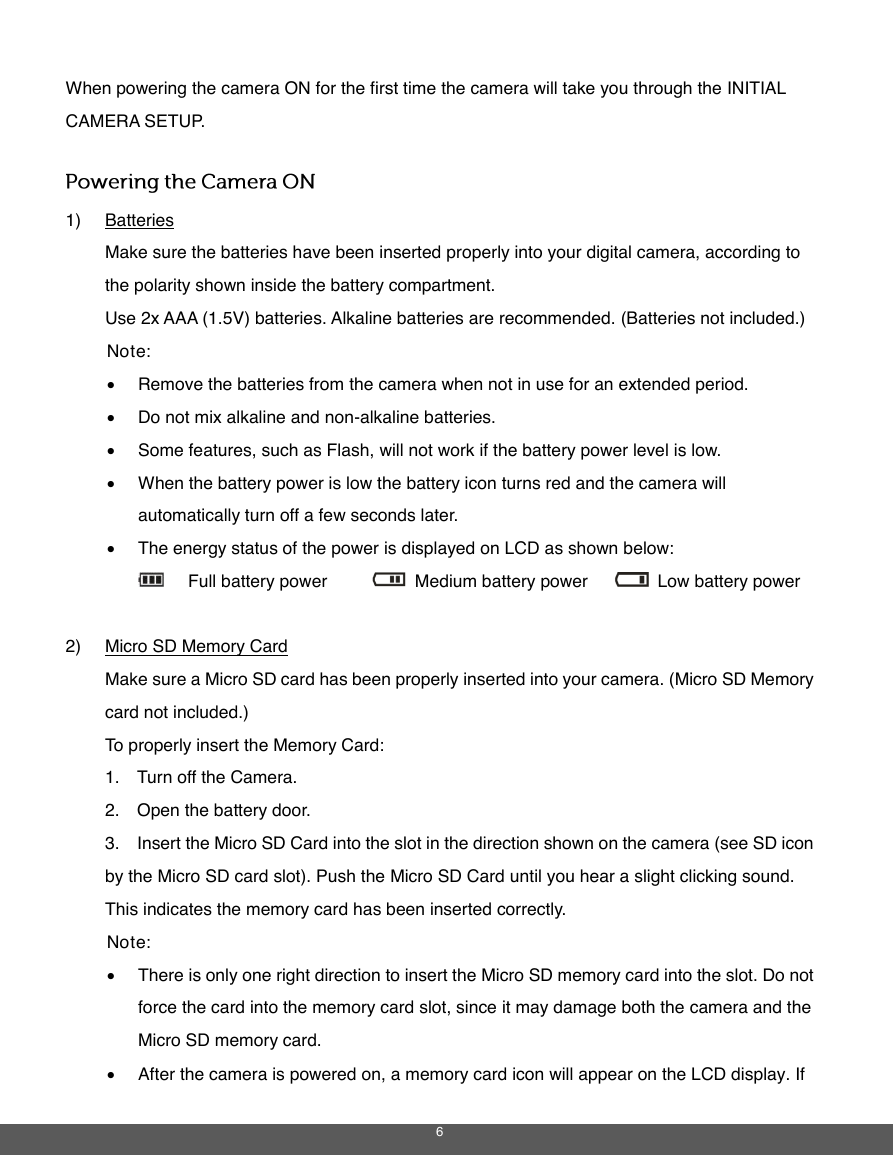
Full battery power
Medium battery power
Low battery power
2) Micro SD Memory Card
Make sure a Micro SD card has been properly inserted into your camera. (Micro SD Memory
card not included.)
To properly insert the Memory Card:
1. Turn off the Camera.
2. Open the battery door.
3. Insert the Micro SD Card into the slot in the direction shown on the camera (see SD icon
by the Micro SD card slot). Push the Micro SD Card until you hear a slight clicking sound.
This indicates the memory card has been inserted correctly.
Note:
There is only one right direction to insert the Micro SD memory card into the slot. Do not
force the card into the memory card slot, since it may damage both the camera and the
Micro SD memory card.
After the camera is powered on, a memory card icon will appear on the LCD display. If
6
�
you do not see the SD icon on the display, please check if the card was inserted
properly.
IMPORTANT: The Micro SD memory card must be formatted before taking
photographs.
Formatting the Micro SD Memory Card
1. Press the MENU button (
) in Photo Capture or Video Capture mode.
2. Select the Setup Menu options by pressing the RIGHT button.
3. Press the W (
)DOWN button to highlight and select the ‘Format’ and press the
SHUTTER/OK button to confirm.
4. To format the Micro SD Memory Card, select ‘Yes’ and press the SHUTTER/OK
button.
To exit the menu without formatting the SD Memory Card select ‘No’ then press the
SHUTTER/OK button. Alternatively, you can press the MENU button to exit.
6. Once the SD Memory Card is formatted – ‘Completed’ appears briefly on the LCD
indicating the format process has finished.
3) Power On
Press the
POWER button on the top of the camera to turn on the camera.
7
�



 2023年江西萍乡中考道德与法治真题及答案.doc
 2012年重庆南川中考生物真题及答案.doc
 2013年江西师范大学地理学综合及文艺理论基础考研真题.doc
 2020年四川甘孜小升初语文真题及答案I卷.doc
 2020年注册岩土工程师专业基础考试真题及答案.doc
 2023-2024学年福建省厦门市九年级上学期数学月考试题及答案.doc
 2021-2022学年辽宁省沈阳市大东区九年级上学期语文期末试题及答案.doc
 2022-2023学年北京东城区初三第一学期物理期末试卷及答案.doc
 2018上半年江西教师资格初中地理学科知识与教学能力真题及答案.doc
 2012年河北国家公务员申论考试真题及答案-省级.doc
 2020-2021学年江苏省扬州市江都区邵樊片九年级上学期数学第一次质量检测试题及答案.doc
 2022下半年黑龙江教师资格证中学综合素质真题及答案.doc