Table of Contents
Preface ........................................................................................................ 3
About this Manual .................................................................................. 3
Safety and Handling Precautions .............................................................. 3
Using this Menu ..................................................................................... 4
Introduction ................................................................................................. 5
System Requirements ............................................................................. 5
Main Features ........................................................................................ 5
Package Contents ................................................................................... 6
Camera Views ........................................................................................ 7
Camera Buttons ..................................................................................... 9
Navigation Control ................................................................................ 10
Camera Memory ................................................................................... 11
Getting Started ........................................................................................... 12
Attach the Camera Strap ....................................................................... 12
Inserting the Battery ............................................................................ 12
Inserting an SD/SDHC/SDXC Memory Card ............................................. 13
Charging the Battery ............................................................................ 14
Turning the Power On and Off ............................................................... 14
Initial Settings ...................................................................................... 14
Modes ................................................................................................. 15
Using the LCD monitor ................................................................................ 16
LCD Monitor Layout .............................................................................. 16
Changing the LCD Monitor Display ......................................................... 20
Recording Images, Videos and Voices ........................................................... 20
Taking Images ..................................................................................... 20
Setting the Zoom Control ...................................................................... 21
Using Flash .......................................................................................... 22
Setting the Focus Mode ........................................................................ 22
Using the Function Menu ...................................................................... 23
Recording Videos.................................................................................. 24
Mode dial ............................................................................................ 28
Using Voices Recording ......................................................................... 35
Using the Record Menu ......................................................................... 38
Playback .................................................................................................... 43
Viewing in Single Navigation .................................................................. 43
Viewing Thumbnails ............................................................................. 43
Zooming images ................................................................................... 44
Playing Videos ...................................................................................... 44
Playing Voice Recording ........................................................................ 45
Playing Voice Memo .............................................................................. 45
Deleting an Image/Video/Audio ............................................................. 46
Playback Menu ..................................................................................... 46
Using the Setup Menu ................................................................................. 55
Setting Sounds ..................................................................................... 55
Setting Power Save............................................................................... 55
1
�
Setting LCD Save .................................................................................. 56
Setting Date & Time ............................................................................. 56
Setting Language ................................................................................. 56
Setting File Numbering ......................................................................... 56
Setting TV Out ..................................................................................... 57
Setting LCD Brightness ......................................................................... 57
Setting Battery Type ............................................................................. 57
Setting Memory Kit ............................................................................... 57
Reset All .............................................................................................. 58
Making Connections .................................................................................... 59
Connecting the Camera to a TV ............................................................. 59
Connecting the Camera to a PC ............................................................. 59
Connecting the Camera to a Printer ....................................................... 61
Setting the Print Mode Menu ................................................................. 62
Appendix.................................................................................................... 63
About Folder and File Names ................................................................. 63
Troubleshooting .......................................................................................... 63
Specifications ............................................................................................. 64
Technical Support and Warranty information..................................................66
2
�
Preface
About this Manual
Copyright
This manual is designed to assist you in using your new digital camera. All information presented is as
accurate as possible but is subject to change without notice.
This manual contains proprietary information protected by copyright. All rights are reserved. No part of this
manual may be reproduced by any mechanical, electronic or other means, in any form, without prior
written permission of the manufacturer.
© Copyright 2011
Federal Communications Commission (FCC) Compliance
This equipment has been tested and found to comply with the limits for a Class B digital device, pursuant to
Part 15 of the FCC Rules. These limits are designed to provide reasonable protection against harmful
interference in a residential installation. This equipment generates, uses, and can radiate radio frequency
energy and, if not installed and used in accordance with the instructions, may cause harmful interference
to radio communications. However, there is no guarantee that interference will not occur in a particular
installation. If this equipment does cause harmful interference to radio or television reception, which can
be determined by turning the equipment off and on, the user is encouraged to try to correct the
interference by one or more of the following measures:
• Reorient or relocate the receiving antenna.
• Increase the distance between the equipment and the receiver.
• Connect the equipment to an outlet on a circuit different from that to which the receiver is connected.
• Consult the dealer or an experienced radio/TV technician for help.
Warning: A shielded-type power cord is required in order to meet FCC emission limits and to prevent
interference to radio and television reception. Use only shielded cable to connect I/O devices to this
equipment. Any changes or modifications not expressly approved by the manufacturer may void your
warranty and service agreement.
Declaration of Conformity
This device complies with Part 15 of the FCC rules. Operation is subject to the following conditions:
• This device may not cause harmful interference.
• This device must accept any interference received, including interference that may cause undesired
operation.
Trademark Recognition
Windows XP/Vista/Win7 are registered trademarks of Microsoft Corporation in the United States and/or
other countries. Windows is an abbreviated term referring to the Microsoft Windows Operation System. All
other companies or product names are trademarks or registered trademarks of their respective companies.
Safety and Handling Precautions
Camera Information
• Do not take apart or attempt to service the camera yourself.
• Do not expose the camera to moisture, or extreme temperatures.
• Allow the camera to warm up when moving from cold to warm temperatures.
• Do not touch the camera lens.
• Do not expose the lens to direct sunlight for extended periods.
• Do not use abrasive chemicals, cleaning solvents or strong detergents to clean the product. Wipe the
product with a slightly damp soft cloth.
• Do not make the camera collide with objects or put heavy objects on it.
3
�
Battery Information
• Turn off the camera before installing or removing the battery.
• Use only the provided batteries or type of battery and charger that came with your camera. Using
other types of battery or charger may damage the equipment and invalidate the warranty.
• Inserting the battery upside down can cause damage to the product and possibly cause an explosion.
• When the camera is used for an extended period of time, it is normal for the camera body to feel
warm.
for a long period of time.
• Download all pictures and remove the battery from the camera if you are going to store the camera
• The type of battery and the battery power level may cause the lens to be stuck up.
• Risk of explosion if battery is replaced by an incorrect type. Dispose of used batteries according to the
instructions.
Using this Menu
Symbols used in this manual are explained below:
This indicates useful information when using your camera.
This indicates important message that should be read before using the function.
4
�
Congratulations on your purchase of the new digital camera.
Capturing high-quality digital images is fast and easy with this state-of-the-art smart camera.
Introduction
System Requirements
In order to get the most out of your camera, your computer must meet the following system requirements:
For Windows:
• Windows XP/Vista/Win7
• Processor: Pentium II 450MHz or above
• Memory: 512MB or above
• HDD space: 200MB or above
• 16bit color display monitor
• Microsoft DirectX 9.0C
• USB port and CD-ROM drive
For Macintosh:
• Power Mac G3 or later
• Mac OS 10.3.X (X=0~9) ~ 10.6.6 or later
• Memory: 512MB or above
• Q. Time player ver. 6.0.3 or above
• USB port and CD-ROM drive
Main Features
• 16 mega pixels resolution
• Up to 21x optical zoom and 5x digital zoom
• 3.0 inch color LCD monitor
• 128MB internal flash memory with optional external SD/SDHC/SDXC card
• Supports up to 4GB of SD card, and up to 32GB of SDHC card and to 64GB of SDXC card
• Easy-to-use button interface
• DCF, DPOF, PictBridge compatibility
• Slideshow to review still images
• A/V output to view your images, videos and audio on your TV
• USB port to transfer images, videos and audio to your PC
5
�
Package Contents
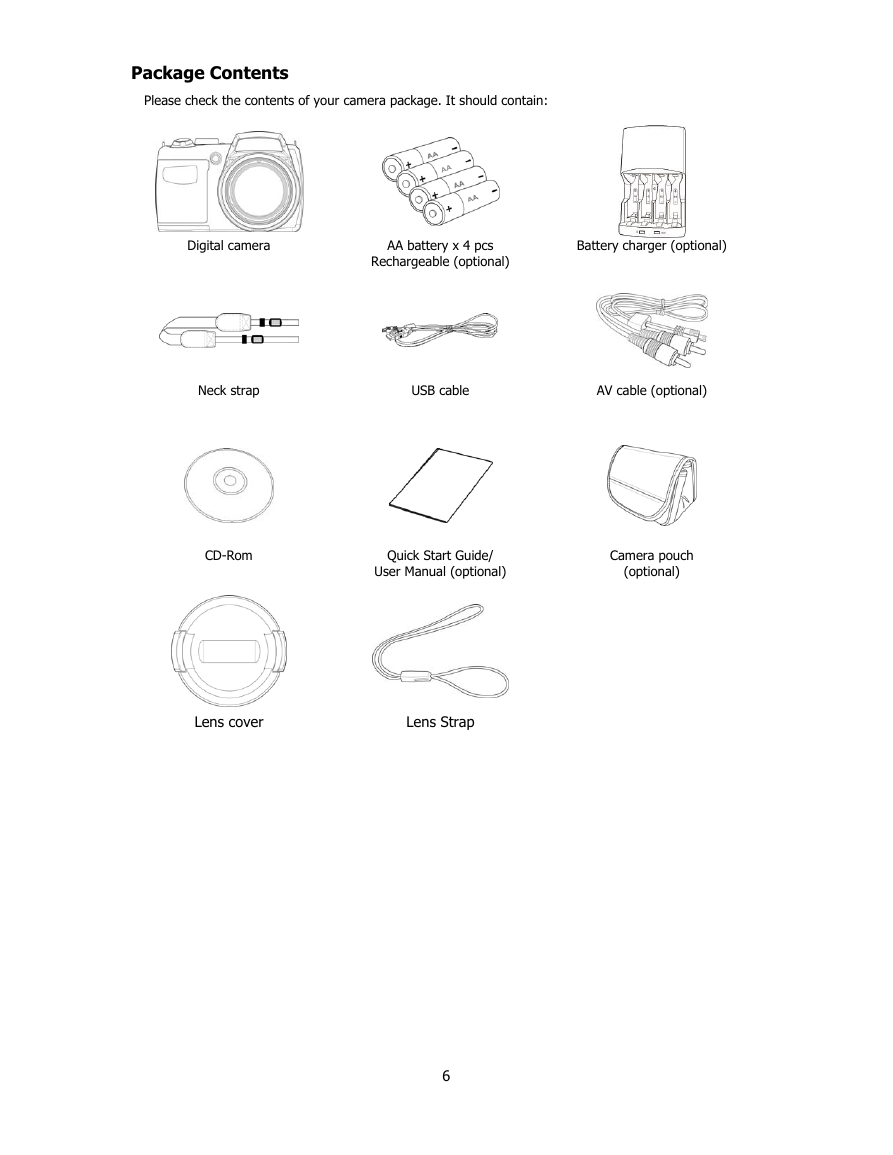
Please check the contents of your camera package. It should contain:
AA battery x 4 pcs
Rechargeable (optional)
Battery charger (optional)
Digital camera
Neck strap
USB cable
AV cable (optional)
CD-Rom
Quick Start Guide/
User Manual (optional)
Camera pouch
(optional)
Lens cover
Lens Strap
6
�
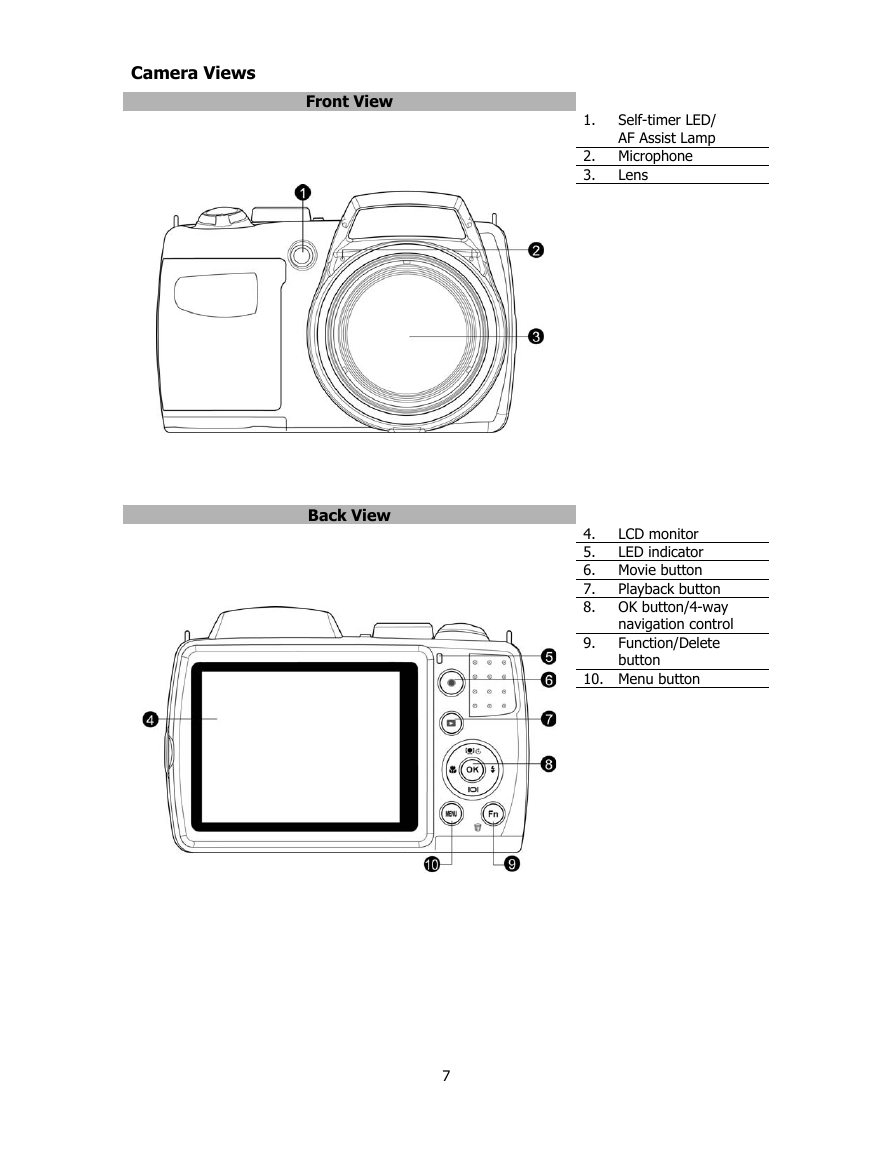
Self-timer LED/
AF Assist Lamp
Microphone
Lens
1.
2.
3.
LCD monitor
4.
LED indicator
5.
Movie button
6.
7.
Playback button
8. OK button/4-way
navigation control
Function/Delete
button
9.
10. Menu button
Camera Views
Front View
Back View
7
�
Top View
Bottom View
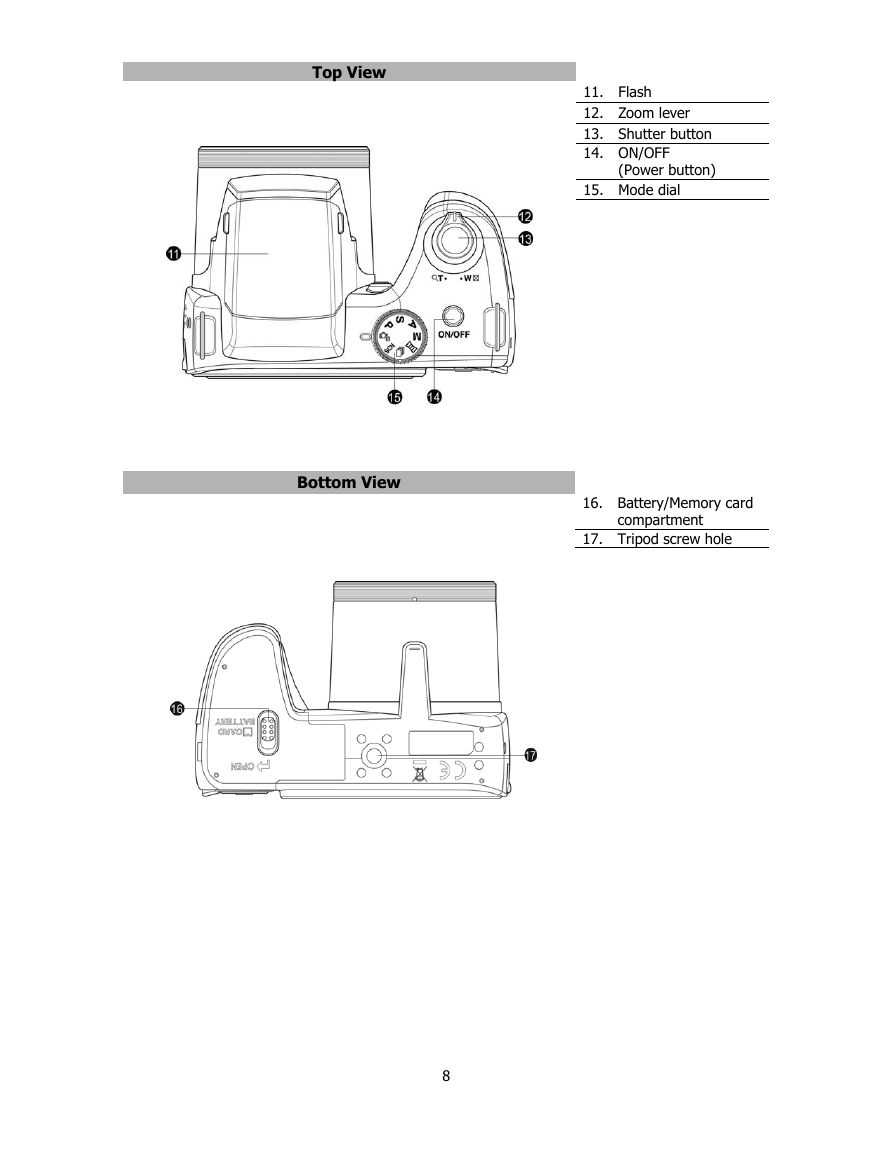
11. Flash
12. Zoom lever
13. Shutter button
14. ON/OFF
(Power button)
15. Mode dial
16. Battery/Memory card
compartment
17. Tripod screw hole
8
�


 2023年江西萍乡中考道德与法治真题及答案.doc
 2012年重庆南川中考生物真题及答案.doc
 2013年江西师范大学地理学综合及文艺理论基础考研真题.doc
 2020年四川甘孜小升初语文真题及答案I卷.doc
 2020年注册岩土工程师专业基础考试真题及答案.doc
 2023-2024学年福建省厦门市九年级上学期数学月考试题及答案.doc
 2021-2022学年辽宁省沈阳市大东区九年级上学期语文期末试题及答案.doc
 2022-2023学年北京东城区初三第一学期物理期末试卷及答案.doc
 2018上半年江西教师资格初中地理学科知识与教学能力真题及答案.doc
 2012年河北国家公务员申论考试真题及答案-省级.doc
 2020-2021学年江苏省扬州市江都区邵樊片九年级上学期数学第一次质量检测试题及答案.doc
 2022下半年黑龙江教师资格证中学综合素质真题及答案.doc