Welcome:
Dear user, thanks for purchasing this product.
Much investment in time and effort has gone into its development, and it is our hope
that it will give you many years of trouble-free service.
Safety Notice:
1. Do not drop, puncture or disassemble the device; otherwise the warranty will be voided.
2. Avoid all contact with water, and dry hands before using.
3. Do not expose the device to high temperature or leave it in direct sunlight. Doing so may
damage the device.
4. Use the device with care. Avoid pressing hard on the device.
5. For your own safety, avoid using the device when there is a storm or lightning.
6. Do not use batteries of different specifications. Doing so may lead to the potential for serious
damage.
7. Remove the battery during long periods between usage, as a deteriorated battery may affect
the functionality of the device.
8. Remove the battery if it shows signs of leaking or distortion.
9. Use only the accessories supplied by the manufacturer.
10. Keep the device out of the reach of infants.
11. Risk of explosion if battery is replaced by an incorrect type.
12. Dispose of used batteries according to the instructions.
FCC Compliance Statement:
This device complies with Part 15 of the FCC Rules. Operation is
subjected to the following two conditions: (1) this device may not cause
harmful interference, and (2) this device must accept any interference
received, including interference that may cause undesired operation.
This equipment has been tested and found to comply with limits for a
Class B digital device, pursuant to Part 15 of the FCC rules. These limits
are designed to provide reasonable protection against harmful interference in residential
installations. This equipment generates, uses, and can radiate radio frequency energy, and if
not installed and used in accordance with the instructions, may cause harmful interference to
radio communications.
However, there is no guarantee that interference will not occur in a particular installation. If this
equipment does cause interference to radio or television equipment reception, which can be
determined by turning the equipment off and on, the user is encouraged to try to correct the
interference by one or more of the following measures:
-Reorient or relocate the receiving antenna.
-Move the equipment away from the receiver.
-Plug the equipment into an outlet on a circuit different from that to which the receiver is
connected.
-Consult the dealer or an experienced radio/television technician for additional suggestions.
You are cautioned that any change or modifications to the equipment not expressly approved
by the party responsible for compliance could void Your authority to operate such equipment.
If the time arises to throw away your product, please
recycle all the components possible.
Batteries and rechargeable batteries are not to be
disposed in your domestic waste! Please recycle
them at your local recycling point.
Together we can help to protect the environment.
�
Getting Started
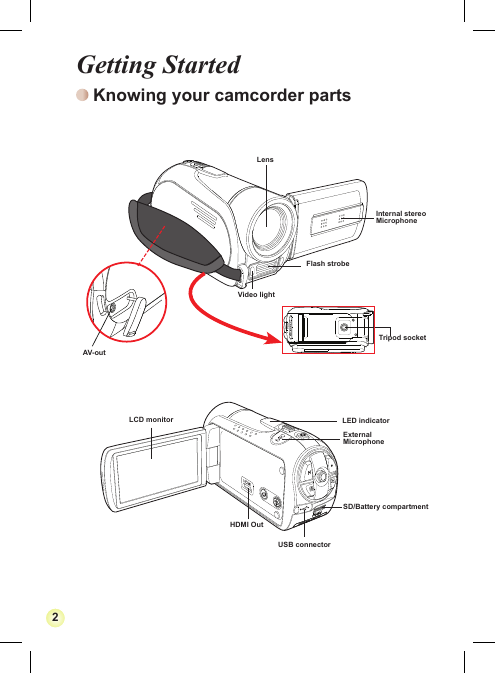
Knowing your camcorder parts
Lens
Flash strobe
Video light
Internal stereo
Microphone
Tripod socket
LED indicator
External
Microphone
SD/Battery compartment
HDMI Out
USB connector
AV-out
LCD monitor
�
�
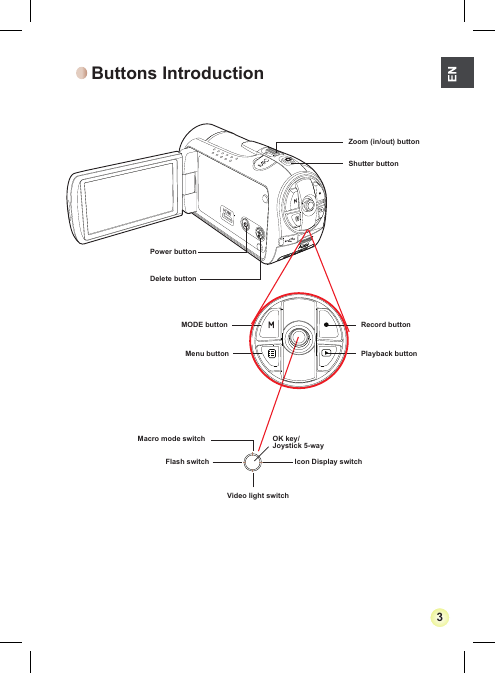
Buttons Introduction
Zoom (in/out) button
Shutter button
Power button
Delete button
MODE button
Menu button
Record button
Playback button
Macro mode switch
OK key/
Joystick 5-way
Flash switch
Icon Display switch
Video light switch
�
�
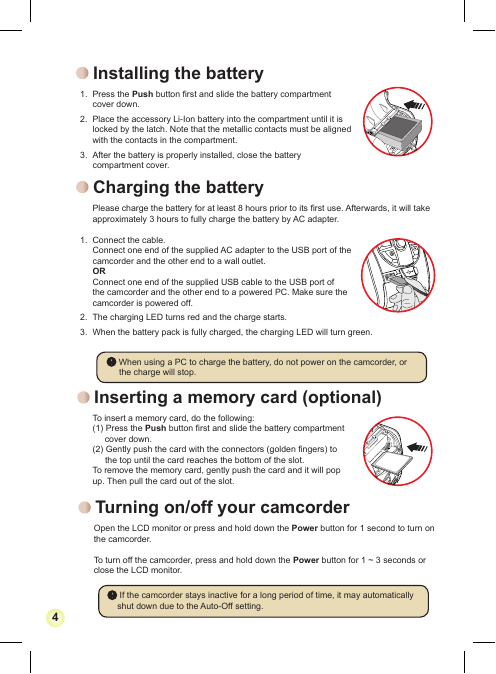
Installing the battery
1. Press the Push button first and slide the battery compartment
cover down.
2. Place the accessory Li-Ion battery into the compartment until it is
locked by the latch. Note that the metallic contacts must be aligned
with the contacts in the compartment.
3. After the battery is properly installed, close the battery
compartment cover.
Charging the battery
Please charge the battery for at least 8 hours prior to its first use. Afterwards, it will take
approximately 3 hours to fully charge the battery by AC adapter.
1. Connect the cable.
Connect one end of the supplied AC adapter to the USB port of the
camcorder and the other end to a wall outlet.
OR
Connect one end of the supplied USB cable to the USB port of
the camcorder and the other end to a powered PC. Make sure the
camcorder is powered off.
2. The charging LED turns red and the charge starts.
3. When the battery pack is fully charged, the charging LED will turn green.
When using a PC to charge the battery, do not power on the camcorder, or
the charge will stop.
Inserting a memory card (optional)
To insert a memory card, do the following:
(1) Press the Push button first and slide the battery compartment
cover down.
(2) Gently push the card with the connectors (golden fingers) to
the top until the card reaches the bottom of the slot.
To remove the memory card, gently push the card and it will pop
up. Then pull the card out of the slot.
Turning on/off your camcorder
Open the LCD monitor or press and hold down the Power button for 1 second to turn on
the camcorder.
To turn off the camcorder, press and hold down the Power button for 1 ~ 3 seconds or
close the LCD monitor.
If the camcorder stays inactive for a long period of time, it may automatically
shut down due to the Auto-Off setting.
�
�
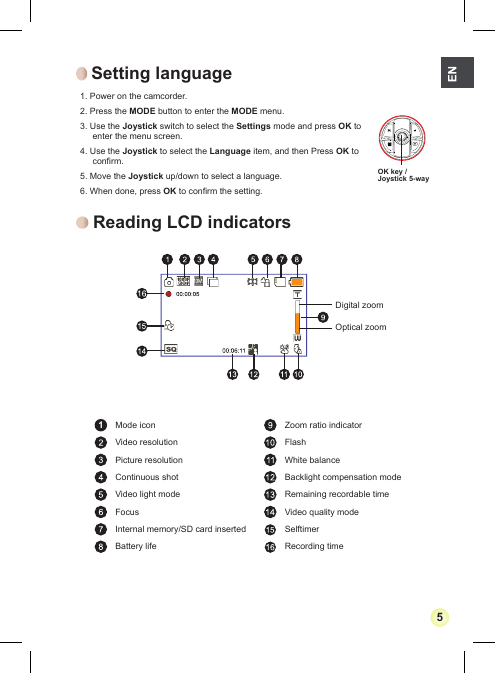
Setting language
1. Power on the camcorder.
2. Press the MODE button to enter the MODE menu.
3. Use the Joystick switch to select the Settings mode and press OK to
enter the menu screen.
4. Use the Joystick to select the Language item, and then Press OK to
confirm.
5. Move the Joystick up/down to select a language.
6. When done, press OK to confirm the setting.
Reading LCD indicators
OK key /
Joystick 5-way
Digital zoom
Optical zoom
1 Mode icon
Video resolution
Picture resolution
Continuous shot
Video light mode
Focus
Internal memory/SD card inserted
Battery life
Zoom ratio indicator
Flash
White balance
Backlight compensation mode
Remaining recordable time
Video quality mode
Selftimer
Recording time
5
Open the LCD monitor or press and hold down the Power button for 1 second to turn on
�
Basic Operations
Recording a video clip
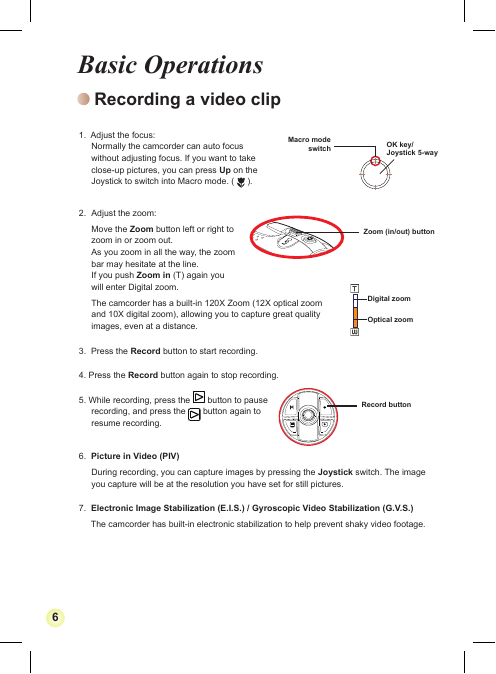
1. Adjust the focus:
Normally the camcorder can auto focus
without adjusting focus. If you want to take
close-up pictures, you can press Up on the
Joystick to switch into Macro mode. (
).
2. Adjust the zoom:
Move the Zoom button left or right to
zoom in or zoom out.
As you zoom in all the way, the zoom
bar may hesitate at the line.
If you push Zoom in (T) again you
will enter Digital zoom.
Macro mode
switch
OK key/
Joystick 5-way
Zoom (in/out) button
The camcorder has a built-in 120X Zoom (12X optical zoom
and 10X digital zoom), allowing you to capture great quality
images, even at a distance.
Digital zoom
Optical zoom
3. Press the Record button to start recording.
4. Press the Record button again to stop recording.
5. While recording, press the
recording, and press the
resume recording.
button to pause
button again to
Record button
6. Picture in Video (PIV)
During recording, you can capture images by pressing the Joystick switch. The image
you capture will be at the resolution you have set for still pictures.
7. Electronic Image Stabilization (E.I.S.) / Gyroscopic Video Stabilization (G.V.S.)
The camcorder has built-in electronic stabilization to help prevent shaky video footage.
��
�
Joystick 5-way
Zoom (in/out) button
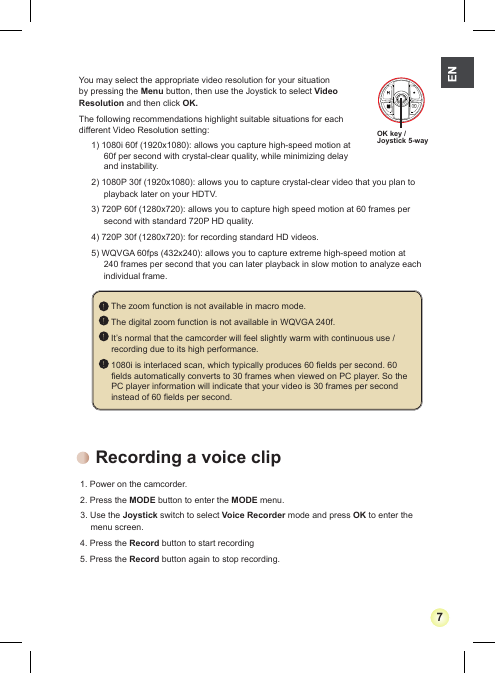
You may select the appropriate video resolution for your situation
by pressing the Menu button, then use the Joystick to select Video
Resolution and then click OK.
The following recommendations highlight suitable situations for each
different Video Resolution setting:
1) 1080i 60f (1920x1080): allows you capture high-speed motion at
60f per second with crystal-clear quality, while minimizing delay
and instability.
OK key /
Joystick 5-way
2) 1080P 30f (1920x1080): allows you to capture crystal-clear video that you plan to
playback later on your HDTV.
3) 720P 60f (1280x720): allows you to capture high speed motion at 60 frames per
second with standard 720P HD quality.
4) 720P 30f (1280x720): for recording standard HD videos.
5) WQVGA 60fps (432x240): allows you to capture extreme high-speed motion at
240 frames per second that you can later playback in slow motion to analyze each
individual frame.
The zoom function is not available in macro mode.
The digital zoom function is not available in WQVGA 240f.
It’s normal that the camcorder will feel slightly warm with continuous use /
recording due to its high performance.
1080i is interlaced scan, which typically produces 60 fields per second. 60
fields automatically converts to 30 frames when viewed on PC player. So the
PC player information will indicate that your video is 30 frames per second
instead of 60 fields per second.
Recording a voice clip
1. Power on the camcorder.
2. Press the MODE button to enter the MODE menu.
3. Use the Joystick switch to select Voice Recorder mode and press OK to enter the
menu screen.
4. Press the Record button to start recording
5. Press the Record button again to stop recording.
��
�
Taking a still picture
1. Adjust the focus:
Normally the camcorder can auto focus without adjusting focus. If you want to take close-
up pictures, you can push the Joystick button up to switch to Macro mode (
).
2. Zooming:
Move the Zoom button up or down to zoom in or zoom out.
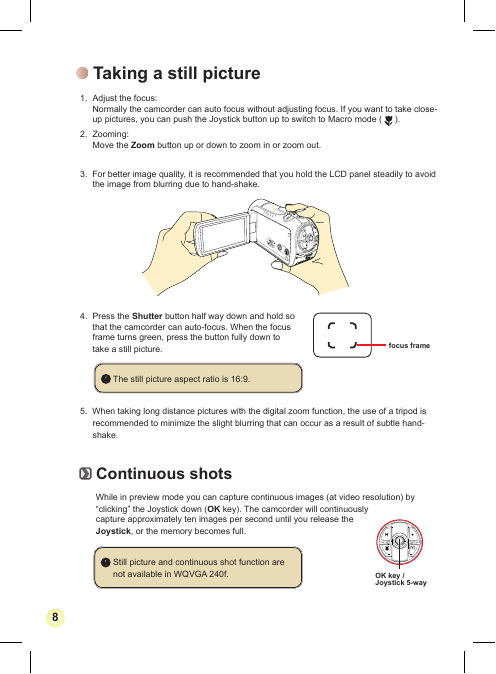
3. For better image quality, it is recommended that you hold the LCD panel steadily to avoid
the image from blurring due to hand-shake.
4. Press the Shutter button half way down and hold so
that the camcorder can auto-focus. When the focus
frame turns green, press the button fully down to
take a still picture.
The still picture aspect ratio is 16:9.
focus frame
5. When taking long distance pictures with the digital zoom function, the use of a tripod is
recommended to minimize the slight blurring that can occur as a result of subtle hand-
shake.
Continuous shots
While in preview mode you can capture continuous images (at video resolution) by
“clicking” the Joystick down (OK key). The camcorder will continuously
capture approximately ten images per second until you release the
Joystick, or the memory becomes full.
Still picture and continuous shot function are
not available in WQVGA 240f.
OK key /
Joystick 5-way
��
�


 2023年江西萍乡中考道德与法治真题及答案.doc
 2012年重庆南川中考生物真题及答案.doc
 2013年江西师范大学地理学综合及文艺理论基础考研真题.doc
 2020年四川甘孜小升初语文真题及答案I卷.doc
 2020年注册岩土工程师专业基础考试真题及答案.doc
 2023-2024学年福建省厦门市九年级上学期数学月考试题及答案.doc
 2021-2022学年辽宁省沈阳市大东区九年级上学期语文期末试题及答案.doc
 2022-2023学年北京东城区初三第一学期物理期末试卷及答案.doc
 2018上半年江西教师资格初中地理学科知识与教学能力真题及答案.doc
 2012年河北国家公务员申论考试真题及答案-省级.doc
 2020-2021学年江苏省扬州市江都区邵樊片九年级上学期数学第一次质量检测试题及答案.doc
 2022下半年黑龙江教师资格证中学综合素质真题及答案.doc