logo资料库

柯尼卡美能达打印机-PagePro 20说明书.pdf

第1页 / 共270页
第2页 / 共270页
第3页 / 共270页
第4页 / 共270页
第5页 / 共270页
第6页 / 共270页
第7页 / 共270页
第8页 / 共270页
资料共270页,剩余部分请下载后查看
Back to Index
--------------------------------------------------------
PagePro20 User Manual
Unpacking
Foreword
Contents
Chapter 1
1. Printer Features
2. Printer Parts
3. Control Panel
Chapter 2
1. Installation Pracaution
2. Operational Precaution
3. Setting Up your Printer
4. Connecting the Power Cord
5. Turning the Printer ON and OFF
6. Printing a Test Page
7. Connecting the Interface Cable
8. Moving the Printer
Chapter 3
1. Using the Control Panel
2. Understanding the Printer Menus
3. Loading Paper
4. Printing
5. Understanding Fonts
Chapter 4
1. Supplies for Maintenance
2. Replacing the Imaging Cartridge
3. Cleaning your Printer
Chapter 5
1. Clearing a Paper Misfeed
2. Printing Problems
3. Print Quality Problems
4. Understanding Printer Messages
Chapter 6
1. Installing the third Tray Unit
2. Installing the Duplex Unit
3. Installing the Network Card
4. Installing the Adobe PostScript ROM-DIMM and Hard Disk
5. Installing the SIMM
Chapter 7
1. Printer
2. Third Tray Unit (optional)
3. Duplex Unit (optional)
4. SIMM
5. Interface Connector and Cable
Printer Driver for Windows 95
Introduction
System Requirements
Installing the Printer Driver
Manual Installation
Setting the Printing Options
General Button Operations
Printer Properties Window
General
Details
Setup
Watermarks
Paper
Graphics
Fonts
Device Option
Printing Documents
Installing the Minolta Font Manager
Minolta Status Monitor 20
Introduction
System Requirements
Installing the Minolta Staus Monitor
Understanding the Status Monitor
Indicator Status and Status Icon
Status Monitor Menus
User Setting Items
Printer Driver for Windows 3.1
Introduction
System Requirements
Installing the Printer Driver
Selecting the Printer Port
Selecting Timeout Options
Choosing a Default Printer
Setting the Printer Options
General Button Operations
Printer Setup Window
Setup
Watermark
Paper
Graphics
Fonts
Device Options
Printing Documents
Installing the Minolta Font Manager
Appendix A
Character Sets
Appendix B
Font Lists
Index
A - F
G - M
N - P
R - T
U - W
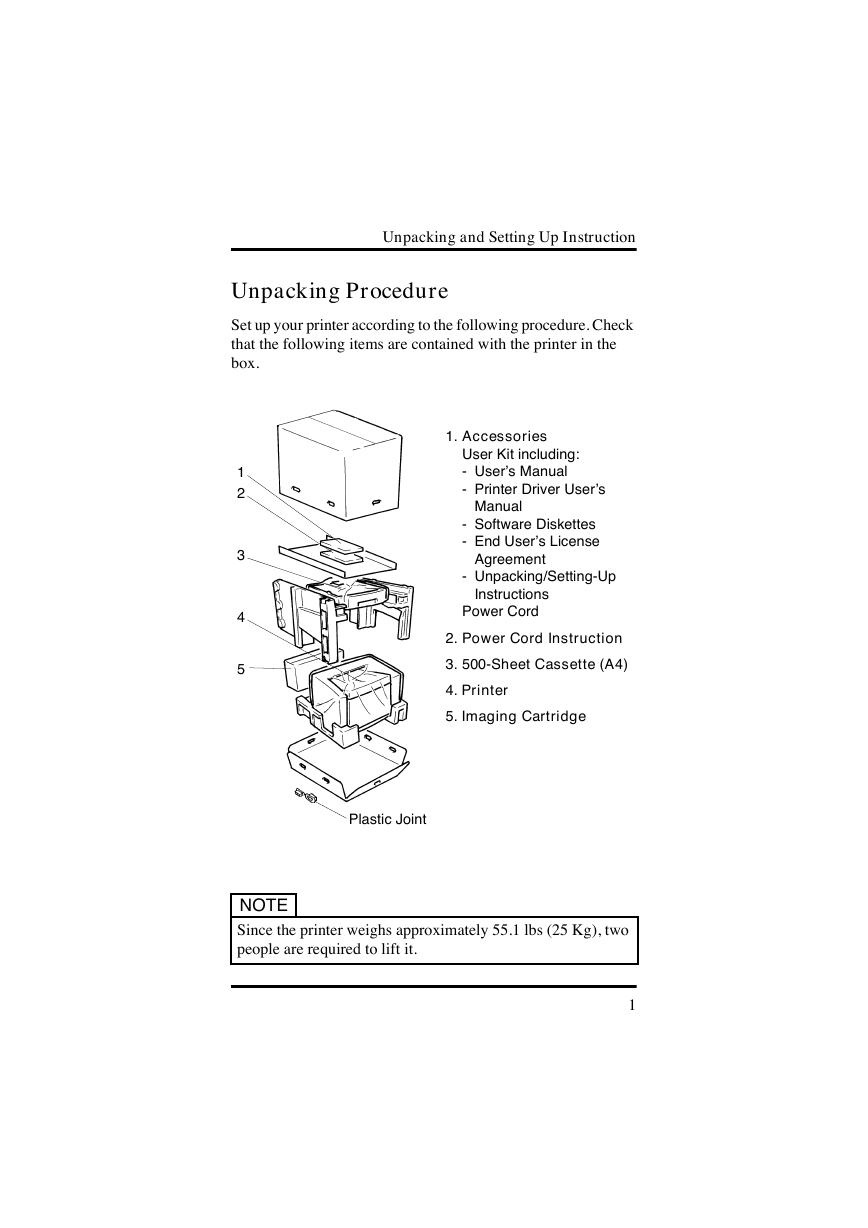
Unpacking and Setting Up Instruction Unpacking Procedure Set up your printer according to the following procedure. Check that the following items are contained with the printer in the box. 1 2 3 4 5 1. Accessories User Kit including: - User’s Manual - Printer Driver User’s Manual - Software Diskettes - End User’s License Agreement - Unpacking/Setting-Up Instructions Power Cord 2. Power Cord Instruction 3. 500-Sheet Cassette (A4) 4. Printer 5. Imaging Cartridge Plastic Joint NOTE Since the printer weighs approximately 55.1 lbs (25 Kg), two people are required to lift it. 1
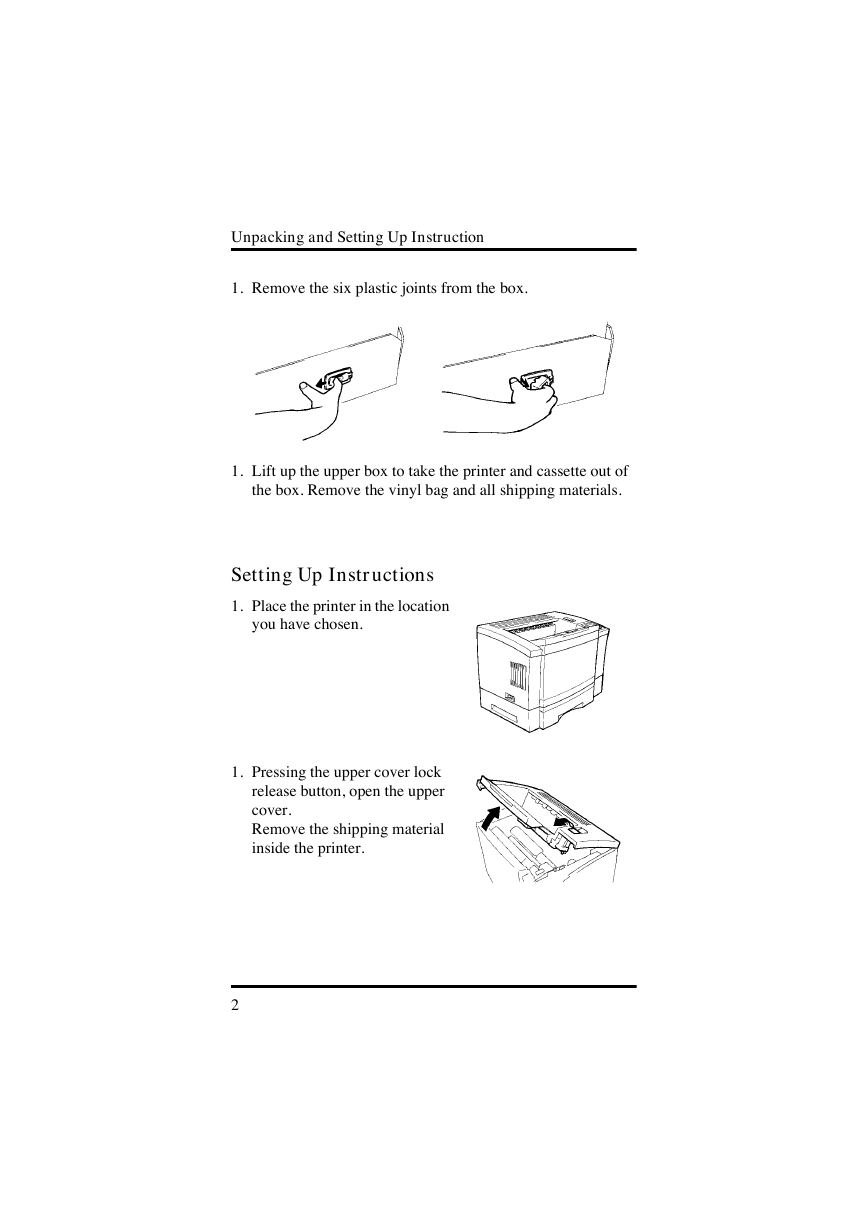
Unpacking and Setting Up Instruction 1. Remove the six plastic joints from the box. 1. Lift up the upper box to take the printer and cassette out of the box. Remove the vinyl bag and all shipping materials. Setting Up Instructions 1. Place the printer in the location you have chosen. 1. Pressing the upper cover lock release button, open the upper cover. Remove the shipping material inside the printer. 2
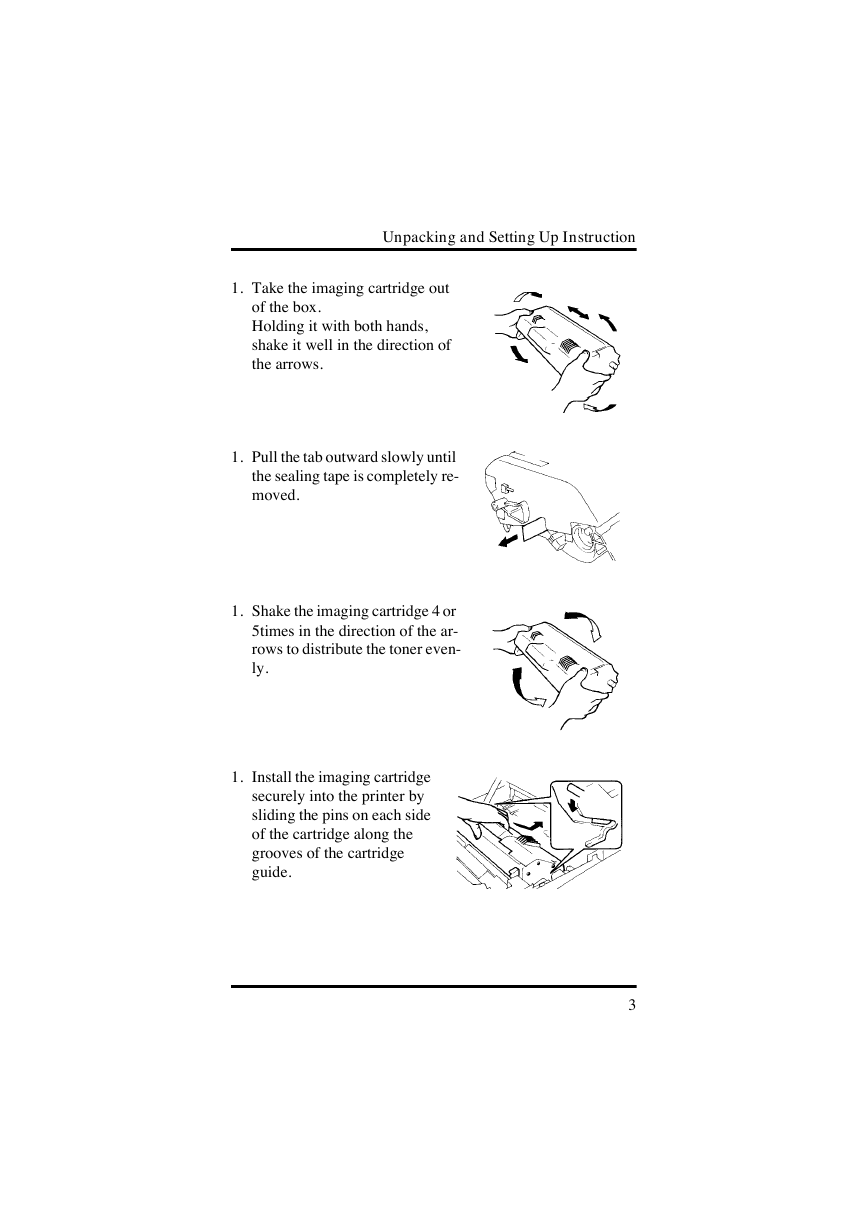
Unpacking and Setting Up Instruction 1. Take the imaging cartridge out of the box. Holding it with both hands, shake it well in the direction of the arrows. 1. Pull the tab outward slowly until the sealing tape is completely re- moved. 1. Shake the imaging cartridge 4 or 5times in the direction of the ar- rows to distribute the toner even- ly. 1. Install the imaging cartridge securely into the printer by sliding the pins on each side of the cartridge along the grooves of the cartridge guide. 3
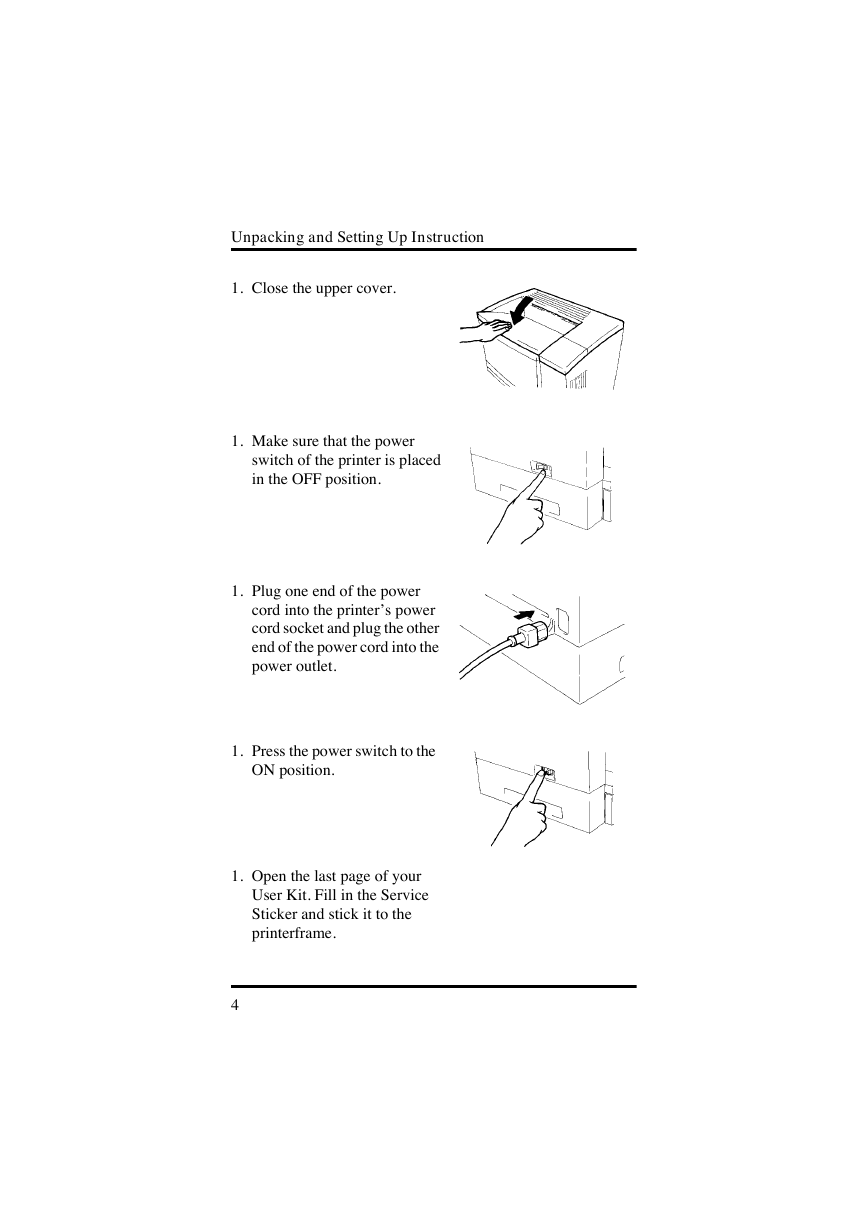
Unpacking and Setting Up Instruction 1. Close the upper cover. 1. Make sure that the power switch of the printer is placed in the OFF position. 1. Plug one end of the power cord into the printer’s power cord socket and plug the other end of the power cord into the power outlet. 1. Press the power switch to the ON position. 1. Open the last page of your User Kit. Fill in the Service Sticker and stick it to the printerframe. 4
Foreword Welcome Thank you for selecting a Minolta PagePro 20 Printer! To assist you to easily set up and operate your printer and install the Printer Driver software, the Minolta PagePro 20 Printer comes with a comprehensive User Kit. The Minolta PagePro 20 User Kit con- sists of an Unpacking and Setting Up Instruction, a User’s Manual and a Software Package. The first chapters of the User’s Manual explain the functions of the printer and how it operates. Besides, they provide you with the trou- bleshooting tips as well as general precautions you should observe when operating the printer. The chapters for Windows 95, Windows 3.1 and Status Monitor 20 describe how to install and use the Minolta PagePro 20 Printer Util- ity. Before reading these chapters, we recommend that you read the previous chapters of the User’s Manual first, where it is explained how to set up and operate the printer. At the back you will find the Software Package including installa- tion disks of the Printer Utility and Font Manager. To ensure top performance and effective use of your printer, read this manual carefully from cover to cover, and keep it at hand for future reference. No part of these documents may be reproduced, transmitted, tran- scribed, stored in a retrieval system, or translated into other lan- guages without the express written prior consent of Minolta Co., Ltd. The contents of these manuals are subject to change without notice. Trademark Acknowledgments HP, LaserJet 4V and PCL are registered trademarks of Hewlett- Packard Company. Centronics is a registered trademark of Centronics Data Computer Corporation. i
Foreword TrueType is a registered trademark of Apple Computer, Inc. IBM is a registered trademark of International Business Machines Corporation. Intellifont is a trademark of Agfa Corporation. Adobe, PostScript, and the PostScript logo are trademarks of Adobe Systems, Inc. NetWare is a registered trademark of Novell Inc. Minolta is a registered trademark of Minolta Co., Ltd. PagePro is a trademark of Minolta in Europe, Japan and Asia. All other products or name brands are trademarks or registered trademarks of their respective holders. This printer includes the software developed by Tokyo Denshi Sekei K.K. ii
Contents Chapter 1 Introduction 1. Printer Features.............................................1-1 2. Printer Parts and Accessories .....................1-2 3. Control Panel .................................................1-6 Layout for Control Panel ..................................1-6 Indicator Function............................................1-7 LCD Function ..................................................1-7 Key Functions..................................................1-8 Chapter 2 Setting-Up 1. Installation Precaution..................................2-1 Selecting a Location for the Printer .................2-1 Power Source ..................................................2-1 Grounding........................................................2-2 Space Requirements.......................................2-3 2. Operational Precaution..................................2-4 Operating Environment....................................2-4 Operation.........................................................2-4 Printer Supplies ...............................................2-6 3. Setting Up Your Printer .................................2-7 4. Connecting the Power Cord .........................2-9 5. Turning the Printer ON and OFF ..................2-10 Turning the Printer ON.....................................2-10 Turning the Printer OFF...................................2-10 6. Printing a Test Page ......................................2-11 Configuration Page..........................................2-12 PCL Font List...................................................2-13 PCL Demo Print...............................................2-15 iii
Contents 7. Connecting the Interface Cable ...................2-16 Interface Port ...................................................2-16 8. Moving the Printer.........................................2-17 Chapter 3 Using the Printer 1. Using the Control Panel................................3-1 Basic Menu Setting Method ............................3-1 Tray 1 Paper Size Setting Method ...................3-2 Job Separation ................................................3-3 2. Understanding the Printer Menus................3-4 Overview of Printer Menus ..............................3-4 Printer Menus ..................................................3-6 (1) Print Menu ...............................................3-7 (2) PCL Menu................................................3-10 (3) PS Menu ..................................................3-11 (4) System Menu...........................................3-12 (5) Parallel Menu ...........................................3-14 (6) Maintenance Menu ..................................3-16 (7) Network Menu..........................................3-17 (8) Test Print..................................................3-19 3. Loading Paper................................................3-21 Supported Media .............................................3-21 Paper Type ....................................................3-21 Paper Size.....................................................3-21 Capacity ........................................................3-22 Printable Area ...............................................3-23 Page Orientation..............................................3-24 Printing on Envelopes......................................3-25 Printing on Labels............................................3-26 iv
分享到:
收藏