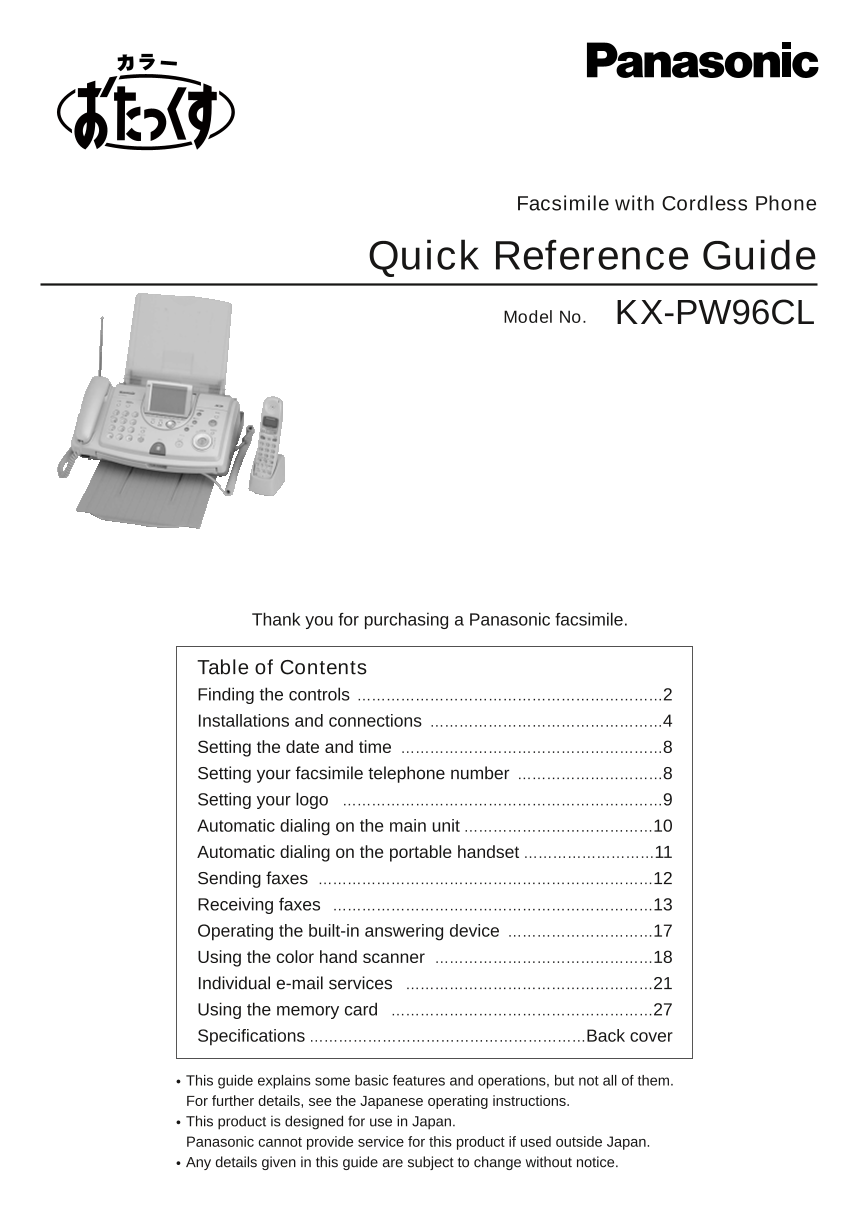
Facsimile with Cordless Phone
Quick Reference Guide
Model No. KX-PW96CL
Thank you for purchasing a Panasonic facsimile.
Table of Contents
Finding the controls ………………………………………………………2
Installations and connections …………………………………………4
Setting the date and time ………………………………………………8
Setting your facsimile telephone number …………………………8
Setting your logo …………………………………………………………9
Automatic dialing on the main unit…………………………………10
Automatic dialing on the portable handset………………………11
Sending faxes ……………………………………………………………12
Receiving faxes …………………………………………………………13
Operating the built-in answering device …………………………17
Using the color hand scanner ………………………………………18
Individual e-mail services ……………………………………………21
Using the memory card ………………………………………………27
Specifications…………………………………………………Back cover
● This guide explains some basic features and operations, but not all of them.
For further details, see the Japanese operating instructions.
● This product is designed for use in Japan.
Panasonic cannot provide service for this product if used outside Japan.
● Any details given in this guide are subject to change without notice.
Finding the controls
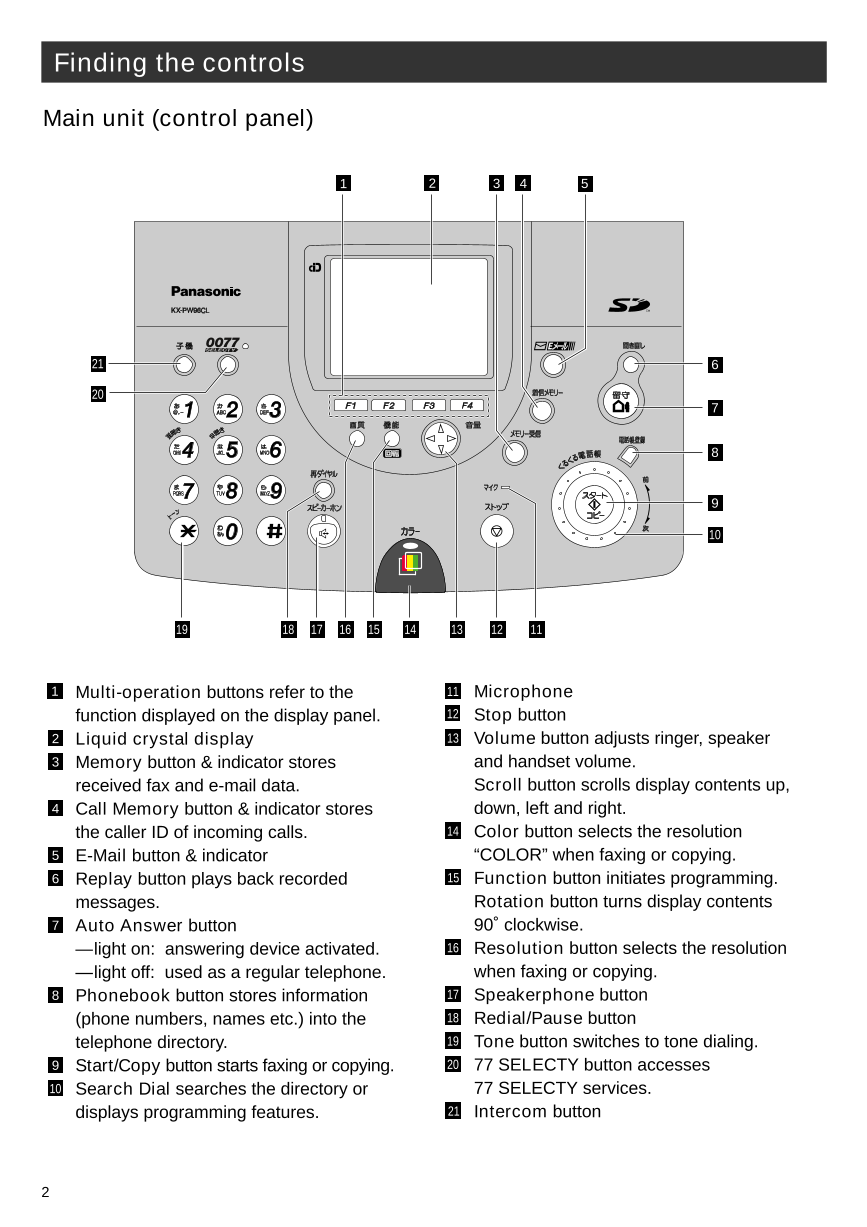
Main unit (control panel)
1 2 3 4 5
21 6
20
7
8
9
10
19 18 17 16 15 14 13 12 11
1 Multi-operation buttons refer to the 11 Microphone
function displayed on the display panel. 12 Stop button
2 Liquid crystal display 13 Volume button adjusts ringer, speaker
3 Memory button & indicator stores and handset volume.
received fax and e-mail data. Scroll button scrolls display contents up,
4 Call Memory button & indicator stores down, left and right.
the caller ID of incoming calls. 14 Color button selects the resolution
5 E-Mail button & indicator “COLOR” when faxing or copying.
6 Replay button plays back recorded 15 Function button initiates programming.
messages. Rotation button turns display contents
7 Auto Answer button 90˚ clockwise.
—light on: answering device activated. 16 Resolution button selects the resolution
—light off: used as a regular telephone. when faxing or copying.
8 Phonebook button stores information 17 Speakerphone button
(phone numbers, names etc.) into the 18 Redial/Pause button
telephone directory. 19 Tone button switches to tone dialing.
9 Start/Copy button starts faxing or copying. 20 77 SELECTY button accesses
10 Search Dial searches the directory or 77 SELECTY services.
displays programming features. 21 Intercom button
2
Finding the controls
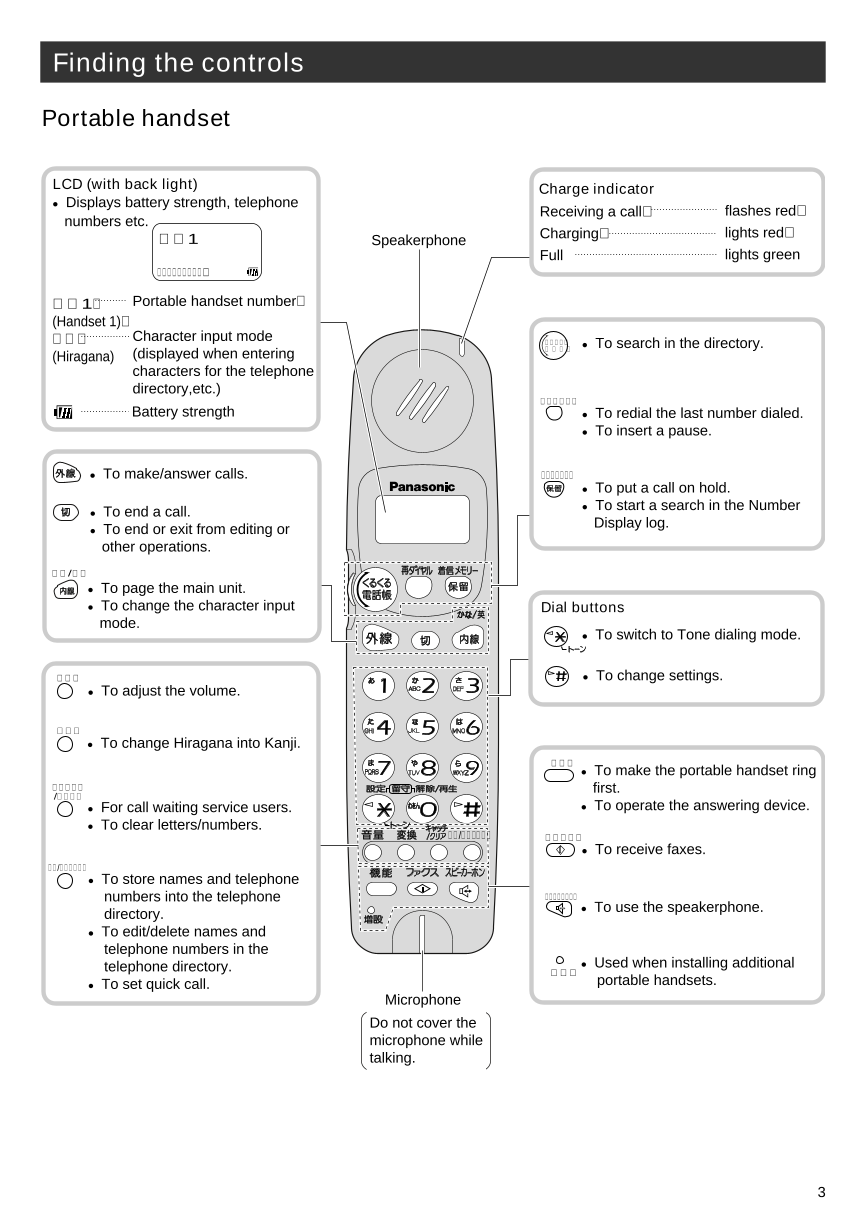
Portable handset
LCD (with back light) Charge indicator
● Displays battery strength, telephone
Receiving a call� flashes red�
numbers etc.
子機1 Speakerphone Charging� lights red�
Full lights green
かな�
子機1� Portable handset number�
(Handset 1)�
かな� Character input mode くるくる�
電 話 帳 � ● To search in the directory.
(Hiragana) (displayed when entering
characters for the telephone
directory,etc.)
再ダイヤル�
Battery strength ● To redial the last number dialed.
● To insert a pause.
● To make/answer calls. 着信メモリー�
● To put a call on hold.
● To end a call. ● To start a search in the Number
To end or exit from editing or Display log.
●
other operations.
かな/英�
● To page the main unit.
● To change the character input Dial buttons
mode.
● To switch to Tone dialing mode.
音量� ● To change settings.
● To adjust the volume.
変換�
● To change Hiragana into Kanji.
機能�
● To make the portable handset ring
キャッチ� first.
/クリア�
● For call waiting service users. ● To operate the answering device.
● To clear letters/numbers.
登録/修正・確定� ファクス�
● To receive faxes.
登録/修正・確定�
● To store names and telephone
numbers into the telephone スピーカーホン�
directory. ● To use the speakerphone.
● To edit/delete names and
telephone numbers in the
telephone directory. ● Used when installing additional
増設�
● To set quick call. portable handsets.
Microphone
Do not cover the
microphone while
talking.
3
Installations and connections
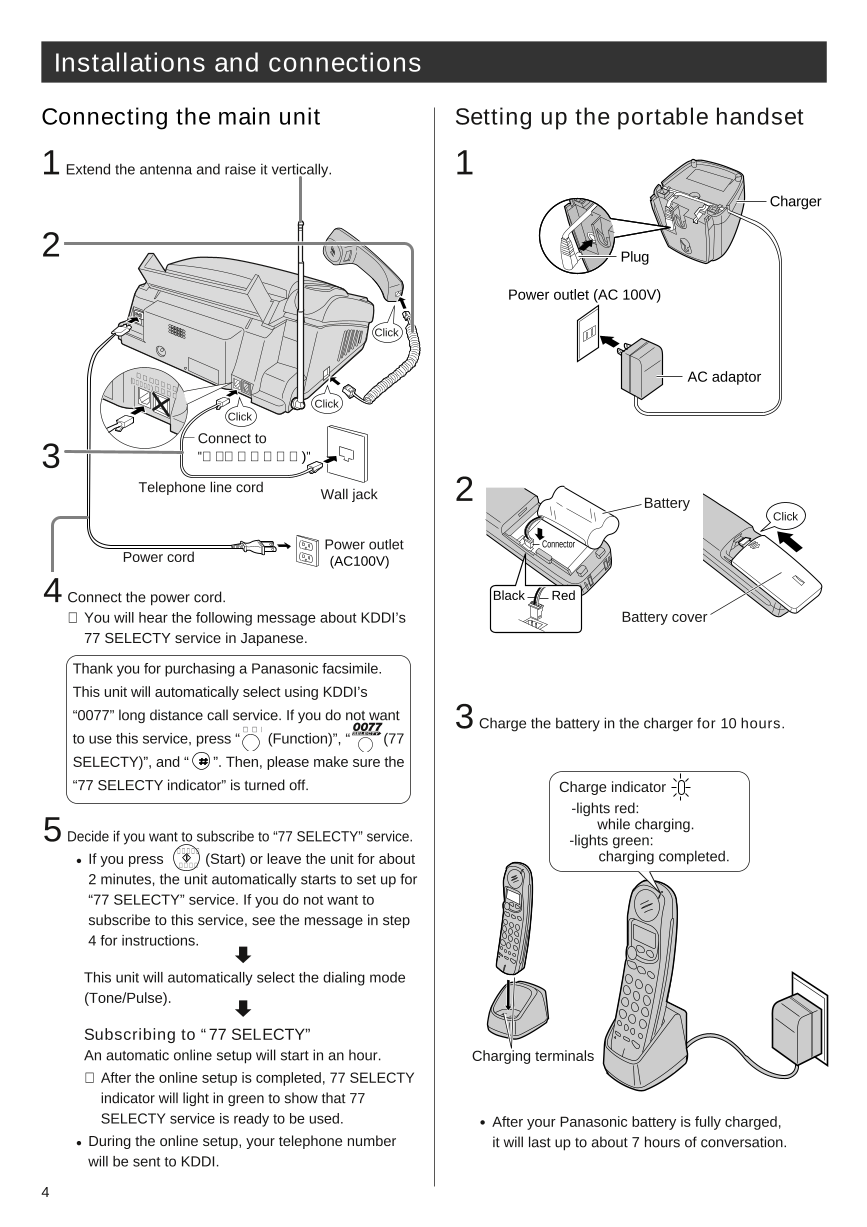
Connecting the main unit Setting up the portable handset
1 Extend the antenna and raise it vertically. 1
Charger
2 Plug
Power outlet (AC 100V)
Click
回
(電 線
話 �停 AC adaptor
回線へ 電
) 電 用
話 �
機�
Click
Click
Connect to
3 "回線(電話回線へ)"
Telephone line cord Wall jack 2 Battery
Click
Power outlet Connector
Power cord (AC100V)
4 Connect the power cord. Black Red
➡ You will hear the following message about KDDI’s Battery cover
77 SELECTY service in Japanese.
Thank you for purchasing a Panasonic facsimile.
This unit will automatically select using KDDI’s
“0077” long distance call service. If you do not want
機能� 3 Charge the battery in the charger for 10 hours.
to use this service, press “ (Function)”, “ (77
SELECTY)”, and “ ”. Then, please make sure the
“77 SELECTY indicator” is turned off. Charge indicator
-lights red:
5 while charging.
Decide if you want to subscribe to “77 SELECTY” service. -lights green:
スタート�
● If you press (Start) or leave the unit for about charging completed.
コピー�
2 minutes, the unit automatically starts to set up for
“77 SELECTY” service. If you do not want to
subscribe to this service, see the message in step
4 for instructions.
This unit will automatically select the dialing mode
(Tone/Pulse).
Subscribing to “77 SELECTY”
An automatic online setup will start in an hour. Charging terminals
➡ After the online setup is completed, 77 SELECTY
indicator will light in green to show that 77
SELECTY service is ready to be used. ●After your Panasonic battery is fully charged,
●During the online setup, your telephone number it will last up to about 7 hours of conversation.
will be sent to KDDI.
4
Installations and connections
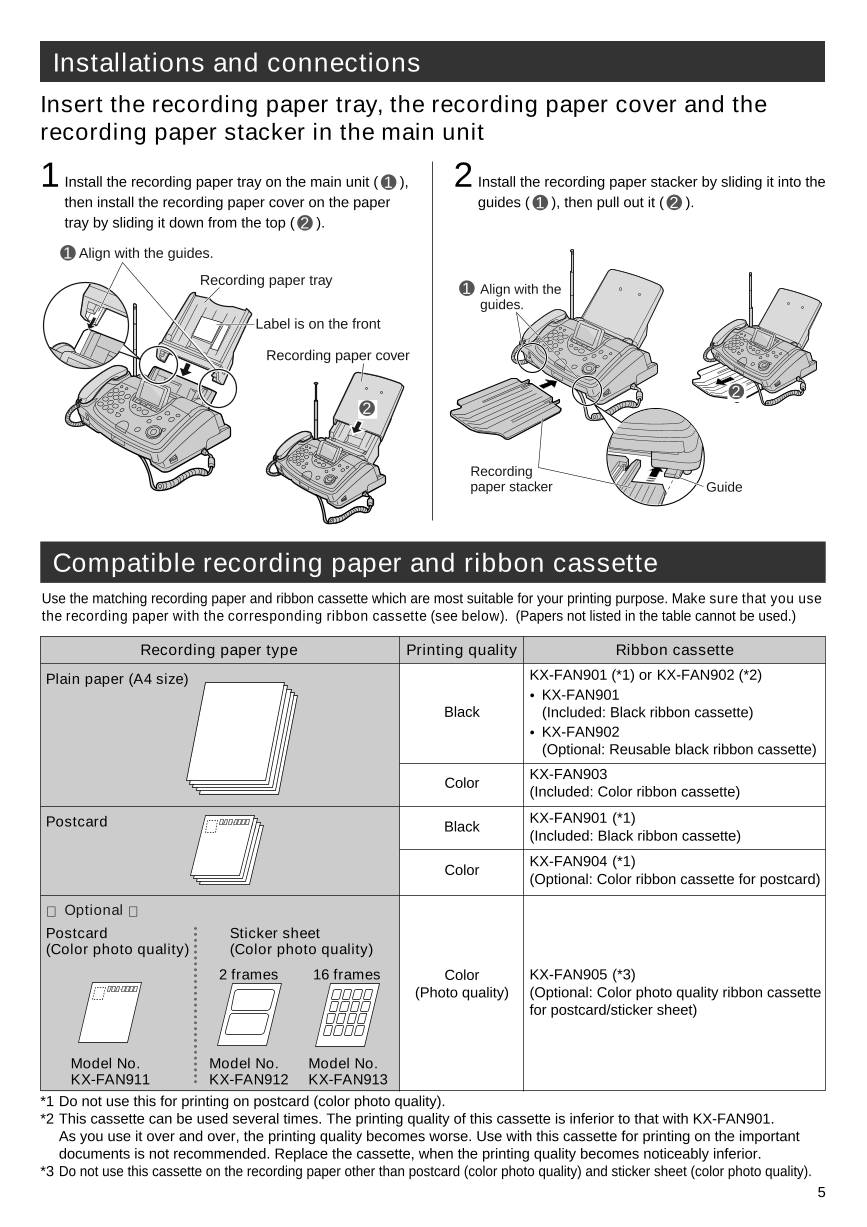
Insert the recording paper tray, the recording paper cover and the
recording paper stacker in the main unit
1 Install the recording paper tray on the main unit ( 1 ), 2 Install the recording paper stacker by sliding it into the
then install the recording paper cover on the paper guides ( 1 ), then pull out it ( 2 ).
tray by sliding it down from the top ( 2 ).
1 Align with the guides.
Recording paper tray 1 Align with the
guides.
Label is on the front
Recording paper cover
2
2
Recording
paper stacker Guide
Compatible recording paper and ribbon cassette
Use the matching recording paper and ribbon cassette which are most suitable for your printing purpose. Make sure that you use
the recording paper with the corresponding ribbon cassette (see below). (Papers not listed in the table cannot be used.)
Recording paper type Printing quality Ribbon cassette
Plain paper (A4 size) KX-FAN901 (*1) or KX-FAN902 (*2)
● KX-FAN901
Black (Included: Black ribbon cassette)
● KX-FAN902
(Optional: Reusable black ribbon cassette)
KX-FAN903
Color
(Included: Color ribbon cassette)
Postcard KX-FAN901 (*1)
Black
(Included: Black ribbon cassette)
KX-FAN904 (*1)
Color
(Optional: Color ribbon cassette for postcard)
~ Optional ~
Postcard Sticker sheet
(Color photo quality) (Color photo quality)
2 frames 16 frames Color KX-FAN905 (*3)
(Photo quality) (Optional: Color photo quality ribbon cassette
for postcard/sticker sheet)
Model No. Model No. Model No.
KX-FAN911 KX-FAN912 KX-FAN913
*1 Do not use this for printing on postcard (color photo quality).
*2 This cassette can be used several times. The printing quality of this cassette is inferior to that with KX-FAN901.
As you use it over and over, the printing quality becomes worse. Use with this cassette for printing on the important
documents is not recommended. Replace the cassette, when the printing quality becomes noticeably inferior.
*3 Do not use this cassette on the recording paper other than postcard (color photo quality) and sticker sheet (color photo quality).
5
Installations and connections
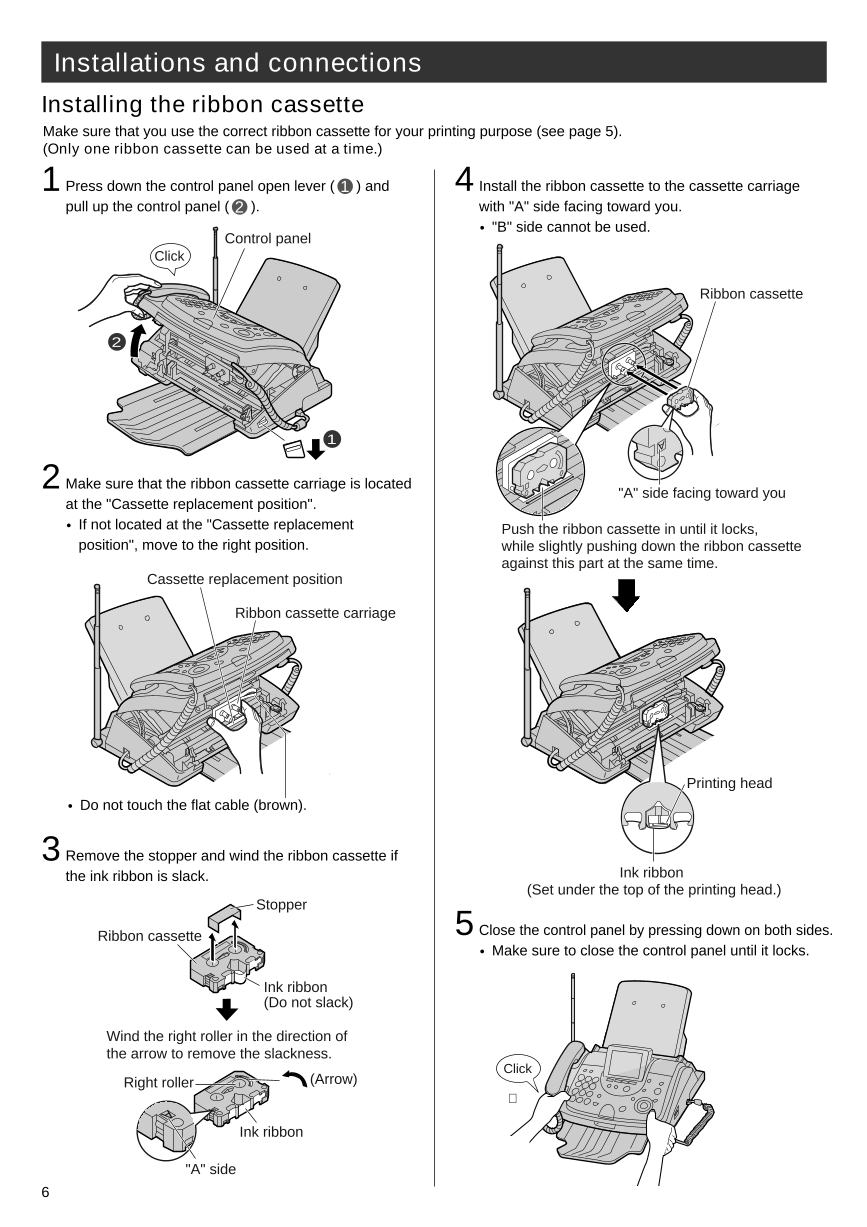
Installing the ribbon cassette
Make sure that you use the correct ribbon cassette for your printing purpose (see page 5).
(Only one ribbon cassette can be used at a time.)
1 Press down the control panel open lever ( 1 ) and 4 Install the ribbon cassette to the cassette carriage
pull up the control panel ( 2 ). with "A" side facing toward you.
● "B" side cannot be used.
Control panel
Click
Ribbon cassette
2
1
2 Make sure that the ribbon cassette carriage is located
"A" side facing toward you
at the "Cassette replacement position".
● If not located at the "Cassette replacement Push the ribbon cassette in until it locks,
position", move to the right position. while slightly pushing down the ribbon cassette
against this part at the same time.
Cassette replacement position
Ribbon cassette carriage
Printing head
● Do not touch the flat cable (brown).
3 Remove the stopper and wind the ribbon cassette if
the ink ribbon is slack. Ink ribbon
(Set under the top of the printing head.)
Stopper
Ribbon cassette 5 Close the control panel by pressing down on both sides.
● Make sure to close the control panel until it locks.
Ink ribbon
(Do not slack)
Wind the right roller in the direction of
the arrow to remove the slackness.
Click
Right roller (Arrow)
�
Ink ribbon
"A" side
6
Installations and connections
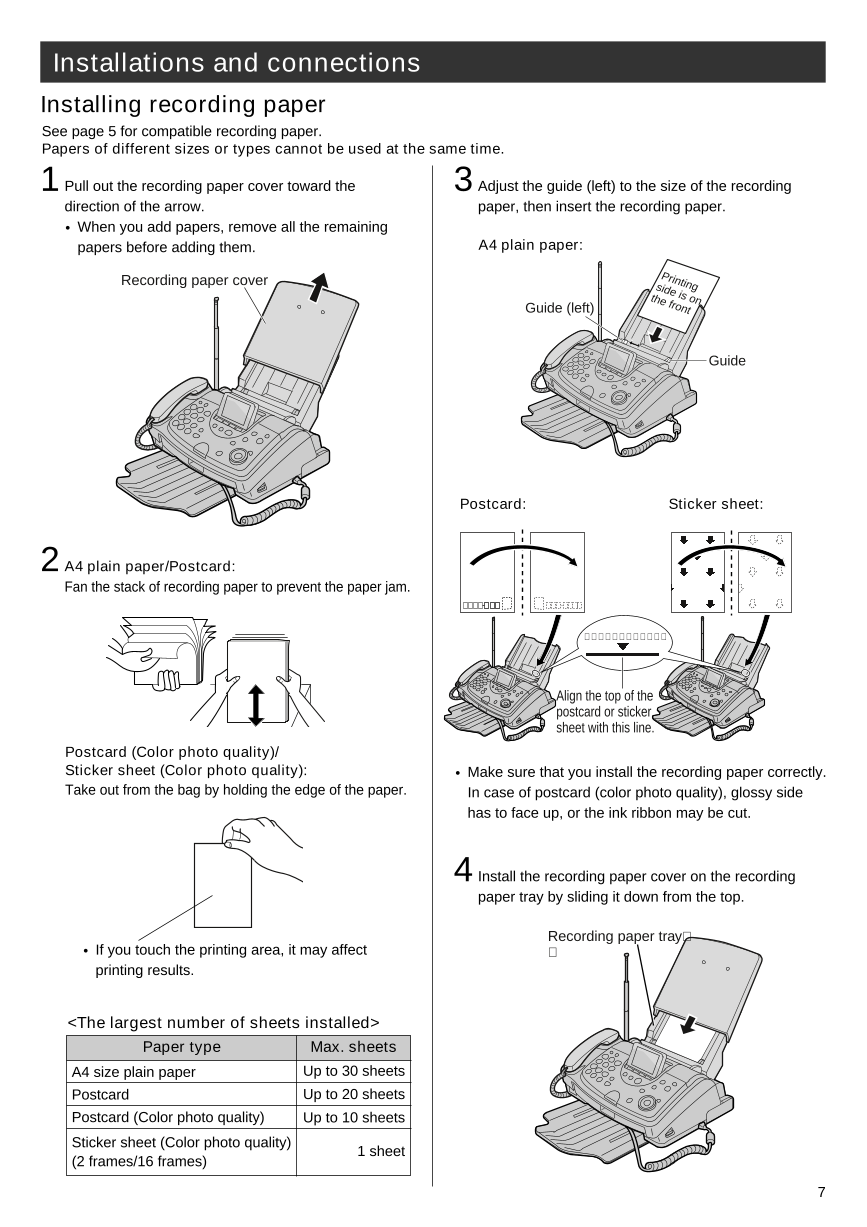
Installing recording paper
See page 5 for compatible recording paper.
Papers of different sizes or types cannot be used at the same time.
1 Pull out the recording paper cover toward the 3 Adjust the guide (left) to the size of the recording
direction of the arrow. paper, then insert the recording paper.
● When you add papers, remove all the remaining
papers before adding them. A4 plain paper:
Recording paper cover Prin
si t
d in
t e g
h
e is on
Guide (left) fron
t
Guide
Postcard: Sticker sheet:
2 A4 plain paper/Postcard:
Fan the stack of recording paper to prevent the paper jam.
はがき・シール紙の上端�
Align the top of the
postcard or sticker
sheet with this line.
Postcard (Color photo quality)/
Sticker sheet (Color photo quality): ● Make sure that you install the recording paper correctly.
Take out from the bag by holding the edge of the paper. In case of postcard (color photo quality), glossy side
has to face up, or the ink ribbon may be cut.
4 Install the recording paper cover on the recording
paper tray by sliding it down from the top.
Recording paper tray�
● If you touch the printing area, it may affect �
printing results.
Paper type Max. sheets
A4 size plain paper Up to 30 sheets
Postcard Up to 20 sheets
Postcard (Color photo quality) Up to 10 sheets
Sticker sheet (Color photo quality)
1 sheet
(2 frames/16 frames)
7
Setting the date and time Setting your facsimile
telephone number
F 3 F 3
機能� ストップ� 画質�機能� ストップ�
1 機能� 機能�
Press (Function). 機能登録 モ ー ト ゙ � 1 Press (Function). 機能登録 モ ー ト ゙ �
[ くるくる]� [ くるくる]�
� �
2 Press . 日付時刻� 2 Press . 電話番号 ?�
Cursor 2000年 01月 01日� Cursor . . . . . . . . . . . . . . . .
00:00
クリア� 登録� クリア� 登録�
3 Enter the correct year/month/day/time. 3 Enter your facsimile telephone number, up to 20
Example: Sep. 20, 2000 15:45 (3:45 PM) digits.
Press . Example: 098 765 43・・
日付時刻� 電話番号 ?�
2000年 09月 20日� 098 765 43 . .
15:45
クリア� 登録� クリア� 登録�
4 画質�
登録� The (Space) button
Press F 3 (Register). 登録 しました� replaces the digit with a space.
4 登録�
Press F 3 (Register). 登録 しました�
日付時刻�
2000年 09月 20日�
15:45
クリア� 登録�
電話番号 ?�
098 765 43 . .
5 ストップ�
Press (Stop). 9月2 0日(水)� クリア� 登録�
ストップ�
操作案内�メモリーカード� 留守電�ファクス一覧� 5 Press (Stop). 9月2 0日(水)�
操作案内�メモリーカード� 留守電�ファクス一覧�
8


 2023年江西萍乡中考道德与法治真题及答案.doc
 2012年重庆南川中考生物真题及答案.doc
 2013年江西师范大学地理学综合及文艺理论基础考研真题.doc
 2020年四川甘孜小升初语文真题及答案I卷.doc
 2020年注册岩土工程师专业基础考试真题及答案.doc
 2023-2024学年福建省厦门市九年级上学期数学月考试题及答案.doc
 2021-2022学年辽宁省沈阳市大东区九年级上学期语文期末试题及答案.doc
 2022-2023学年北京东城区初三第一学期物理期末试卷及答案.doc
 2018上半年江西教师资格初中地理学科知识与教学能力真题及答案.doc
 2012年河北国家公务员申论考试真题及答案-省级.doc
 2020-2021学年江苏省扬州市江都区邵樊片九年级上学期数学第一次质量检测试题及答案.doc
 2022下半年黑龙江教师资格证中学综合素质真题及答案.doc