User Guide A115
WWeellccoommee
You have now become the owner of the A115. This phone offers you the versatility
of Android coupled with the trusted craftsmanship of Micromax. Get ready to
enjoy the joyride
Android 4.1.2
Dual SIM support
3G Support
Pinch Zoom Feature
5 Inch Capacitive Touch screen
HSDPA
HSUPA
1 GHz Dual Core Processor
GPS
Bluetooth 4.0
External memory (expandable up to 32 GB)
Gravity sensor
1
�
User Guide A115
PPhhoonnee LLaayyoouutt
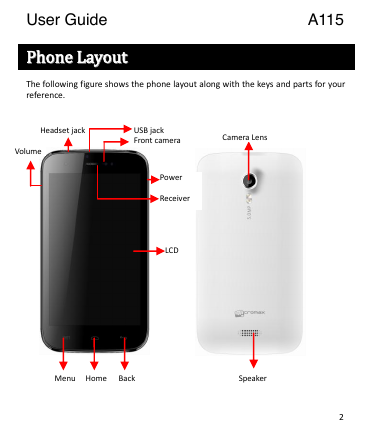
The following figure shows the phone layout along with the keys and parts for your
reference.
USB jack
Front camera
Camera Lens
Power
Receiver
LCD
Headset jack
Volume
Menu Home
Back
Speaker
2
�
User Guide A115
GGeettttiinngg SSttaarrtteedd
Insert SIM Card
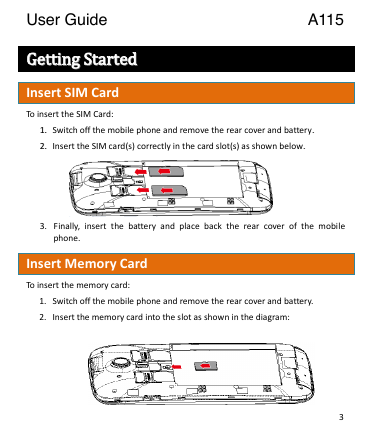
To insert the SIM Card:
11.. Switch off the mobile phone and remove the rear cover and battery..
22.. Insert the SIM card(s) correctly in the card slot(s) as shown below..
3. Finally, insert the battery and place back the rear cover of the mobile
phone.
Insert Memory Card
To insert the memory card:
1. Switch off the mobile phone and remove the rear cover and battery.
2. Insert the memory card into the slot as shown in the diagram:
3
�
User Guide A115
Note: Use only compatible memory cards approved by Micromax with this device.
Incompatible cards may damage the card and the device and corrupt data stored
on the card..
Please charge the battery for at least 4 hours continuously before you use the
newly purchased phone for the first time.
Using the Touch Screen
Please refer to the preceding phone layout for a better understanding:
You can use the touch screen in the following ways:
Action
Touch
Touch and hold
Drag
Swipe or slide
Double-tap
Pinch
Rotate the
screen
Effect
Acts on items on the screen, such as application and settings
icons, to type letters and symbols using the onscreen
keyboard, or to press onscreen buttons
Touch and hold an item on the screen until an action occurs
Touch and hold an item and move your finger on the screen
until you reach the target position
Quickly slide your finger across the surface of the screen,
(without dragging an item). For example, slide the screen up
or down to scroll a list
Tap quickly twice on a webpage, map, or other screen to
zoom. For example, double-tap a section of a webpage in
Browser to zoom that section to fit the width of the screen.
You can also double-tap to control the zoom in Maps, and in
other applications.
In some applications you can zoom in and out by placing two
fingers on the screen at once and pinching them together (to
zoom out) or spreading them apart (to zoom in).
On most screens, the orientation of the screen changes as
you rotate it. You can turn this feature on and off
4
�
User Guide A115
Customize Home Screen
You can add applications, shortcuts, widgets, and other items to any part of the
Home screen or change the wallpaper.
Enter Apps screen, long press and hold an application till the screen vibrates, and
then release your finger hold.
Long press and hold the widget or icon you want to move. Once the device vibrates,
don't release your hold on the icon. Drag the widget or icon to a new location on
the screen.
Manage Notifications
Your notification icons inform you of new messages and events.
When you receive a notification, its icon appears in the status bar, along with a
summary that appears only briefly.
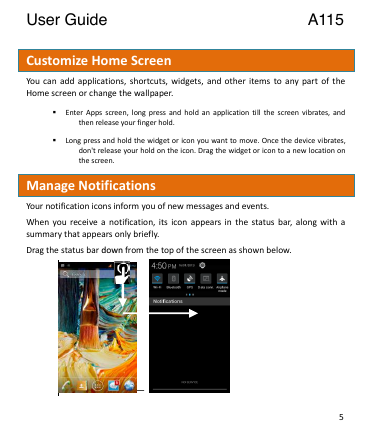
Drag the status bar ddoowwnn from the top of the screen as shown below.
——
5
�
User Guide A115
The Notifications panel displays your network provider name and a list of your
current notifications.
Drag the tab at the bottom of the Notifications panel to the top of the screen.
Or just press the back button. The panel also closes when you touch a
notification to respond to it.
Toolkits
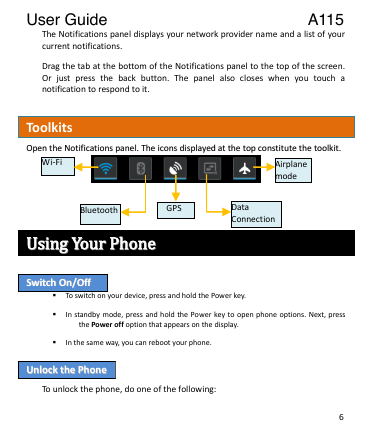
Wi-Fi
Bluetooth
GPS
OOppeenn tthhee NNoottiiffiiccaattiioonnss ppaanneell.. TThhee iiccoonnss ddiissppllaayyeedd aatt tthhee ttoopp ccoonnssttiittuuttee tthhee ttoooollkkiitt..
UUssiinngg YYoouurr PPhhoonnee
Data
Connection
Airplane
mode
SSwwiittcchh OOnn//OOffff
To switch on your device, press and hold the Power key.
In standby mode, press and hold the Power key to open phone options. Next, press
the Power off option that appears on the display.
In the same way, you can reboot your phone.
UUnnlloocckk tthhee PPhhoonnee
To unlock the phone, do one of the following:
6
�
User Guide A115
Press and hold the Power key. The LCD shows up a with a lock icon.
Slide the lock to with your finger towards the unlock icon to unlock the phone.
If the phone lock has been activated, you need to enter the unlock code.
MMaakkee aa CCaallll
Touch the
icon to enter your desired number and press the
icon on the dialer
pad that displays.
OR
Touch the
icon and press the Contacts icon to access the desired number and
then press
to make the call.
AAnnsswweerr//RReejjeecctt aa CCaallll
To answer a call, slide the phone icon to the right.
To reject a call, slide the phone icon to the left.
MMaakkee aann IInntteerrnnaattiioonnaall CCaallll
1.
In dialing mode, press and hold the 0 key, until the + sign appears on the
screen.
2. Enter the desired international code and then the complete phone
number and make the call.
IInn CCaallll OOppttiioonnss
Touch the Mute icon to mute your voice so that the phone’s MIC will not transmit
voice to the other end. You can resume transmitting your voice by pressing the
Mute icon again.
7
�
User Guide A115
Use the Dial pad for DTMF inputs.
Touch Menu key and select Start Recordings to start call recording.
Touch the Speaker icon to listen via the speaker.
End the call by pressing the End
icon.
CChhaannggee SSccrreeeenn DDiissppllaayy OOrriieennttaattiioonn
You can change the orientation of your screen by rotating the phone in
landscape or portrait view.
LLiisstteenn ttoo MMuussiicc
Menu > Music
You will be presented with the list of available songs to play. You can listen to
music by tapping the required icons.
SSeenndd MMeessssaaggeess
Menu > Messaging
You can compose a new message or reply to existing messages in the list.
AAdddd CCoonnttaaccttss ttoo PPhhoonneebbooookk
Menu > Dialpad
Dial a number and click on
icon.
You can either create a new contact or can add the number to existing contacts.
8
�


 2023年江西萍乡中考道德与法治真题及答案.doc
 2012年重庆南川中考生物真题及答案.doc
 2013年江西师范大学地理学综合及文艺理论基础考研真题.doc
 2020年四川甘孜小升初语文真题及答案I卷.doc
 2020年注册岩土工程师专业基础考试真题及答案.doc
 2023-2024学年福建省厦门市九年级上学期数学月考试题及答案.doc
 2021-2022学年辽宁省沈阳市大东区九年级上学期语文期末试题及答案.doc
 2022-2023学年北京东城区初三第一学期物理期末试卷及答案.doc
 2018上半年江西教师资格初中地理学科知识与教学能力真题及答案.doc
 2012年河北国家公务员申论考试真题及答案-省级.doc
 2020-2021学年江苏省扬州市江都区邵樊片九年级上学期数学第一次质量检测试题及答案.doc
 2022下半年黑龙江教师资格证中学综合素质真题及答案.doc