Facsimile with Cordless Phone
KX-PW11CLH
KX-PW11CLK
Model No. KX-PW21CL
Quick Reference Guide
The digital speaker phone (main unit)
allows hands free conversations.
Automatic dialing (Up to 99 phone
numbers can be stored with names.)
Digital answering machine with
flash memory
Auto cutter
Hand scanner (for KX-PW21CL only)
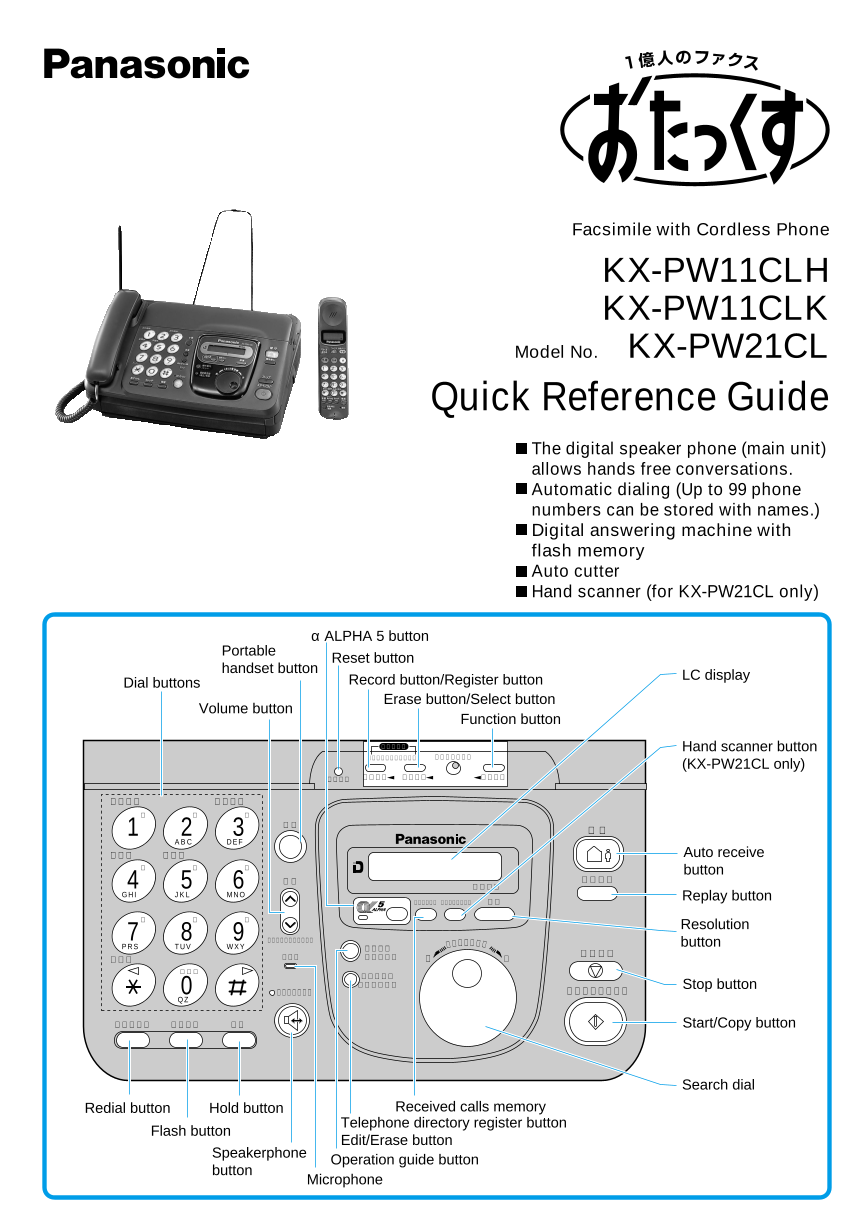
α ALPHA 5 button
Portable Reset button
handset button
Dial buttons Record button/Register button LC display
Erase button/Select button
Volume button
Function button
留守電操作 Hand scanner button
録音(応答/通話)-消去 くるくる電話帳
(KX-PW21CL only)
リセット [登録] [選択] [機能]
前の用件 次の用件
ア カ サ
1 2 3 子機 留守
A B C D E F
遅聞き 早聞き Auto receive
タ ナ ハ
4 5 6 button
音量 聞き直し
用件件数
G H I J K L M N O
画質 Replay button
着信メモリー ハンドスキャナー
マ ヤ ラ
7 8 9 Resolution
呼出/スピーカー/受話
P R S T U V W X Y くる電話
操作案内 くる 帳 button
トーン マイク /ミュート 前 次 ストップ
ワヲン
0 電話帳登録
/修正/削除
スタート/コピー Stop button
スピーカーホン
Q Z
再ダイヤル キャッチ 保留 Start/Copy button
Search dial
Redial button Hold button Received calls memory
Flash button Telephone directory register button
Edit/Erase button
Speakerphone Operation guide button
button
Microphone
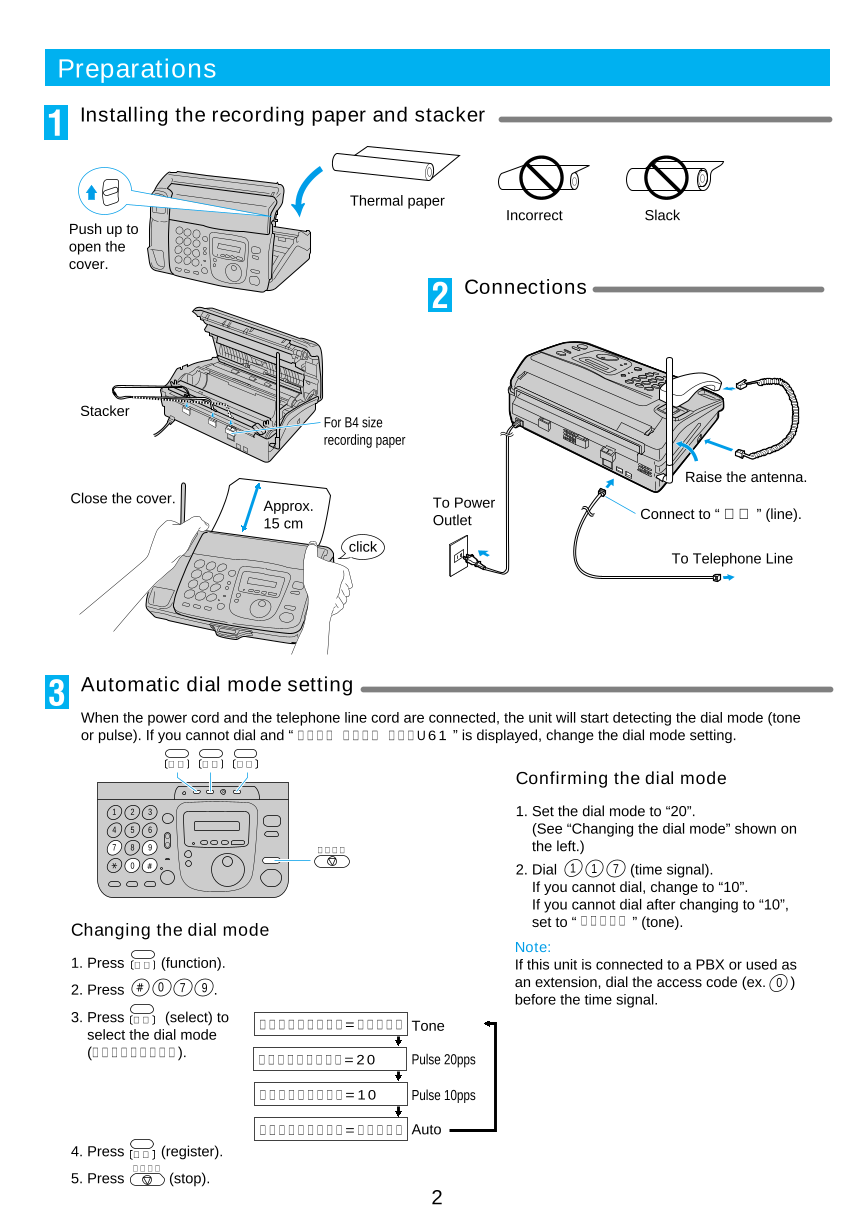
Preparations
1 Installing the recording paper and stacker
Thermal paper
Incorrect Slack
Push up to
open the
cover.
2 Connections
Stacker
For B4 size
recording paper
Raise the antenna.
Close the cover. Approx. To Power
Outlet Connect to “ 回線 ” (line).
15 cm
click
To Telephone Line
3 Automatic dial mode setting
When the power cord and the telephone line cord are connected, the unit will start detecting the dial mode (tone
or pulse). If you cannot dial and “ カ イ セ ン チ ェ ッ ク エ ラ ー U61 ” is displayed, change the dial mode setting.
登録 選択 機能
Confirming the dial mode
1 2 3 1. Set the dial mode to “20”.
4 5 6 (See “Changing the dial mode” shown on
7 8 9 ストップ the left.)
0 2. Dial 1 1 7 (time signal).
If you cannot dial, change to “10”.
If you cannot dial after changing to “10”,
Changing the dial mode set to “ フ ゚ ッ シ ュ ” (tone).
Note:
1. Press 機 能 (function). If this unit is connected to a PBX or used as
2. Press 0 7 9 . an extension, dial the access code (ex. 0 )
before the time signal.
3. Press 選 択 (select) to カ イ セ ン シ ュ ヘ ゙ ツ = フ ゚ ッ シ ュ Tone
select the dial mode
(カ イ セ ン シ ュ ヘ ゙ ツ ). カ イ セ ン シ ュ ヘ ゙ ツ = 20 Pulse 20pps
カ イ セ ン シ ュ ヘ ゙ ツ = 10 Pulse 10pps
カ イ セ ン シ ュ ヘ ゙ ツ = シ ゙ ト ゙ ウ Auto
4. Press 登 録 (register).
ストップ
5. Press (stop).
2
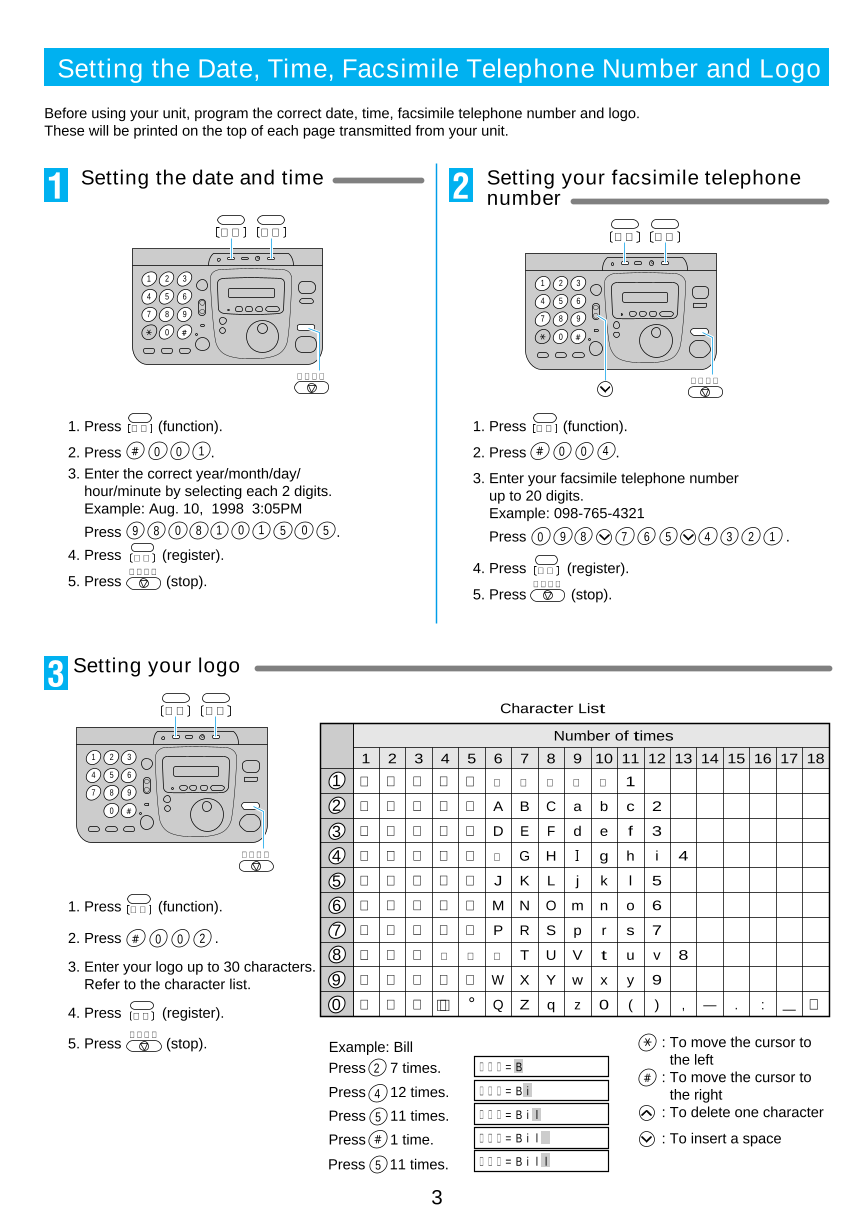
Setting the Date, Time, Facsimile Telephone Number and Logo
Before using your unit, program the correct date, time, facsimile telephone number and logo.
These will be printed on the top of each page transmitted from your unit.
1 Setting the date and time 2 Setting your facsimile telephone
number
登録 機能 登録 機能
1 2 3 1 2 3
4 5 6 4 5 6
7 8 9 7 8 9
0 0
ストップ ストップ
1. Press 機 能 (function). 1. Press 機 能 (function).
2. Press 0 0 1 . 2. Press 0 0 4 .
3. Enter the correct year/month/day/ 3. Enter your facsimile telephone number
hour/minute by selecting each 2 digits. up to 20 digits.
Example: Aug. 10, 1998 3:05PM Example: 098-765-4321
Press 9 8 0 8 1 0 1 5 0 5 . Press 0 9 8 7 6 5 4 3 2 1 .
4. Press 登 録 (register).
ストップ 4. Press 登 録 (register).
5. Press (stop). ストップ
5. Press (stop).
3 Setting your logo
登録 機能 Character List
Number of times
1 2 3 1 2 3 4 5 6 7 8 9 10 11 12 13 14 15 16 17 18
4 5 6 1 ア イ ウ エ オ ア イ ウ エ オ 1
7 8 9
0 2 カ キ ク ケ コ A B C a b c 2
3 サ シ ス セ ソ D E F d e f 3
ストップ 4 タ チ ツ テ ト ツ G H I g h i 4
5 ナ ニ ヌ ネ ノ J K L j k l 5
1. Press 機 能 (function). 6 ハ ヒ フ ヘ ホ M N O m n o 6
2. Press . 7 マ ミ ム メ モ P R S p r s 7
0 0 2
8 ヤ ユ ヨ ヤ ユ ヨ T U V t u v 8
3. Enter your logo up to 30 characters.
Refer to the character list. 9 ラ リ ル レ ロ W X Y w x y 9
4. Press 登 (register). 0 ワ ヲ ン ` ° Q Z q z 0 ( ) , — . : — ・
録
ストップ
5. Press (stop). Example: Bill : To move the cursor to
Press 7 times. ナ マ エ = B the left
2
: To move the cursor to
Press 4 12 times. ナ マ エ = B i the right
Press 5 11 times. ナ マ エ = B i l : To delete one character
Press 1 time. ナ マ エ = B i l : To insert a space
Press 5 11 times. ナ マ エ = B i l l
3
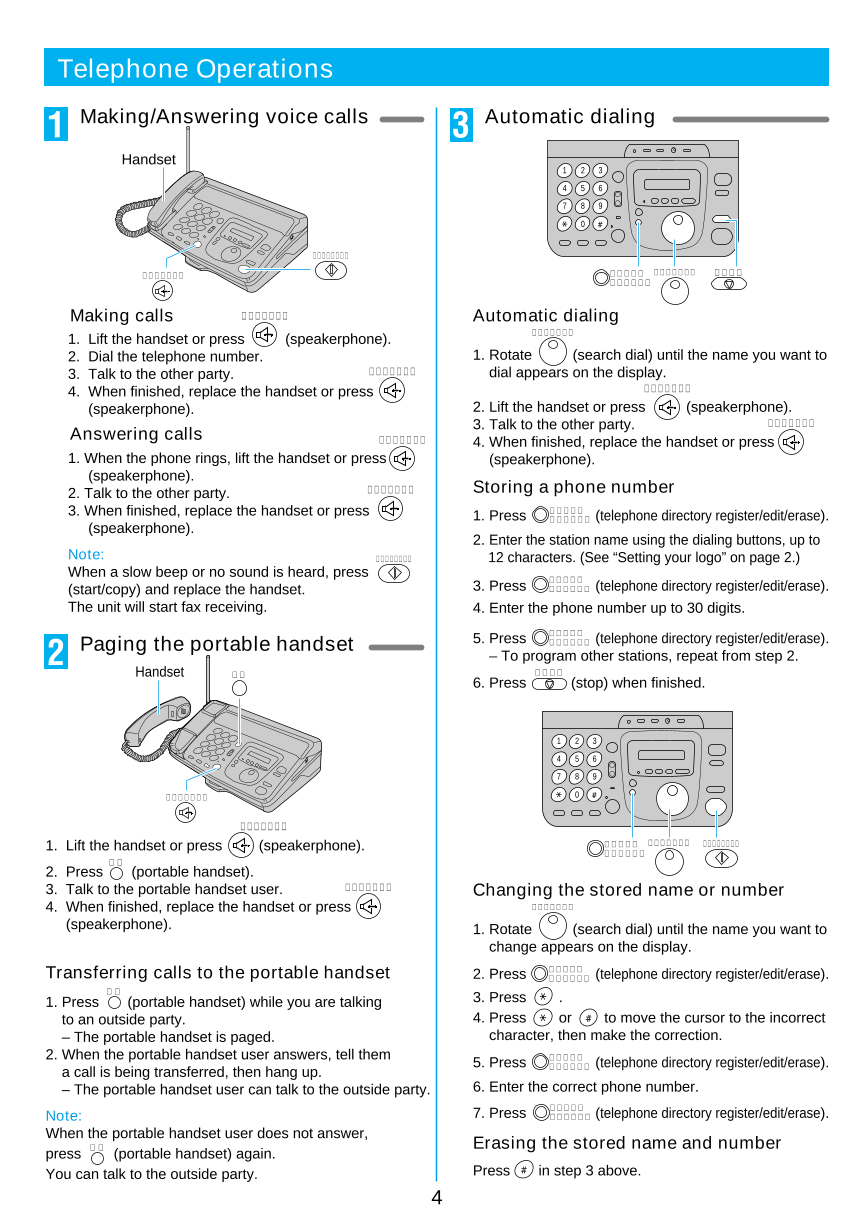
Telephone Operations
1 Making/Answering voice calls 3 Automatic dialing
Handset
1 2 3
4 5 6
7 8 9
0
スタート/コピー
スピーカーホン 電話帳登録 くるくる電話帳 ストップ
/修正/削除
Making calls スピーカーホン Automatic dialing
1. Lift the handset or press (speakerphone). くるくる電話帳
2. Dial the telephone number. 1. Rotate (search dial) until the name you want to
3. Talk to the other party. スピーカーホン dial appears on the display.
4. When finished, replace the handset or press スピーカーホン
(speakerphone). 2. Lift the handset or press (speakerphone).
3. Talk to the other party. スピーカーホン
Answering calls スピーカーホン 4. When finished, replace the handset or press
1. When the phone rings, lift the handset or press (speakerphone).
(speakerphone).
2. Talk to the other party. スピーカーホン Storing a phone number
3. When finished, replace the handset or press 1. Press 電話帳登録 / 修 正 / 削 除 (telephone directory register/edit/erase).
(speakerphone).
2. Enter the station name using the dialing buttons, up to
Note: スタート/コピー 12 characters. (See “Setting your logo” on page 2.)
When a slow beep or no sound is heard, press
電話帳登録
(start/copy) and replace the handset. 3. Press / 修 正 / 削 除 (telephone directory register/edit/erase).
The unit will start fax receiving. 4. Enter the phone number up to 30 digits.
電話帳登録
2 Paging the portable handset 5. Press / 修 正 / 削 除 (telephone directory register/edit/erase).
– To program other stations, repeat from step 2.
Handset 子機 ストップ
6. Press (stop) when finished.
1 2 3
4 5 6
7 8 9
スピーカーホン 0
スピーカーホン
1. Lift the handset or press (speakerphone). 電話帳登録 くるくる電話帳 スタート/コピー
/修正/削除
子機
2. Press (portable handset).
3. Talk to the portable handset user. スピーカーホン Changing the stored name or number
4. When finished, replace the handset or press くるくる電話帳
(speakerphone). 1. Rotate (search dial) until the name you want to
change appears on the display.
Transferring calls to the portable handset 2. Press 電 話 帳 登録/修正/ 削
除 (telephone directory register/edit/erase).
子機
1. Press (portable handset) while you are talking 3. Press .
to an outside party. 4. Press or to move the cursor to the incorrect
– The portable handset is paged. character, then make the correction.
2. When the portable handset user answers, tell them 5. Press 電 話 帳 登 録/修正/削
除 (telephone directory register/edit/erase).
a call is being transferred, then hang up.
– The portable handset user can talk to the outside party. 6. Enter the correct phone number.
Note: 7. Press 電話/ 修
帳 登 録正/削
除 (telephone directory register/edit/erase).
When the portable handset user does not answer,
Erasing the stored name and number
press 子 機 (portable handset) again.
You can talk to the outside party. Press in step 3 above.
4
Facsimile Operations
1 Transmitting documents 2 Receiving documents
Document Tray
Handset Handset
Adju
g s
u t
i t
d h
e e
s.
スピーカーホン
くるくる電話帳 スピーカーホン
スタート/コピー 画質
スタート/コピー
Transmitting documents manually Receiving documents manually
スピーカーホン
1. Open the document tray and adjust the guides. 1. When the unit rings, lift the handset or press
(speakerphone) to answer the call.
2. Insert the document FACE DOWN until a beep is
heard. (up to 5 sheets at a time) 2. When:
画質
3. Press (resolution) to select the resolution. – document reception is required,
スピーカーホン – a slow beep is heard, or
4. Lift the handset or press (speakerphone). – no sound is heard,
スタート/コピー
5. Dial the phone number. press (start/copy).
スタート/コピー
6. When a fax tone is heard, press (start/copy).
3. Replace the handset if using it.
7. Replace the handset. – The unit will start fax receiving.
– The unit will start fax transmission.
Selecting the resolution
画質
Press (resolution).
カ ゙ シ ツ = フ ツ ウ STANDARD
カ ゙ シ ツ = チ イ サ イ FINE
カ ゙ シ ツ = シ ャ シ ン HALF TONE
Transmitting documents using automatic
dialing
1. Open the document tray and adjust the guides.
2. Insert the document FACE DOWN until a beep is
heard. (up to 5 sheets at a time)
画質
3. Press (resolution) to select the resolution.
4. Dial the phone number using the dial keys or
くるくる電話帳
select the name using (search dial).
スタート/コピー
5. Press (start/copy).
– The unit will start fax transmission.
5
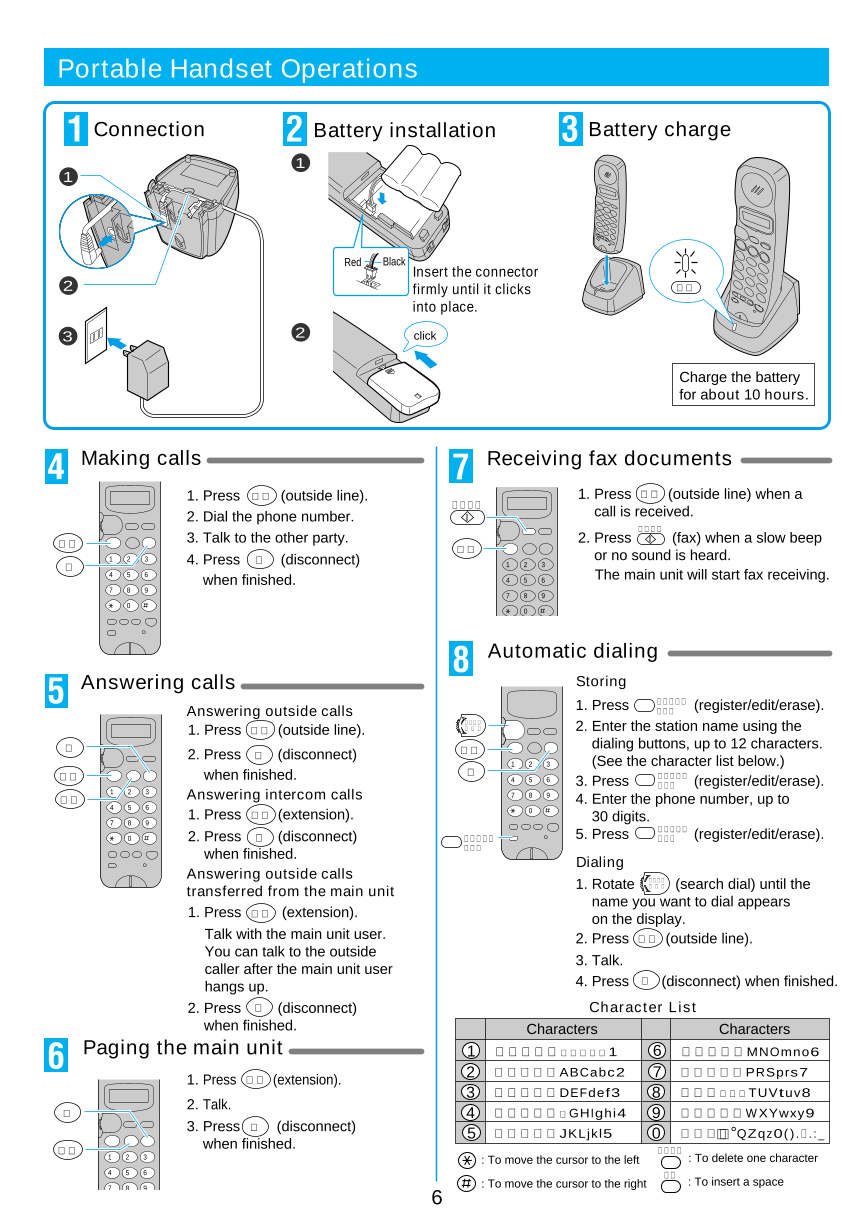
Portable Handset Operations
1. Connection 2. Battery installation 3. Battery charge
1
1
Red Black
Insert the connector
2 firmly until it clicks 充電
into place.
3 2 click
Charge the battery
for about 10 hours.
4 Making calls 7 Receiving fax documents
1. Press 外 線 (outside line). 1. Press 外 線 (outside line) when a
ファクス
2. Dial the phone number. call is received.
ファクス
外線 3. Talk to the other party. 2. Press (fax) when a slow beep
外線
1 2 3 4. Press 切 (disconnect) or no sound is heard.
切 1 2 3
4 5 6 when finished. 4 5 6 The main unit will start fax receiving.
7 8 9
7 8 9
0
0
8 Automatic dialing
5 Answering calls Storing
Answering outside calls 1. Press 登録/修正 / 削 除 (register/edit/erase).
くるくる
1. Press 外 線 (outside line). 電 話 帳 2. Enter the station name using the
切 外線 dialing buttons, up to 12 characters.
2. Press 切 (disconnect)
1 2 3 (See the character list below.)
外線 when finished. 切
4 5 6 3. Press 登録/ 削
/修
除
正 (register/edit/erase).
1 2 3
内線 Answering intercom calls 7 8 9 4. Enter the phone number, up to
4 5 6
1. Press 内 線 (extension). 0
7 8 9 30 digits.
登録/修正
0 2. Press 切 (disconnect) 登録/修正 5. Press / 削 除 (register/edit/erase).
when finished. /削除
Dialing
Answering outside calls
transferred from the main unit 1. Rotate く る く る 電 話 帳 (search dial) until the
name you want to dial appears
1. Press 内 線 (extension). on the display.
Talk with the main unit user. 2. Press 外 線 (outside line).
You can talk to the outside
3. Talk.
caller after the main unit user
hangs up. 4. Press 切 (disconnect) when finished.
2. Press 切 (disconnect) Character List
when finished. Characters Characters
6 Paging the main unit 1 アイウエオアイウエオ1 6 ハヒフヘホMNOmno6
1. Press 内 線 (extension). 2 カキクケコABCabc2 7 マミムメモPRSprs7
3 サシスセソDEFdef3 8 ヤユヨヤユヨTUVtuv8
2. Talk.
切 4 タチツテトツGHIghi4 9 ラリルレロWXYwxy9
3. Press 切 (disconnect) 5 ナニヌネノJKLjkl5 0 ワヲン` °QZqz0( ) . ー . : _
内線 when finished. キャッチ
1 2 3 : To move the cursor to the left : To delete one character
4 5 6 音量
7 8 9 : To move the cursor to the right : To insert a space
6
0
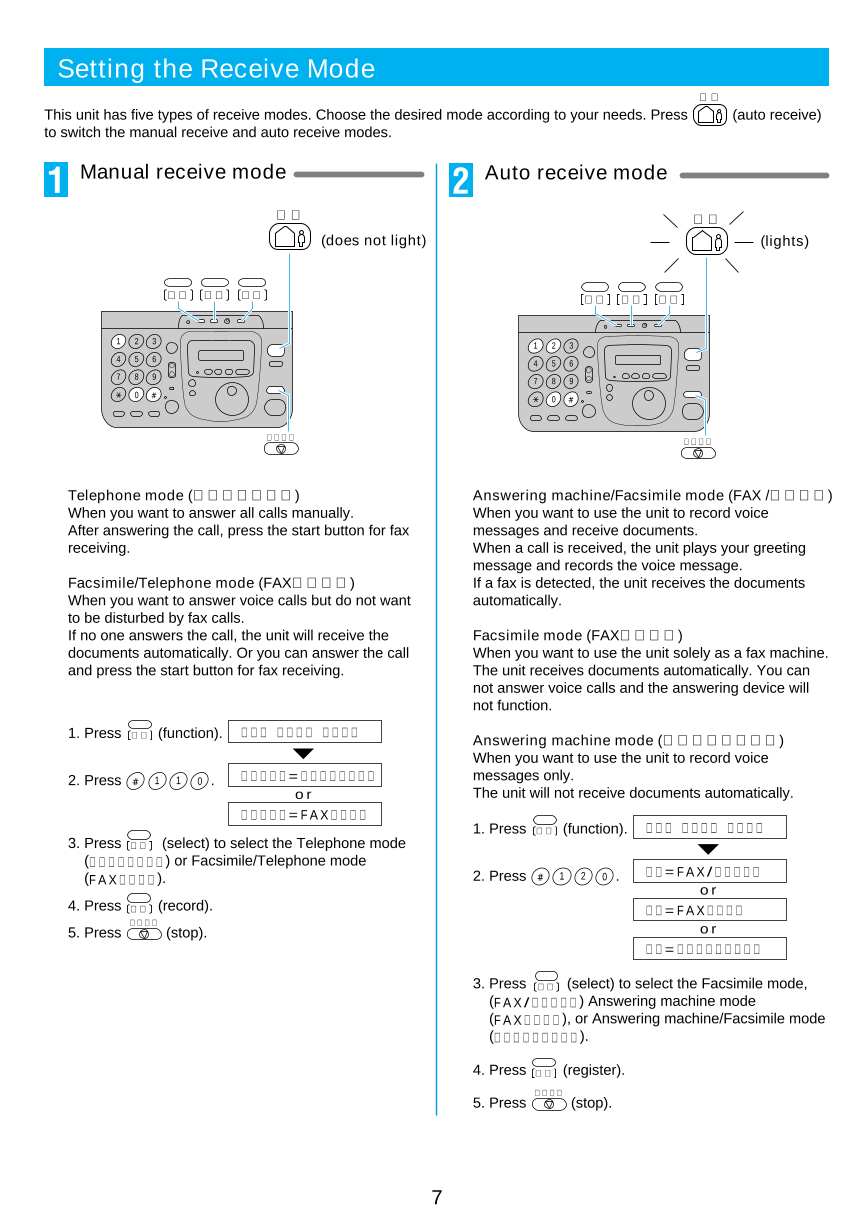
Setting the Receive Mode
留守
This unit has five types of receive modes. Choose the desired mode according to your needs. Press (auto receive)
to switch the manual receive and auto receive modes.
1 Manual receive mode 2 Auto receive mode
留守 留守
(does not light) (lights)
登録 選択 機能 登録 選択 機能
1 2 3 1 2 3
4 5 6 4 5 6
7 8 9 7 8 9
0 0
ストップ ストップ
Telephone mode (デンワユウセン) Answering machine/Facsimile mode (FAX /ルスデン)
When you want to answer all calls manually. When you want to use the unit to record voice
After answering the call, press the start button for fax messages and receive documents.
receiving. When a call is received, the unit plays your greeting
message and records the voice message.
Facsimile/Telephone mode (FAXユウセン) If a fax is detected, the unit receives the documents
When you want to answer voice calls but do not want automatically.
to be disturbed by fax calls.
If no one answers the call, the unit will receive the Facsimile mode (FAXセンヨウ)
documents automatically. Or you can answer the call When you want to use the unit solely as a fax machine.
and press the start button for fax receiving. The unit receives documents automatically. You can
not answer voice calls and the answering device will
not function.
1. Press 機 能 (function). キ ノ ウ ト ウ ロ ク モ ー ト ゙ Answering machine mode (ルスデンセンヨウ)
When you want to use the unit to record voice
2. Press 1 1 0 . サ ゙ イ タ ク = テ ゙ ン ワ ユ ウ セ ン messages only.
o r The unit will not receive documents automatically.
サ ゙ イ タ ク = FAXユ ウ セ ン
1. Press 機 能 (function). キ ノ ウ ト ウ ロ ク モ ー ト ゙
3. Press 選 択 (select) to select the Telephone mode
(テ ゙ ン ワ ユ ウ セ ン ) or Facsimile/Telephone mode
(FAXユ ウ セ ン ). 2. Press 1 2 0 . ル ス = FAX / ル ス テ ゙ ン
o r
4. Press 登 録 (record). ル ス = FAXセ ン ヨ ウ
ストップ
5. Press (stop). o r
ル ス = ル ス テ ゙ ン セ ン ヨ ウ
3. Press 選 択 (select) to select the Facsimile mode,
(FAX / ル ス テ ゙ ン ) Answering machine mode
(FAXセ ン ヨ ウ ), or Answering machine/Facsimile mode
(ル ス テ ゙ ン セ ン ヨ ウ ).
4. Press 登 録 (register).
ストップ
5. Press (stop).
7
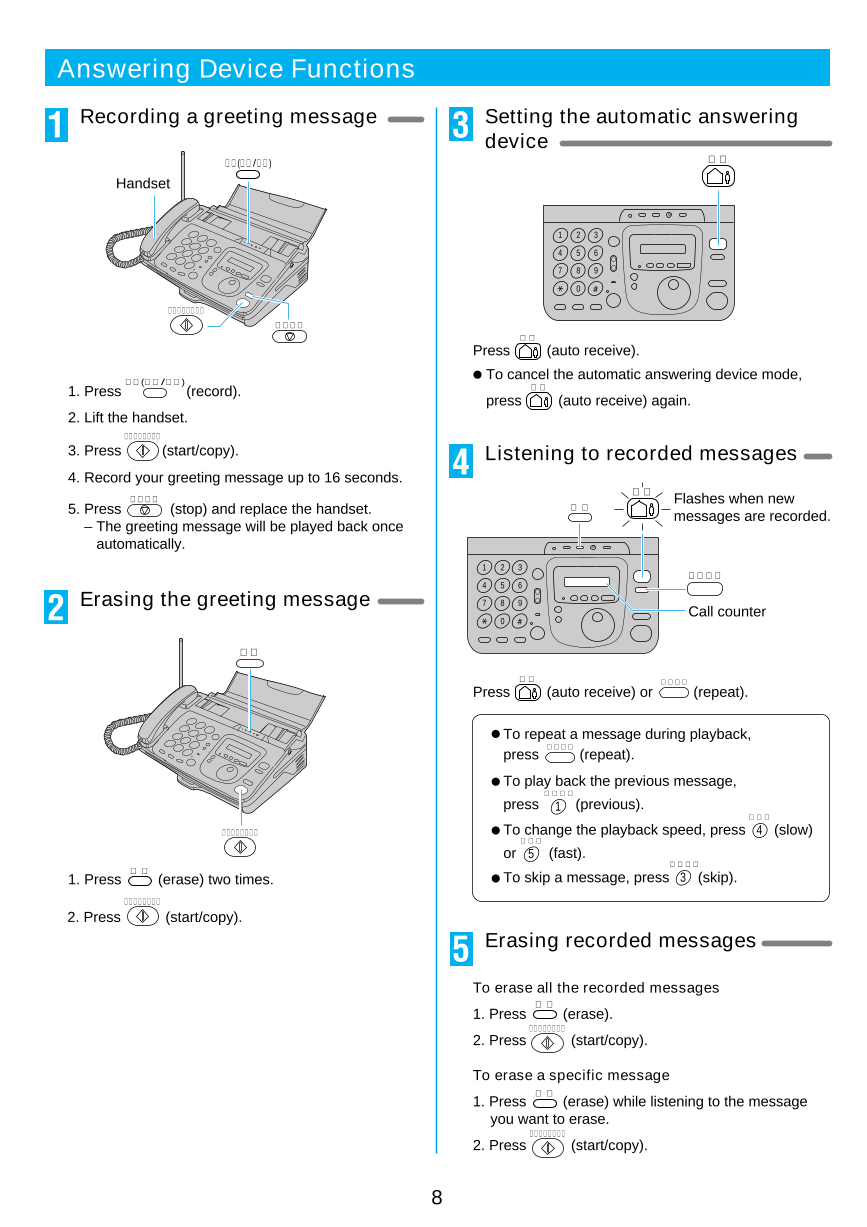
Answering Device Functions
1 Recording a greeting message 3 Setting the automatic answering
device
録音(応答/通話) 留守
Handset
1 2 3
4 5 6
7 8 9
0
スタート/コピー
ストップ
留守
Press (auto receive).
To cancel the automatic answering device mode,
録音(応答/通話)
1. Press (record). 留守
press (auto receive) again.
2. Lift the handset.
スタート/コピー
3. Press (start/copy). Listening to recorded messages
4. Record your greeting message up to 16 seconds. 4
留守
ストップ Flashes when new
5. Press (stop) and replace the handset. 消去
messages are recorded.
– The greeting message will be played back once
automatically.
1 2 3
聞き直し
4 5 6
2 Erasing the greeting message 7 8 9
Call counter
0
消去
留守 聞き直し
Press (auto receive) or (repeat).
To repeat a message during playback,
聞き直し
press (repeat).
To play back the previous message,
前の用件
press 1 (previous).
遅聞き
スタート/コピー To change the playback speed, press 4 (slow)
早聞き
or 5 (fast).
次の用件
消 去
1. Press (erase) two times. To skip a message, press 3 (skip).
スタート/コピー
2. Press (start/copy).
5 Erasing recorded messages
To erase all the recorded messages
消去
1. Press (erase).
スタート/コピー
2. Press (start/copy).
To erase a specific message
消去
1. Press (erase) while listening to the message
you want to erase.
スタート/コピー
2. Press (start/copy).
8



 2023年江西萍乡中考道德与法治真题及答案.doc
 2012年重庆南川中考生物真题及答案.doc
 2013年江西师范大学地理学综合及文艺理论基础考研真题.doc
 2020年四川甘孜小升初语文真题及答案I卷.doc
 2020年注册岩土工程师专业基础考试真题及答案.doc
 2023-2024学年福建省厦门市九年级上学期数学月考试题及答案.doc
 2021-2022学年辽宁省沈阳市大东区九年级上学期语文期末试题及答案.doc
 2022-2023学年北京东城区初三第一学期物理期末试卷及答案.doc
 2018上半年江西教师资格初中地理学科知识与教学能力真题及答案.doc
 2012年河北国家公务员申论考试真题及答案-省级.doc
 2020-2021学年江苏省扬州市江都区邵樊片九年级上学期数学第一次质量检测试题及答案.doc
 2022下半年黑龙江教师资格证中学综合素质真题及答案.doc