1億人のファクス
Facsimile with Cordless Phone
KX-PW12CL/KX-PW12CLW
KX-PW22CLH/KX-PW22CLK
KX-PW32CL
KX-PW42CL
Model No. KX-PW52CLH
Quick Reference Guide
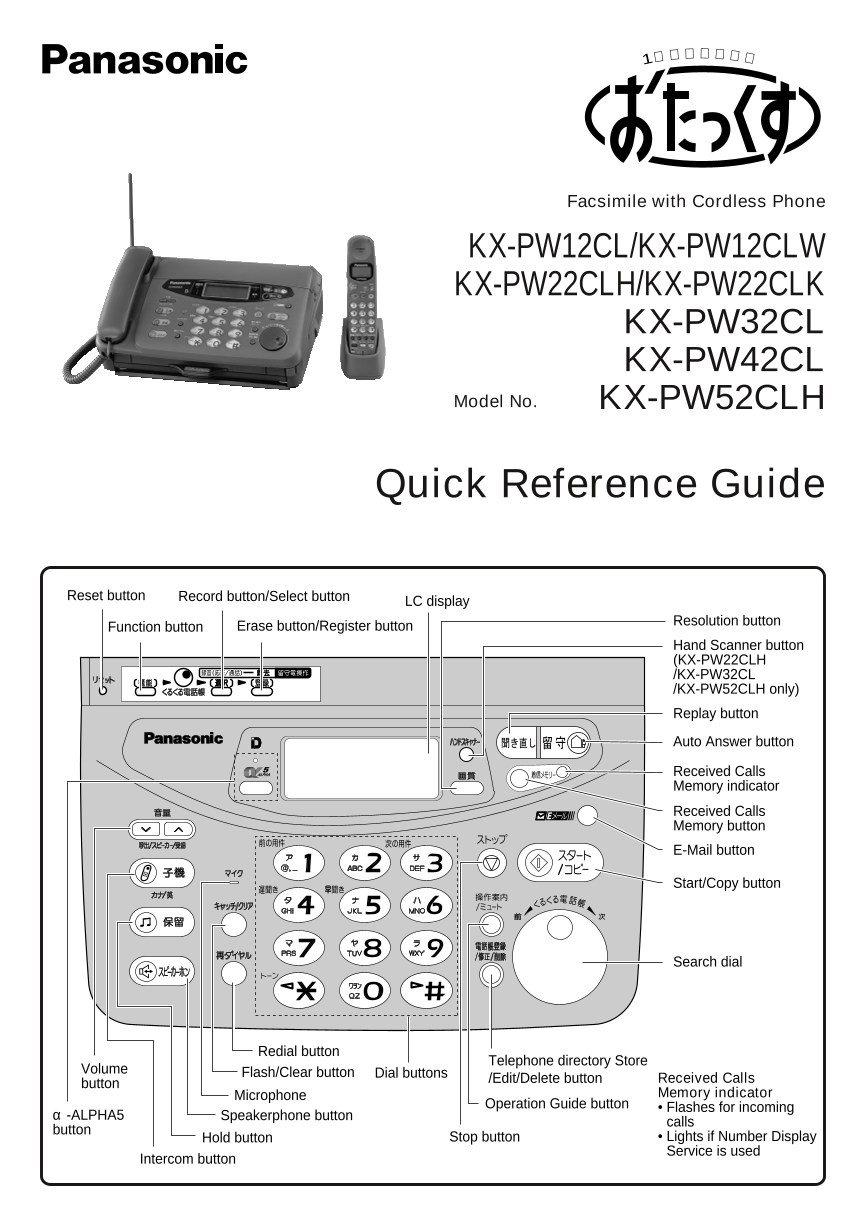
Reset button Record button/Select button LC display
Function button Erase button/Register button Resolution button
Hand Scanner button
(KX-PW22CLH
/KX-PW32CL
/KX-PW52CLH only)
Replay button
Auto Answer button
Received Calls
Memory indicator
Received Calls
Memory button
E-Mail button
Start/Copy button
Search dial
Redial button
Volume Telephone directory Store
Flash/Clear button Dial buttons
button /Edit/Delete button Received Calls
Microphone Memory indicator
Operation Guide button
α-ALPHA5 Speakerphone button • Flashes for incoming
button calls
Hold button Stop button • Lights if Number Display
Intercom button Service is used
Names and Functions
HANDSET
In use/charge indicator
When receiving a call flashes red
When recharging� lights red
When recharging is
complete lights green
LC Display
(can be seen in the dark)
Displays battery strength, telephone
numbers etc. (ex)
プライベート呼出音切カナ英�
プライベート� Displayed when receiving
Earpiece (Private)� private message or fax
呼出音切� Displayed when ringer
(Ringer off)�volume is set to OFF
カナ英� Displayed when entering
(Kana/English) characters for the telephone
● Search Dial, for telephone numbers directory
stored in memory. Displays battery strength
● For referring to telephone numbers
when using Number Display
Service. ● To put a call on hold
くるくる� ● To start the search for telephone numbers
電 話 帳 � when using Number Display Service
カナ/英�
To make/answer calls
● To end a call
● To end storing and other operations
● To page the main unit
Dial buttons (do not light) ● To change the enter mode when using
the search dial to enter names
To change from pulse to tone dialing
● To store names and telephone numbers
in the search dial
● To edit/delete names and telephone
To adjust the volume numbers in the search dial
● To set quick call
● To redial the last number dialed
To insert a pause ●
● For Call Waiting Service users
● To clear letters/numbers
● To make the handset ring first
● To operate the answering device To use the speakerphone
● To use the private message and fax
feature To receive faxes
Mouthpiece
(Do not cover with hand while speaking)
Used when installing additional
handsets
2
Preparations
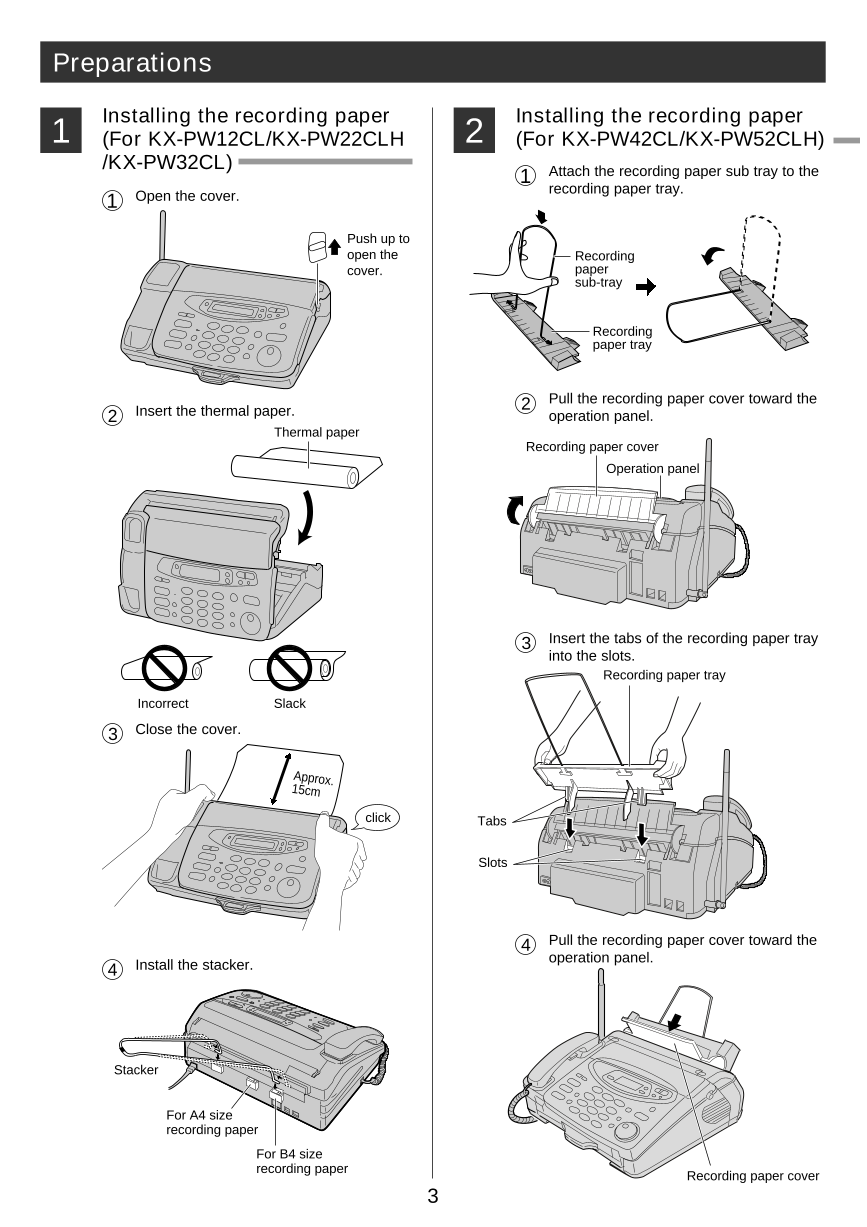
1 Installing the recording paper Installing the recording paper
(For KX-PW12CL/KX-PW22CLH 2 (For KX-PW42CL/KX-PW52CLH)
/KX-PW32CL)
1 Attach the recording paper sub tray to the
Open the cover. recording paper tray.
1
Push up to
open the Recording
cover. paper
sub-tray
Recording
paper tray
2 Pull the recording paper cover toward the
2 Insert the thermal paper. operation panel.
Thermal paper
Recording paper cover
Operation panel
3 Insert the tabs of the recording paper tray
into the slots.
Recording paper tray
Incorrect Slack
3 Close the cover.
Approx.
15cm
click Tabs
Slots
4 Pull the recording paper cover toward the
Install the stacker. operation panel.
4
Stacker
For A4 size
recording paper
For B4 size
recording paper Recording paper cover
3
Preparations
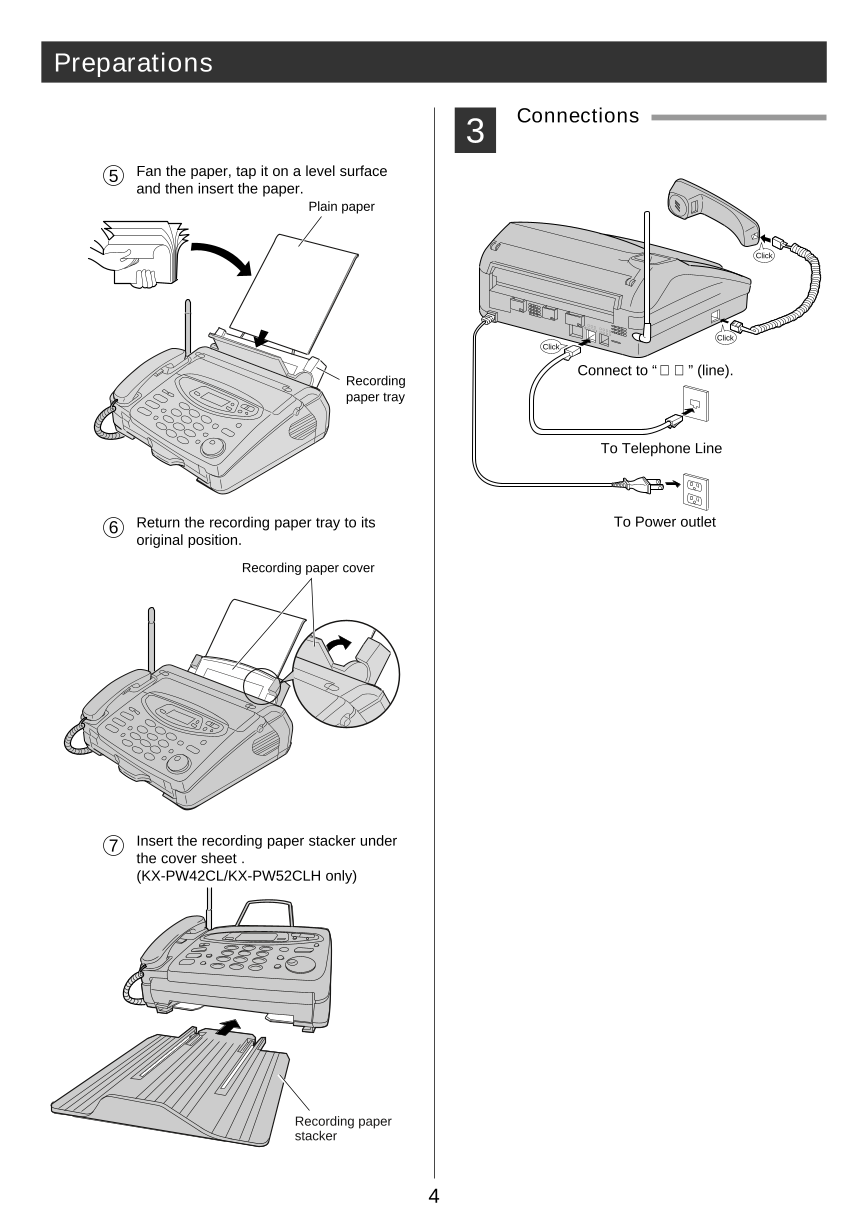
3 Connections
5 Fan the paper, tap it on a level surface
and then insert the paper.
Plain paper
Click
回
( 線
電話 �
回線 停
) 電
電 用
話 �
機�
Click
Click
Connect to “回線” (line).
Recording
paper tray
To Telephone Line
6 Return the recording paper tray to its To Power outlet
original position.
Recording paper cover
7 Insert the recording paper stacker under
the cover sheet .
(KX-PW42CL/KX-PW52CLH only)
Recording paper
stacker
4
Telephone Operations
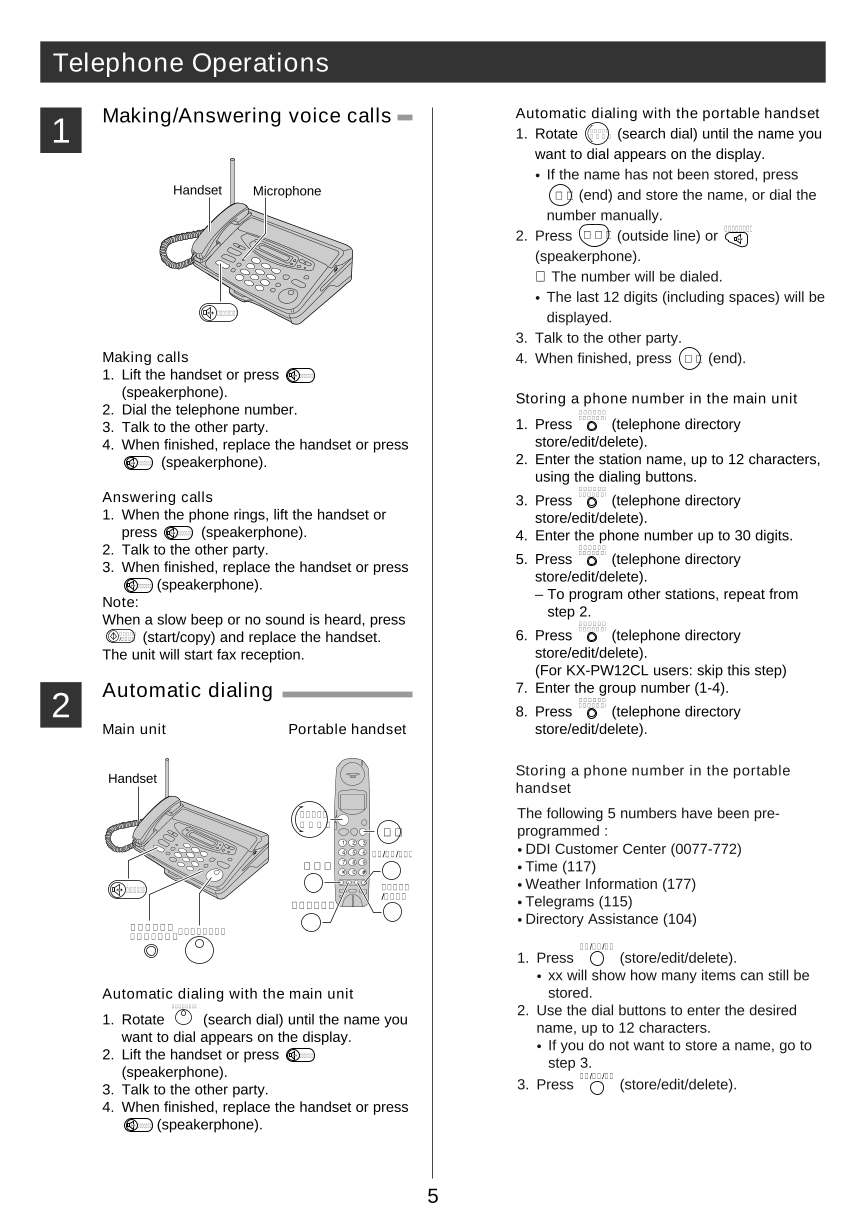
Making/Answering voice calls Automatic dialing with the portable handset
1 1. Rotate くるくる�
電 話 帳 � (search dial) until the name you
want to dial appears on the display.
● If the name has not been stored, press
Handset Microphone 切�(end) and store the name, or dial the
number manually.
スピーカーホン�
� 2. Press 外線�(outside line) or
(speakerphone).
➡ The number will be dialed.
● The last 12 digits (including spaces) will be
スピーカーホン� displayed.
3. Talk to the other party.
Making calls 4. When finished, press 切� (end).
1. Lift the handset or press スピーカーホン�
(speakerphone). Storing a phone number in the main unit
2. Dial the telephone number. 電話帳登録�
/修正/削除�
3. Talk to the other party. 1. Press (telephone directory
4. When finished, replace the handset or press store/edit/delete).
スピーカーホン� (speakerphone). 2. Enter the station name, up to 12 characters,
using the dialing buttons.
電話帳登録�
Answering calls /修正/削除�
3. Press (telephone directory
1. When the phone rings, lift the handset or store/edit/delete).
press スピーカーホン� (speakerphone). 4. Enter the phone number up to 30 digits.
2. Talk to the other party. 電話帳登録�
/修正/削除�
3. When finished, replace the handset or press 5. Press (telephone directory
(speakerphone). store/edit/delete).
スピーカーホン�
Note: – To program other stations, repeat from
When a slow beep or no sound is heard, press step 2.
電話帳登録�
/修正/削除�
スタート�
/コピー� (start/copy) and replace the handset. 6. Press (telephone directory
The unit will start fax reception. store/edit/delete).
(For KX-PW12CL users: skip this step)
2 Automatic dialing 7. Enter the group number (1-4).
電話帳登録�
/修正/削除�
8. Press (telephone directory
Main unit Portable handset store/edit/delete).
Handset Storing a phone number in the portable
handset
くるくる� The following 5 numbers have been pre-
� 電 話 帳 �
切� programmed :
登録/修正/削除� ●DDI Customer Center (0077-772)
音量� ●Time (117)
キャッチ� ●
スピーカーホン� Weather Information (177)
/クリア�
再ダイヤル� ●Telegrams (115)
●Directory Assistance (104)
電話帳登録�
/修正/削除�くるくる電話帳�
登録/修正/削除
1. Press (store/edit/delete).
● xx will show how many items can still be
Automatic dialing with the main unit stored.
くるくる電話帳� 2. Use the dial buttons to enter the desired
1. Rotate (search dial) until the name you name, up to 12 characters.
want to dial appears on the display.
● If you do not want to store a name, go to
2. Lift the handset or press スピーカーホン�
step 3.
(speakerphone). 登録/修正/削除
3. Talk to the other party. 3. Press (store/edit/delete).
4. When finished, replace the handset or press
スピーカーホン� (speakerphone).
5
Telephone Operations Facsimile Operations
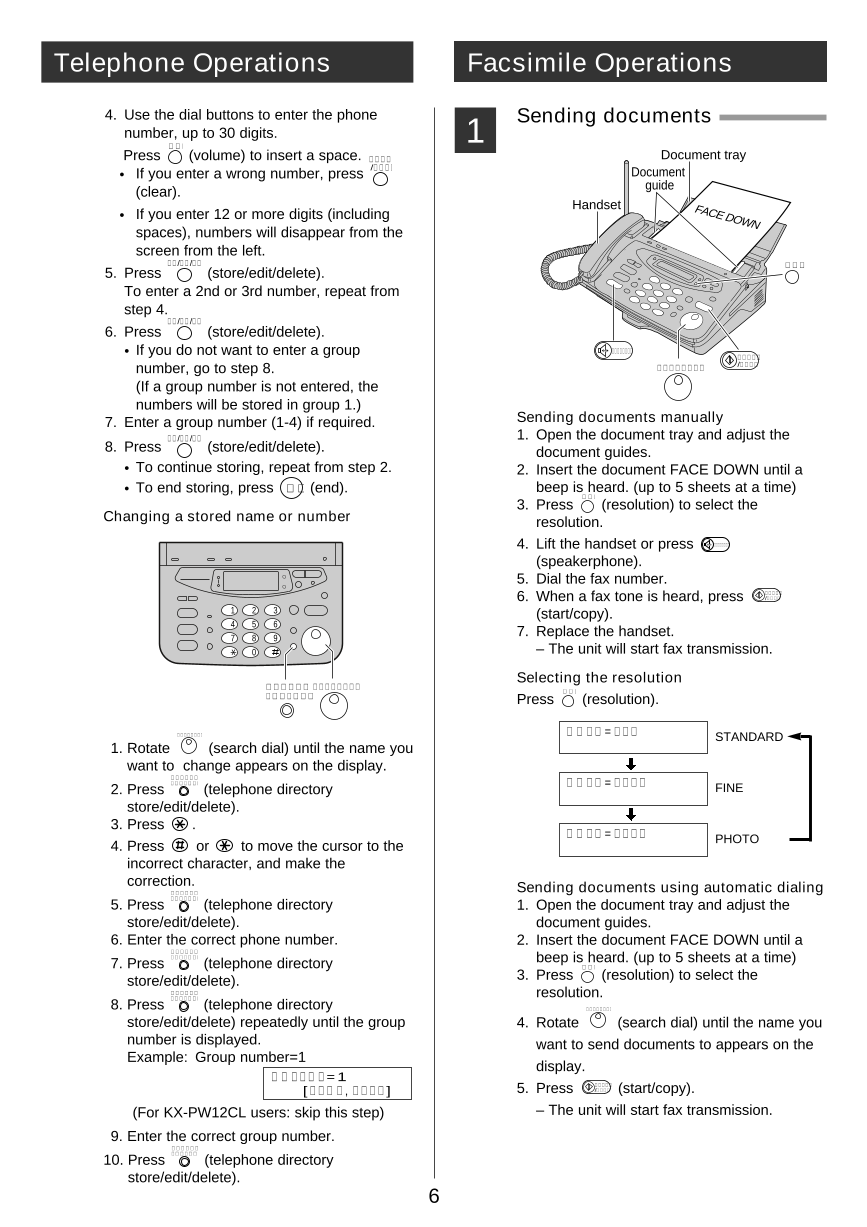
4. Use the dial buttons to enter the phone Sending documents
number, up to 30 digits. 1
音量�
Press (volume) to insert a space. キャッチ� Document tray
● If you enter a wrong number, press /クリア� Document
(clear). guide
Handset
● If you enter 12 or more digits (including FACE DOWN
spaces), numbers will disappear from the
screen from the left. �
登録/修正/削除 画質�
5. Press (store/edit/delete).
To enter a 2nd or 3rd number, repeat from
step 4.
登録/修正/削除
6. Press (store/edit/delete).
● If you do not want to enter a group スピーカーホン�
スタート�
number, go to step 8. くるくる電話帳� /コピー�
(If a group number is not entered, the
numbers will be stored in group 1.)
7. Enter a group number (1-4) if required. Sending documents manually
登録/修正/削除 1. Open the document tray and adjust the
8. Press (store/edit/delete). document guides.
● To continue storing, repeat from step 2. 2. Insert the document FACE DOWN until a
● To end storing, press 切� (end). beep is heard. (up to 5 sheets at a time)
画質�
3. Press (resolution) to select the
Changing a stored name or number resolution.
4. Lift the handset or press スピーカーホン�
(speakerphone).
5. Dial the fax number.
6. When a fax tone is heard, press スタート�
/コピー�
1 2 3 (start/copy).
4 5 6
7 8 9 7. Replace the handset.
0 – The unit will start fax transmission.
Selecting the resolution
電話帳登録� くるくる電話帳�
画質�
/修正/削除� Press (resolution).
くるくる電話帳� カ ゙ シ ツ = フ ツ ウ STANDARD
1. Rotate (search dial) until the name you
want to change appears on the display.
電話帳登録�
/修正/削除�
2. Press (telephone directory カ ゙ シ ツ = チ イ サ イ FINE
store/edit/delete).
3. Press .
カ ゙ シ ツ = シ ャ シ ン
4. Press or to move the cursor to the PHOTO
incorrect character, and make the
correction.
電話帳登録� Sending documents using automatic dialing
/修正/削除�
5. Press (telephone directory 1. Open the document tray and adjust the
store/edit/delete). document guides.
6. Enter the correct phone number. 2. Insert the document FACE DOWN until a
電話帳登録�
/修正/削除�
7. Press (telephone directory beep is heard. (up to 5 sheets at a time)
画質�
store/edit/delete). 3. Press (resolution) to select the
電話帳登録�
/修正/削除� resolution.
8. Press (telephone directory くるくる電話帳�
store/edit/delete) repeatedly until the group 4. Rotate (search dial) until the name you
number is displayed. want to send documents to appears on the
Example: Group number=1
display.
ク ゙ ル ー フ ゚ =1
スタート�
[ ス ウ シ ゙ , ト ウ ロ ク ] 5. Press /コピー� (start/copy).
(For KX-PW12CL users: skip this step) – The unit will start fax transmission.
9. Enter the correct group number.
電話帳登録�
/修正/削除�
10. Press (telephone directory
store/edit/delete).
6
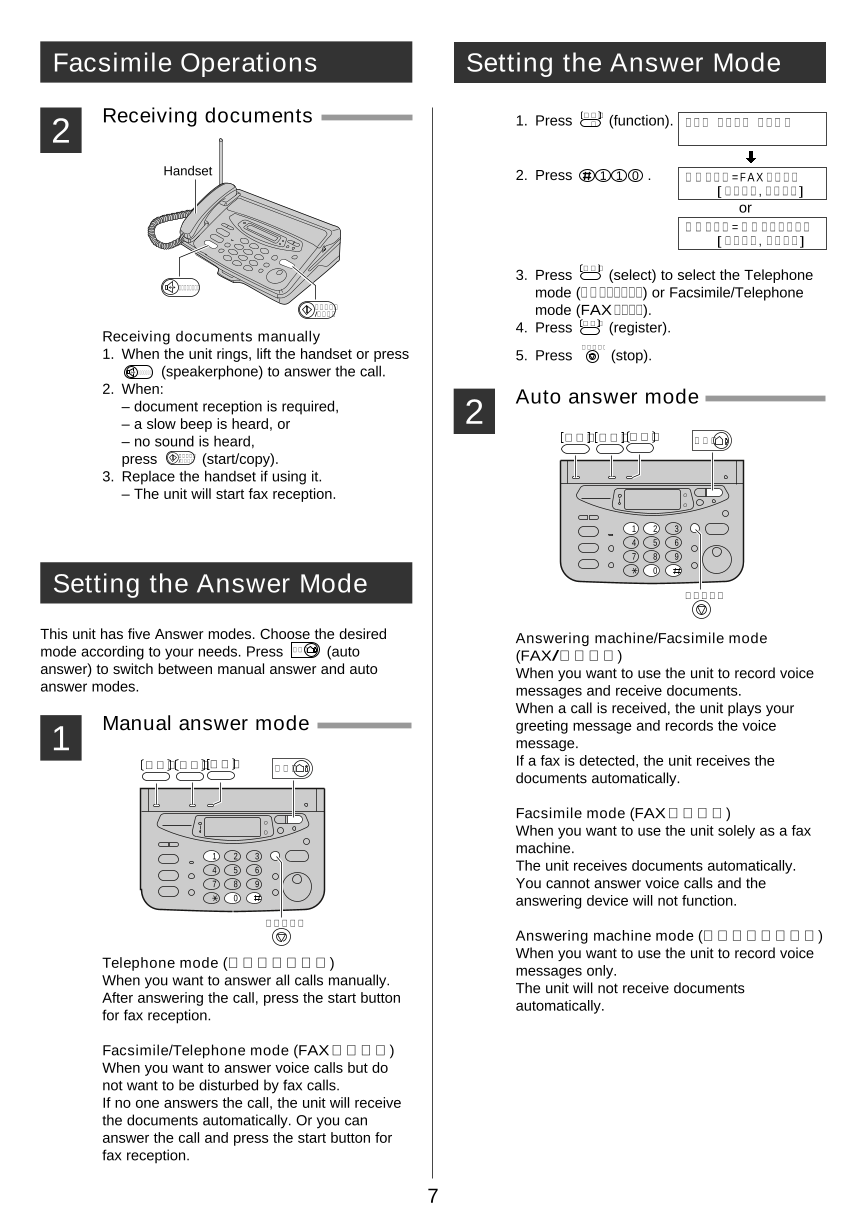
Facsimile Operations Setting the Answer Mode
2 Receiving documents 1. Press 機能�
� (function). キ ノ ウ ト ウ ロ ク モ ー ト ゙
Handset 2. Press 1 1 0 . サ ゙ イ タ ク =FAX ユ ウ セ ン
[ セ ン タ ク , ト ウ ロ ク ]
or
�
サ ゙ イ タ ク = テ ゙ ン ワ ユ ウ セ ン
[ セ ン タ ク , ト ウ ロ ク ]
選択�
3. Press (select) to select the Telephone
スピーカーホン� mode (デンワユウセン) or Facsimile/Telephone
スタート�
/コピー� mode (FAXユウセン).
4. Press 登録� (register).
Receiving documents manually
ストップ�
1. When the unit rings, lift the handset or press 5. Press (stop).
スピーカーホン� (speakerphone) to answer the call.
2. When:
– document reception is required, 2 Auto answer mode
– a slow beep is heard, or
– no sound is heard, 機能�選択�登録� 留守�
press スタート�
/コピー� (start/copy).
3. Replace the handset if using it.
– The unit will start fax reception.
1 2 3
4 5 6
7 8 9
0
Setting the Answer Mode
ストップ�
This unit has five Answer modes. Choose the desired Answering machine/Facsimile mode
mode according to your needs. Press 留守� (auto (FAX/ルスデン)
answer) to switch between manual answer and auto When you want to use the unit to record voice
answer modes. messages and receive documents.
When a call is received, the unit plays your
1 Manual answer mode greeting message and records the voice
message.
機能�選択�登録� If a fax is detected, the unit receives the
留守�
documents automatically.
Facsimile mode (FAXセンヨウ)
When you want to use the unit solely as a fax
machine.
1 2 3
4 5 6 The unit receives documents automatically.
7 8 9 You cannot answer voice calls and the
0 answering device will not function.
ストップ�
Answering machine mode (ルスデンセンヨウ)
When you want to use the unit to record voice
Telephone mode (デンワユウセン) messages only.
When you want to answer all calls manually. The unit will not receive documents
After answering the call, press the start button automatically.
for fax reception.
Facsimile/Telephone mode (FAXユウセン)
When you want to answer voice calls but do
not want to be disturbed by fax calls.
If no one answers the call, the unit will receive
the documents automatically. Or you can
answer the call and press the start button for
fax reception.
7
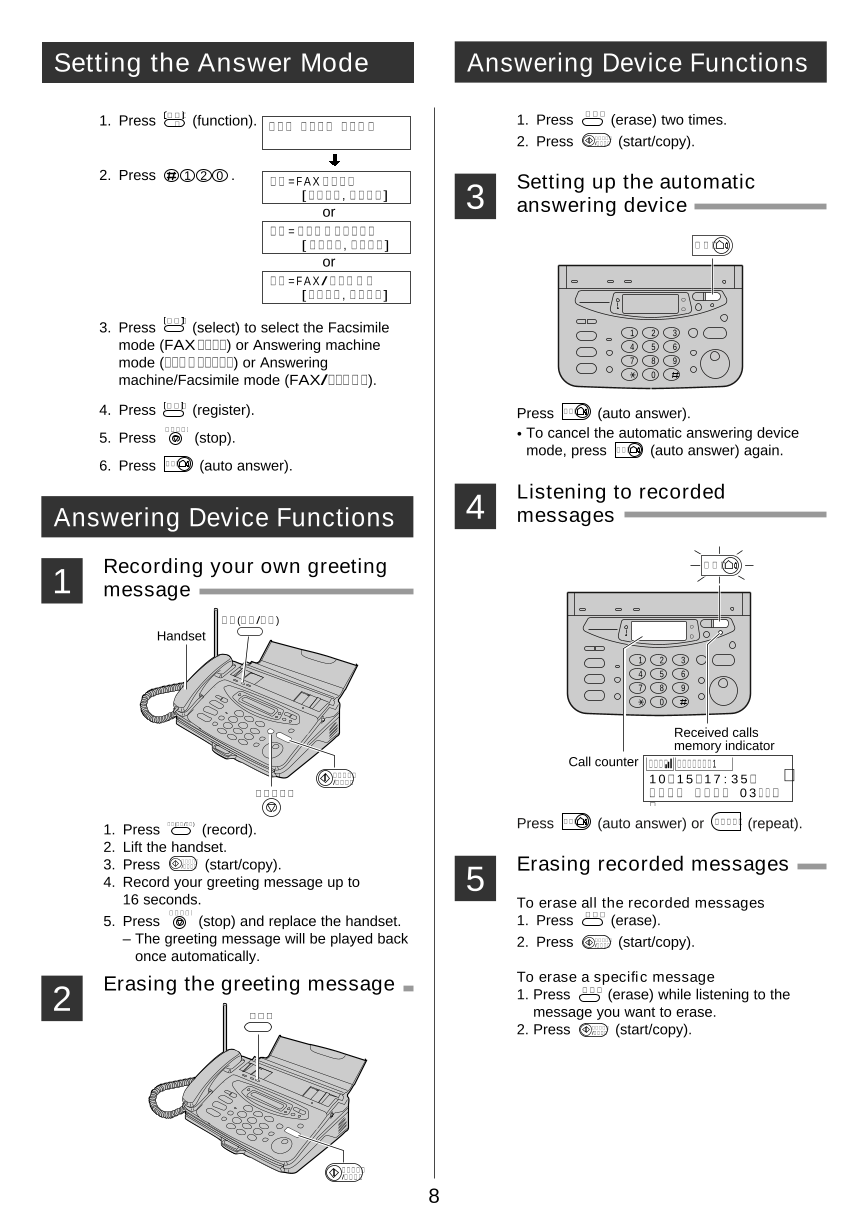
Setting the Answer Mode Answering Device Functions
1. Press 機能�
� (function). キ ノ ウ ト ウ ロ ク モ ー ト ゙ 1. Press 消去� (erase) two times.
2. Press スタート�
/コピー� (start/copy).
2. Press 1 2 0 . ル ス =FAX セ ン ヨ ウ
3 Setting up the automatic
[ セ ン タ ク , ト ウ ロ ク ]
or answering device
ル ス = ル ス テ ゙ ン セ ン ヨ ウ
[ セ ン タ ク , ト ウ ロ ク ] 留守�
or
ル ス =FAX/ ル ス テ ゙ ン
[ セ ン タ ク , ト ウ ロ ク ]
選択�
3. Press (select) to select the Facsimile 1 2 3
mode (FAXセンヨウ) or Answering machine 4 5 6
mode (ルスデンセンヨウ) or Answering 7 8 9
machine/Facsimile mode (FAX/ルスデン). 0
4. Press 登録� (register). Press 留守� (auto answer).
ストップ�
5. Press (stop). ● To cancel the automatic answering device
mode, press 留守� (auto answer) again.
6. Press 留守� (auto answer).
4 Listening to recorded
Answering Device Functions messages
1 Recording your own greeting 留守�
message
録音(応答/通話)
Handset
1 2 3
4 5 6
� 7 8 9
0
Received calls
memory indicator
Call counter 録音残� プライベート 1
スタート�
/コピー� 1 0月1 5日1 7 : 3 5� �
ストップ� ヨ ウ ケ ン ロ ク オ ン 0 3 ケ ン �
�
録音(応答/通話) 留守�
1. Press (record). Press (auto answer) or 聞き直し� (repeat).
2. Lift the handset.
3. Press スタート�
/コピー� (start/copy).
5 Erasing recorded messages
4. Record your greeting message up to
16 seconds. To erase all the recorded messages
ストップ� 消去�
5. Press (stop) and replace the handset. 1. Press (erase).
– The greeting message will be played back 2. Press スタート�
/コピー� (start/copy).
once automatically.
2 Erasing the greeting message To erase a specific message
1. Press 消去� (erase) while listening to the
消去� message you want to erase.
2. Press スタート�
/コピー� (start/copy).
�
スタート�
/コピー�
8



 2023年江西萍乡中考道德与法治真题及答案.doc
 2012年重庆南川中考生物真题及答案.doc
 2013年江西师范大学地理学综合及文艺理论基础考研真题.doc
 2020年四川甘孜小升初语文真题及答案I卷.doc
 2020年注册岩土工程师专业基础考试真题及答案.doc
 2023-2024学年福建省厦门市九年级上学期数学月考试题及答案.doc
 2021-2022学年辽宁省沈阳市大东区九年级上学期语文期末试题及答案.doc
 2022-2023学年北京东城区初三第一学期物理期末试卷及答案.doc
 2018上半年江西教师资格初中地理学科知识与教学能力真题及答案.doc
 2012年河北国家公务员申论考试真题及答案-省级.doc
 2020-2021学年江苏省扬州市江都区邵樊片九年级上学期数学第一次质量检测试题及答案.doc
 2022下半年黑龙江教师资格证中学综合素质真题及答案.doc