SporTrak™ Color User Manual Addendum
Since the release of the User Manual for the SporTrak Color, there have been en-
hancements to the SporTrak Color’s software. This addendum will describe those
enhancements as well as provide some additional information that may help you
use your SporTrak Color GPS Receiver.
You can keep your SporTrak Color up to date by checking the Magellan® web site
at www.magellangps.com for future software releases that you can upload into your
SporTrak Color receiver.
Enhancements:
On/Off Protection – This feature is designed to provide a different way to turn the
SporTrak Color on or off to avoid accidental turn on or off if carried in a backpack
or your pocket.
Keypad Light Timer – This enhancement was introduced to increase the battery life
of your SporTrak Color. This feature automatically turns the keypad light off after
1 minute of inactivity.
Map Screen Detailed Information – This provides a simple method of saving a
waypoint or going to an item displayed or just viewing additional information
about any item displayed on the map. You will find that this method is the easiest
way to save or go to any map item.
Destination Plotter – You now have the option of displaying lines on the map
screen that graphically display a line from your present position to your destination
and/or a line from the departure point to your destination.
Magnetic Heading – Under Map Setup you can now select to set the top of the dis-
play to magnetic heading using the information provided by the SporTrak Color’s
built-in compass.
Map Utilities – You can now select which basemap or detail map you want to use if
you have uploaded optional maps into your SporTrak Color’s memory. You also
have the option of deleting from your SporTrak Color’s memory any optional maps
that you have uploaded.
Navaids – The SporTrak Color now contains a comprehensive list of navaids to sup-
port the many mariners who are using the SporTrak Color receiver.
Tides and Currents – The SporTrak Color can now display tide and current infor-
mation for various ports and stations. Please note that current information can be
displayed only if you have a chart that you have uploaded from one of the optional
Magellan MapSend® BlueNav™ software packages.
1
�
Corrections to the User Manual
Page 23 – “Changing the Data Fields” — The User Manual incorrectly states that
there are 13 different options to select from for the Map display. There are actually
17 different data field options (bearing, distance, speed, heading, VMG, CTS,
ETA, ETE, XTE, turn, elevation, time, date, COG, EPE, avg. speed, or max.
speed) you can select.
Page 71 – “Calibrating the Compass” — An additional step was omitted from the
instructions. After you rotate the receiver and it beeps as instructed in Step 5, you
need to turn the receiver over (face down) until it beeps again.
Page 78 – The second paragraph beginning with “Preparation”, disregard the first
sentence and the next sentence in parentheses, the SporTrak Color does not utilize
an SD Card. Data is uploaded directly into the unit’s memory.
Page 79 – The second paragraph should read as follows: Here is the region for this
example. Notice that when you move the cursor inside the rectangle, the memory
space that this region will occupy on your SporTrak Color is displayed.
Additional Information
SporTrak Color Support – This will provide SporTrak Color owners living in Eu-
rope the information they need to contact Thales Navigation for support of their
Magellan receiver.
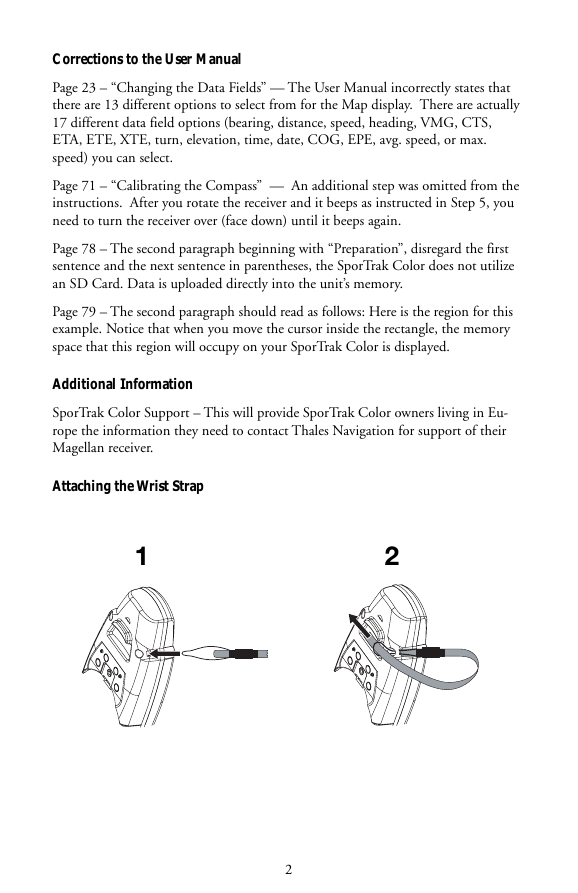
Attaching the Wrist Strap
1
2
2
�
Enhancement Instructions
On/Off Protection
This feature was added to assist those who accidentally turn their receiver on or off
while it is being carried in their pocket, backpack or other container. The following
shows the differences between normal on/off and protected on/off.
Turning the SporTrak Color On:
Normal: Press the Power key.
Protected: Press and hold the Power key until the first start-up screen is dis-
played.
Turning the SporTrak Color Off:
Normal: Press the Power key. (Pressing the Escape key aborts the power off.)
Protected: Press the Power key. You have 5 seconds to press the Enter key. If
you do not press the Enter key, the SporTrak Color stays on, returning to the
last screen displayed.
Turning the Power Key Protection On or Off:
1) From any screen, press the Menu key and use the up or down arrows to
highlight “Setup”. Press the Enter key.
2) Use the up or down arrows to highlight “Power key” and press the Enter
key.
3) Use the up or down arrows to highlight your power key choice, either “No
protection” or “On/Off protected”. Press the Enter key.
Keypad Light Timer
Normally, when you turn on your SporTrak Color, a light behind the keypad comes
on allowing you to see the keys in dark or low-light environments. If at any time,
no keys have been pressed for any 1-minute time frame, the keypad light will turn
off. To turn the keypad light back on, press any key. (Note that pressing any of the
keys with the keypad light off, does not perform the function, only turns the key-
pad light back on.)
Disabling the Keypad Light Timer
The Keypad Light Timer is on whenever the display backlight is on. Press and
hold the Power key down, once for each step, to step through the levels of
backlight intensity. When the backlight is off, so is the keypad light.
3
�
Map Screen Detailed Information
When your cursor or your position icon is over a map item (road, city, POI, etc.)
you can quickly and easily view additional information about that item. From this
display, you can very easily save the position into your user database or you can cre-
ate a GOTO route to that map item with the push of a button.
Viewing Detailed Map Information for Your Present Position
1) While viewing the Map screen and your present position icon is displayed,
press the Enter key. (If your Present Position icon is not being displayed,
press the Escape key to reset the cursor to your present position. If an
hourglass is being displayed instead of your Present Position icon, the
SporTrak Color is not computing position information and you may need
to give the antenna a better, unobstructed view of the sky.)
2)
If your present position is over a map item, a list of all the map items
available for your position will be displayed. (If your position is not over a
known map item, nothing will be displayed.)
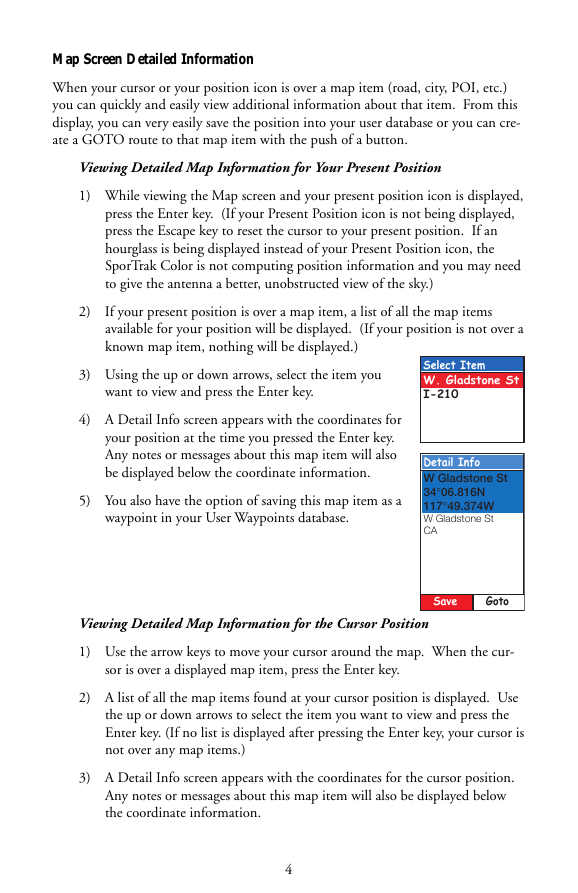
3) Using the up or down arrows, select the item you
want to view and press the Enter key.
Select Item
W. Gladstone St
I-210
4) A Detail Info screen appears with the coordinates for
your position at the time you pressed the Enter key.
Any notes or messages about this map item will also
be displayed below the coordinate information.
5) You also have the option of saving this map item as a
waypoint in your User Waypoints database.
Detail Info
W Gladstone St
34°06.816N
117°49.374W
W Gladstone St
CA
Save
Goto
Viewing Detailed Map Information for the Cursor Position
1) Use the arrow keys to move your cursor around the map. When the cur-
sor is over a displayed map item, press the Enter key.
2) A list of all the map items found at your cursor position is displayed. Use
the up or down arrows to select the item you want to view and press the
Enter key. (If no list is displayed after pressing the Enter key, your cursor is
not over any map items.)
3) A Detail Info screen appears with the coordinates for the cursor position.
Any notes or messages about this map item will also be displayed below
the coordinate information.
4
�
4) You can also save this map item as a waypoint in your User Waypoints da-
tabase or create a GOTO route to this map item (described below).
Saving or Going to a Map Item from the Detailed Map Information Screen
1) To Save the Map Item in to your User Waypoint database, use the left or
right arrows to highlight the “Save” button at the bottom of the screen
and press the Enter key. The Mark screen is displayed allowing you to edit
the details for this position. When you are done, highlight the “Save” but-
ton and press the Enter key. (This method does not apply to waypoints
that are already in your User Waypoint database. User waypoints can be
edited or deleted.)
2) To create a GOTO route to the map item chosen, use the left or right ar-
rows to highlight the “GOTO” button and press then Enter key.
Editing or Deleting a User Waypoint from the Detailed Map Information
Screen
If the map item you selected to view is from your User Waypoint database, you
are presented with three buttons, “Edit”, “Goto” or “Del”. Use the arrow keys
to highlight the desired option and press the Enter key.
Edit: Selecting Edit brings up the “Edit WPT” screen allowing you to change
the details for this waypoint. When you are satisfied with your changes, use
the arrow keys to highlight “Save” and press the Enter key.
Goto: Selecting Goto creates a GOTO route from your present position to the
waypoint displayed. You are returned to the Map screen and are ready to begin
navigating towards the waypoint.
Delete: Selecting the “Del” button allows you the option of removing this
waypoint permanently from your User Waypoint database. A confirmation
screen is displayed requiring that you confirm this deletion.
Exiting the Detailed Map Information Screen
To return to the Map screen, press the Escape key.
Destination Plotter
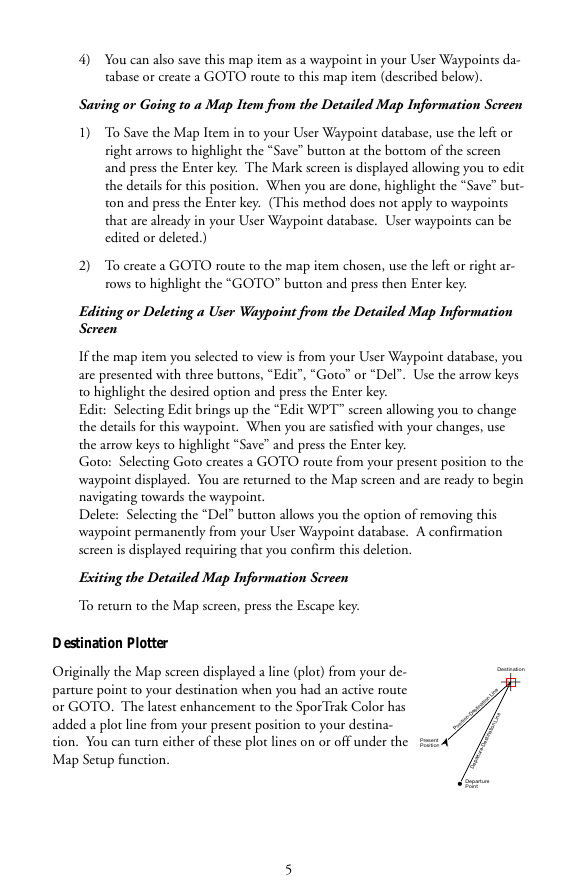
Originally the Map screen displayed a line (plot) from your de-
parture point to your destination when you had an active route
or GOTO. The latest enhancement to the SporTrak Color has
added a plot line from your present position to your destina-
tion. You can turn either of these plot lines on or off under the
Map Setup function.
Present
Position
Destination
Position-Destination Line
e
Lin
n
atio
estin
arture-D
p
e
D
Departure
Point
5
�
Selecting Destination Plot Lines
1) From the Map screen, press the Menu key. Use the up or down arrows to
highlight “Map Setup” and press the Enter key.
2) Press the right arrow to access the “Display” tab.
3) Using the up or down arrows, highlight “Pos-Dest Line” or “Depart-Dest
Line”
4) Press the Enter key to toggle the status of your selection. When the box is
checked, the line will be displayed.
Magnetic North for the Map Screen
Using the information from the electronic compass built in to your SporTrak Color,
you can now set the top of the map display to reflect magnetic north. Previously you
could only select the top of the display to reflect north, your course or your track.
Selecting Magnetic Heading Up for the Map Screen
1) From the Map screen, press the Menu key. Use the up or down arrows to
highlight “Map Setup” and press the Enter key.
2) With the “Orientation” field highlighted, press the Enter key.
3) A drop down list is displayed with the four options
for the map screen orientation. Use the up or down
arrows to highlight “Magnetic HDG Up” and press
the Enter key.
Map Utilities
You can use this feature to select the basic map or the detailed map that you want to
use. You can also use Map Utilities to delete a map, other then the basic map, from
memory.
What is the difference between a basic map and a detail map? The basic map (or
basemap) is the map that came built in to your SporTrak Color when you pur-
chased it. It has basic street detail and some Points of Interest, which is enough in-
formation for simple navigating in towns and major roadways. Basic maps cover a
large land area, have limited detailed information and use up a small amount of
memory.
Detail maps are maps you can upload using any of the Magellan software options
through the MapSend or MapSend BlueNav series of software applications. These
maps have an enormous amount of detail down to the street level and a vast selec-
tion of POIs that can be displayed on your Map screen. Detail maps are limited in
size to the amount of free memory in your receiver, have a lot of detailed informa-
tion and can use up a substantial amount of memory.
6
�
Are there other basic maps available? Yes. If you have the Magellan MapSend
WorldWide Basemap CD-ROM, you can select any area on the globe and upload it
to your SporTrak Color receiver.
Selecting a Basemap or a Detail Map
1) From any screen, press the Menu key. Use the up or down arrows to high-
light “Map Utilities” and press the Enter key.
2) With “Change Map” highlighted, press the Enter key.
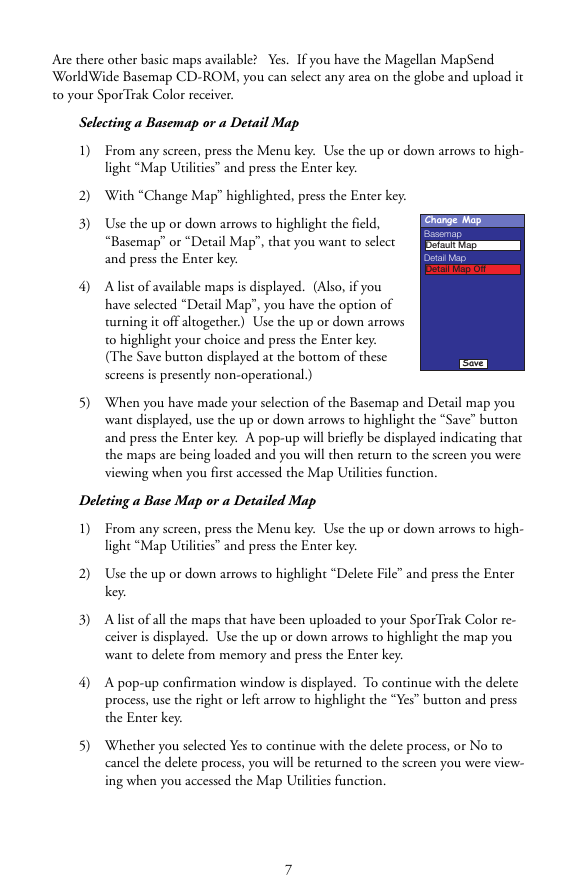
3) Use the up or down arrows to highlight the field,
“Basemap” or “Detail Map”, that you want to select
and press the Enter key.
4) A list of available maps is displayed. (Also, if you
have selected “Detail Map”, you have the option of
turning it off altogether.) Use the up or down arrows
to highlight your choice and press the Enter key.
(The Save button displayed at the bottom of these
screens is presently non-operational.)
Change Map
Basemap
Default Map
Detail Map
Detail Map Off
Save
5) When you have made your selection of the Basemap and Detail map you
want displayed, use the up or down arrows to highlight the “Save” button
and press the Enter key. A pop-up will briefly be displayed indicating that
the maps are being loaded and you will then return to the screen you were
viewing when you first accessed the Map Utilities function.
Deleting a Base Map or a Detailed Map
1) From any screen, press the Menu key. Use the up or down arrows to high-
light “Map Utilities” and press the Enter key.
2) Use the up or down arrows to highlight “Delete File” and press the Enter
key.
3) A list of all the maps that have been uploaded to your SporTrak Color re-
ceiver is displayed. Use the up or down arrows to highlight the map you
want to delete from memory and press the Enter key.
4) A pop-up confirmation window is displayed. To continue with the delete
process, use the right or left arrow to highlight the “Yes” button and press
the Enter key.
5) Whether you selected Yes to continue with the delete process, or No to
cancel the delete process, you will be returned to the screen you were view-
ing when you accessed the Map Utilities function.
7
�
Navaids
The SporTrak Color now provides mariners with navaids added to their waypoint
database. These navaids can be used as any other waypoint and are easily accessed
through the Database function of your SporTrak Color receiver.
Tides and Currents
SporTrak Color users can now access tide information for ports that are stored in
their basemap. If a chart from one of the Magellan MapSend BlueNav products has
been uploaded, additional tide and current information can be displayed for ports/
stations that were included with the chart. (Please note that not all MapSend
BlueNav charts contain station information.)
The Tide Screens
The Tide screen displays the times for high and low tides, the water height and the
coefficients (French internal ports only) for a selected date and port. The dis-
played water heights are the height of the water at the lowest astronomical tide.
These values are provided as a rough guide and may vary with weather conditions.
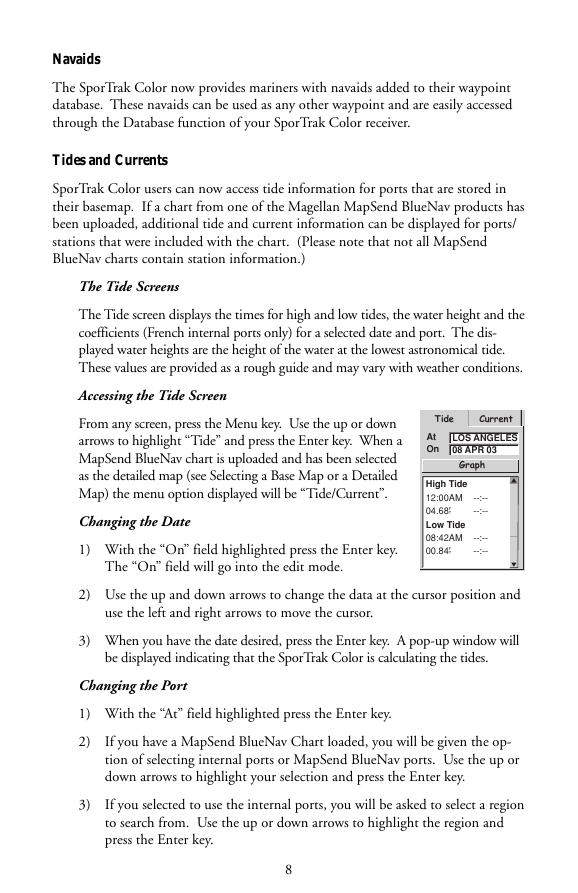
Accessing the Tide Screen
From any screen, press the Menu key. Use the up or down
arrows to highlight “Tide” and press the Enter key. When a
MapSend BlueNav chart is uploaded and has been selected
as the detailed map (see Selecting a Base Map or a Detailed
Map) the menu option displayed will be “Tide/Current”.
Changing the Date
1) With the “On” field highlighted press the Enter key.
The “On” field will go into the edit mode.
Tide
Current
At
On
LOS ANGELES
08 APR 03
Graph
High Tide
12:00AM
T
04.68F
Low Tide
08:42AM
T
00.84F
--:--
--:--
--:--
--:--
2) Use the up and down arrows to change the data at the cursor position and
use the left and right arrows to move the cursor.
3) When you have the date desired, press the Enter key. A pop-up window will
be displayed indicating that the SporTrak Color is calculating the tides.
Changing the Port
1) With the “At” field highlighted press the Enter key.
2)
3)
If you have a MapSend BlueNav Chart loaded, you will be given the op-
tion of selecting internal ports or MapSend BlueNav ports. Use the up or
down arrows to highlight your selection and press the Enter key.
If you selected to use the internal ports, you will be asked to select a region
to search from. Use the up or down arrows to highlight the region and
press the Enter key.
8
�




 2023年江西萍乡中考道德与法治真题及答案.doc
 2012年重庆南川中考生物真题及答案.doc
 2013年江西师范大学地理学综合及文艺理论基础考研真题.doc
 2020年四川甘孜小升初语文真题及答案I卷.doc
 2020年注册岩土工程师专业基础考试真题及答案.doc
 2023-2024学年福建省厦门市九年级上学期数学月考试题及答案.doc
 2021-2022学年辽宁省沈阳市大东区九年级上学期语文期末试题及答案.doc
 2022-2023学年北京东城区初三第一学期物理期末试卷及答案.doc
 2018上半年江西教师资格初中地理学科知识与教学能力真题及答案.doc
 2012年河北国家公务员申论考试真题及答案-省级.doc
 2020-2021学年江苏省扬州市江都区邵樊片九年级上学期数学第一次质量检测试题及答案.doc
 2022下半年黑龙江教师资格证中学综合素质真题及答案.doc