logo资料库

飞利浦传真机-HFC 141说明书.pdf

第1页 / 共52页
第2页 / 共52页
第3页 / 共52页
第4页 / 共52页
第5页 / 共52页
第6页 / 共52页
第7页 / 共52页
第8页 / 共52页
资料共52页,剩余部分请下载后查看
1 Introduction
Important information
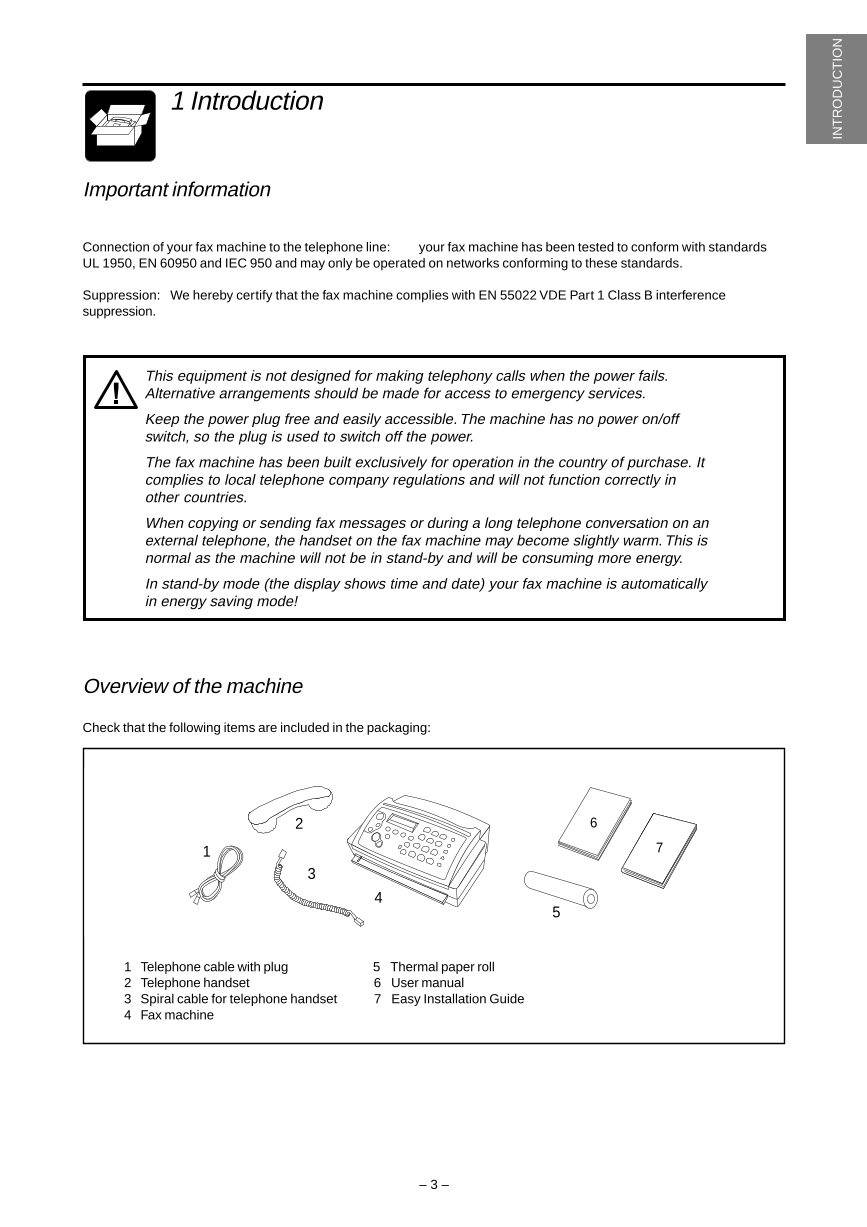
Overview of the machine
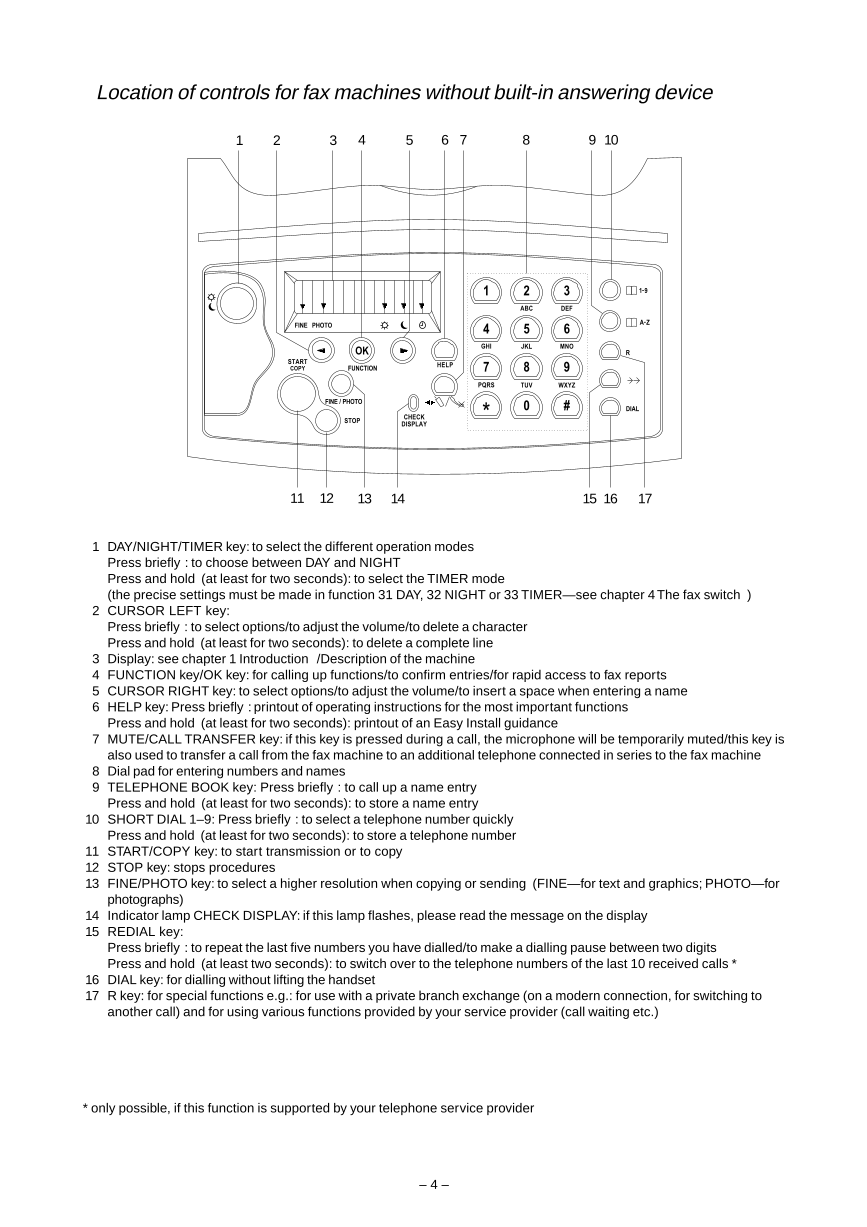
Location of controls for fax machines without built-in answering device
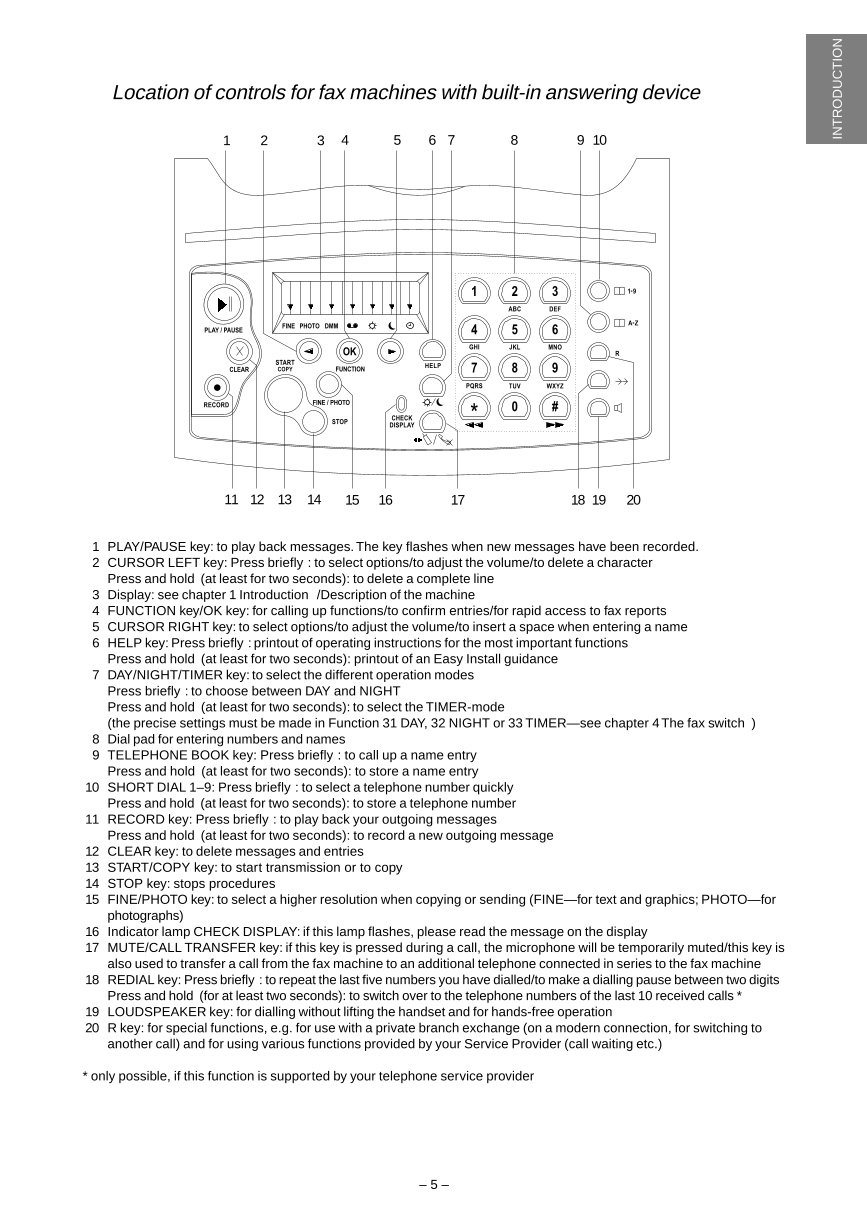
Location of controls for fax machines with built-in answering device
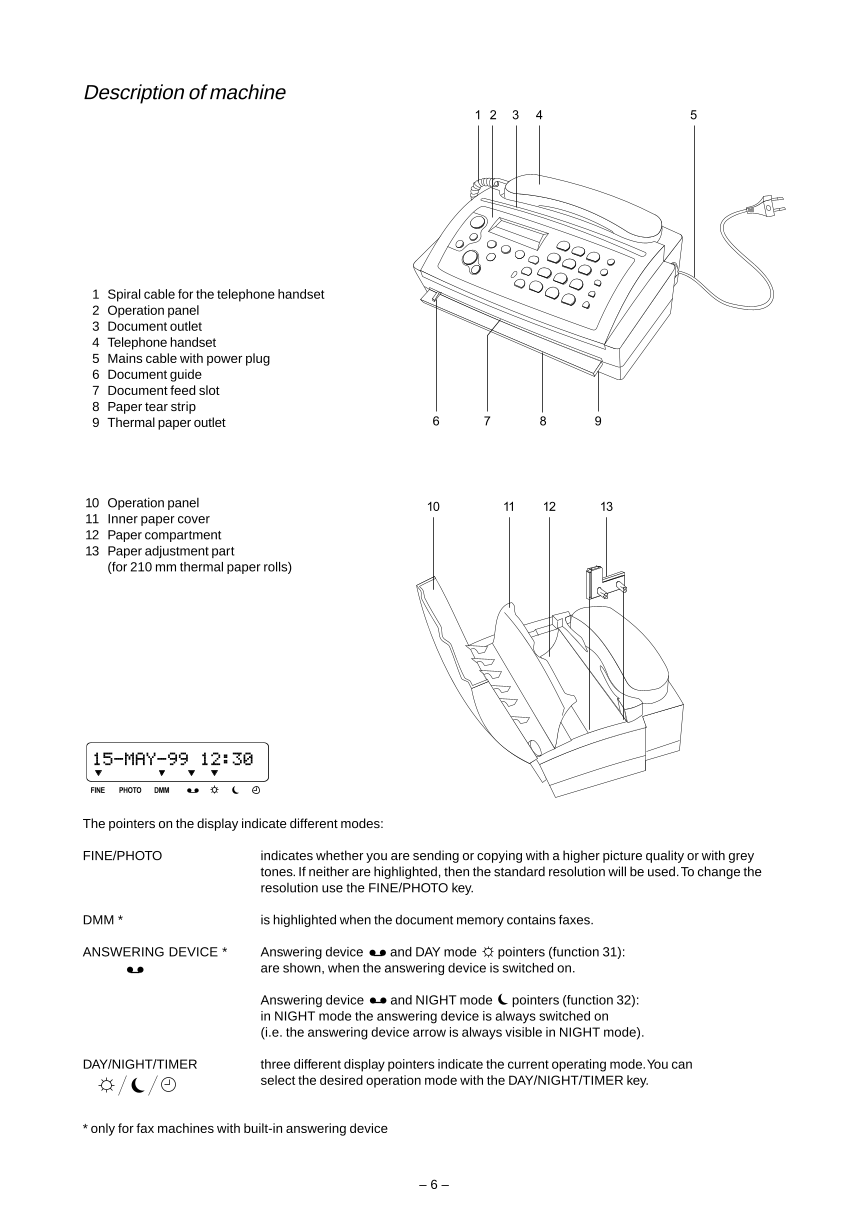
Description of machine
General view of functions
2 Installation
the correct location
connecting to the telephone socket
connecting the spiral cable to the handset
connecting the handset to the fax machine
connecting to the power supply
connecting additional devices
loading and removing thermal paper and
the easy install function
Location of the base station of a cordless telephone
Connecting to a home telephone system
Connecting to a private branch exchange
Tone or pulse dialling/PABX setting
3 Basic functions
Language of display and reports
Entering time and date
Entering your number and name
Ringer selection
Volume of the ringer
Volume of the loudspeaker
4 The fax switch
Alternatives available with the fax switch- DAY/NIGHT/TIMER
The fax switch in use with additional devices
Serial configuration
Parallel configuration
TIMER mode
DAY Mode
NIGHT mode-for fax machines WITHOUT built-in answering device
NIGHT mode-for fax machine WITH built-in answering device
5 The telephone
Making a call
Redial
Caller ID (Identity of the caller)
Deleting entries from the Redial or Caller ID memory
Short dial
Telephone book
Correcting and deleting stored short dial or telephone book entries
On-hook dialling
Hands-free operation (only for devices with built-in answering device)
Muting the microphone
Call transfer
6 The fax
Sending faxes
Improving the picture quality
Transmission report-error report
Fax journal
Polled reception
Quick polling
Faxing to sub-addresses
Receiving faxes in memory-Paperless fax reception (only for fax machines with built-in answering device)
7 The answering device (only for fax machines with built-in answering device)
Switching on/off the answering device
Recording and playing back your outgoing message
Adjusting the recording time
Listening to messages
Volume of messages
Deleting messages
Automatic forwarding of messages
Recording a telephone conversation
VIP code
Remote access
Preparing your fax machine for remote access
Remote access of the answering device
8 Additional functions
Copying
EASY LINK-Setting additional devices
HELP function
Short dial and telephone book list
Fax reception: EXPERT
9 Troubleshooting
Service code
10 Appendix
Technical specification
Glossary
Index
A
Activating
timer mode
Additional devices
call transfer
connection
fax switch
setup
technical term
Adjusting the recording time ¹)
Answering device ¹)
adjusting the recording time
automatic forwarding of messages
deleting messages
in DAY mode
in NIGHT mode
listening to messages
pointer on the display
recording a telephone conversation
recording your outgoing message
remote access
switching on/off
VIP-code
volume of messages
Answering machine
connection
fax switch
Appendix
Arrows on the display
B
Base station of cordless telephones
proper location
Basic functions
C
Call duration on the display
Call transfer
from an additional telephone to the fax machine
from fax machine to an additional telephone
Caller ID
deleting entries from the memory
Dialling a telephone number of a received call
Searching through the memory
Change
DAY mode
NIGHT mode ²)
NIGHT mode ¹)
recording time ¹)
timer mode
type of ring signal
volume of loudspeaker
volume of messages ¹)
volume of ring signal
Code
Easy Link
polled reception
remote access ¹)
service code
VIP ¹)
Configuration
parallel
serial
Connecting
additional devices
the handset to the fax machine
the spiral cable to the handset
to the power supply
to the telephone socket
Connection
to a home telephone system
to private branch exchange
Copying
Cordless telephone
connection
fax switch
proper location of the base station
Correct
stored short dial/telephone book entries
Correct location
of the base station of cordless telephones
D
Date
how to enter
DAY mode
configuring/checking
pointer on the display
Deactivating
timer mode
Delete
messages ¹)
settings
stored short dial/telephone book entries
Description of the device
Device description
Dialling
without lifting the handset
Display
Caller ID
clock
Fax recept.: *5
language
pointers
Rel. line: **
Transfer: *0
DMM ¹)
pointer on the display
receiving faxes in memory
Document
feed slot
good quality originals
guide
outlet
technical term
DTMF
technical term
Duration
of recording time ¹)
E
Easy Install Function
Easy Link
Entering
display language
time and date
your name
your number
Error report-transmission report
EXPERT mode
explanation
F
Fax journal
Fax message
receive paperless
sending
Fax paper
technical term
Fax recept.: *5
Fax reception
DAY mode
EXPERT mode
NIGHT mode ²)
NIGHT mode ¹)
via computer/modem
Fax switch
alternatives
DAY mode
EXPERT mode
in use with additional devices
NIGHT mode ²)
NIGHT mode ¹)
parallel configuration
serial configuration
technical term
timer mode
Faxing to sub-addresses
Fine mode
pointer on the display
sending a fax
when copying
Flashing
of Check Display lamp
of the PLAY/PAUSE key ¹)
Forwarding
of messages ¹)
Functions
basic functions
overview
G
General view of functions
Glossary
Guarantee
H
Hands-free operation ¹)
Handset
Header
entering your name
entering your telephone number
Help key
press more than two seconds
Home telephone system
connecting the fax machine
technical term
Hotline
I
Identity of the caller
deleting entries from the memory
Important information
Improving the picture quality
Incoming message
technical term
Information
general
Inner paper cover
Installation
connecting additional devices
connecting the handset to the fax machine
connecting the spiral cable to the handset
connecting to a home telephone system
connecting to a private branch exchange
connecting to the power supply
connecting to the telephone socket
correct location
easy install function
loading and removing thermal paper
location of the base station of cordless phones
K
Key allocation ²)
Key allocation ¹)
L
Language of display and reports
Listening to messages ¹)
Loading thermal paper
Location
keys ²)
keys ¹)
of the base station of cordless telephones
of the fax machine
Loudspeaker
regulate volume
M
Mains cable with power plug
Making a call
Memory
Messages ¹)
delete
forwarding
play back
recording time
regulate volume
Microphone
muting
Millennium switch
Modem
connection
fax switch
Muting the microphone
N
Name
entering
Names with numbers
correcting
deleting
NIGHT mode
pointer on the display
NIGHT mode ²)
configuring/checking
NIGHT mode ¹)
configuring/checking
Number
entering
O
On-hook dialling
Operating environment (temparature, humidity)
Operation panel
Operation panel ²)
Operation panel ¹)
Optimum mode of your fax switch
parallel
serial
Other devices
call transfer
fax switch
Other telephones
setup
Outgoing message ¹)
recording
technical term
Outside line
Overview
of all functions
of device components
of key allocation ²)
of key allocation ¹)
of the machine
P
PABX
connection
setting
technical term
Packaging contents
Paper
loading and removing thermal paper
Paper adjustment part
Paper compartment
Paper tear strip
Paperless fax reception
Parallel configuration
DAY mode
EXPERT mode
NIGHT mode ²)
NIGHT mode ¹)
technical term
Phone book
storing names or numbers with the TELEPHONE BOOK
using the telephone book
Phone call
hands-free ¹)
Photo mode
pointer on the display
sending a fax
when copying
Picture quality
improving
Pointers on the display
Polled reception
Polling
quick polling
reception
technical term
to sub-addresses
Preparing your fax machine for remote access ¹)
Print quality
Printout
function list
no printout when copying
no printout when receiving a fax
Short dial/telephone book list
transmission/error report
Problem solution
Programming
date and time
day mode
language of display and reports
night mode ²)
night mode ¹)
type of ring signal
volume of ring signal
volume of the loudspeaker
your name
your number
Proper location
of the base station of cordless telephones
PTT
technical term
Public network
Pulse or tone dialling
technical term
Q
Quick and easy installation of your fax machine
connecting additional devices
connecting the handset to the fax machine
connecting the spiral cable to the handset
connecting to the power supply
connecting to the telephone socket
correct location
Quick polling
R
Recording
a telephone conversation ¹)
your outgoing message ¹)
Redialling
deleting entries from the memory
of the last 5 numbers
Regular line
Rel. line: **
Remote access ¹)
preparing
Removing thermal paper
Reports
Language of reports
Resolution (FINE/PHOTO)
Ring signal
choose type
regulate volume
S
Sender identification
technical term
Sending
fax messages
which documents to use
Serial configuration
DAY mode
EXPERT mode
NIGHT mode ²)
NIGHT mode ¹)
technical term
Service code
Settings
language of display and reports
time and date
type of ring signal
volume of loudspeaker
volume of ring signal
your name
your number
Short dial
correcting and deleting entries
print stored numbers
storing short dial numbers and names
using the short dial keys
Spiral cable for the telephone handset
Storing
correcting stored short dial/telephone book entries
deleting stored short dial/telephone book entries
short dial numbers
with the telephone book keys
Storing names with numbers
telephone book
Sub-addresses
faxing to sub-addresses
Switching off
the answering device ¹)
the timer mode
Switching on
the answering device ¹)
the timer mode
T
TAM
technical term
Technical specification
Technical terms
Telephone book
correcting and deleting entries
print stored numbers
storing names or numbers with the TELEPHONE BOOK
using the telephone book
Telephone call
call duration appearing on the display
hands-free ¹)
recording a conversation ¹)
Thermal paper
loading and removing
outlet
technical term
Time
how to enter
TIMER mode
configuring/checking time
deactivating/activating
pointer on the display
Tone or pulse dialling
technical term
Transfer: *0
Transmission report-error report
Troubleshooting
U
Using
short dial keys
the telephone book
V
VIP code ¹)
ringing despite switched on answering machine ¹)
Volume
of loudspeaker
of recorded messages ¹)
of ring signal
Your international guarantee
Dear Customer, The fax machine you have purchased enables you to use other corded and cordless telephones with it. It also offers features to simplify its installation and convenient use. Below you will find some of the most important functions: SENDING FAX MESSAGES To send a fax message longer than one page you can place one page at a time in the document feeder. If your machine has an integrated answering device, it is also possible to receive fax messages into memory in case you run out of thermal paper. Stored messages are printed as soon as you have loaded a new thermal paper roll. USE OF ADDITIONAL (CORDLESS) TELEPHONES Your fax machine will support other additional devices including corded and cordless telephones. If you have answered an incoming call, you will have the opportunity to transfer the call from the cordless phone to the fax, or vice versa. Even after the integrated answering device has switched on, you have the possibility to answer the call from an additional telephone and switch off the answering device. Call transfer between cordless phones depends on the capability of the cordless phones themselves. HELP KEY To ensure you get the best from your machine it has a dedicated HELP key. When pressed, the machine prints an overview of all the basic operations of the fax machine. EASY INSTALL keep pressed for at least 2 seconds HELP The help key will also guide you through the installation of your fax machine. Press and hold the HELP key for two seconds and a sheet will be printed out. Use this sheet together with the display prompts to aid the installation of your machine. Once you have gone through these steps the machine will automatically configure itself. Should you add an additional device at a later date, just go through EASY INSTALL again to verify them. SERIAL/PARALLEL CONFIGURATION Your fax machine is especially designed to operate with other telecom products such as cordless telephones, external answering devices and PC modems, connected to the same PTT line. When the fax machine is connected in SERIAL (i.e. phones are connected directly to the fax) it has full control of the behaviour of all other telephones connected to the line. Alternatively if the machine is connected in PARALLEL (i.e. phones are connected to other telephone sockets) it will have a limited control of all the other telephones. By using EASY INSTALL you will ensure that the connected phones will operate correctly in each configuration. FAX SWITCH/TIMER The machine will automatically switch between DAY and NIGHT modes, an icon on the display will indicate the current status. The default settings are Night from 10 pm and Day from 6 am. You can of course change these settings to suit your own requirements. DAY MODE AND NIGHT MODE (with/without built-in ANSWERING DEVICE ) During DAY it is assumed that you want to be alerted to an incoming call. Dependent on the configuration fax messages will be received after one ring and you will be alerted to an incoming voice call. If the machine has an integrated answering device, the call will be answered after a few rings. In NIGHT mode it is assumed that you do not want to be disturbed. If your machine does not have a built-in answering device it will ring at a reduced volume. However, if it has a built-in answering device, you have the choice not to be disturbed at all, as voice and fax calls can be received silently. – I –
SAFETY INSTRUCTIONS Important information for safe installation: · Never connect your fax machine to the power supply or telephone socket during a thunderstorm. · Never connect the telephone in damp rooms unless the wall sockets are specially designed for humid conditions. · Never touch uninsulated telephone or power cables unless the telephone cable is disconnected from the telephone line and/or the power cable is disconnected from the power line. · Never install the fax machine close to radiators or air conditioners. · Place the fax machine on a flat surface and ensure a minimum clearance of 15 cm between the fax machine and other machines and objects. · Make sure that your fax machine is stable and rests squarely on the supporting surface. Any fall can cause severe damage to the fax machine and/or injury to people, especially small children. · Make sure that air circulates freely around the fax machine. Do not operate the fax machine in closed boxes, cupboards, cabinets etc. Leave a clear space of 10 cm around the ventilation grilles of the fax machine. Never cover the fax machine (tablecloths, paper, folders etc.). Do not place the fax machine on beds, tablecloths, cushions, sofas, carpets or other soft underlays due to the danger of overheating and subsequent fire. · Ensure safe cable laying (danger of stumbling, damage to the cable or the fax machine). Important information for safe operation: Never expose your fax machine to rain or any other form of moisture, in order to prevent the risk of electric shock or fire. In a thunderstorm, disconnect the fax machine from both the mains and the telephone line. If you are unable to disconnect the fax machine, do not use it and do not telephone due to the danger of lightning strike and/or damage to the device. The exception to this rule is the cordless telephone detached from its base station. To prevent the risk of electric shock it is not allowed to open the flap on the bottom of the paper compartment. Opening the flap is strictly reserved to authorised service personnel. · Please read all warning notices and instructions and follow them precisely. · Avoid operating the fax machine in direct sunlight. · Disconnect the fax machine from the mains and telephone line before cleaning the surface of the machine. Never use liquid or gaseous cleaning agents (sprays, scouring agents, polishes etc.). · Never touch the power plug/socket or telephone socket with wet hands. · Do not allow any liquid to enter the fax machine. Otherwise there is a risk of electric shock or other injury to people and severe damage to the fax machine. If any liquid does enter the fax machine, immediately remove the power plug and have the fax machine professionally inspected. · Do not place any heavy object on the fax machine. · Never block the ventilation openings of the fax machine. · If the display breaks, a mildly corrosive liquid may leak out. Avoid contact with skin and eyes. · In case of any damage caused to the housing of your fax machine in particular to power cables please remove the mains plug and call your service repair centre. The housing of your fax machine may only be opened by authorised service personnel. Other instructions: · If you have not connected your fax machine to the mains, it will not function at all—even for making telephone calls. · If you notice a change in the performance of your fax machine or the quality of its functions, please call your service agent. – II –
1 INTRODUCTION 2 INSTALLATION 3 BASIC FUNCTIONS 1 2 3 4 5 6 7 8 9 ∗ 0 # 4 THE FAX SWITCH FAX 5 THE TELEPHONE 6 THE FAX FAX 7 THE ANSWERING DEVICE (only for fax machines with built-in answering device) 8 ADDITIONAL FUNCTIONS 9 TROUBLESHOOTING A 10 APPENDIX BC – 1 – TROUBLE- ADDITIONAL THE ANSWERING THE FAX BASIC APPENDIX THE FAX THE TELEPHONE INSTALLATION INTRODUCTION SHOOTING FUNCTIONS DEVICE SWITCH FUNCTIONS
Table of contents 1 Introduction ................................................. 3 6 The fax ........................................................ 26 Important information ......................................................... 3 Sending faxes .................................................................. 26 Overview of the machine .................................................. 3 Improving the picture quality ............................................ 27 Location of controls for fax machines without Transmission report—error report ................................... 28 built-in answering device ................................................... 4 Fax journal ....................................................................... 28 Location of controls for fax machines with Polled reception ............................................................... 28 built-in answering device ................................................... 5 Quick polling .................................................................... 29 Description of machine ...................................................... 6 Faxing to sub-addresses ................................................. 29 General view of functions .................................................. 7 Receiving faxes in memory—Paperless fax reception (only for fax machines with built-in 2 Installation ................................................... 8 answering device) ........................................................... 29 the correct location ............................................................ 8 connecting to the telephone socket ................................... 8 7 The answering device (only for fax connecting the spiral cable to the handset ........................ 8 machines with built-in answering device) ................. 30 connecting the handset to the fax machine ....................... 8 Switching on/off the answering device ............................ 30 connecting to the power supply ......................................... 8 Recording and playing back your outgoing connecting additional devices ............................................ 8 message ......................................................................... 30 loading and removing thermal paper and ........................... 8 Adjusting the recording time ............................................ 31 the easy install function ..................................................... 8 Listening to messages ..................................................... 32 Location of the base station of a cordless telephone ......... 8 Volume of messages ....................................................... 32 Connecting to a home telephone system .......................... 9 Deleting messages .......................................................... 32 Connecting to a private branch exchange ......................... 9 Automatic forwarding of messages ................................. 33 Tone or pulse dialling/PABX setting ................................... 9 Recording a telephone conversation ............................... 34 3 Basic functions .......................................... 11 VIP code ......................................................................... 34 Remote access ............................................................... 35 Language of display and reports ..................................... 11 Preparing your fax machine for remote access .......... 35 Entering time and date ..................................................... 11 Remote access of the answering device .................... 35 Entering your number and name ..................................... 12 Ringer selection .............................................................. 12 8 Additional functions .................................. 37 Volume of the ringer ......................................................... 13 Copying ........................................................................... 37 Volume of the loudspeaker .............................................. 13 EASY LINK—Setting additional devices ......................... 37 4 The fax switch ............................................ 14 HELP function ................................................................. 38 Short dial and telephone book list .................................... 38 Alternatives available with the fax switch— Fax reception: EXPERT .................................................. 39 DAY/NIGHT/TIMER ........................................................ 14 The fax switch in use with additional devices .................. 14 9 Troubleshooting ......................................... 40 Serial configuration ..................................................... 14 Service code ................................................................... 43 Parallel configuration ................................................... 15 TIMER mode ................................................................... 15 10 Appendix .................................................. 44 DAY Mode ....................................................................... 16 Technical specification .................................................... 44 NIGHT mode—for fax machines WITHOUT Glossary ......................................................................... 45 built-in answering device ................................................. 18 Index ............................................................................... 46 NIGHT mode—for fax machine WITH Your international guarantee ............................................ 49 built-in answering device ................................................. 19 5 The telephone ............................................ 20 Making a call ................................................................... 20 Redial .............................................................................. 20 Caller ID (Identity of the caller) ........................................ 20 Deleting entries from the Redial or Caller ID memory ............................................................ 21 Short dial ......................................................................... 21 Telephone book ............................................................... 22 Correcting and deleting stored short dial or telephone book entries .................................................... 23 On-hook dialling .............................................................. 24 Hands-free operation (only for devices with built-in answering device) ................................................ 24 Muting the microphone .................................................... 25 Call transfer ..................................................................... 25 – 2 –
1 Introduction Important information Connection of your fax machine to the telephone line: your fax machine has been tested to conform with standards UL 1950, EN 60950 and IEC 950 and may only be operated on networks conforming to these standards. Suppression: We hereby certify that the fax machine complies with EN 55022 VDE Part 1 Class B interference suppression. This equipment is not designed for making telephony calls when the power fails. Alternative arrangements should be made for access to emergency services. Keep the power plug free and easily accessible. The machine has no power on/off switch, so the plug is used to switch off the power. The fax machine has been built exclusively for operation in the country of purchase. It complies to local telephone company regulations and will not function correctly in other countries. When copying or sending fax messages or during a long telephone conversation on an external telephone, the handset on the fax machine may become slightly warm. This is normal as the machine will not be in stand-by and will be consuming more energy. In stand-by mode (the display shows time and date) your fax machine is automatically in energy saving mode! Overview of the machine Check that the following items are included in the packaging: 2 6 1 7 3 4 5 1 Telephone cable with plug 5 Thermal paper roll 2 Telephone handset 6 User manual 3 Spiral cable for telephone handset 7 Easy Installation Guide 4 Fax machine – 3 – INTRODUCTION
Location of controls for fax machines without built-in answering device 1 2 3 4 5 6 7 8 9 10 1 2 3 1-9 ABC DEF A-Z FINE PHOTO 4 5 6 GHI JKL MNO OK R START HELP COPY FUNCTION 7 8 9 PQRS TUV WXYZ FINE / PHOTO 0 # DIAL CHECK STOP DISPLAY 11 12 13 14 15 16 17 1 DAY/NIGHT/TIMER key: to select the different operation modes Press briefly : to choose between DAY and NIGHT Press and hold (at least for two seconds): to select the TIMER mode (the precise settings must be made in function 31 DAY, 32 NIGHT or 33 TIMER—see chapter 4 The fax switch ) 2 CURSOR LEFT key: Press briefly : to select options/to adjust the volume/to delete a character Press and hold (at least for two seconds): to delete a complete line 3 Display: see chapter 1 Introduction /Description of the machine 4 FUNCTION key/OK key: for calling up functions/to confirm entries/for rapid access to fax reports 5 CURSOR RIGHT key: to select options/to adjust the volume/to insert a space when entering a name 6 HELP key: Press briefly : printout of operating instructions for the most important functions Press and hold (at least for two seconds): printout of an Easy Install guidance 7 MUTE/CALL TRANSFER key: if this key is pressed during a call, the microphone will be temporarily muted/this key is also used to transfer a call from the fax machine to an additional telephone connected in series to the fax machine 8 Dial pad for entering numbers and names 9 TELEPHONE BOOK key: Press briefly : to call up a name entry Press and hold (at least for two seconds): to store a name entry 10 SHORT DIAL 1–9: Press briefly : to select a telephone number quickly Press and hold (at least for two seconds): to store a telephone number 11 START/COPY key: to start transmission or to copy 12 STOP key: stops procedures 13 FINE/PHOTO key: to select a higher resolution when copying or sending (FINE—for text and graphics; PHOTO—for photographs) 14 Indicator lamp CHECK DISPLAY: if this lamp flashes, please read the message on the display 15 REDIAL key: Press briefly : to repeat the last five numbers you have dialled/to make a dialling pause between two digits Press and hold (at least two seconds): to switch over to the telephone numbers of the last 10 received calls * 16 DIAL key: for dialling without lifting the handset 17 R key: for special functions e.g.: for use with a private branch exchange (on a modern connection, for switching to another call) and for using various functions provided by your service provider (call waiting etc.) * only possible, if this function is supported by your telephone service provider – 4 –
Location of controls for fax machines with built-in answering device 1 2 3 4 5 6 7 8 9 10 1 2 3 1-9 ABC DEF A-Z FINE PHOTO DMM PLAY / PAUSE 4 5 6 GHI JKL MNO OK R START HELP CLEAR COPY FUNCTION 7 8 9 PQRS TUV WXYZ RECORD FINE / PHOTO 0 # CHECK STOP DISPLAY 11 12 13 14 15 16 17 18 19 20 1 PLAY/PAUSE key: to play back messages. The key flashes when new messages have been recorded. 2 CURSOR LEFT key: Press briefly : to select options/to adjust the volume/to delete a character Press and hold (at least for two seconds): to delete a complete line 3 Display: see chapter 1 Introduction /Description of the machine 4 FUNCTION key/OK key: for calling up functions/to confirm entries/for rapid access to fax reports 5 CURSOR RIGHT key: to select options/to adjust the volume/to insert a space when entering a name 6 HELP key: Press briefly : printout of operating instructions for the most important functions Press and hold (at least for two seconds): printout of an Easy Install guidance 7 DAY/NIGHT/TIMER key: to select the different operation modes Press briefly : to choose between DAY and NIGHT Press and hold (at least for two seconds): to select the TIMER-mode (the precise settings must be made in Function 31 DAY, 32 NIGHT or 33 TIMER—see chapter 4 The fax switch ) 8 Dial pad for entering numbers and names 9 TELEPHONE BOOK key: Press briefly : to call up a name entry Press and hold (at least for two seconds): to store a name entry 10 SHORT DIAL 1–9: Press briefly : to select a telephone number quickly Press and hold (at least for two seconds): to store a telephone number 11 RECORD key: Press briefly : to play back your outgoing messages Press and hold (at least for two seconds): to record a new outgoing message 12 CLEAR key: to delete messages and entries 13 START/COPY key: to start transmission or to copy 14 STOP key: stops procedures 15 FINE/PHOTO key: to select a higher resolution when copying or sending (FINE—for text and graphics; PHOTO—for photographs) 16 Indicator lamp CHECK DISPLAY: if this lamp flashes, please read the message on the display 17 MUTE/CALL TRANSFER key: if this key is pressed during a call, the microphone will be temporarily muted/this key is also used to transfer a call from the fax machine to an additional telephone connected in series to the fax machine 18 REDIAL key: Press briefly : to repeat the last five numbers you have dialled/to make a dialling pause between two digits Press and hold (for at least two seconds): to switch over to the telephone numbers of the last 10 received calls * 19 LOUDSPEAKER key: for dialling without lifting the handset and for hands-free operation 20 R key: for special functions, e.g. for use with a private branch exchange (on a modern connection, for switching to another call) and for using various functions provided by your Service Provider (call waiting etc.) * only possible, if this function is supported by your telephone service provider – 5 – INTRODUCTION
Description of machine 1 2 3 4 5 1 Spiral cable for the telephone handset 2 Operation panel 3 Document outlet 4 Telephone handset 5 Mains cable with power plug 6 Document guide 7 Document feed slot 8 Paper tear strip 9 Thermal paper outlet 6 7 8 9 10 Operation panel 10 11 12 13 11 Inner paper cover 12 Paper compartment 13 Paper adjustment part (for 210 mm thermal paper rolls) 15-MAY-99 12:30 FINE PHOTO DMM The pointers on the display indicate different modes: FINE/PHOTO indicates whether you are sending or copying with a higher picture quality or with grey tones. If neither are highlighted, then the standard resolution will be used. To change the resolution use the FINE/PHOTO key. DMM * is highlighted when the document memory contains faxes. ANSWERING DEVICE * Answering device and DAY mode pointers (function 31): are shown, when the answering device is switched on. Answering device and NIGHT mode pointers (function 32): in NIGHT mode the answering device is always switched on (i.e. the answering device arrow is always visible in NIGHT mode). DAY/NIGHT/TIMER three different display pointers indicate the current operating mode. You can select the desired operation mode with the DAY/NIGHT/TIMER key. * only for fax machines with built-in answering device – 6 –
分享到:
收藏