3x Instr.Manual (English) new 1/2/02 10:52 am Page 1
CONGRATULATIONS
Congratulations on the purchase of your new
camera. Your camera has been carefully
engineered and manufactured to give you
dependable operation. Read this manual
before operating the unit to become more
familiar with it and obtain the performance
that will bring you continued enjoyment for
many years.
This manual has been written and formatted
with such depth and detail so you can
maximize the features of your camera, yet
easily follow the instructions.
11
�
3x Instr.Manual (English) new 1/2/02 10:52 am Page 2
TABLE OF CONTENTS
Table of Contents.........................................................................................2
Important Information..................................................................................3
FCC Information ......................................................................................3
User Information.....................................................................................3
Precautions...................................................................................................4
Location of Controls.....................................................................................5
Front/Top.................................................................................................5
Bottom/Rear............................................................................................6
Display....................................................................................................6
Getting Started.............................................................................................7
Loading the Battery................................................................................7
Turning the Camera On and Off.............................................................7
Checking the Battery ..............................................................................8
Setting the Time and Date .....................................................................8
Setting the Flash ...................................................................................11
Setting the Image Quality .....................................................................11
Taking Pictures ...........................................................................................12
Taking Pictures......................................................................................12
Using the Self-Timer..............................................................................14
Pictures Remaining ...............................................................................14
Auto Power Off......................................................................................15
Reviewing/Deleting Pictures .......................................................................16
Reviewing Pictures................................................................................16
Deleting Individual Pictures From Memory...........................................16
Deleting All Pictures From Memory ......................................................18
Computer Connection .................................................................................19
Installing the Eye-Q3X Camera Software ..............................................19
Connecting Your Camera to Your PC and Downloading Pictures.........19
Downloading Your Pictures Directly to Windows using the
“My Camera” Device .............................................................................21
Troubleshooting Guide...............................................................................22
Care and Maintenance ...............................................................................24
Software Customer Care ............................................................................25
2
�
3x Instr.Manual (English) new 1/2/02 10:52 am Page 3
IMPORTANT INFORMATION
FCC INFORMATION
FCC WARNING: This equipment meets the limits for a class B digital device,
pursuant to Part 15 of FCC rules. Only the cable supplied with the camera
should be used. Operation with other cables is likely to result in interference to
radio and TV reception and could void the user’s authorization to operate this
equipment. This device complies with Part 15 of the FCC Rules. Operation is
subject to the following two conditions:
•
•
This device may not cause harmful interference.
This device must accept any interference received, including interference
that may cause undesired operation.
Tested To Comply
With FCC Standards
for HOME OR OFFICE USE
Changes or modifications not expressly approved by the manufacturer may void
the user’s authority to operate this equipment.
USER INFORMATION
NOTE: This equipment has been tested and found to comply with the limits for
a class B digital device, pursuant to Part 15 of the FCC Rules. These limits are
designed to provide reasonable protection against harmful interference in a
residential installation. This equipment generates, uses and can radiate radio
frequency energy and, if not installed and used in accordance with the
instructions, may cause harmful interference to radio communications. However,
there is no guarantee that interference will not occur in a particular installation.
If this equipment does cause harmful interference to radio or television
reception, which can be determined by turning the equipment on and off, the
user is encouraged to try to correct the interference by one or more of the
following measures:
• Reorient or relocate the receiving antenna.
•
•
Increase the separation between the equipment and receiver.
Connect the equipment into an outlet on a circuit different from that to
which the receiver is connected.
Consult the dealer or an experienced radio/TV technician for help.
•
3
�
3x Instr.Manual (English) new 1/2/02 10:52 am Page 4
IMPORTANT INFORMATION
Be sure to observe the following precautions when using the camera:
•
Never try to take pictures or use the built-in display when
operating a motor vehicle or while walking.
Never try to open the case of the camera or attempt your own
repairs. Always leave service to authorized repair facilities.
Keep the camera away from water and other liquids, and never
let it get wet. Never use when it is raining or snowing.
Should foreign matter or water get into the unit, immediately
turn the power off and contact your local authorized service
center.
Physical damage and malfunction of this unit can cause the
image data stored in its memory to be deleted. Be sure to
always keep backup copies of data by transferring them to a
personal computer.
Under the environment with electrostatic discharge, the unit
may require the user to reset
Do not leave the camera in places subject to extremely high
temperatures, such as a sealed vehicle or in direct sunlight.
Disconnect the battery when camera is not used for long periods
of time.
Use 3V Lithium Battery (CR123A) only.
Dispose of battery promptly and in a manner that complies with
applicable laws.
Do not place the camera in unstable locations, such as a sloping
surface or unstable table where the camera may fall.
Do not touch or press on the display or lens.
•
•
•
•
•
•
•
•
•
•
•
4
�
3x Instr.Manual (English) new 1/2/02 10:52 am Page 5
LOCATION OF CONTROLS
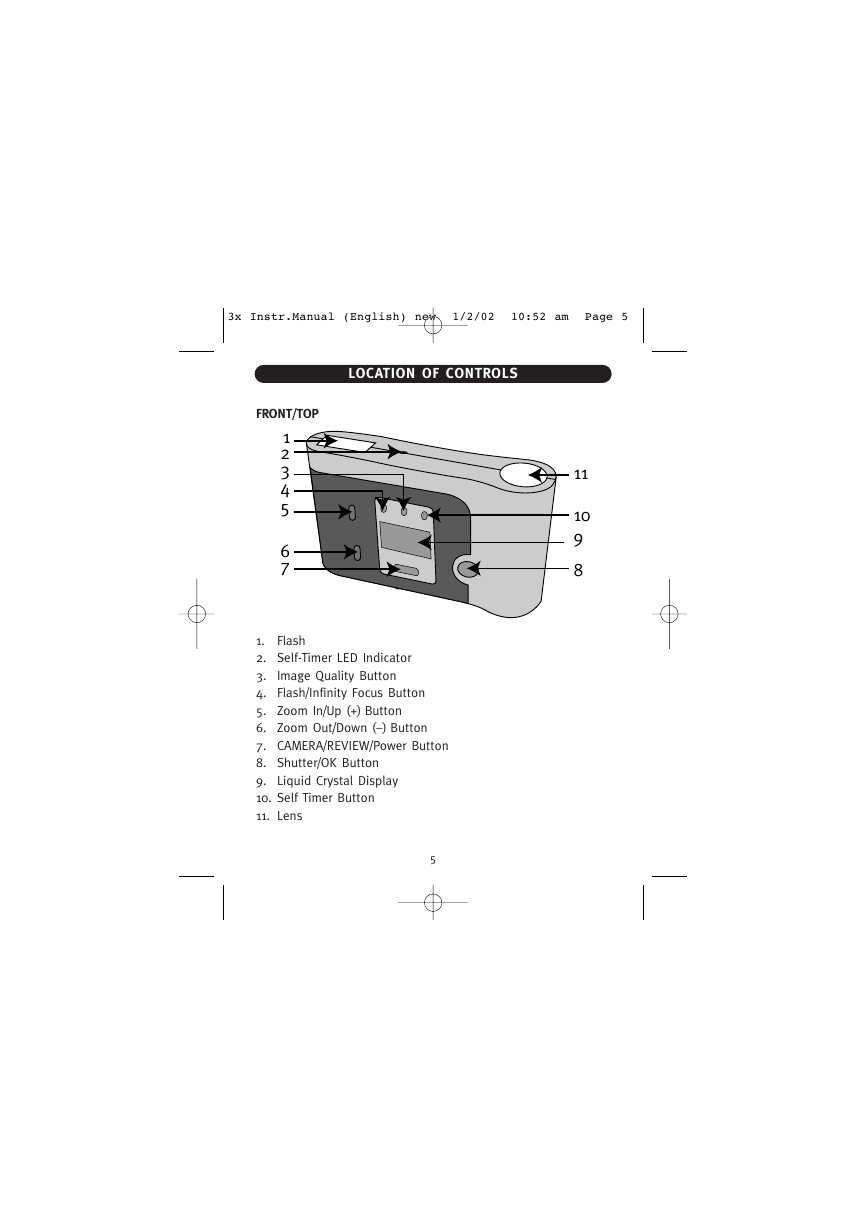
FRONT/TOP
1
2
3
4
5
6
7
11
10
9
8
Flash
Image Quality Button
1.
2. Self-Timer LED Indicator
3.
4. Flash/Infinity Focus Button
5. Zoom In/Up (+) Button
6. Zoom Out/Down (–) Button
7. CAMERA/REVIEW/Power Button
8. Shutter/OK Button
9. Liquid Crystal Display
10. Self Timer Button
11. Lens
5
�
3x Instr.Manual (English) new 1/2/02 10:52 am Page 6
LOCATION OF CONTROLS (CONTINUED)
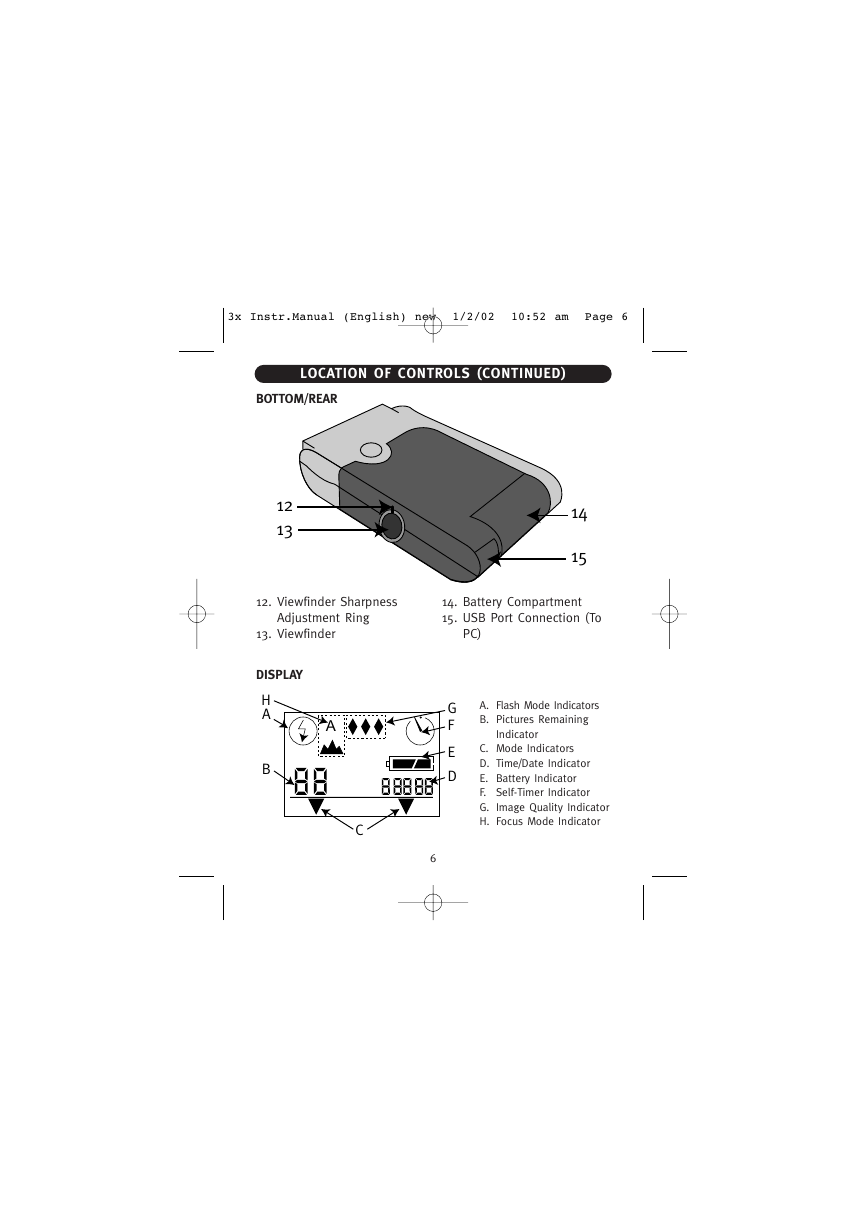
BOTTOM/REAR
12
13
14
15
12. Viewfinder Sharpness
Adjustment Ring
13. Viewfinder
14. Battery Compartment
15. USB Port Connection (To
PC)
DISPLAY
H
A
B
A
G
F
E
D
A. Flash Mode Indicators
B. Pictures Remaining
Indicator
C. Mode Indicators
D. Time/Date Indicator
E. Battery Indicator
F. Self-Timer Indicator
G.
H. Focus Mode Indicator
Image Quality Indicator
C
6
�
3x Instr.Manual (English) new 1/2/02 10:52 am Page 7
GETTING STARTED
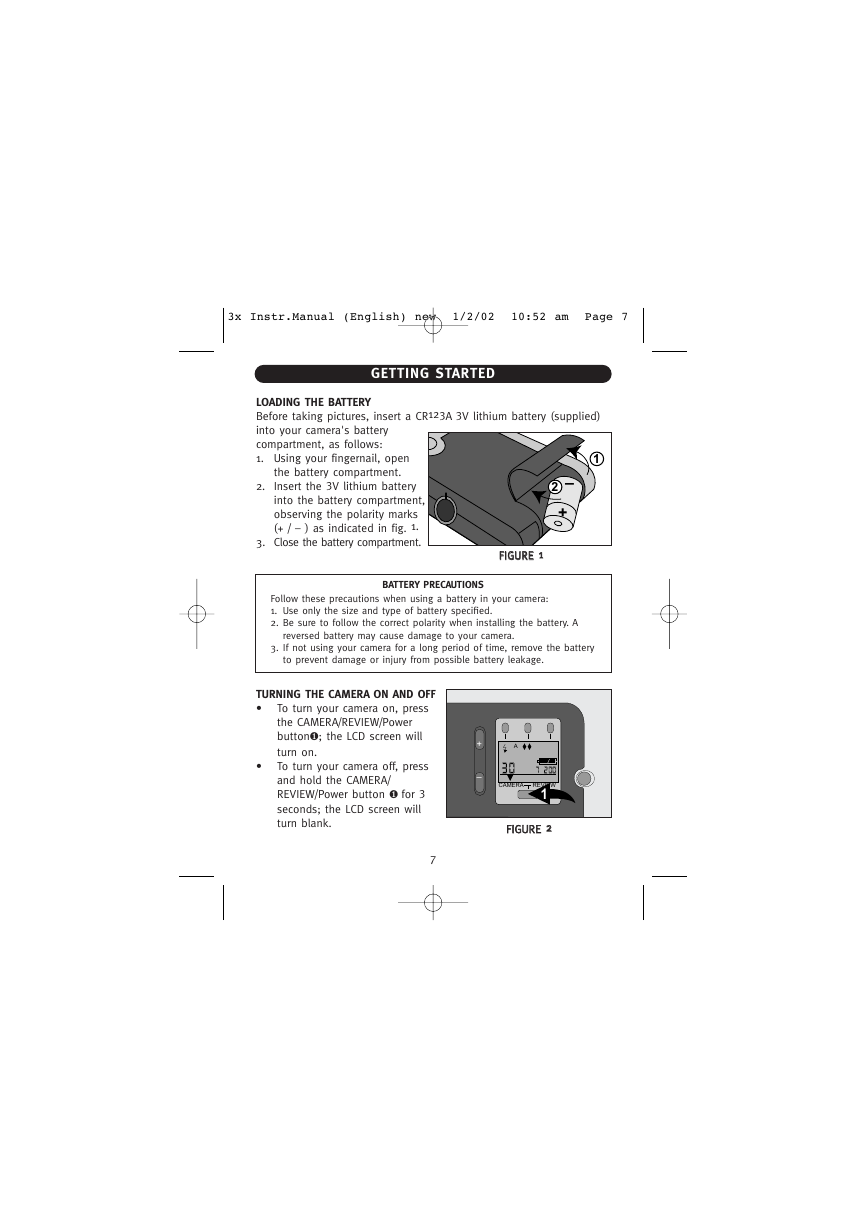
LOADING THE BATTERY
Before taking pictures, insert a CR123A 3V lithium battery (supplied)
into your camera's battery
compartment, as follows:
1. Using your fingernail, open
1
2.
the battery compartment.
Insert the 3V lithium battery
into the battery compartment,
observing the polarity marks
(+ / – ) as indicated in fig. 1.
3. Close the battery compartment.
2 –
+
FFIIGGUURREE 11
BATTERY PRECAUTIONS
Follow these precautions when using a battery in your camera:
1. Use only the size and type of battery specified.
2. Be sure to follow the correct polarity when installing the battery. A
reversed battery may cause damage to your camera.
3. If not using your camera for a long period of time, remove the battery
to prevent damage or injury from possible battery leakage.
TURNING THE CAMERA ON AND OFF
•
To turn your camera on, press
the CAMERA/REVIEW/Power
button❶; the LCD screen will
turn on.
To turn your camera off, press
and hold the CAMERA/
REVIEW/Power button ❶ for 3
seconds; the LCD screen will
turn blank.
•
A
+
–
CAMERA
REVIEW
1
FFIIGGUURREE 22
7
�
3x Instr.Manual (English) new 1/2/02 10:52 am Page 8
GETTING STARTED (CONTINUED)
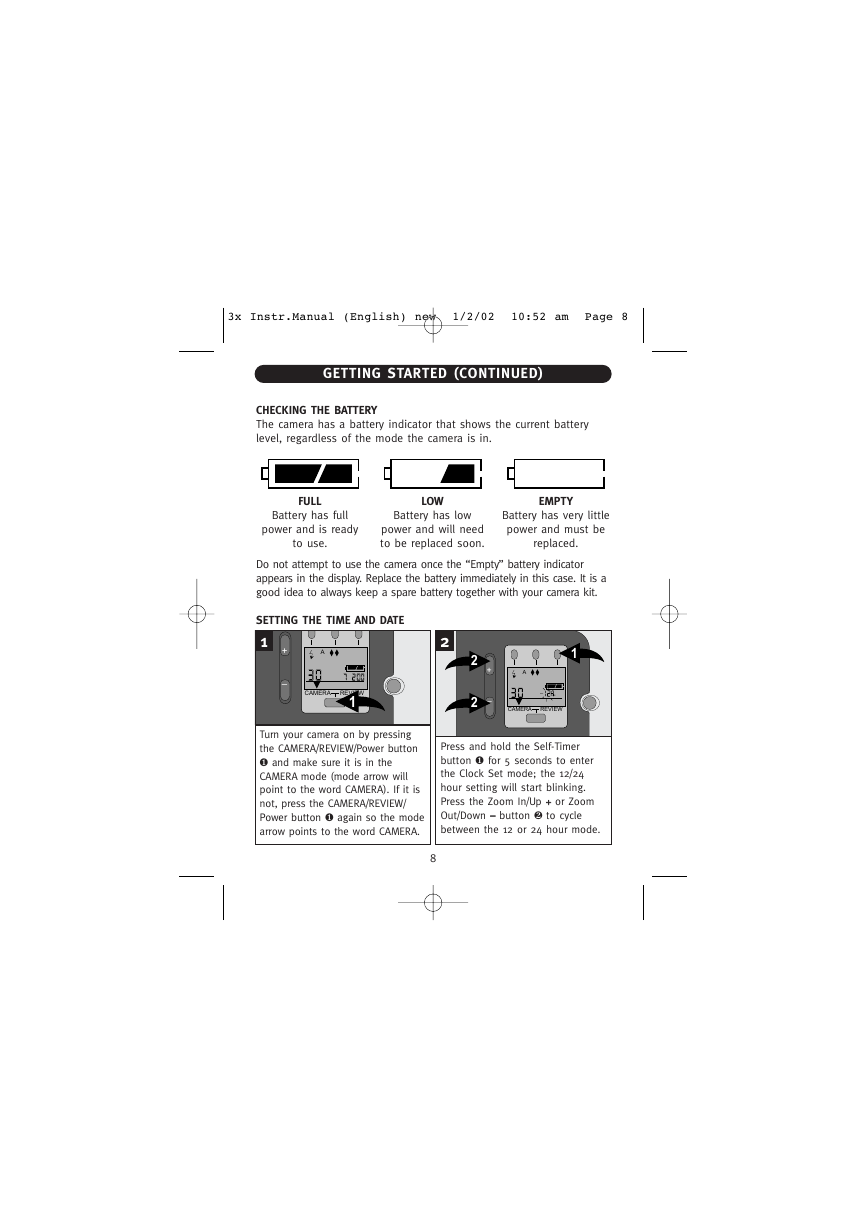
CHECKING THE BATTERY
The camera has a battery indicator that shows the current battery
level, regardless of the mode the camera is in.
FULL
LOW
EMPTY
Battery has full
power and is ready
to use.
Battery has low
power and will need
to be replaced soon.
Battery has very little
power and must be
replaced.
Do not attempt to use the camera once the “Empty” battery indicator
appears in the display. Replace the battery immediately in this case. It is a
good idea to always keep a spare battery together with your camera kit.
SETTING THE TIME AND DATE
1
+
A
–
CAMERA
REVIEW
1
2
2
2
+
–
1
A
CAMERA
REVIEW
Turn your camera on by pressing
the CAMERA/REVIEW/Power button
❶ and make sure it is in the
CAMERA mode (mode arrow will
point to the word CAMERA). If it is
not, press the CAMERA/REVIEW/
Power button ❶ again so the mode
arrow points to the word CAMERA.
Press and hold the Self-Timer
button ❶ for 5 seconds to enter
the Clock Set mode; the 12/24
hour setting will start blinking.
Press the Zoom In/Up ++ or Zoom
Out/Down –– button ❷ to cycle
between the 12 or 24 hour mode.
8
�


 2023年江西萍乡中考道德与法治真题及答案.doc
 2012年重庆南川中考生物真题及答案.doc
 2013年江西师范大学地理学综合及文艺理论基础考研真题.doc
 2020年四川甘孜小升初语文真题及答案I卷.doc
 2020年注册岩土工程师专业基础考试真题及答案.doc
 2023-2024学年福建省厦门市九年级上学期数学月考试题及答案.doc
 2021-2022学年辽宁省沈阳市大东区九年级上学期语文期末试题及答案.doc
 2022-2023学年北京东城区初三第一学期物理期末试卷及答案.doc
 2018上半年江西教师资格初中地理学科知识与教学能力真题及答案.doc
 2012年河北国家公务员申论考试真题及答案-省级.doc
 2020-2021学年江苏省扬州市江都区邵樊片九年级上学期数学第一次质量检测试题及答案.doc
 2022下半年黑龙江教师资格证中学综合素质真题及答案.doc