IS529
USER MANUAL
© 2012 All Rights Reserved.
Windows and the Windows logo are registered trademarks of Microsoft Corporation.
All other trademarks are the property of their respective companies.
�
1
�
Thank you for purchasing this digital camera. Everything you need to take quality digital photos
and videos is included with your digital camera.
Polaroid makes capturing those special moments as easy as possible.
Please read this manual carefully first in order to get the most out of your digital camera.
Note: Your camera needs an SD Memory card (up to 32GB) for normal use.
SD Memory cards are not included and need to be purchased separately.
1. Digital Camera
2. Lithium Battery
3. USB Cable
4. Polaroid Instant Memories
Software Installation CD
5. Wrist Strap
6. AC Charger
Note: SD Memory Card not included.
2
�
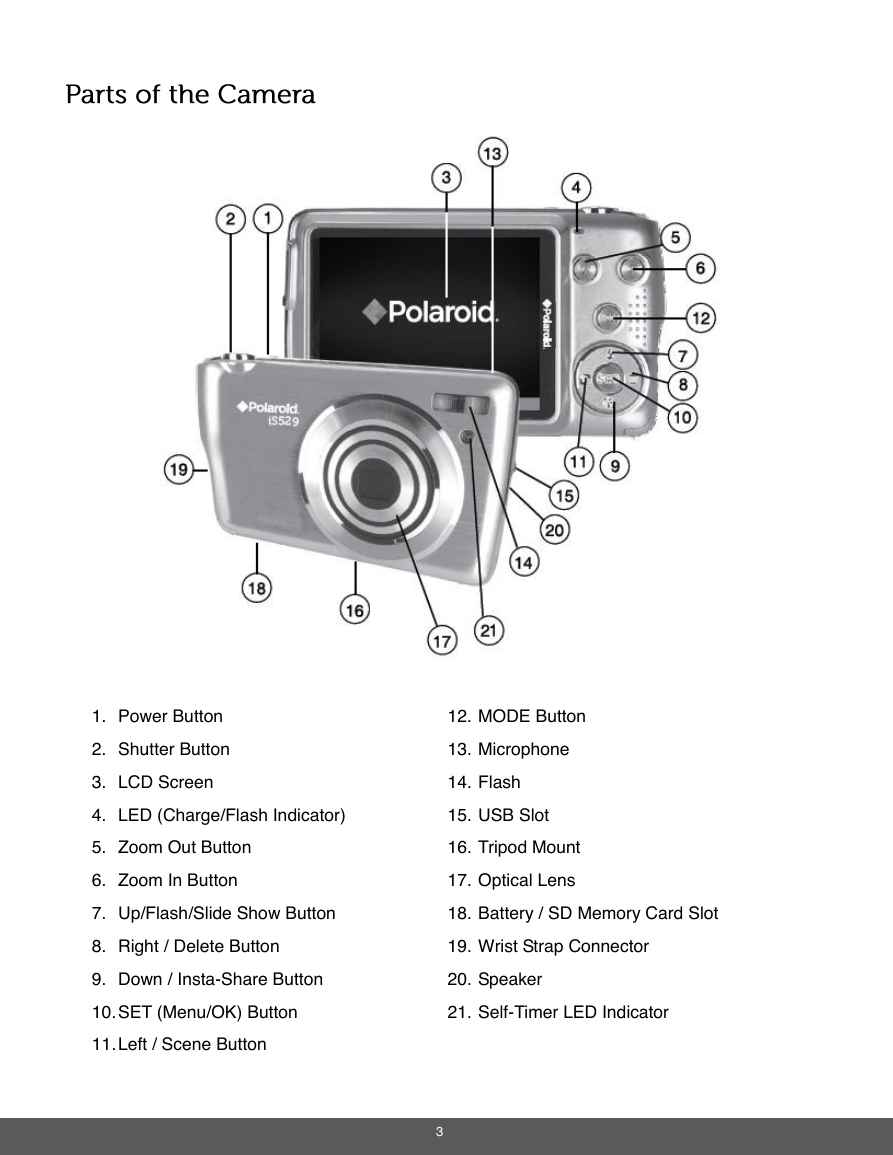
1. Power Button
2. Shutter Button
3. LCD Screen
12. MODE Button
13. Microphone
14. Flash
4. LED (Charge/Flash Indicator)
15. USB Slot
5. Zoom Out Button
6. Zoom In Button
16. Tripod Mount
17. Optical Lens
7. Up/Flash/Slide Show Button
18. Battery / SD Memory Card Slot
8. Right / Delete Button
19. Wrist Strap Connector
9. Down / Insta-Share Button
20. Speaker
10. SET (Menu/OK) Button
21. Self-Timer LED Indicator
11. Left / Scene Button
3
�
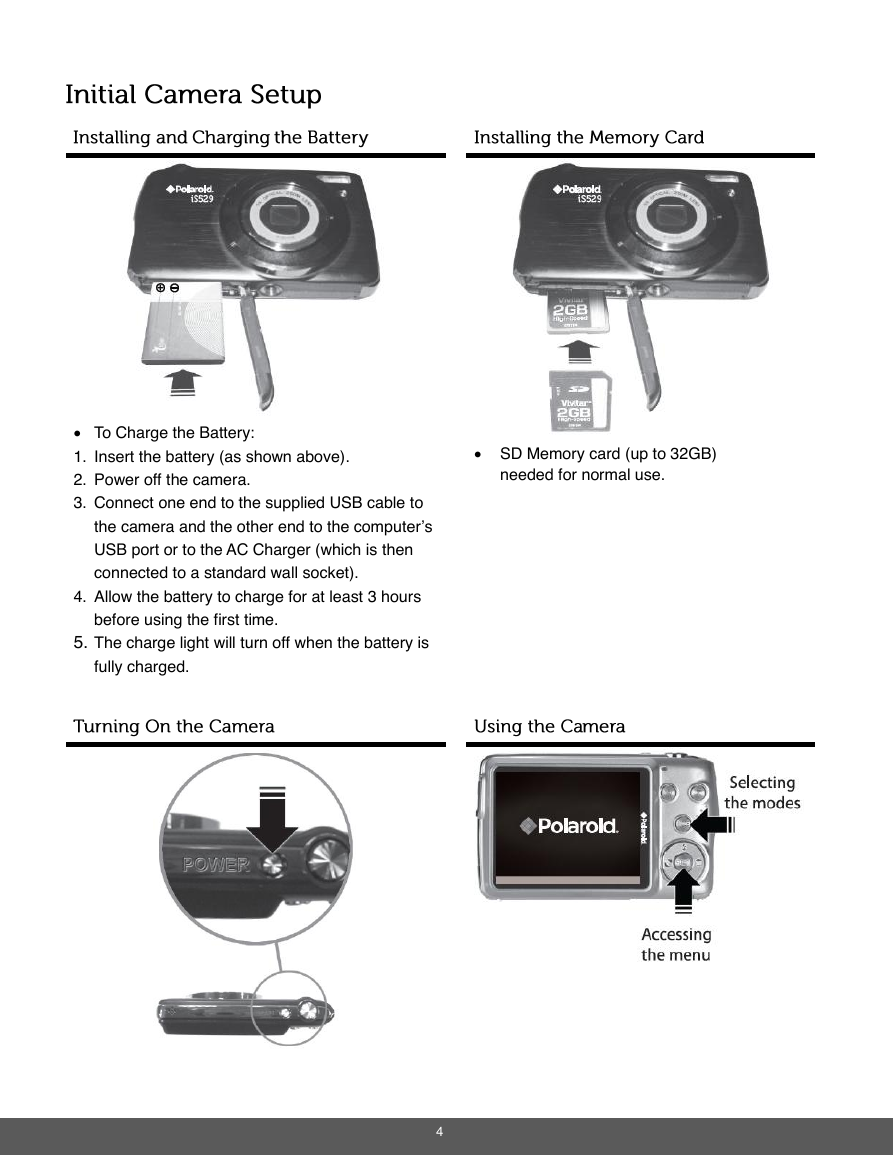
To Charge the Battery:
1. Insert the battery (as shown above).
2. Power off the camera.
3. Connect one end to the supplied USB cable to
the camera and the other end to the computer’s
USB port or to the AC Charger (which is then
connected to a standard wall socket).
4. Allow the battery to charge for at least 3 hours
before using the first time.
5. The charge light will turn off when the battery is
fully charged.
SD Memory card (up to 32GB)
needed for normal use.
4
�
When powering the camera ON for the first time the camera will take you through the initial
camera setup.
1)
Installing and Charging the Battery
First make sure that the battery is correctly inserted. The lithium battery should be inserted
all the way into the battery compartment. The latch should then cover the battery when
inserted correctly.
To charge your battery, first connect the supplied USB Cable to your camera.
Then follow one of the steps below:
A) Charge the battery using the USB connection cable (included) and your computer:
- Connect one end of the USB cable into the USB port on your camera.
- Connect the other end of the USB cable to the USB port on your computer.
B) Charge the battery using the USB connection cable (included) and the AC Adapter
(included).
- Connect one end of the USB cable into the USB port on your camera.
- Connect the other end to the AC Adapter and then plug the AC Adapter into a power
socket.
5
�
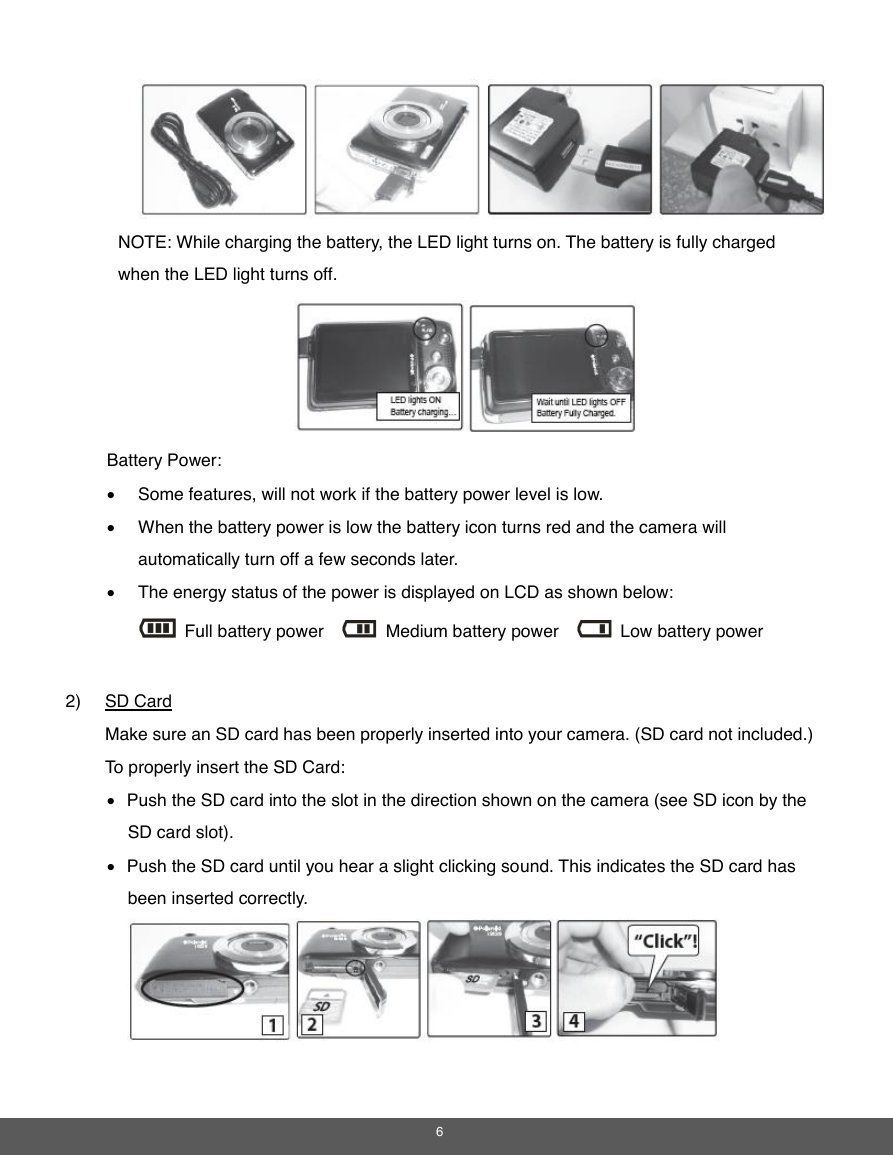
NOTE: While charging the battery, the LED light turns on. The battery is fully charged
when the LED light turns off.
Battery Power:
Some features, will not work if the battery power level is low.
When the battery power is low the battery icon turns red and the camera will
automatically turn off a few seconds later.
The energy status of the power is displayed on LCD as shown below:
Full battery power
Medium battery power
Low battery power
2) SD Card
Make sure an SD card has been properly inserted into your camera. (SD card not included.)
To properly insert the SD Card:
Push the SD card into the slot in the direction shown on the camera (see SD icon by the
SD card slot).
Push the SD card until you hear a slight clicking sound. This indicates the SD card has
been inserted correctly.
6
�
NOTE:
After the camera is powered on, an SD icon will appear on the LCD display. If you do not
see the SD icon on the display, please check if the card was inserted properly.
Make sure the SD card is not locked (check the lock switch on the side of the SD card).
If the SD card is locked this will prevent the camera from saving captured photos to the
SD card.
3) Power On
Press the
POWER button to turn on the camera.
After powering on your camera for the first time, you will be prompted to select a language for the
camera. The Language selection menu appears. Select the language of your choice by pressing
the UP and DOWN direction control buttons. Then press the SET button to confirm the selection.
Once a language has been selected, you will be asked if you would like to continue with the initial
camera setup. A message will appear: “Continue with Camera Setup?”
Select “Yes” to continue or “No” to exit the setup.
Note: If you select “No” and decide to leave the camera setup, the camera will be set to its default
settings. These settings can be adjusted at any time manually through the menus in the camera.
7
�


 2023年江西萍乡中考道德与法治真题及答案.doc
 2012年重庆南川中考生物真题及答案.doc
 2013年江西师范大学地理学综合及文艺理论基础考研真题.doc
 2020年四川甘孜小升初语文真题及答案I卷.doc
 2020年注册岩土工程师专业基础考试真题及答案.doc
 2023-2024学年福建省厦门市九年级上学期数学月考试题及答案.doc
 2021-2022学年辽宁省沈阳市大东区九年级上学期语文期末试题及答案.doc
 2022-2023学年北京东城区初三第一学期物理期末试卷及答案.doc
 2018上半年江西教师资格初中地理学科知识与教学能力真题及答案.doc
 2012年河北国家公务员申论考试真题及答案-省级.doc
 2020-2021学年江苏省扬州市江都区邵樊片九年级上学期数学第一次质量检测试题及答案.doc
 2022下半年黑龙江教师资格证中学综合素质真题及答案.doc