English
Getting Started
Parts of the camcorder
Loading/Removing battery
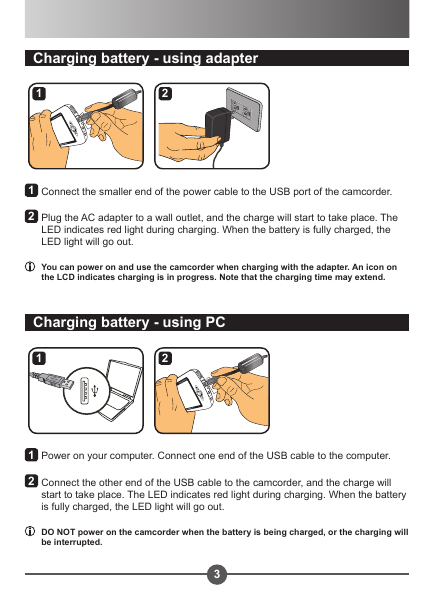
Charging battery - using adapter
Charging battery - using PC
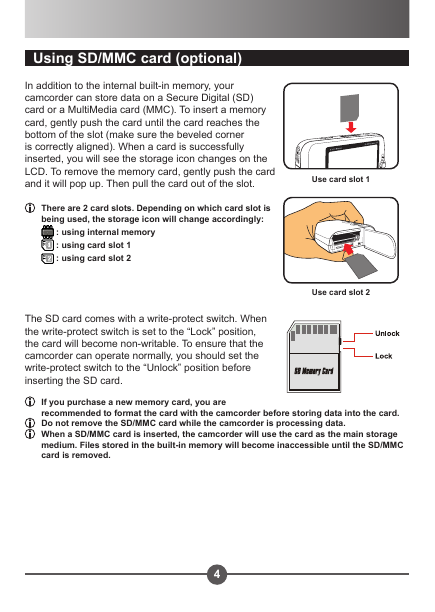
Using SD/MMC card (optional)
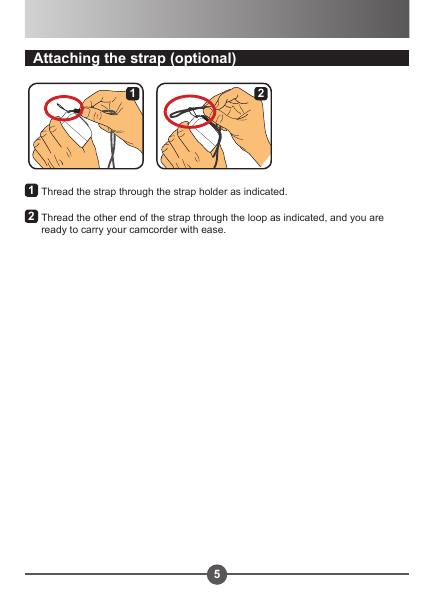
Attaching the strap (optional)
Basic Operations
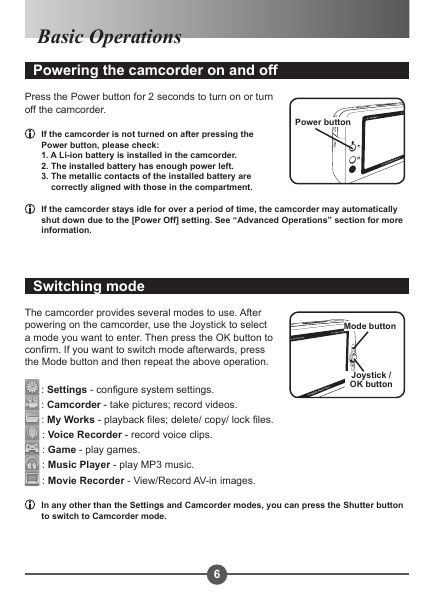
Powering the camcorder on and off
Switching mode
Setting time
Setting language
Recording a video clip
OSD display - recording video
Taking a still picture
OSD display - Camcorder mode
Recording a voice clip
OSD display - Voice Recorder mode
Playback
Playing files
OSD display - My Works mode
Locking a file / Copying files
Music Player
Copy MP3 files
Playing music
Displaying lyrics
Playing games
Playing games
Viewing display on a TV
Connecting the camcorder to TV
Recording TV program or DVD
Connecting the camcorder to TV or DVD player
Advanced Operations
Using menu
Menu items in Settings mode -1
Menu items in Settings mode -2
Menu items in Camcorder mode -1
Menu items in Camcorder mode -2
Menu items in My Works mode
Menu items in Voice Recorder mode
Menu items in Music Player mode
Menu items in Movie Recorder mode
Copy files to PC
Connecting the camcorder to PC
File folder of the removable disk
Appendix -1
Troubleshooting -1
Troubleshooting -2
Troubleshooting -3
Battery power indicator table
Capacity table
Battery life table
Specifications
System requirement
Appendix -2
Instruction for ArcSoft MediaConverter™
Deutsch
Start
Teile der Videokamera
Einlegen der Batterie
Laden der Batterie - Anwendung des Adapters
Das Laden der Batterie - Anwendung des PCs
Anwendung der SD/MMC Karte (Optional)
Anbringen des Tragriemens
Grundfunktionen
Die Videokamera an- und ausschalten
Schaltermodus
Zeit einstellen
Sprache einstellen
Ein Videoclip aufnehmen
OSD Bildschirm - Videoaufnahme
Ein Standbild aufnehmen
OSD Bildschirm – Camcordermodus
Aufnahme eines Stimmenclips
OSD Bildschirm – Sprachaufzeichnungmodus
Wiedergeben
Dateien wiedergeben
OSD Bildschirm – Meine Werke Modus
Dateienschutz / Dateien kopieren
Musikspieler
Kopieren von MP3 Dateien
Musik wiedergeben
Liedertexte wiedergeben
Spiele spielen
Spiele spielen
Video im Fernseher wiedergeben
Die Videokamera an den Fernseher anschliessen
Aufnahme von TV Programm oder DVD
Die Videokamera an das TV oder den DVD Spieler anschliessen.
Erweiterte Funktionen
Menü anwenden
Menüfunktionen in Einstellungenmodus -1
Menüfunktionen in Einstellungenmodus -2
Menüitems in Camcordermodus -1
Menüitems in Camcordermodus -2
Menüitems in Meine Dateien Modus
Menüitems in Sprachaufzeichnungmodus
Menüitems in Musikspieler Modus
Menüitems in Video Aufnahme Modus
Dateien auf den PC kopieren
Die Videokamera an den PC anschliessen
Dateiordner der entfernbaren Disk
Anhang - 1
Problembehebung - 1
Problembehebung - 2
Problembehebung - 3
Batteriestrom Indikatortabelle
Kapazitätstabelle
Batterielebenszeit Tabelle
Specifications
Systemanfordrungen
Anhang - 2
Anweisung für ArcSoft MediaConverter™
Français
POUR COMMENCER
Pièces du caméscope
Charger/Enlever la batterie
Recharge de la batterie et utilisation de l’adaptateur
Recharge de la batterie – utilisation du PC
Utilisation d’une carte SD/MMC (en option)
Fixation de la lanière (en option)
Opérations de base
Allumer et éteindre le caméscope
Changement de mode
Réglage de l’heure
Choix de la langue
Enregistrement d’un clip vidéo
Affichage sur écran - enregistrement vidéo
Prendre une image fixe
Affichage sur écran (OSD) - Mode caméscope
Enregistrement d’un clip vocal
Affichage sur écran (OSD) - Mode Enregistrement Vocal
Lecture
Lecture de fichiers
Affichage écran - Mode Mes Travaux
Verrouiller un fichier/Copier des fichiers
Lecteur de Musique
Copier des fichiers MP3
Lecture de musique
Affichage des paroles
Jeux
Jeux
Affichage sur téléviseur
Connexion du caméscope au téléviseur
Enregistrement d’un programme TV ou d’un DVD
Connexion du caméscope au téléviseur ou au lecteur de DVD
Opérations complexes
Utilisation du menu
Éléments du Menu en mode Réglages - 1
Éléments du menu en mode Réglages - 2
Éléments du menu en mode Caméscope - 1
Éléments du menu en mode Caméscope - 2
Éléments du Menu en mode Mes Travaux
Éléments du menu en mode Enregistreur de voix
Éléments du menu en mode Lecteur de musique
Éléments du menu en mode Enregistreur de film
Copier les fichiers vers le PC
Connexion du caméscope au PC
Dossier du disque amovible
Annexe - 1
Dépannage - 1
Dépannage - 2
Dépannage - 3
Tableau des voyants d’alimentation de la batterie
Tableau Capacité
Tableau de l’autonomie de la batterie
Spécifications
Exigences système
Annexe - 2
Instructions pour ArcSoft MediaConverter™
Italiano
Come cominciare
Parti della videocamera
Loading/Removing batteria
Caricamento della batteria – uso dell’adattatore
Caricamento della batteria – uso del PC
Uso della Scheda SD/MMC (opzionale)
Come si attacca il cinturino (opzionale)
Operazioni basilari
Come si accende e spegne la videocamera
Per cambiare le modalità
Impostazione orario
Impostazione lingua
Registrazione di una sequenza di video
Display OSD – registrazione del video
Coem si scatta un’istantanea
Display OSD - Modalità videocamera
Registrazione di una sequenza di voce
OSD mostra - Modalità Registr. Voce
Riproduzione
Esecuzione dei file
OSD mostra - Modalità Mio Lavoro
Come si blocca un file / Come si copiano i file
Riprod. Musica
Copia dei file MP3
Esecuzione di musica
Mostra delle parole
Esecuzione di giochi
Coem si eseguono i giochi
Visualizzazione del display su una TV
Collegamento della videocamera alla TV
Registrazione dei programmi TV o DVD
Collegamento della videocamera alla TV o al DVD player
Operazioni avanzate
Uso del menu
Voci del menu nella Modalità impostazioni - 1
Voci del menu nella Modalità impostazioni - 2
Voci del menu nella Modalità videocamera - 1
Voci del menu nella Modalità videocamera - 2
Voci del menu nella Modalità Mio Lavoro
Voci del menu nella Modalità Registr. Voce
Voci del menu nella Modalità Riprod. Musica
Voci del menu nella Modalità Registratore Filmati
Copia dei file sul PC
Collegamento della videocamera al PC
Cartella dei file del disco asportabile
Appendice - 1
Ricerca Guasti - 1
Ricerca Guasti - 2
Ricerca Guasti - 3
Tavola indicativa della corrente della batteria
Tavola della capacità
Tavola della durata della batteria
Specificazioni
Requisiti del sistema
Appendice - 2
Istruzioni per ArcSoft MediaConverter™
Nederlands
Om te beginnen
Onderdelen van de camcorder
De batterij plaatsen
De batterij opladen - met de adapter
De batterij opladen - met de computer
De SD/MMC-kaart gebruiken (optioneel)
De draagriem bevestigen (optioneel)
Algemene bedieningen
De camcorder aan- en uitzetten
De modus veranderen
De tijd instellen
De taal instellen
Een videofragment opnemen
OSD weergave – video-opname
Een foto nemen
OSD weergave – modus Camcorder
Een geluidsfragment opnemen
OSD weergave – modus Geluidsopname
Weergave
Bestanden afspelen
OSD weergave – modus Mijn werk
Een bestand vergrendelen (lock) / Bestanden kopiëren
Muziekspeler
MP3-bestanden kopiëren
Muziek afspelen
Liedjesteksten weergeven
Spelletjes spelen
Spelletjes spelen
Weergave op TV
De camcorder op een TV aansluiten
Het opnemen van Tv-programma’s of DVD-bestanden
De camcorder op een TV of een DVD-speler aansluiten
Geavanceerde werking
Het menu gebruiken
Menuopties in de modus Instellingen - 1
Menuopties in de modus Instellingen - 2
Menuopties in de modus Camcorder - 1
Menuopties in de modus Camcorder - 2
Menuopties in de modus Mijn werk
Menuopties in de modus Geluidsopname
Menuopties in de modus Muziekspeler
Menuopties in de modus Filmopname
Bestanden naar een computer kopiëren
Aansluiten van de camcorder op een computer
Bestandsmap van de verwisselbare schijf
Bijlage - 1
Oplossen van problemen - 1
Oplossen van problemen - 2
Oplossen van problemen - 3
Energieniveau van de batterij
Geheugencapaciteit
Gebruiksduur van de batterij
Specificaties
Systeemvereisten
Bijlage - 2
Richtlijnen voor ArcSoft MediaConverter™
Español
Inicio
Piezas de la la videocámara
Cargar/Remover la batería
Cargar la batería – Uso del adaptador
Cargar la batería – Uso de la PC
Uso de la tarjeta SD/MMC (opcional)
Pegado de la correa (opcional)
Operaciones Básicas
Encendido y Apagado de la videocámara
Cambio de Modo
Programar Horas
Programar Idiomas
Grabar clips video
Visualización OSD-Grabar video
Tomar fotos fijas
Visualización OSD-Modo Videocámara
Reproducción
Reproducir archivos
Pantalla OSD – Modo Mis Trabajos
Enganchar un archivo/Copiar archivos
Tocamúsicas
Copiar Archivos MP3
Reproducir música
Mostrar Líricos
Juegos
Juegos
Visualización en Televisor
Conexión de la Cámara Grabadora al Televisor
Grabación de Programas de TV o DVD
Conexión de la cámara grabadora a TV o TocaDVDs
Avanzadas Operaciones
Usar el Menú
Objetos del Menú en el Modo Programaciones - 1
Objetos del Menú en el Modo Programaciones - 2
Objetos del Menú en el Modo Cámara Grabadora - 1
Objetos del Menú en el Modo Cámara Grabadora - 2
Objetos del Menú en el Modo Mis Trabajos
Objetos del Menú en la Registrador de voz
Objetos del Menú en el Modo Tocamúsicas
Objetos del Menú en el Grabapelículas
Copiado de Archivos a PC
Conexión de la Cámara Grabadora a PC
Carpeta de Archivos del Disco Movible
Apéndice - 1
Fallas y soluciones - 1
Fallas y soluciones - 2
Fallas y soluciones - 3
Tabla de indicadoras de la batería
Tabla de Capacidad
Tabla de duración de batería
Especificaciones
Requisito del sistema
Apéndice - 2
Instrucciones para la aplicación ArcSoft MediaConverter™
Português
Início
Peças da câmara gravador
Carregar/Remover a bateria
Carregar a batería – Uso do adaptador
Carregar a bateria – Uso da PC
Uso da cartão SD/MMC (opcional)
Pegado da correia (opcional)
Operações Básicas
Ligado e Desligado da câmara gravador
Cambio de Modo
Programar Horas
Programar Idiomas
Gravar clips video
Painel OSD-Gravar video
Tomar fotos fixas
Painel OSD-Modo Câmara gravador
Gravar clips video
Painel OSD-Modo Câmara gravador
Reprodução
Reproduzir arquivos
Pantalha OSD – Modo Meus Trabalhos
Fechar um arquivo/Copiar arquivos
Reprodutor musical
Copiar Arquivos MP3
Reproduzir música
Mostrar Líricos
Jogos
Jogos
Ver Televisor
Conexión da Câmara Gravador ao Televisor
Gravação de Programas de TV ou DVD
Conexión da câmara gravador a TV ou Reprodutor de DVDs
Avançadas Operações
Usar o Menu
Objetos do Menu no Modo Programações - 1
Objetos do Menu no Modo Programações - 2
Objetos do Menu no Modo Câmara Gravador - 1
Objetos do Menu no Modo Câmara Gravador - 2
Objetos do Menu no Modo Meus Trabalhos
Objetos do Menu no Registrador de voz
Objetos do Menu no Modo Reprodutor Musical
Objetos do Menu no Gravador de Películas
Copiado de Arquivos a PC
Conexão da Câmara Gravador a PC
Dobradeira de Arquivos do Disco Móvil
Apêndice - 1
Faltas e soluções - 1
Faltas e soluções - 2
Faltas e soluções - 3
Tabela de indicadors da bateria
Tabela de Capacidade
Tabela de duração de bateria
Especificações
Requisito do sistema
Apêndice - B
Instruções para o ArcSoft MediaConverter™
日本語
始めましょう
ビデオカメラの各部の名称
バッテリの取付け 取外し
バッテリを充電する - アダプターを使用する
バッテリを充電する - コンピュータを使用する
カード(オプション)を使用する
ストラップ(オプション)を取り付ける
基本操作
ビデオカメラの電源を入れる 電源を切る
モードを切り替える
時間を設定する
言語を設定する
ビデオクリップを録画する
ディスプレイ - ビデオを録画する
写真を撮影する
ディスプレイ - ビデオカメラモード
音声クリップを録音する
OSD ディスプレイ – 音声記録モード
再生
ファイルを再生する
OSD ディスプレイ – 自分の作品モード
ファイルを保護する / ファイルをコピーする
ミュージックプレーヤー
MP3ファイルをコピーする
音楽を再生する
歌詞を表示する
ゲームをする
ゲームをする
テレビで表示する
ビデオカメラをテレビに 接続する
テレビ番組やDVD を録画する
ビデオカメラをテレビやDVD プレーヤーに接続する
アドバンスド操作
メニューを使う
設定モード のメニュー項目 - 1
設定モード のメニュー項目 - 2
ビデオカメラモード のメニュー項目 - 1
ビデオカメラモード のメニュー項目 - 2
自分の作品モード のメニュー項目
音声記録モード のメニュー項目
ミュージックプレーヤーモード のメニュー項目
ビデオレコーダーモード のメニュー項目
ファイルをコンピュータにコピーする
ビデオカメラをコンピュータに接続する
リムーバブルディスクのファイルフォルダ
付録 - 1
トラブルシューティング - 1
トラブルシューティング - 2
トラブルシューティング - 3
バッテリ残量インジケータ一覧表
容量一覧表
バッテリ寿命一覧表
仕様
システム要件
付録 - 2
ArcSpft MediaConverter™の使用について
한국어
시작하기
캠코더 각 부분의 명칭
전지 넣기/꺼내기
전지 충전하기-어댑터 사용
전지 충전하기- PC 사용
SD/MMC 카드(옵션) 사용하기
스트랩(옵션) 부착하기
기본 조작
캠코더 전원 켜고 끄기
모드 전환하기
시간 설정하기
언어 설정하기
비디오 클립 촬영하기
OSD 디스플레이 - 비디오 촬영하기
스틸 사진 촬영하기
OSD 디스플레이 - 캠코더 모드
음성 클립 녹음하기
OSD 디스플레이 - 음성 리코더 모드
재생
파일 재생하기
OSD 디스플레이 - 내작업 모드
파일 잠그기/파일 복사하기
음악
MP3파일 복사하기
음악 재생하기
가사 표시하기
게임 하기
게임 하기
TV로 보기
TV에 캠코더 연결하기
TV 프로그램 또는 DVD 녹화하기
TV 또는 DVD 플레이에 캠코더 연결하기
고급 조작
메뉴 사용하기
설정 모드 메뉴 항목 - 1
설정 모드 메뉴 항목 - 2
캠코더 모드 메뉴 항목 - 1
캠코더 모드 메뉴 항목 - 2
내작업 모드 메뉴 항목
음성 리코더 모드 메뉴 항목
음악 모드 메뉴 항목
무비 레코터 모드 메뉴 항목
PC에 파일 복사하기
PC에 캠코더 연결하기
이동식 디스크의 파일 폴더
부록 - 1
문제 해결 - 1
문제 해결 - 2
문제 해결 - 3
전지 전력 표시 표
용량 표:
전지 용량 표
제품 명세
시스템 요구 사항
부록 - 2
ArcSoft MediaConverter™ 사용법
简体中文
开始使用
摄像机部件
装载电池
电池充电—使用适配器
电池充电—使用PC
使用 SD/MMC 卡 (选配)
系上绳带 (选配)
基本操作
摄像机开机和关机
开关模式
设置时间
设置语言
录制影像片断
OSD显示器—录制影像
拍摄一张静止图片
OSD显示器—摄像模式
录制一个声音片断
OSD显示器—录音模式
播放
播放文件
OSD显示-作品模式
锁定一个文件 / 复制档案
音乐播放器
复制 MP3 文件
播放音乐
显示歌词
玩游戏
玩游戏
在电视上查看显示内容
将便携式摄像机连接到电视上
录制电视节目或者DVD
将便携式摄像机连接到电视或者 DVD 播放器上
高级操作
使用菜单
系统设置模式的菜单选项-1
系统设置模式的菜单选项-2
摄像模式菜单选项-1
摄像模式菜单选项-2
作品模式下的菜单选项
录音模式下的菜单选项
音乐模式下的菜单选项
录像片模式下的菜单选项
将文件复制到电脑上
将便携式摄像机和电脑连接
可移动磁盘的文件夹
附录-1
故障排除-1
故障排除-2
故障排除-3
电池电力指示灯表
容量表
电池寿命表
技术参数
系统要求
附录-2
ArcSoft MediaConverter的指示说明
繁體中文
開始使用
攝影機各部零件
裝入/取出電池
為電池充電 – 使用變壓器
為電池充電 – 使用PC
使用安全數位卡/多 卡(SD/MMC) (選購配件)
掛上安全吊帶(選購配件)
基本操作
打開和關閉攝影機電源
切換模式
設定時間
設定語言
錄製短片
螢幕顯示(OSD) – 錄影
拍攝靜態照片
螢幕顯示(OSD) – 數位攝影模式
錄製音效片段
螢幕顯示(OSD) – 數位錄音模式
播放
播放檔案
螢幕顯示(OSD) – 我的作品模式
鎖定檔案/複製檔案
音樂播放
複製MP3檔案
播放音樂
顯示歌詞
玩休閒遊戲
玩休閒遊戲
檢視電視上的顯示畫面
連接攝影機和電視機
錄製電視節目或DVD
連接攝影機和電視機或DVD播放器
進階操作
使用功能選單
設定模式中的功能選單項目 - 1
設定模式中的功能選單項目 - 2
數位攝影模式中的功能選單項目 - 1
數位攝影模式中的功能選單項目 - 2
我的作品模式中之功能選單項目
數位錄音模式中的功能選單項目
音樂播放模式中的功能選單項目
影片錄製模式中的的功能選單項目
將檔案複製到PC
連接攝影機和PC
卸除式磁碟機的檔案資料夾
附錄 - 1
故障排除 - 1
故障排除 - 2
故障排除 - 3
電池電力指示表
記憶容量表
電池使用壽命
規格
系統需求
附錄 - 2
ArcSoft MediaConverter™的指示說明
ไทย
เริ่ มต้นกา รใช้ งา น
ส่วนต่างๆ ของกล้องถ่ายวิดีโอ
การใส่/การถอดแบตเตอรี่
การชาร์จแบตเตอรี่ - การใช้อะแดปเตอร์
การชาร์จแบตเตอรี่ - การใช้พีซี
การใช้ SD/MMC การ์ด (ใส่หรือไม่ก็ได้)
การใส่สายร้อยข้อมือ (ใส่หรือไม่ก็ได้)
กา รทำ งา นพื้นฐา น
การเปิดและปิดกล้องถ่ายวิดีโอ
การเปลี่ยนโหมด
การตั้งเวลา
การตั้งภาษา
การบันทึกวิดีโอคลิป
หน้าจอ OSD - การบันทึกวิดีโอ
การถ่ายภาพนิ่ง
หน้าจอ OSD - โหมดกล้องถ่ายวิดีโอ
การบันทึกคลิปเสียง
หน้าจอ OSD - โหมดเครื่องบันทึกเสียง
กา รเล่ น
การเล่นไฟล์
หน้าจอ OSD - โหมดผลงาน
การล็อคไฟล์ / การคัดลอกไฟล์
เค รื่องเล่ นเพ ลง
คัดลอกไฟล์ MP3
การเล่นเพลง
การแสดงเนื้อเพลง
กา รเล่ นเก ม
การเล่นเกม
กา รดูหน้า จอบน TV
การเชื่อมต่อกล้องถ่ายวิดีโอไปยัง TV
กา รบันทึกรา ยกา ร TV หรือ DVD
การเชื่อมต่อกล้องถ่ายวิดีโอไปยัง TV หรือเครื่องเล่น DVD
กา รทำ งา นชั้นสูง
การใช้เมนู
รายการเมนูในโหมดการตั้งค่า - 1
รายการเมนูในโหมดการตั้งค่า - 2
รายการเมนูในโหมดกล้องถ่ายวิดีโอ - 1
รายการเมนูในโหมดกล้องถ่ายวิดีโอ - 2
รายการเมนูในโหมดผลงาน
รายการเมนูในโหมดเครื่องบันทึกเสียง
รายการเมนูในโหมดเครื่องเล่นเพลง
รายการเมนูในโหมดเครื่องบันทึกภาพยนตร์
คัดลอกไฟ ล์ไป ยังพีซี
การเชื่อมต่อกล้องถ่ายวิดีโอไปยังพีซี
โฟลเดอร์ไฟล์ของดิสก์ที่ถอดเข้าออกได้
ภา คผนวก - 1
การแก้ไขปัญหา - 1
การแก้ไขปัญหา - 2
การแก้ไขปัญหา - 3
ตารางตัวแสดงสถานะพลังงานแบตเตอรี่
ตารางความจุ
ตารางอายุการใช้งานแบตเตอรี่
ข้อมูลจำเพาะ
ความต้องการของระบบ
ภาคผนวก - 2
ขั้นตอนสำหรับ ArcSoft MediaConverter™





 2023年江西萍乡中考道德与法治真题及答案.doc
 2012年重庆南川中考生物真题及答案.doc
 2013年江西师范大学地理学综合及文艺理论基础考研真题.doc
 2020年四川甘孜小升初语文真题及答案I卷.doc
 2020年注册岩土工程师专业基础考试真题及答案.doc
 2023-2024学年福建省厦门市九年级上学期数学月考试题及答案.doc
 2021-2022学年辽宁省沈阳市大东区九年级上学期语文期末试题及答案.doc
 2022-2023学年北京东城区初三第一学期物理期末试卷及答案.doc
 2018上半年江西教师资格初中地理学科知识与教学能力真题及答案.doc
 2012年河北国家公务员申论考试真题及答案-省级.doc
 2020-2021学年江苏省扬州市江都区邵樊片九年级上学期数学第一次质量检测试题及答案.doc
 2022下半年黑龙江教师资格证中学综合素质真题及答案.doc