Digital Camcorder
English
Getting started
Loading the battery
Inserting the SD/MMC card (optional)
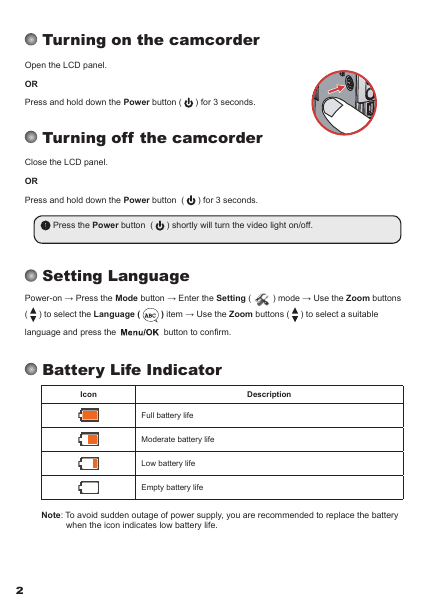
Turning on the camcorder
Turning off the camcorder
Setting Language
Battery Life Indicator
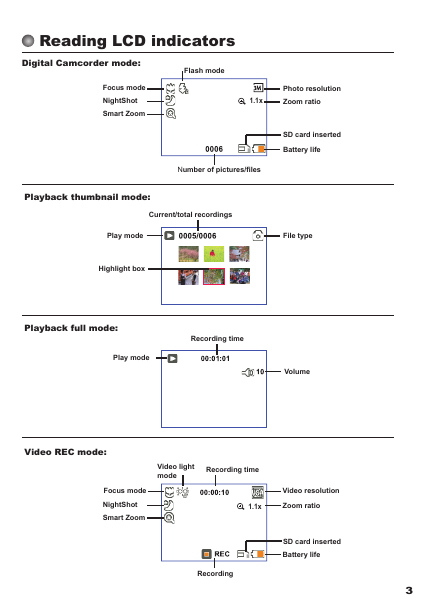
Reading LCD indicators
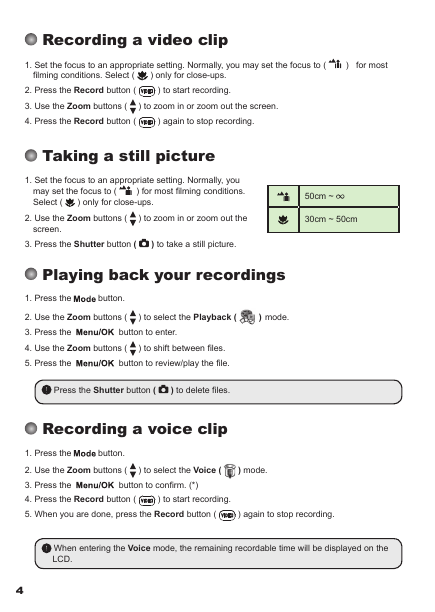
Recording a video clip
Taking a still picture
Playing back your recordings
Recording a voice clip
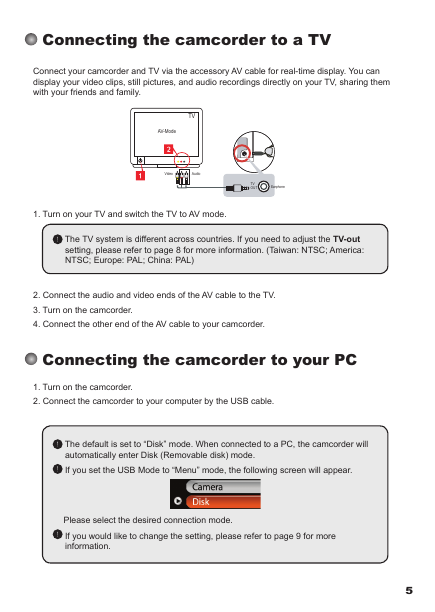
Connecting the camcorder to a TV
Connecting the camcorder to your PC
Mode selection
Basic operation
Menu items in Camera mode (1)
Menu items in Camera mode (2)
Menu items in Playback mode
Menu items in Setting mode (1)
Menu items in Setting mode (2)
Advanced Instructions
Copying files to Your PC
Installing the driver to your PC
Copying files to Your PC (continued)
Connecting the camcorder to your PC
File location
Using PC Camera
Installing the software
Starting the application
Using DV xxxx PC Camera
Using DV xxxx PC Camera (Continued)
Using DV xxxx PC Camera (Continued)
Appendix: A
Troubleshooting
Flicker Settings
System Message
Appendix: B
Instruction for ArcSoft MediaConverter™
Appendix: C
System Requirements
Deutsch
Erste Schritte
Einlegen der Batterie
Einlegen der SD-/MMC-Karte (optional)
Einschalten des Camcorders
Ausschalten des Camcorders
Einstellen der Sprache
Batterieladestandsanzeige
Lesen der LCD-Anzeigen
Aufzeichnen von Videos
Aufnehmen von Fotos
Wiedergeben Ihrer Aufzeichnungen
Aufzeichnung von Sprachdateien
Anschließen des Camcorders an ein TV-Gerät
Anschließen des Camcorders an einen PC
Moduswahl
Grundbetrieb
Menüpunkte im Kameramodus (1)
Menüpunkte im Kameramodus (2)
Menüpunkte im Wiedergabemodus
Menüpunkte im Einstellungsmodus (1)
Menüpunkte im Einstellungsmodus (2)
Erweiterte Anweisungen
Kopieren von Dateien auf Ihren PC
Installieren des Treibers auf dem PC
Kopieren von Dateien auf den PC (Fortsetzung)
Anschließen des Camcorders an einen PC
Dateipfad
Verwenden als PC-Kamera
Installieren der Software
Starten des Programms
Verwenden der PC-Kamera DV xxxx
Verwenden der PC-Kamera DV xxxx (Fortsetzung)
Verwenden der PC-Kamera DV xxxx (Fortsetzung)
Anhang: A
Problembehebung
Frequenzeinstellungen
Systemmeldungen
Anhang: B
Anweisung für ArcSoft MediaConverter™
Anhang: C
Systemvoraussetzungen
Français
La prise en main
Installer la pile
Insérer la carte SD/MMC (facultatif)
Allumer le caméscope
Eteindre le caméscope
Régler la langue
Indicateur d’autonomie pile
Lire les indicateurs LCD
Enregistrer un clip vidéo
Prendre une photo
Lire vos enregistrements
Enregistrer une séquence vocale
Relier le caméscope à un téléviseur
Branchement du caméscope sur votre PC
Sélection du mode
Utilisation de base
Les éléments de menu du mode appareil photo (1)
Les éléments de menu du mode appareil photo (2)
Les éléments de menu du mode Lecture
Les éléments de menu du mode réglage (1)
Les éléments de menu du mode réglage (2)
Instructions avancées
Copier des fichiers vers votre PC
Installer le pilote sur votre PC
Copier des fichiers vers votre PC (suite)
Branchement du caméscope sur votre PC
Emplacement des fichiers
Utiliser la PC Caméra
Installer le logiciel
Démarrez l’application
Utiliser la PC Caméra DV xxxx
Utiliser la PC Caméra DV xxxx (Suite)
Utiliser la PC Caméra DV xxxx (Suite)
Annexe: A
Dépannage
Réglage de fréquence
Messages système
Annexe: B
Instructions pour ArcSoft MediaConverter™
Annexe: C
Configuration système requise
Italiano
Preparazione
Inserimento della batteria
Inserimento della scheda SD/MMC (opzionale)
Accensione della videocamera
Spegnimento della videocamera
Impostazione della lingua
Indicatore di carica della batteria
Lettura degli indicatori del display LCD
Registrazione di una sequenza video
Fotografare
Riproduzione delle registrazioni
Registrazione di una sequenza vocale
Collegamento della videocamera al televisore
Collegamento della videocamera al PC
Selezione modalità
Funzionamento di base
Voci del menu in modalità Fotocamera (1)
Voci del menu in modalità Fotocamera (2)
Voci del menu in modalità Riproduzione
Voci del menu in modalità Impostazioni (1)
Voci del menu in modalità Impostazioni (2)
Istruzioni avanzate
Copiare i file sul PC
Installazione del driver sul PC
Copiare i file sul PC (segue)
Collegamento della videocamera al PC
Posizione dei file
Uso della funzione PC Camera
Installazione del software
Avviare l’applicazione
Uso della funzione PC Camera DV xxxx
Uso della funzione PC Camera DV xxxx (segue)
Uso della funzione PC Camera DV xxxx (segue)
Appendice: A
Risoluzione dei problemi
Impostazioni della frequenza
Messaggi del sistema
Appendice: B
Istruzioni per ArcSoft MediaConverter™
Appendice: C
Requisiti del sistema
Español
Primeros pasos
Cargar la batería
Insertar una tarjeta de memoria SD/MMC (opcional)
Encender la videocámara
Apagar la videocámara
Configuración de idioma
Indicador de carga de la batería
Leer los indicadores LCD
Grabar un clip de vídeo
Capturar una imagen estática
Reproducir las grabaciones
Grabar un clip de voz
Conectar la videocámara a un televisor
Conectar la videocámara a su PC
Seleccionar el modo
Funcionamiento básico
Elementos de menú en el modo Cámara (1)
Elementos de menú en el modo Cámara (2)
Elementos de menú en el modo Reproducción
Elementos de menú en el modo Configuración (1)
Elementos de menú en el modo Configuración (2)
Instrucciones avanzadas
Copiar archivos al PC
Instalar el controlador en el PC
Copiar archivos al PC (continuación)
Conectar la videocámara a su PC
Ubicación de los archivos
Utilizar la cámara de PC
Instalar el software
Iniciar la aplicación
Utilización de la cámara de PC DV xxxx
Utilizar la cámara de PC DV xxxx (continuación)
Utilizar la cámara de PC DV xxxx (continuación)
Apéndice: A
Solución de problemas
Configuración de parpadeo
Mensajes del sistema
Apéndice: B
Instrucciones para la aplicación ArcSoft MediaConverter™
Apéndice: C
Requisitos del sistema
Português
Preparação da câmara
Colocação das pilhas
Introdução do cartão de memória SD/MMC (opcional)
Ligar a camcorder
Desligar a camcorder
Definição do idioma
Indicador de carga das pilhas
Significado dos ícones apresentados no ecrã LCD
Gravação de um clip de vídeo
Tirar fotografias
Reprodução das suas gravações
Gravação de um clip de voz
Ligação da camcorder a um televisor
Ligação da camcorder ao PC
Selecção dos modos da camcorder
Operações básicas
Itens do menu no modo Câmara (1)
Itens do menu no modo Câmara (2)
Itens do menu no modo Reproduzir
Itens do menu no modo Definição (1)
Itens do menu no modo Definição (2)
Instruções avançadas
Copiar ficheiros para o PC
Instalação do controlador no PC
Copiar ficheiros para o PC (continuação)
Ligação da camcorder ao PC
Localização dos ficheiros
Utilização da função PC Camera
Instalação do software
Iniciar a aplicação
Utilização da função PC Camera do DV xxxx
Utilização da função PC Camera do DV xxxx (continuação)
Utilização da função PC Camera do DV xxxx (continuação)
Apêndice: A
Resolução de problemas
Definições de cintilação
Mensagens do sistema
Apêndice: B
Instruções para o ArcSoft MediaConverter™
Apêndice: C
Requisitos do sistema
Nederlands
Aan de slag
De batterij plaatsen
De SD/MMC-kaart plaatsen (optioneel)
De camcorder inschakelen
De camcorder uitschakelen
De taal instellen
Indicator levensduur batterij
LCD-indicators aflezen
Een videoclip opnemen
Een foto maken
Uw opnamen afspelen
Een videoclip opnemen
De camcorder aansluiten op een tv
De camcorder aansluiten op uw pc
Modusselectie
Basisbediening
Menu-items in de cameramodus (1)
Menu-items in de cameramodus (2)
Menu-items in de weergavemodus
Menu-items in de Instellingsmodus (1)
Menu-items in de Instellingsmodus (2)
Geavanceerde richtlijnen
Bestanden kopiëren naar uw pc
Het stuurprogramma voor uw pc installeren
Bestanden kopiëren naar uw pc (vervolg)
De camcorder aansluiten op uw pc
Bestandslocatie
De PC-camera gebruiken
De software installeren
De toepassing starten
De DV xxxx PC-camera gebruiken
De DV xxxx PC-camera gebruiken (vervolg)
De DV xxxx PC-camera gebruiken (vervolg)
Bijlage: A
Problemen oplossen
Flikkerinstellingen
Systeembericht
Bijlage: B
Richtlijnen voor ArcSoft MediaConverter™
Bijlage: C
Systeemvereisten
Русский
Подготовка к эксплуатации
Установка батареи
Установка карты памяти SD или MMC (не входит в комплект поставки)
Включение камеры
Выключение камеры
Установка языка
Индикатор заряда батареи
Значения индикаторов ЖК-дисплея
Видеосъемка
Фотосъемка
Просмотр файлов
Аудиозапись
Подключение камеры к телевизору
Подключение камеры к компьютеру
Выбор режима
Основные операции
Пункты меню в режиме фотокамеры (1)
Пункты меню в режиме фотокамеры (2)
Пункты меню в режиме просмотра
Пункты меню в режиме настройки (1)
Пункты меню в режиме настройки (2)
Дополнительные инструкции
Копирование файлов на ПК
Установка драйвера на ПК
Копирование файлов на ПК (продолжение)
Подключение камеры к компьютеру
Расположение файлов
Использование веб-камеры
Установка программного обеспечения
Запуск приложения
Использование веб-камеры DV xxxx
Использование веб-камеры DV xxxx (продолжение)
Использование веб-камеры DV xxxx (продолжение)
Приложение A
Устранение неполадок
Настройки мерцания
Системные сообщения
Приложение B
Инструкции по использованию ArcSoft MediaConverter™
Приложение C
Системные требования
Svenska
Komma igång
Sätta i batteriet
Föra in SD/MMC-kortet (tillval)
Sätta på kameran
Stänga av kameran
Ställa in språk
Indikator för batterilivslängd
Avläsa LCD-indikatorer
Spela in ett videoklipp
Ta stillbilder
Spela upp dina inspelningar
Spela in ett röstklipp
Ansluta kameran till en TV
Ansluta kameran till datorn
Lägesval
Grundläggande användning
Menyposter i kameraläge (1)
Menyposter i kameraläge (2)
Menyposter i uppspelningsläge
Menyposter i inställningsläge (1)
Menyposter i inställningsläge (2)
Avancerade anvisningar
Kopiera filer till PC
Installera drivrutinen i din PC
Kopiera filer till din PC (forts.)
Ansluta kameran till datorn
Filplacering
Använda PC-kamera
Installera programvaran
Starta programmet
Använda DV xxxx PC-kamera
Använda DV xxxx PC-kamera (forts)
Använda DV xxxx PC-kamera (forts)
Bilagor: A
Felsökning
Flimmerinställningar
Systemmeddelande
Bilagor: B
Instruktion för ArcSoft MediaConverter™
Bilagor: C
Systemkrav
ไทย
คู่มือผู้ใช
การใส่แบตเตอรี่
การใส่ SD/MMC การ์ด (อุปกรณ์ซื้อเพิ่ม)
การเปิดกล้องวิดีโอ
การปิดกล้องวิดีโอ
การตั้งภาษา
ตัวแสดงสถานะอายุแบตเตอรี่
การอ่านตัวแสดงสถานะบน LCD
การบันทึกวิดีโอคลิป
การถ่ายภาพนิ่ง
การเล่นสิ่งที่บันทึกไว้
การบันทึกคลิปเสียง
การเชื่อมต่อกล้องวิดีโอไปยังโทรทัศน์
การเชื่อมต่อกล้องวิดีโอไปยังพีซีของคุณ
การเลือกโหมด
การทำงานพื้นฐาน
รายการเมนูในโหมดกล้อง (1)
รายการเมนูในโหมดกล้อง (2)
รายการเมนูในโหมดเล่น
รายการเมนูในโหมดตั้งค่าใช้งาน (1)
รายการเมนูในโหมดตั้งค่าใช้งาน (2)
ขั้นตอนการทำงานชั้นสูง
การคัดลอกไฟล์ไปยังพีซีของคุณ
การติดตั้งไดรเวอร์ลงในพีซีของคุณ
การคัดลอกไฟล์ไปยังพีซีของคุณ (ต่อ)
การเชื่อมต่อกล้องวิดีโอไปยังพีซีของคุณ
ตำแหน่งไฟล์
การใช้กล้องพีซี
การติดตั้งซอฟต์แวร์
การเริ่มแอปพลิเคชั่น
เปิดโปรแกรมกล้องพีซี
การใช้กล้องพีซี
การใช้กล้องพีซี (ต่อ)
การใช้กล้องพีซี (ต่อ)
ภาคผนวก: A
การแก้ไขปัญหา
การตั้งค่าความถี่
ข้อความระบบ
ภาคผนวก: B
ขั้นตอนสำหรับ ArcSoft MediaConverter™
ภาคผนวก: C
ความต้องการของระบบ
繁體中文
準備事項
安裝電池
插入 SD/MMC 卡(另購)
開啟電源
關閉電源
設定系統語言
電池圖示對照表
操作介面顯示
攝錄動態影像
拍照
瀏覽功能
錄音
攝影機與電視連線輸出
將攝影機連結至電腦
模式選擇
基本操作
攝影模式中的選單項目(1)
攝影模式中的選單項目 (2)
播放模式的選單項目
系統設定模式的選單項目 (1)
系統設定模式的選單項目(2)
進階說明
複製檔案至電腦中
安裝驅動程式
複製檔案至電腦中 (續)
將攝影機連結至電腦
檔案位置
使用PC Camera
軟體安裝
準備使用
使用 DV xxxx PC Camera 功能
使用 DV xxxx PC Camera 功能 (續)
使用 DV xxxx PC Camera 功能 (續)
附錄:A
疑難排解
頻率設定表
系統訊息表
附錄:B
ArcSoft MediaConverter™的指示說明™
附錄:C
系統要求
한국어
사용자 설명서
전지 넣기
SD/MMC 카드(옵션) 끼워넣기
캠코더 켜기
캠코더 끄기
언어 설정하기
전지 용량 표시기
비디오 클립 촬영하기
스틸 사진 촬영하기
파일 재생하기
음성 녹음하기
TV에 캠코더 연결하기
PC에 캠코더 연결하기
모드 선택
기본 조작
카메라 모드 메뉴 항목항목(1)
메뉴 항목항목(2)
재생 모드 메뉴 항목
설정 모드 메뉴 항목(1)
설정 모드 메뉴 항목항목(2)
고급 설명서
PC에 파일 복사하기
PC에 드라이버 설치하기
PC에 파일 복사하기(계속)
캠코더 연결하기
파일 위치
PC 카메라 사용하기
소프트웨어 설치하기
응용 프로그램 시작하기
DV xxxx PC 카메라 사용하기
DV xxxx PC 카메라 사용하기(계속)
DV xxxx PC 카메라 사용하기(계속)
부록: A
문제 해결
플리커 설정
시스템 메시지
부록: B
사용법
부록: C
시스템 요구 사항
简体中文
准备事项
安装电池
插入SD/MMC卡(另购)
开启电源
关闭电源
设定系统语言
电池图示对照表
操作接口显示
摄录动态影像
拍照
浏览功能
录音
摄影机与电视联机输出
将摄影机连结至计算机
模式选择
基本操作
摄影模式中的选单项目(1)
摄影模式中的选单项目(2)
播放模式的选单项目
系统设定模式的选单项目(1)
系统设定模式的选单项目(2)
进阶说明
复制档案至计算机中
安装驱动程序
复制档案至计算机中(续)
将摄影机连结至计算机
档案位置
使用PC Camera
软件安装
准备使用
启动DV xxxx程序
使用DV xxxx PC Camera功能
使用DV xxxx PC Camera功能(续)
使用DV xxxx PC Camera功能(续)
附录:A
疑难排解
频率设定表
系统讯息表
附录:B
ArcSoft MediaConverter™的指示说明™
附录:C
系统要求
日本語
始める前に
電池の装填
SD/MMCカード(オプション)の装着
ビデオカメラの電源オン
ビデオカメラの電源オフ
言語の設定
電池残量表示
LCD表示の説明
ビデオクリップの録画
スチル画像の撮影
録画ファイルの再生
音声メモの録音
ビデオカメラのTVへの接続
ビデオカメラのPCへの接続
モードの選択
基本的な操作
カメラモードでのメニュー項目(1)
カメラモードでのメニュー項目(2)
再生モードでのメニュー項目
設定モードでのメニュー項目(1)
設定モードでのメニュー項目(2)
詳しい説明
PCへのファイルコピー
PCへのドライバのインストール
PCへのファイルコピー(つづき)
ビデオカメラのPCへの接続
ファイルの位置
PCカメラの使用
ソフトウェアのインストール
アプリケーションの起動
DV xxxx PCカメラの使用
DV xxxx PCカメラの使用(つづき)
DV xxxx PCカメラの使用(つづき)
付録:A
トラブルシューティング
フリッカ設定
システムメッセージ
付録:B
ArcSoft MediaConverter™の説明
付録:C
システム要件




 2023年江西萍乡中考道德与法治真题及答案.doc
 2012年重庆南川中考生物真题及答案.doc
 2013年江西师范大学地理学综合及文艺理论基础考研真题.doc
 2020年四川甘孜小升初语文真题及答案I卷.doc
 2020年注册岩土工程师专业基础考试真题及答案.doc
 2023-2024学年福建省厦门市九年级上学期数学月考试题及答案.doc
 2021-2022学年辽宁省沈阳市大东区九年级上学期语文期末试题及答案.doc
 2022-2023学年北京东城区初三第一学期物理期末试卷及答案.doc
 2018上半年江西教师资格初中地理学科知识与教学能力真题及答案.doc
 2012年河北国家公务员申论考试真题及答案-省级.doc
 2020-2021学年江苏省扬州市江都区邵樊片九年级上学期数学第一次质量检测试题及答案.doc
 2022下半年黑龙江教师资格证中学综合素质真题及答案.doc