ZedBoard: Standalone USB Device
Tutorial
3 January 2014
Version 14.6.01
Overview
C:\Avnet\ZedBoard\
The archive contents, which accompany this document, contain pre-built ZedBoard
binaries implementing an example Zynq application which demonstrates ZedBoard as a
USB Mass Storage Device.
Extract the contents of the accompanying archive to the following folder:
This tutorial document builds upon the concepts and lab activities of the Xilinx
ZedBoard: Zynq-7000 AP SoC Concepts, Tools, and Techniques document. Please refer
back to this reference material on the ZedBoard community website for further
information on how to configure and customize the underlying Zynq hardware platform.
NOTE: The instructions contained in this document are reference purposes only to
disclose the steps required to implement the USB Device example application upon
the ISE 14.6 Pre-Defined Hardware Platform Template for ZedBoard. These
instructions do not need to be completed if you are already using the pre-built files
from the sd_image subfolder of the archive accompanying this document.
For more information on the ISE 14.6 Pre-Defined Hardware Platform Template for
ZedBoard used in this tutorial, please refer to the SDK documentation found here:
www.xilinx.com/support/documentation/sw_manuals/xilinx14_6/SDK_Doc/tasks/sdk_t_hwspec.htm
Objectives
When this tutorial is complete, you will be able to:
Create an application project upon a Xilinx-provided hardware platform template
Run the USB Mass Storage Device example application on ZedBoard hardware
© 2014 Avnet. All rights reserved. All trademarks and registered trademarks are the property of their respective owners. All specifications
are subject to change without notice.
NOTICE OF DISCLAIMER: Avnet is providing this design, code, or information "as is." By providing the design, code, or information as
one possible implementation of this feature, application, or standard, Avnet makes no representation that this implementation is free from
any claims of infringement. You are responsible for obtaining any rights you may require for your implementation. Avnet expressly
disclaims any warranty whatsoever with respect to the adequacy of the implementation, including but not limited to any warranties or
representations that this implementation is free from claims of infringement and any implied warranties of merchantability or fitness for a
particular purpose.
�
ZedBoard: Standalone USB Device Tutorial
v14.6.04
3 January 2014
Experiment Setup
Software
The software used to test this reference design is:
Windows-7 64-bit
Xilinx SDK 14.6
Cypress CY7C64225 USB-to-UART Driver
o www.zedboard.org Documentation ZedBoard
Cypress USB-to-UART Setup Guide
Hardware
The hardware setup used to test this reference design includes:
PC with minimum amount of additional RAM available for Xilinx tools as
specified at www.xilinx.com/design-tools/vivado/memory.htm for either the
7Z010 or 7Z020 device
o 4GB required but 8GB recommended
Avnet ZedBoard Kit
o
Includes necessary power supply, SD card, and one USB cable
One additional USB cable (Type A to Micro-USB Type B) – only one included in kit
(Optional) ZedBoard integrated USB-JTAG programming port (Xilinx Platform
Cable, Digilent HS1 or HS2 cables are also supported)
o
If you don’t already have a JTAG Cable but wish to use one for this
tutorial, Avnet recommends the Digilent HS2 Cable
http://www.em.avnet.com/en-us/design/drc/Pages/Digilent-JTAG-HS2-Programming-Cable.aspx
www.zedboard.org
Page 2 of 15
�
ZedBoard: Standalone USB Device Tutorial
v14.6.04
3 January 2014
Experiment 1: Create Application Project
In this experiment, a new SDK workspace is established, a new application project is
created, and the USB Mass Storage Device example application code is imported.
1. Launch Xilinx Software Development Kit (SDK) if not already open. Start All
Programs Xilinx Design Tools ISE Design Suite 14.6 EDK Xilinx
Software Development Kit.
Figure 1 – The Xilinx Software Development Kit Application Icon
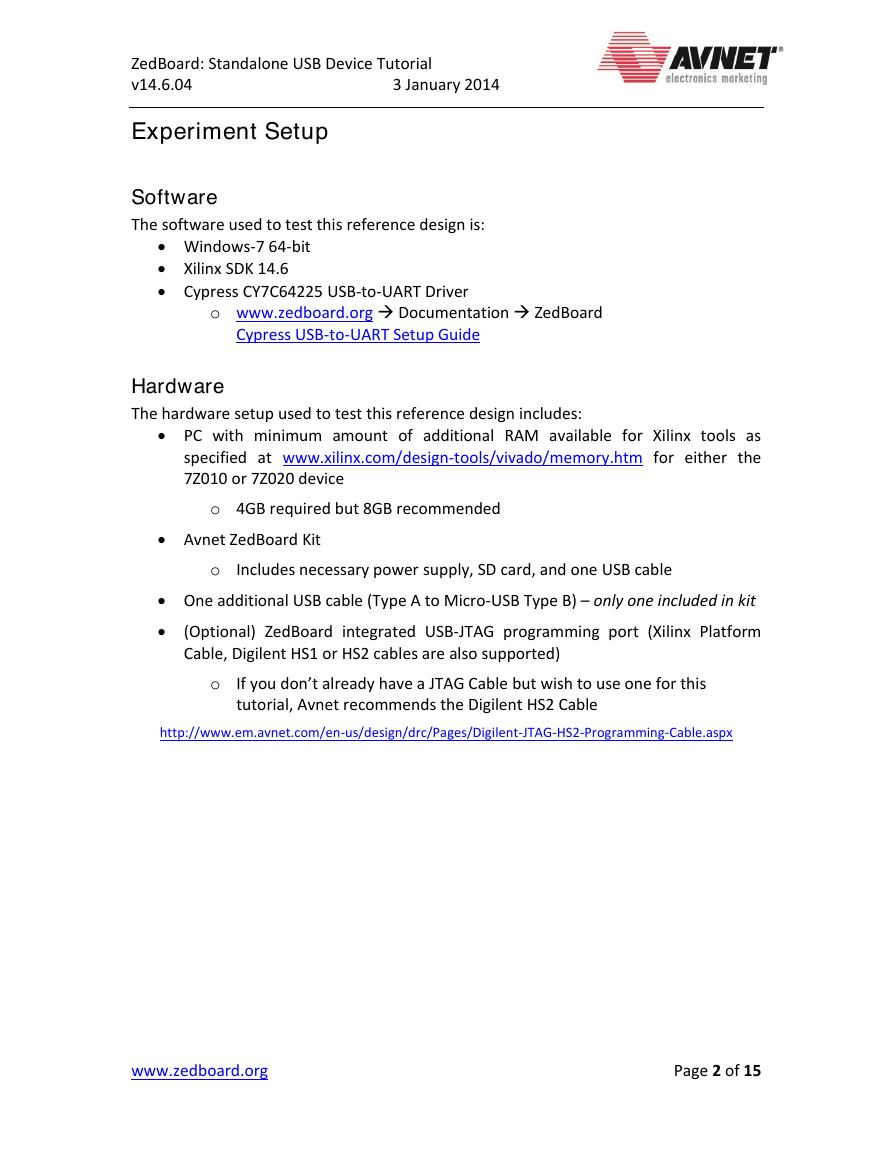
2. Set or switch the workspace to the following folder and then click the OK button:
C:\Avnet\ZedBoard\SDK_Workspace\
Figure 2 – Switching to the Appropriate SDK Workspace
www.zedboard.org
Page 3 of 15
�
ZedBoard: Standalone USB Device Tutorial
v14.6.04
3 January 2014
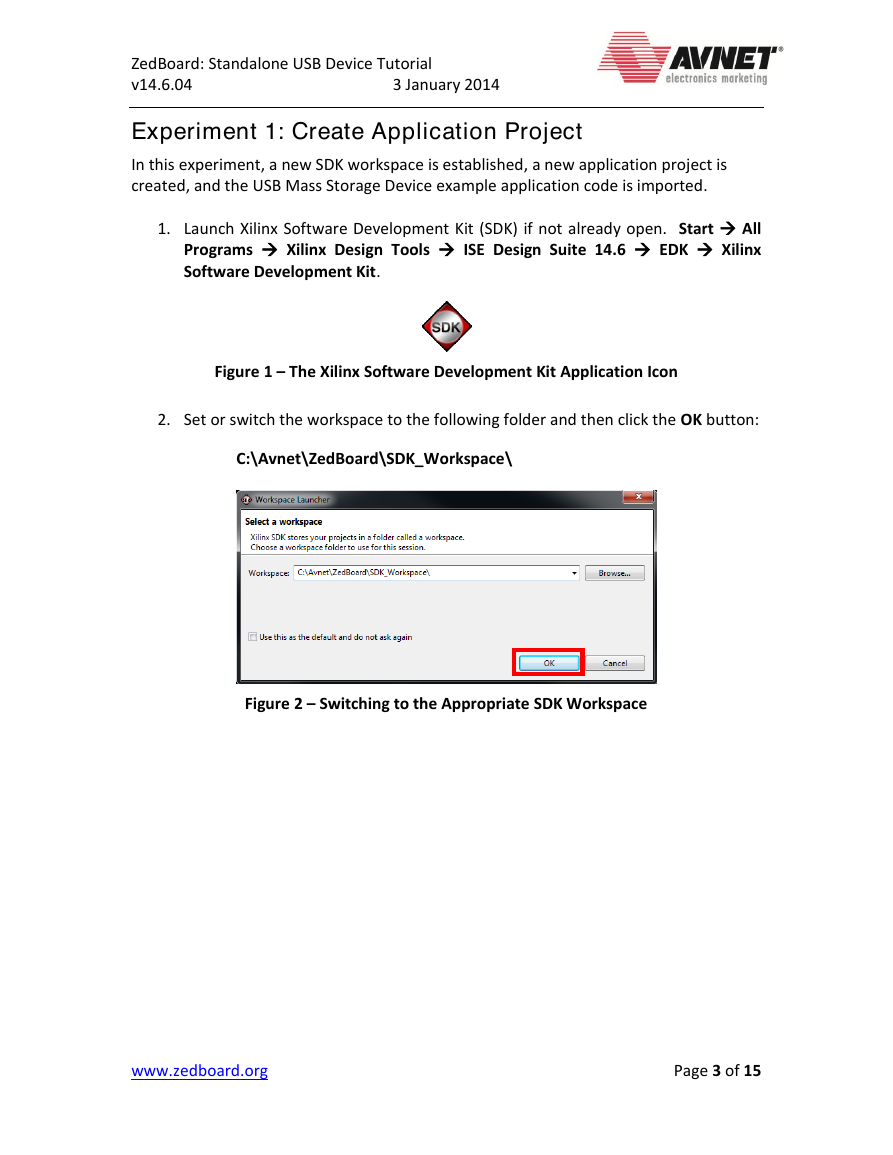
3. Close the Welcome screen if it appears in the SDK window by clicking on the X
control in the tab.
Figure 3 – Closing the SDK Welcome screen
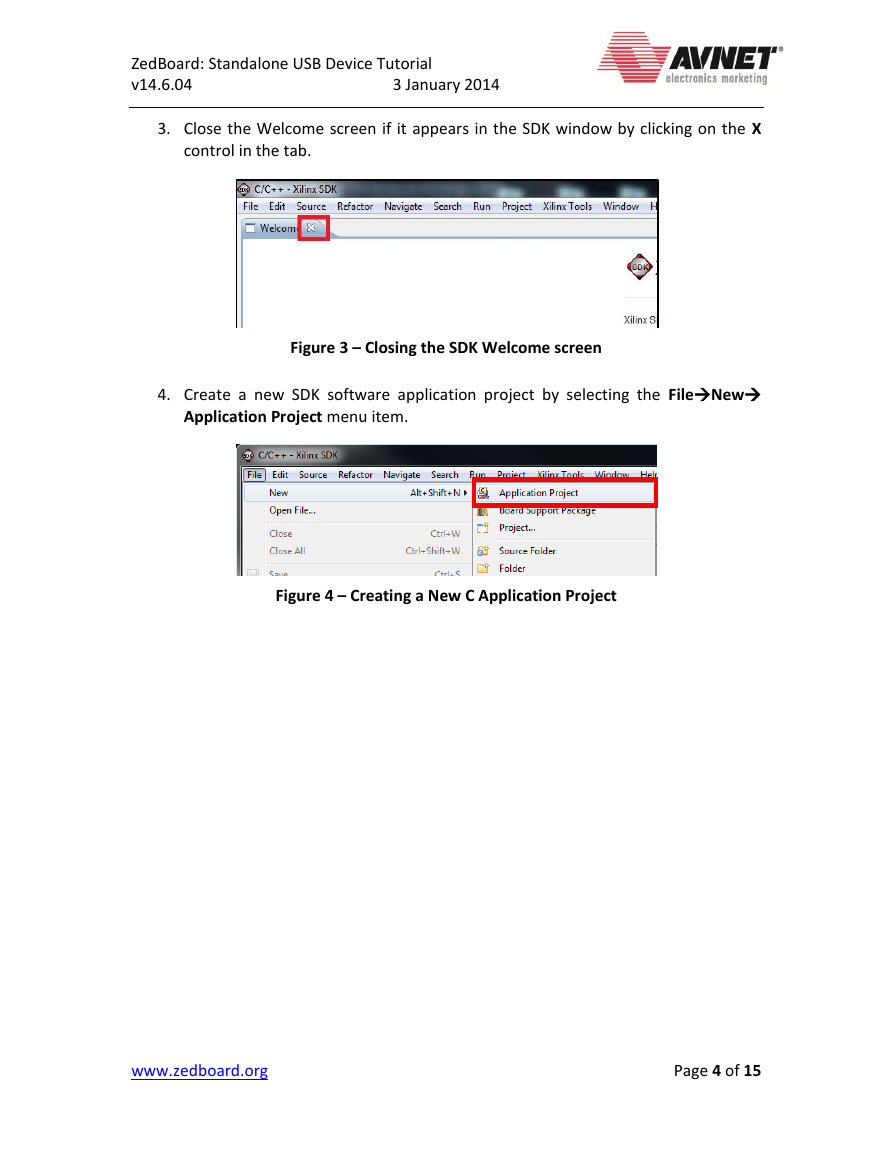
4. Create a new SDK software application project by selecting the FileNew
Application Project menu item.
Figure 4 – Creating a New C Application Project
www.zedboard.org
Page 4 of 15
�
ZedBoard: Standalone USB Device Tutorial
v14.6.04
3 January 2014
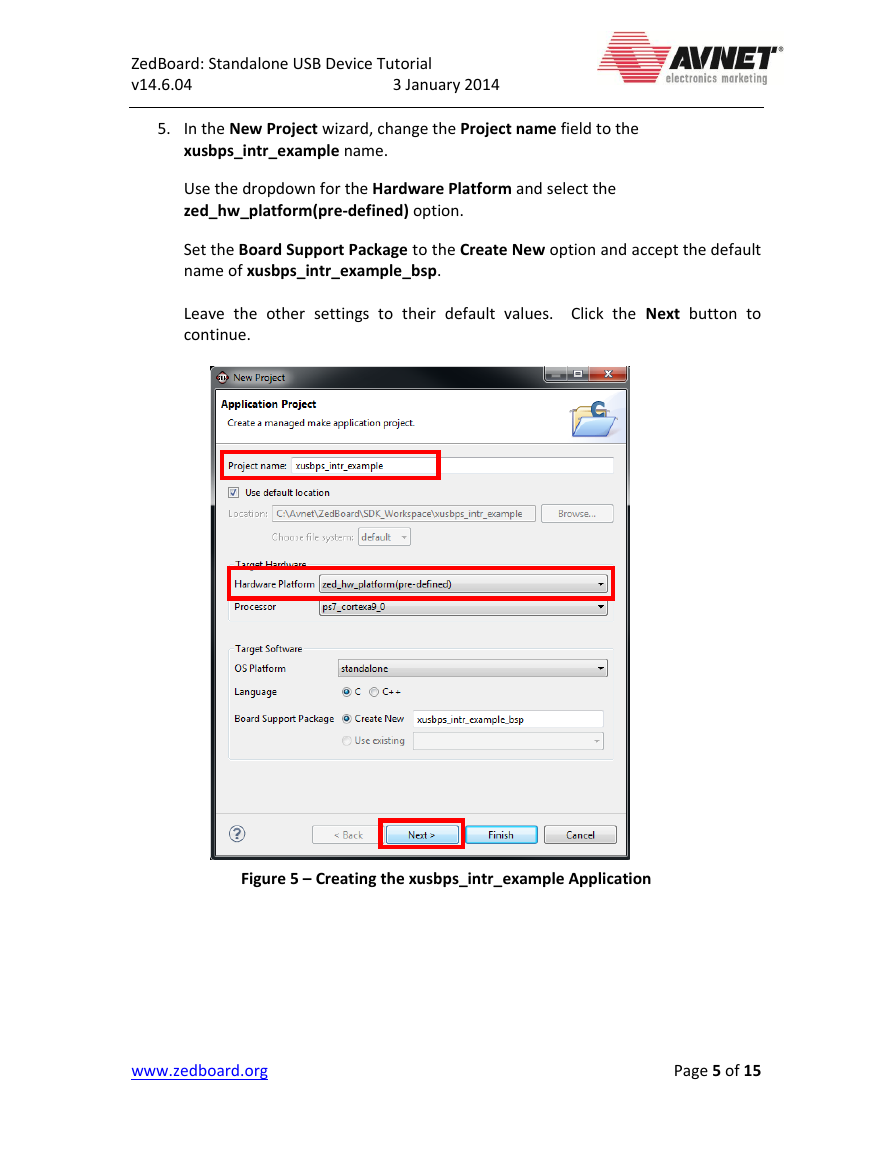
5. In the New Project wizard, change the Project name field to the
xusbps_intr_example name.
Use the dropdown for the Hardware Platform and select the
zed_hw_platform(pre-defined) option.
Set the Board Support Package to the Create New option and accept the default
name of xusbps_intr_example_bsp.
Leave the other settings to their default values. Click the Next button to
continue.
Figure 5 – Creating the xusbps_intr_example Application
www.zedboard.org
Page 5 of 15
�
ZedBoard: Standalone USB Device Tutorial
v14.6.04
3 January 2014
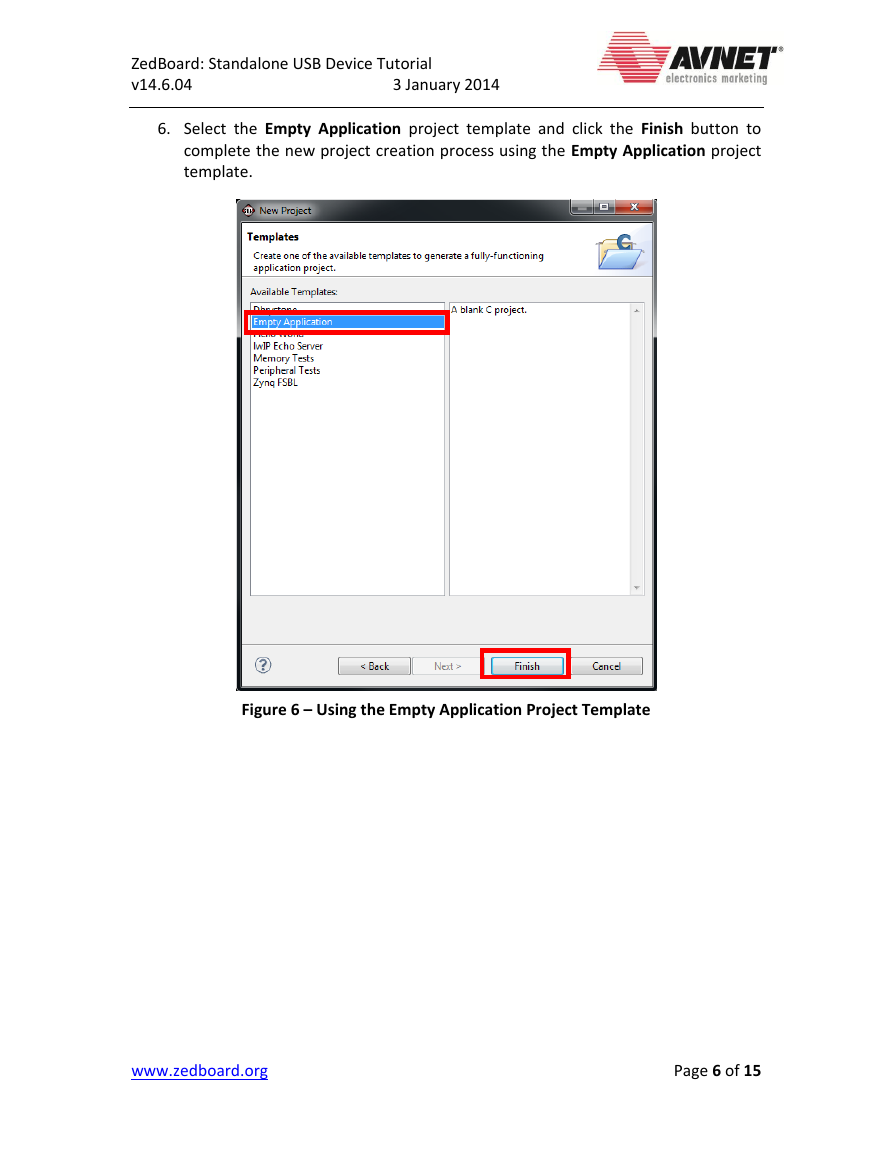
6. Select the Empty Application project template and click the Finish button to
complete the new project creation process using the Empty Application project
template.
Figure 6 – Using the Empty Application Project Template
www.zedboard.org
Page 6 of 15
�
ZedBoard: Standalone USB Device Tutorial
v14.6.04
3 January 2014
7. The empty xusbps_intr_example application project is created along with a new
Board Support Package (BSP) which is based upon the ISE 14.6 Pre-Defined
Hardware Platform Template for ZedBoard in the zed_hw_platform folder.
In the Project Explorer tab, expand the xusbps_intr_example folder tree and
right-click on the src folder.
Click on the Import option in the pop up menu.
Figure 7 – Import Application Source Code
www.zedboard.org
Page 7 of 15
�
ZedBoard: Standalone USB Device Tutorial
v14.6.04
3 January 2014
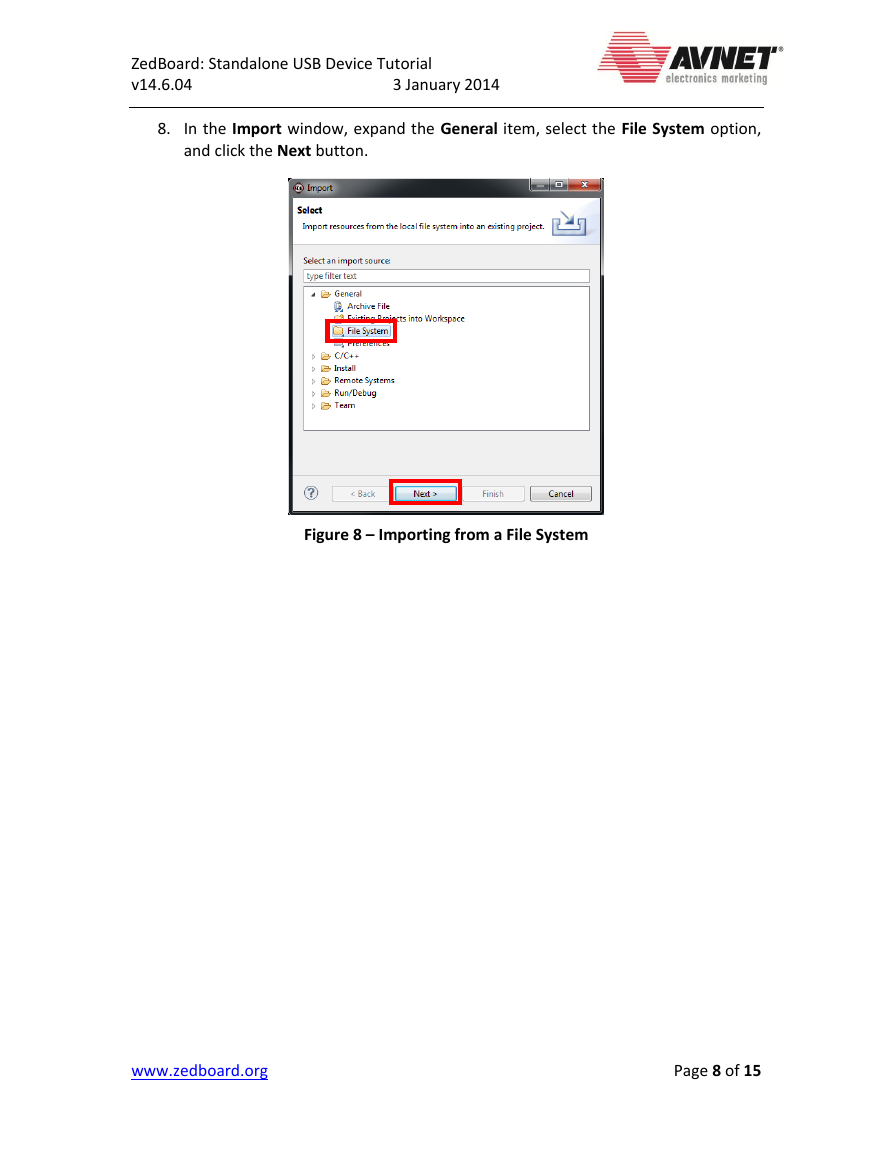
8. In the Import window, expand the General item, select the File System option,
and click the Next button.
Figure 8 – Importing from a File System
www.zedboard.org
Page 8 of 15
�



 2023年江西萍乡中考道德与法治真题及答案.doc
 2012年重庆南川中考生物真题及答案.doc
 2013年江西师范大学地理学综合及文艺理论基础考研真题.doc
 2020年四川甘孜小升初语文真题及答案I卷.doc
 2020年注册岩土工程师专业基础考试真题及答案.doc
 2023-2024学年福建省厦门市九年级上学期数学月考试题及答案.doc
 2021-2022学年辽宁省沈阳市大东区九年级上学期语文期末试题及答案.doc
 2022-2023学年北京东城区初三第一学期物理期末试卷及答案.doc
 2018上半年江西教师资格初中地理学科知识与教学能力真题及答案.doc
 2012年河北国家公务员申论考试真题及答案-省级.doc
 2020-2021学年江苏省扬州市江都区邵樊片九年级上学期数学第一次质量检测试题及答案.doc
 2022下半年黑龙江教师资格证中学综合素质真题及答案.doc