Getting Started with
NI SoftMotion for SolidWorks
™
This tutorial demonstrates how to set up and design motion simulations
using NI SoftMotion for SolidWorks. You will use the LabVIEW Project to
connect to a preconfigured SolidWorks motion study, create and configure
NI SoftMotion axes for the motors in the SolidWorks assembly, and use
NI SoftMotion function blocks to create a trajectory for the SolidWorks
simulation.
Note This document covers how to use NI SoftMotion function blocks with your existing
SolidWorks assemblies to create and evaluate motion profiles for your system. For
information about using SolidWorks refer to the SolidWorks documentation.
Contents
Required Components............................................................................. 2
Required Software ........................................................................... 2
Optional Hardware and Software .................................................... 2
Related Documentation.................................................................... 3
Overview of NI SoftMotion for SolidWorks .......................................... 4
Step 1: Setting Up the LabVIEW Project ............................................... 5
Adding the SolidWorks Assembly to the Project ............................ 5
Adding Axes to the Project.............................................................. 7
Adding Coordinates to the Project................................................... 8
Step 2: Configuring the Axes.................................................................. 10
Step 3: Creating a Motion Profile and Running the Simulation ............. 12
Configuring the Timed Loop ........................................................... 12
Creating a Move Profile................................................................... 13
Deploying, Running, and Stopping the Simulation ......................... 15
Step 4: Deploying to Hardware (Optional) ............................................. 16
Where to Go for Support......................................................................... 18
�
Required Components
This section lists the software used in the tutorial. This section also lists
documents you may find helpful while completing the tutorial.
Required Software
The following software is required for this tutorial.
❑ LabVIEW 2009 (32-bit) or later
❑ LabVIEW NI SoftMotion Module Standard 2009 or later
❑ NI SoftMotion for SolidWorks
Note NI SoftMotion for SolidWorks requires free activation. Refer to Working With
SolidWorks Assemblies in the NI SoftMotion Module book of the LabVIEW Help for
information about activating this feature.
❑ SolidWorks 2009 Service Pack 2.1 or higher and SolidWorks Motion
Simulation with the Motion Simulation add-in enabled from the Tools
menu in SolidWorks. This is included with SolidWorks Premium,
Simulation Premium, or Simulation Professional.
Tip When you enable the Motion Simulation add-in from the Add-Ins dialog box in
SolidWorks, place a checkmark in both the left and right checkboxes so you do not have to
re-enable the add-in each time you use NI SoftMotion for SolidWorks.
You can download a free 30-day trial of the required National Instruments
software from ni.com/labview/family.
Optional Hardware and Software
The following additional hardware and software is required to complete the
Step 4: Deploying to Hardware (Optional) section of this tutorial:
❑ Software
LabVIEW Real-Time Module 2009 or later
–
– NI-RIO 3.2.0 or later
❑ Hardware
– CompactRIO controller and chassis that support the RIO Scan
Interface
or
– NI 9144 distributed chassis
Getting Started with NI SoftMotion for SolidWorks
2
ni.com
�
Two NI 9512 single-axis stepper drive interface modules
Power supply for the controller
–
–
– A separate power supply for the modules
–
Ethernet connection and cable
Tip Even if you do not have the hardware used in this tutorial, you can follow the steps
and perform offline configuration to learn concepts about using CompactRIO with
LabVIEW.
Related Documentation
The following documents contain information that you may find helpful as
you read this tutorial:
LabVIEW Help—Use the LabVIEW Help to access information about
LabVIEW programming concepts, step-by-step instructions for using
LabVIEW, and reference information about LabVIEW VIs, functions,
palettes, menus, tools, properties, methods, events, dialog boxes, and
so on. The LabVIEW Help also lists the LabVIEW documentation
resources available from National Instruments. Access the LabVIEW
Help by selecting Help»Search the LabVIEW Help.
Getting Started with LabVIEW—Use this document as a tutorial to
familiarize yourself with the LabVIEW graphical programming
environment and the basic LabVIEW features you use to build data
acquisition and instrument control applications. Access the Getting
Started with LabVIEW PDF by selecting Start»All Programs»
National Instruments»LabVIEW»LabVIEW Manuals»
LV_Getting_Started.pdf.
LabVIEW NI SoftMotion Module Help—Use this help file to learn
about using NI SoftMotion in LabVIEW including information about
function blocks and using NI SoftMotion with the LabVIEW Project.
To access this help file from LabVIEW, select Help»Search the
LabVIEW Help, then expand the LabVIEW NI SoftMotion Module
book on the Contents tab.
SolidWorks Help
•
Note Refer to the software documentation for installation information.
© National Instruments Corporation
3
Getting Started with NI SoftMotion for SolidWorks
�
Overview of NI SoftMotion for SolidWorks
Using NI SoftMotion with SolidWorks to simulate your system with actual
motion profiles allows you to simulate mechanical dynamics, including
mass and friction effects, cycle times, and individual component
performance before specifying a single physical part and connecting it to
an actual control algorithm. Digital prototyping offers the ability to
visualize and optimize the design and evaluate different design concepts
before incurring the cost of physical prototypes.
Integrating motion simulation with CAD simplifies design because the
simulation uses information that already exists in the CAD model, such as
assembly mates, couplings, and material mass properties. LabVIEW
provides an easy to use, high-level function block programming language
for programming the motion control system that is easy enough for users
with little or no previous motion control programming experience.
Typical applications for the LabVIEW NI SoftMotion Module with
NI SoftMotion for SolidWorks include the following:
Motion trajectory design—You can build complex motion profiles
containing a series of sequential or concurrent move operations
composed of multi-axis straight-line moves, contoured moves,
arc moves, and even complex moves using electronic gearing and
camming.
Visualization—By animating your 3D SolidWorks assembly using
the motion control profiles and timing/sequencing logic you have
designed in LabVIEW, you can quickly evaluate the feasibility of the
overall conceptual design for your machine.
Visualizing the working machine as a virtual prototype helps to
validate the overall conceptual design for the machine very early in the
development. This fosters better communication with customers and
between design team members and helps to close the loop on the
design requirements, must-have features, and engineering trade-offs.
Collision detection—The collision detection feature in SolidWorks
enables you to validate your motion profile designs using your actual
3D CAD model. You can check for interferences, evaluate the need for
interlock control logic to prevent collisions, optimize your motion
profiles to minimize unnecessary dead time, quickly evaluate what-if
scenarios, and safely test new control system logic without the risk of
damaging your physical machine. After your machine has been
designed, prototyped and deployed to the field, collision detection can
also be used to validate new motion profiles before downloading them
to machines operating at your customer site; reducing the risk of
unplanned downtime due to programming mistakes.
Getting Started with NI SoftMotion for SolidWorks
4
ni.com
�
Throughput time studies—By validating your motion system design
using a simulation that includes the actual motion profile constraints
and the mechanical dynamics of your machine such as mass and
friction, you can accurately calculate an estimate for the cycle time
throughput of your machine.
Motor, drive, and transmission sizing—Motor torque and velocity
requirements depend on the acceleration characteristics of your motion
profile and the mechanical dynamics of the payload and transmission
components such as lead screws. Using NI SoftMotion, you can
calculate the required motor torque and velocity charts for your motion
profiles.
Step 1: Setting Up the LabVIEW Project
Before you can start designing motion profiles for your SolidWorks
simulation, you need to import the information from your SolidWorks
assembly into the LabVIEW Project and create NI SoftMotion axes for the
simulated motors included in your assembly.
Tip Refer to Working with SolidWorks Assemblies in the NI SoftMotion Module book of
the LabVIEW Help for a list of caveats and recommendations to consider when creating
and using SolidWorks assemblies with NI SoftMotion.
Adding the SolidWorks Assembly to the Project
Complete the following steps to add the SolidWorks assembly to the
LabVIEW Project:
1. Launch SolidWorks and open the Sorting Machine.SLDASM file
from the \examples\motion\SoftMotion\
SolidWorks CoSimulation\Sorting Machine (SolidWorks
Files) directory. This model simulates an assembly that takes test
tubes from one location and moves them to another.
This tutorial focuses on using an arc move to move the test tubes to a
rotary table. At this point, the assembly and motion study must be
ready to simulate with all the constraints and motors properly
configured. Refer to the SolidWorks Help for more information about
setting up a SolidWorks assembly.
Tip Use the NI Example Finder, available in LabVIEW at Help»Find Examples to find
additional examples using NI SoftMotion for SolidWorks.
© National Instruments Corporation
5
Getting Started with NI SoftMotion for SolidWorks
�
2. Right-click the My Computer item in the LabVIEW Project
Explorer window and select New»SolidWorks Assembly from the
shortcut menu to open the Import Axes from Assembly File dialog
box.
3. Select the SolidWorks assembly to add to the LabVIEW project. If a
SolidWorks assembly is currently open, the Import Axes from
Assembly File dialog box contains the path of this assembly. Click
Browse to select a different assembly file if necessary.
4. Click OK. The selected SolidWorks assembly is added to the Project
Explorer window, including all motors contained in the SolidWorks
motion study.
If the SolidWorks assembly contains multiple motion studies, choose the motion
Note
study to add to the project using the Select Motion Study dialog box. To change the motion
study used in the project after adding the assembly, right-click the SolidWorks assembly
item in the project tree and select Change Motion Study from the shortcut menu.
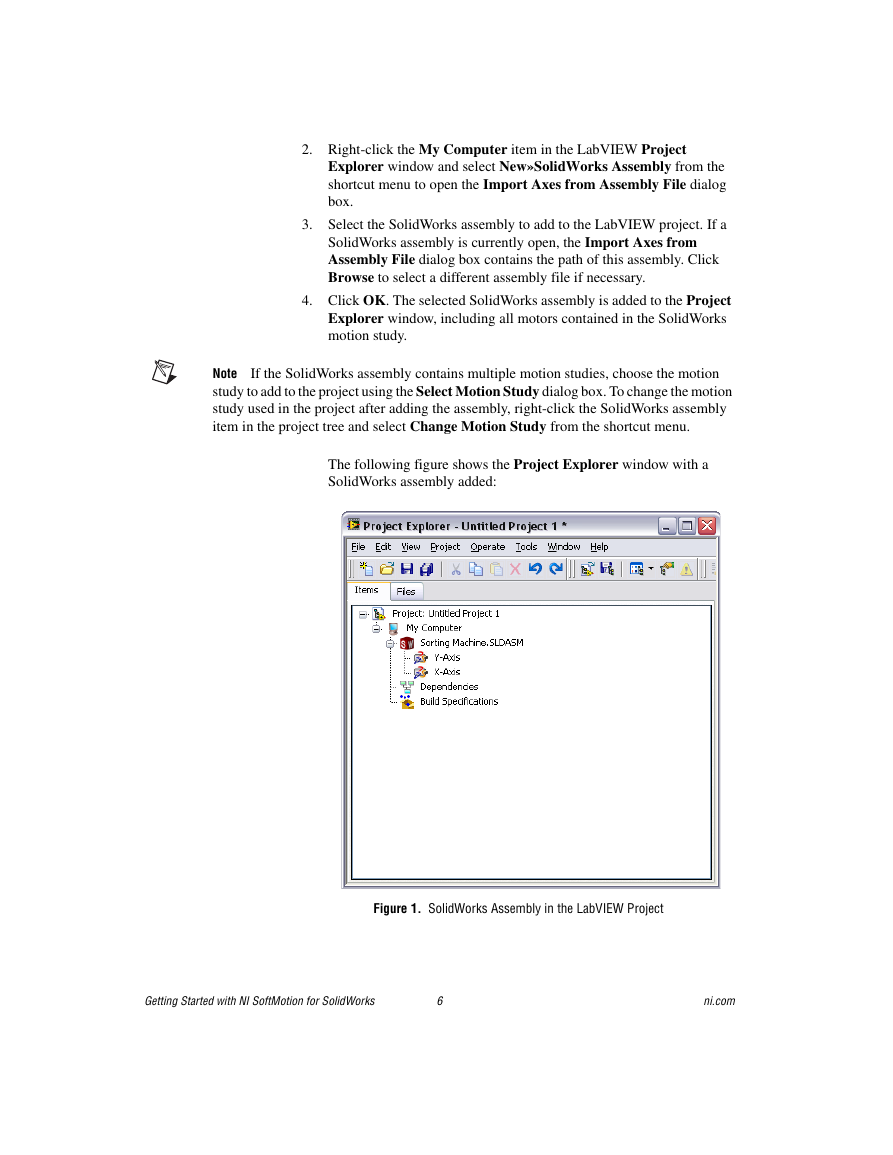
The following figure shows the Project Explorer window with a
SolidWorks assembly added:
Figure 1. SolidWorks Assembly in the LabVIEW Project
Getting Started with NI SoftMotion for SolidWorks
6
ni.com
�
5. Right-click the SolidWorks assembly in the Project Explorer window
and select Properties from the shortcut menu to open the Assembly
Properties dialog box. In the Data Logging Properties section,
specify a name for the log file and place a checkmark in the Log Data
checkbox. This will log position, velocity, acceleration, and torque
data for the simulation to the specified file name in LabVIEW
Measurement (.lvm) format.
Note Each simulation overwrites the selected log file. To create a new log file for the next
simulation you must change the file name before starting the simulation.
Adding Axes to the Project
To simulate using the SolidWorks motors included in the model, you need
to associate the motors with NI SoftMotion axes. The NI SoftMotion axes
are used when creating motion profiles using the NI SoftMotion function
blocks. Complete the following steps to add NI SoftMotion axes to the
project:
1. Right-click on My Computer and select New»NI SoftMotion Axis
from the shortcut menu to open the Axis Manager dialog box, shown
in Figure 2.
2. Select Add New Axis. The new axis automatically binds to an
available SolidWorks motor. Double-click the axis name to rename the
axis and give it a descriptive name.
Figure 2. Axis Manager Dialog Box
3. Click Add New Axis until all available SolidWorks motors are
associated with NI SoftMotion axes.
© National Instruments Corporation
7
Getting Started with NI SoftMotion for SolidWorks
�
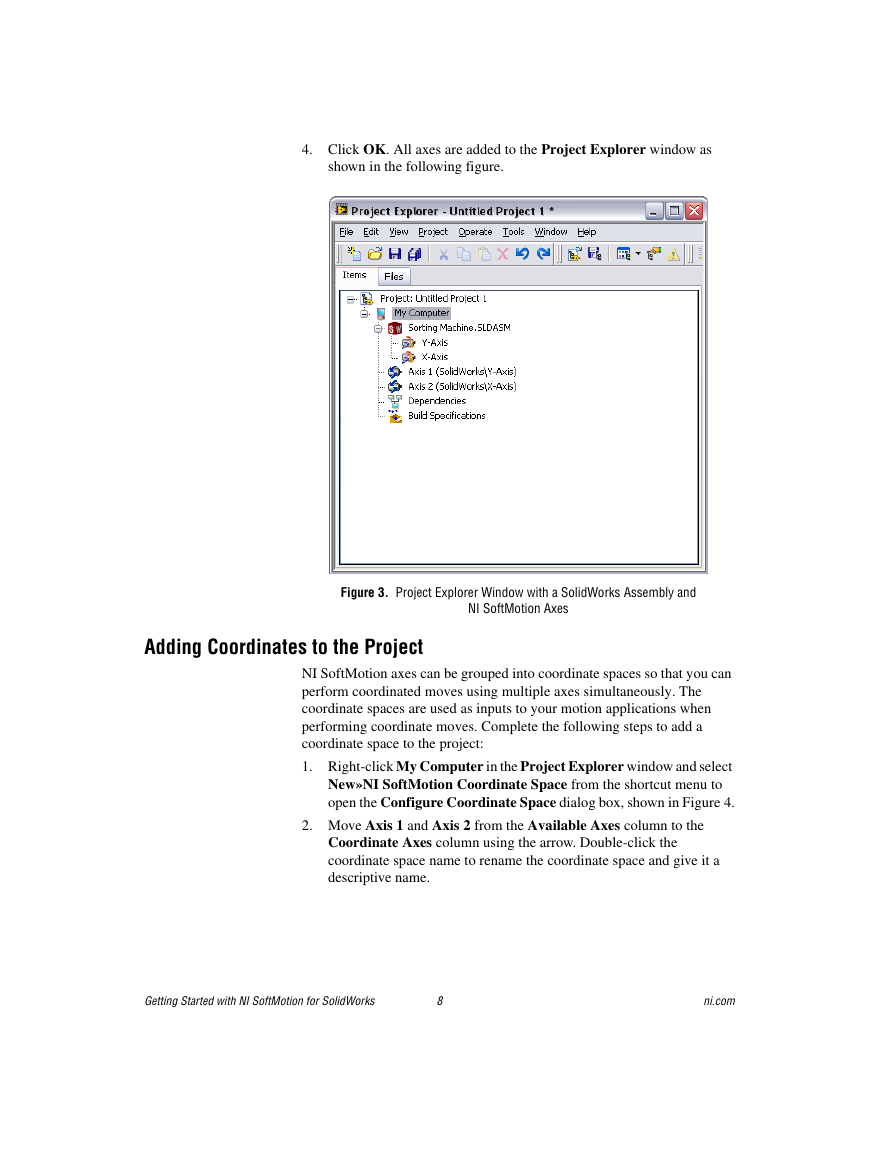
4. Click OK. All axes are added to the Project Explorer window as
shown in the following figure.
Figure 3. Project Explorer Window with a SolidWorks Assembly and
NI SoftMotion Axes
Adding Coordinates to the Project
NI SoftMotion axes can be grouped into coordinate spaces so that you can
perform coordinated moves using multiple axes simultaneously. The
coordinate spaces are used as inputs to your motion applications when
performing coordinate moves. Complete the following steps to add a
coordinate space to the project:
1. Right-click My Computer in the Project Explorer window and select
New»NI SoftMotion Coordinate Space from the shortcut menu to
open the Configure Coordinate Space dialog box, shown in Figure 4.
2. Move Axis 1 and Axis 2 from the Available Axes column to the
Coordinate Axes column using the arrow. Double-click the
coordinate space name to rename the coordinate space and give it a
descriptive name.
Getting Started with NI SoftMotion for SolidWorks
8
ni.com
�




 2023年江西萍乡中考道德与法治真题及答案.doc
 2012年重庆南川中考生物真题及答案.doc
 2013年江西师范大学地理学综合及文艺理论基础考研真题.doc
 2020年四川甘孜小升初语文真题及答案I卷.doc
 2020年注册岩土工程师专业基础考试真题及答案.doc
 2023-2024学年福建省厦门市九年级上学期数学月考试题及答案.doc
 2021-2022学年辽宁省沈阳市大东区九年级上学期语文期末试题及答案.doc
 2022-2023学年北京东城区初三第一学期物理期末试卷及答案.doc
 2018上半年江西教师资格初中地理学科知识与教学能力真题及答案.doc
 2012年河北国家公务员申论考试真题及答案-省级.doc
 2020-2021学年江苏省扬州市江都区邵樊片九年级上学期数学第一次质量检测试题及答案.doc
 2022下半年黑龙江教师资格证中学综合素质真题及答案.doc