HiTi BS-G400
User Manual
EE
English
0
�
Table of Content
1. Check the Package Content.............................................................. 2
2. Get the Latest Application................................................................ 3
3. Comprehend BS-G400.................................................................................. 4
� LCD Controller
� Front
� Back
4. Install BS-G400...................................................................................... 5
� Install Printer
� Installing the Ribbon Cartridge
� Loading the Dedicated Consumables
� Powering Up the Printer
5. BS-G400 Standalone Printing.......................................................... 8
� Print Photos Without a PC
� Home Menu Introduction
� Main Function Introduction
� Special Function Introduction
6. BS-G400 PC-Link Printing............................................................... 18
� Connecting the PC and Printer
� Installing the Printer Driver
� Installing the GalaDesiree Deluxe and PhotoDesiree Deluxe
7. Troubleshooting.............................................................................. 19
� Indicator Status
8. Specification.................................................................................. 20
9. Customer Service Information.......................................................... 21
� Online Support
� Global Sites
!
Please read this instruction manual carefully before using BS-G400.
Store this instruction manual at a safe place for future reference.
1
�
1. Check the Package Content
Before using BS-G400, please check the package content for following items
LCD Controller
Power Cord
BS-G400
USB Cable
Paper Cassette*
:
Master CD
(BS-G400 / PhotoDesiree Deluxe)
GalaDesiree Deluxe
Software CD
)
(
User Manual
(BS-G400 / PDD* / GalaD Deluxe* )
Printer Cleaning Kit*
Note
� Paper Cassette: 2 types of paper cassettes are included. One type is used for loading photo paper or 1x1 stickers and the
� Printer Cleaning Kit includes cleaning kit user guide, cleaning paper, sponge, and micro fiber cleaning cloth.
other type is for loading 4/2/4 or 4x4 stickers.
2
�
2. Acquiring the Latest Application
HiTi website provides the latest driver, application, user manual etc. for users
to download. Please log on to www.hi-ti.com for more information. If there is any
question toward HiTi product, please contact your local service center for detail.
!
Please prepare those data as below when you have any question about BS-G400 that can help us to provide better
service for you
:
� Printer serious number
� Printer model
� Printer firmware version
� Printer driver version
� Computer and OS information
� Version of PhotoDesiree Deluxe and GalaDesiree Deluxe
3
�
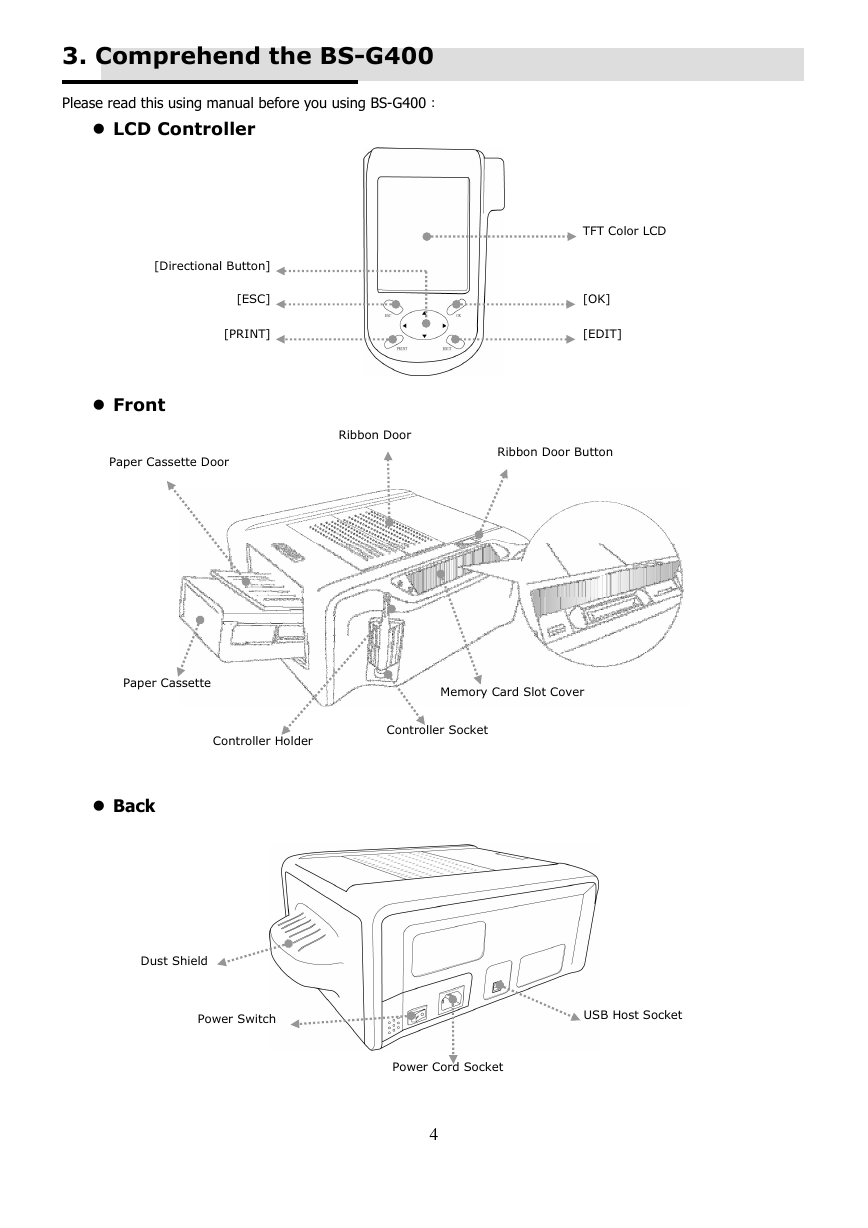
3. Comprehend the BS-G400
Please read this using manual before you using BS-G400
� LCD Controller
[Directional Button]
[ESC]
[PRINT]
� Front
Paper Cassette Door
:
TFT Color LCD
[OK]
[EDIT]
Ribbon Door
Ribbon Door Button
Paper Cassette
Memory Card Slot Cover
Controller Holder
Controller Socket
� Back
Dust Shield
Power Switch
USB Host Socket
Power Cord Socket
4
�
4. Install the BS-G400
� Set Up the Printer
Connect the LCD controller to BS-iD400
� Install the Ribbon Cartridge
1. Twist the spool lock counter clockwise and remove it as illustrated.
2. Open the ribbon door and install the ribbon cartridge
3. Close the ribbon door
5
�
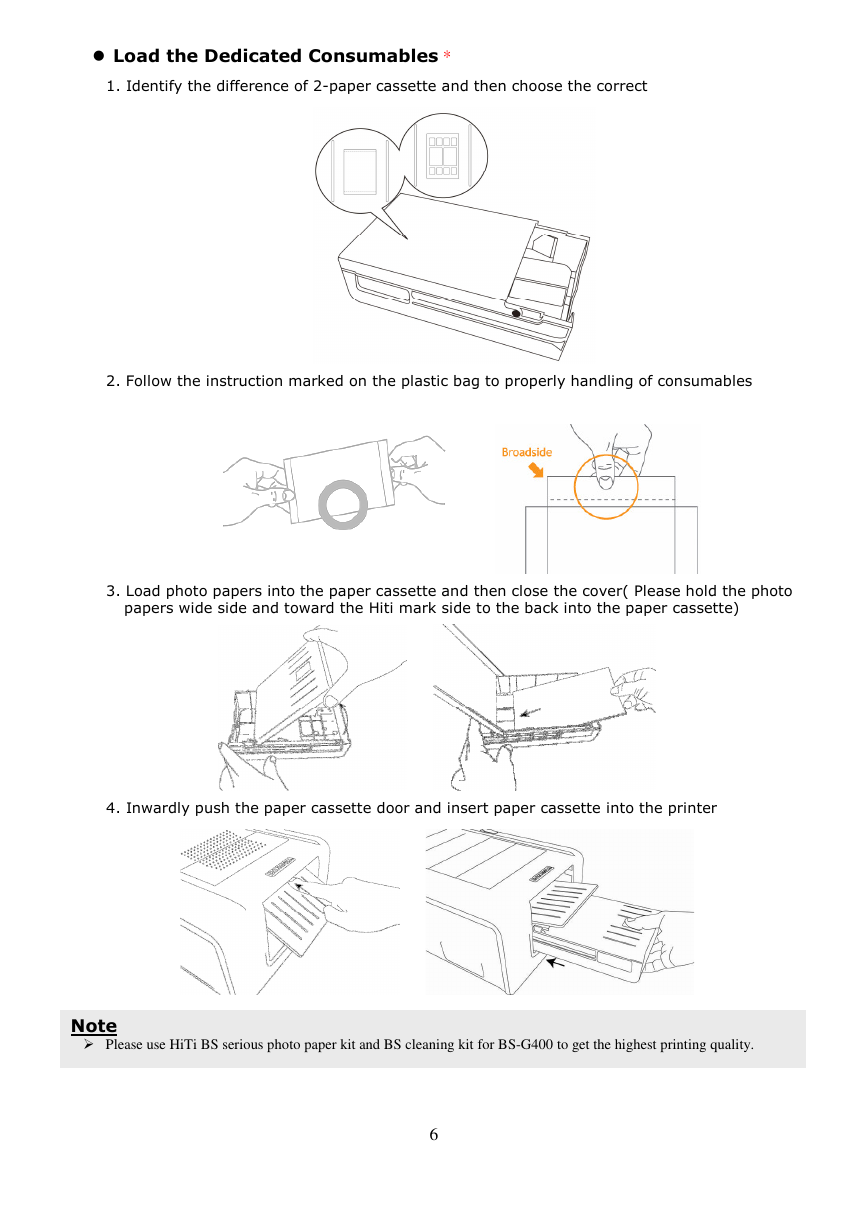
� Load the Dedicated Consumables *
1. Identify the difference of 2-paper cassette and then choose the correct
2. Follow the instruction marked on the plastic bag to properly handling of consumables
3. Load photo papers into the paper cassette and then close the cover( Please hold the photo
papers wide side and toward the Hiti mark side to the back into the paper cassette)
4. Inwardly push the paper cassette door and insert paper cassette into the printer
Note
� Please use HiTi BS serious photo paper kit and BS cleaning kit for BS-G400 to get the highest printing quality.
6
�
� Power Up the Printer
Plug the power cord in the socket and then turn on the power
7
�


 2023年江西萍乡中考道德与法治真题及答案.doc
 2012年重庆南川中考生物真题及答案.doc
 2013年江西师范大学地理学综合及文艺理论基础考研真题.doc
 2020年四川甘孜小升初语文真题及答案I卷.doc
 2020年注册岩土工程师专业基础考试真题及答案.doc
 2023-2024学年福建省厦门市九年级上学期数学月考试题及答案.doc
 2021-2022学年辽宁省沈阳市大东区九年级上学期语文期末试题及答案.doc
 2022-2023学年北京东城区初三第一学期物理期末试卷及答案.doc
 2018上半年江西教师资格初中地理学科知识与教学能力真题及答案.doc
 2012年河北国家公务员申论考试真题及答案-省级.doc
 2020-2021学年江苏省扬州市江都区邵樊片九年级上学期数学第一次质量检测试题及答案.doc
 2022下半年黑龙江教师资格证中学综合素质真题及答案.doc