JW2-e.book Page i Thursday, April 15, 2004 9:53 AM
Notebook Computer
User’s guide
�
JW2-e.book Page ii Thursday, April 15, 2004 9:53 AM
Copyright © 2004
All Rights Reserved
Notebook Computer User’s guide
Original Issue: April 2004
Changes may be made periodically to the information in this publication without obligation to notify any
person of such revision or changes. Such changes will be incorporated in new editions of this manual or
supplementary documents and publications. This company makes no representations or warranties, either
expressed or implied, with respect to the contents hereof and specifically disclaims the implied warranties of
merchantability or fitness for a particular purpose.
Record the model number, serial number, purchase date, and place of purchase information in the space
provided below. The serial number and model number are recorded on the label affixed to your computer.
All correspondence concerning your unit should include the serial number, model number, and purchase
information.
Notebook Computer
Model Number : __________________________________
Serial Number:____________________________________
Purchase Date: ___________________________________
Place of Purchase: ________________________________
All trademarks and registered trademarks are the properties of their respective companies.
�
JW2-e.book Page iii Thursday, April 15, 2004 9:53 AM
Preface
Connecting the computer
Care and maintenance
1 Getting familiar with your computer
A tour of your computer
Front view
Left view
Right view
Bottom view
Features
Display
Indicators
Keyboard
Special keys
Keyboard ergonomics
Touchpad
Launch keys
Storage
Hard disk
Optical drive
CF card slot
Connectivity options
Ethernet and LAN
Fax/data modem
Audio
Securing your computer
Security notch
Passwords
2 Operating on battery power
Battery pack
Battery pack characteristics
Installing and removing the battery pack
Charging the battery
Checking the battery level
Optimizing battery life
Battery-low warning
Power management
vii
vii
ix
1
3
3
5
6
7
8
10
12
14
14
19
20
22
23
23
23
25
26
26
26
28
29
29
29
31
33
33
34
35
36
36
36
38
�
JW2-e.book Page iv Thursday, April 15, 2004 9:53 AM
iv
Contents
3 Peripherals and options
External monitor
Using simultaneous display
S-video
USB devices
USB floppy drive
Audio devices
PC Card
PC Card slot
IEEE 1394 devices
Miscellaneous options
Additional power packs
Key component upgrades
Memory
Hard disk
4 Moving with your computer
Disconnecting from the desktop
Moving around
Preparing the computer
What to bring to short meetings
What to bring to long meetings
Taking the computer home
Preparing the computer
What to bring with you
Special considerations
Setting up a home office
Traveling with the computer
Preparing the computer
What to bring with you
Special considerations
Traveling internationally with the computer
Preparing the computer
What to bring with you
Special considerations
5 Software
System software
Launch Manager
BIOS Utility
Security
Boot
Exit
39
41
41
42
43
43
44
45
45
47
48
48
49
49
50
51
53
53
53
53
53
53
54
54
54
54
55
55
55
55
55
55
56
56
57
59
60
61
63
65
66
�
JW2-e.book Page v Thursday, April 15, 2004 9:53 AM
6 Troubleshooting
Frequently-asked questions
Error messages
A Specifications
Index
v
67
69
72
77
83
�
JW2-e.book Page vi Thursday, April 15, 2004 9:53 AM
vi
Contents
�
JW2-e.book Page vii Thursday, April 15, 2004 9:53 AM
vii
Preface
This notebook computer incorporates new portable technologies and features in an
ultra-slim package.
This manual should answer most of the questions you have about the day-to-day
operation of your notebook computer.
You should also take advantage of the online help files that are available with
almost all of the programs shipped with your computer.
We hope you enjoy your notebook computer. With proper care, your computer
will provide you with years of productive service.
Connecting the computer
Connecting the computer is as easy as 1-2-3.
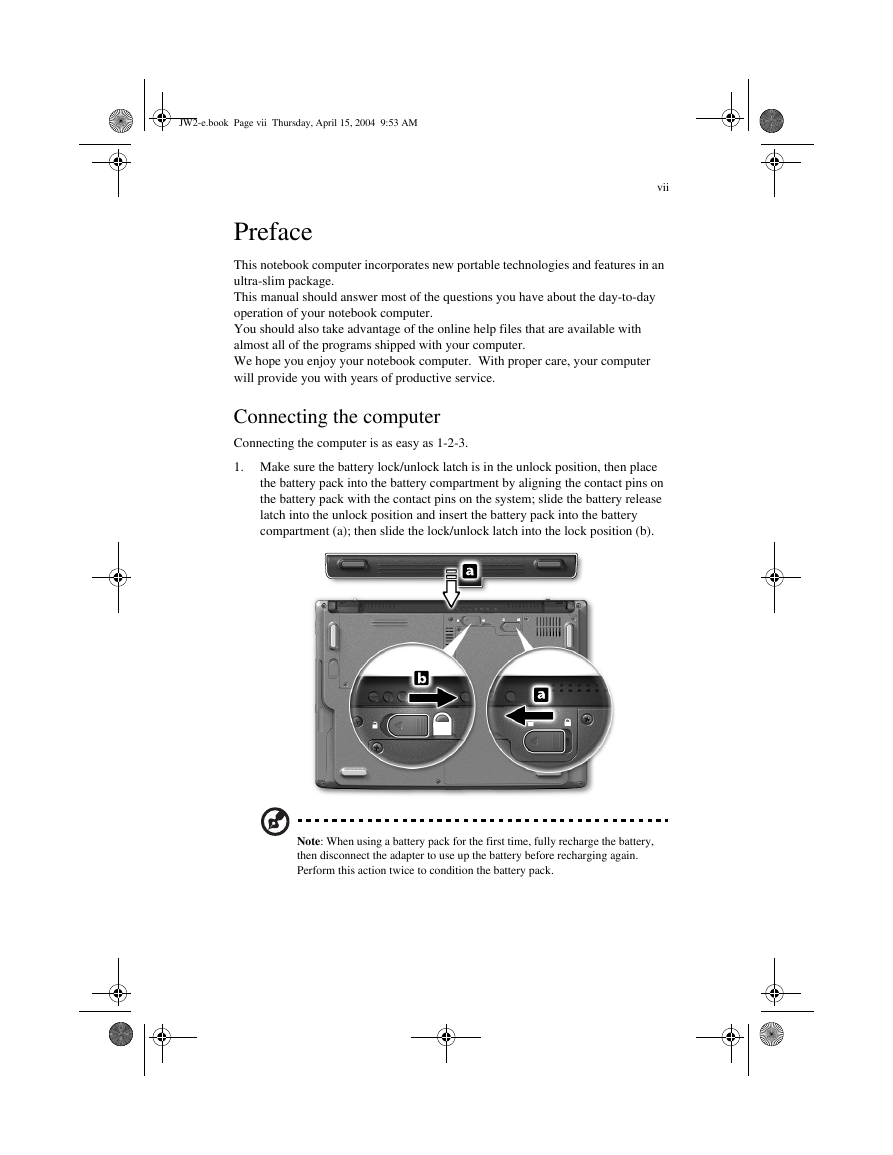
1. Make sure the battery lock/unlock latch is in the unlock position, then place
the battery pack into the battery compartment by aligning the contact pins on
the battery pack with the contact pins on the system; slide the battery release
latch into the unlock position and insert the battery pack into the battery
compartment (a); then slide the lock/unlock latch into the lock position (b).
Note: When using a battery pack for the first time, fully recharge the battery,
then disconnect the adapter to use up the battery before recharging again.
Perform this action twice to condition the battery pack.
�
JW2-e.book Page viii Thursday, April 15, 2004 9:53 AM
viii
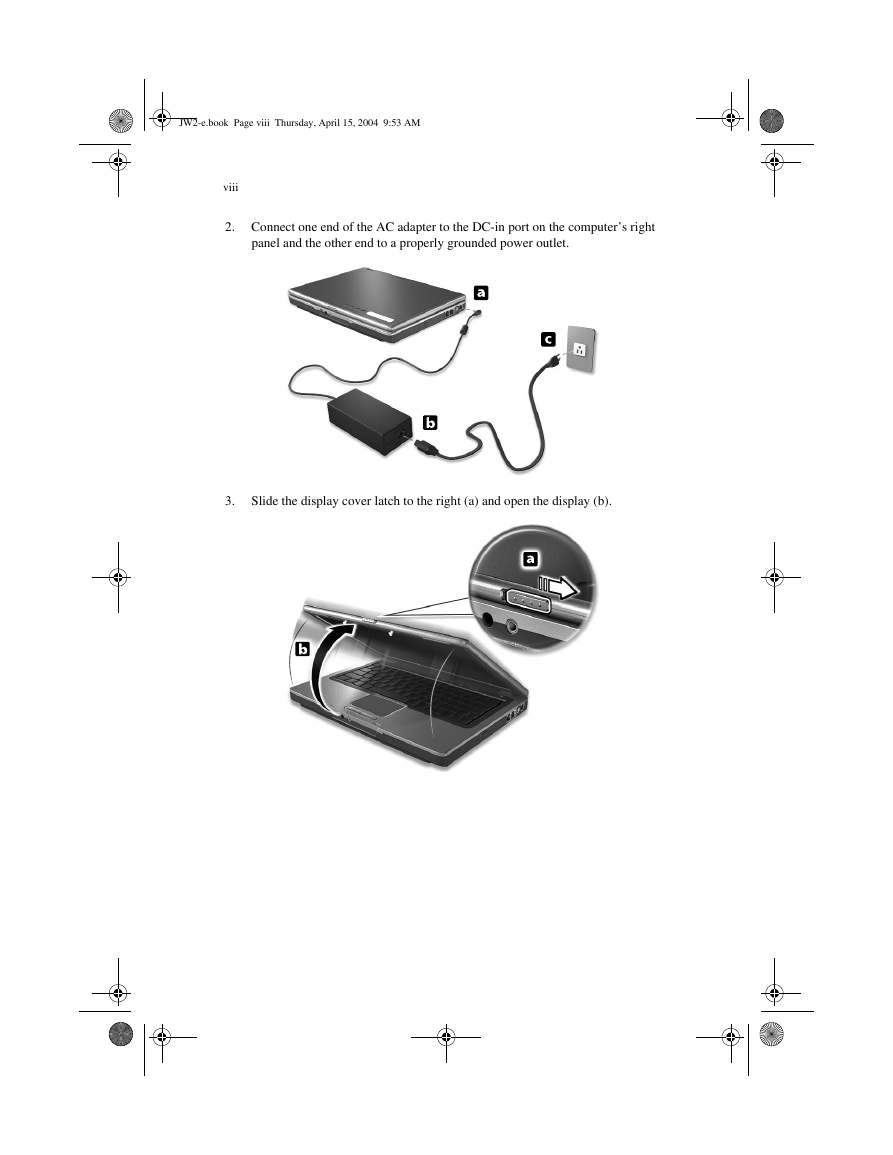
2. Connect one end of the AC adapter to the DC-in port on the computer’s right
panel and the other end to a properly grounded power outlet.
3.
Slide the display cover latch to the right (a) and open the display (b).
�



 2023年江西萍乡中考道德与法治真题及答案.doc
 2012年重庆南川中考生物真题及答案.doc
 2013年江西师范大学地理学综合及文艺理论基础考研真题.doc
 2020年四川甘孜小升初语文真题及答案I卷.doc
 2020年注册岩土工程师专业基础考试真题及答案.doc
 2023-2024学年福建省厦门市九年级上学期数学月考试题及答案.doc
 2021-2022学年辽宁省沈阳市大东区九年级上学期语文期末试题及答案.doc
 2022-2023学年北京东城区初三第一学期物理期末试卷及答案.doc
 2018上半年江西教师资格初中地理学科知识与教学能力真题及答案.doc
 2012年河北国家公务员申论考试真题及答案-省级.doc
 2020-2021学年江苏省扬州市江都区邵樊片九年级上学期数学第一次质量检测试题及答案.doc
 2022下半年黑龙江教师资格证中学综合素质真题及答案.doc