Digital Camera Recorder
AJ-
E
Operating Instructions
I
H
S
L
G
N
E
H
C
S
T
U
E
D
I
S
A
Ç
N
A
R
F
O
N
A
L
A
T
I
I
L
O
Ñ
A
P
S
E
�
$ DO NOT REMOVE PANEL COVER BY UN-
SCREWING.
To reduce the risk of the electric shock, do not
remove cover. No user serviceable parts inside.
Refer servicing to qualified service personnel.
WARNING:
TO REDUCE THE RISK OF FIRE OR SHOCK
HAZARD, DO NOT
THIS
EXPOSE
EQUIPMENT TO RAIN OR MOISTURE.
CAUTION:
TO REDUCE THE RISK OF FIRE OR SHOCK
HAZARD AND ANNOYING INTERFERENCE,
USE THE RECOMMENDED ACCESSORIES
ONLY.
CAUTION:
TO REDUCE THE RISK OF FIRE OR SHOCK
HAZARD, REFER CHANGE OF SWITCH
SETTING INSIDE THE UNIT TO QUALIFIED
SERVICE PERSONNEL.
CAUTION
Danger of explosion if battery is incorrectly
replaced.
Replace only with the same or equivalent type
recommended by the equipment manufacturer.
Discard
to
manufacturer’s instructions.
according
used
batteries
VARNING
Explosionsfara vid felaktigt batteribyte. Använd
samma batterityp eller en ekvivalent typ som
rekommenderas av apparattillverkaren. Kassera
använt batteri enligt fabrikantens instruktion.
ADVARSEL!
Eksplosionsfare ved fejlagtig håndtering.
Udskiftning må kun ske med batteri af samme
fabrikat og type. Levér det brugte batteri tilbage
til leverandøren.
VAROITUS
Paristo voi räjähtää, jos se on virheellisesti
asennettu.
Vaihda paristo ainoastaan
laitevalmistajan
suosittelemaan tyypiin. Hävitä käytetty paristo
valmistajan ohjeiden mukaisesti.
Lithium Battery
Warning
The lithium battery in this equipment must only be
replaced by qualified personnel. When necessary,
contact your local Panasonic supplier.
“The lithium battery is a critical component (type
number CR2032 or BR2032 manufactured by
Panasonic.)
It must never be subjected to excessive heat or
discharge. It must therefore only be fitted in
equipment designed specifically for its use.
Replacement batteries must be of the same type
and manufacturer. They must be fitted in the same
manner and location as the original battery, with
the correct polarity connections observed.
Do not attempt to re-charge the old battery or re-
use it for any other purpose. It should be disposed
of in waste products destined for burial rather than
incineration.”
indicates safety information.
E–2
�
Attention/Attentie
OBatteries are used for the main power source and memory back-up in the product.
At the end of their useful life, you should not throw them away.
Instead, hand them in as small chemical waste.
OVoor de primaire voeding en het reservegeheugen van het apparaat wordt gebruikgemaakt van
een batterij.
Wanneer de batterij is uitgeput, mag u deze niet gewoon weggooien, maar dient u deze als klein
chemisch afval weg te doen.
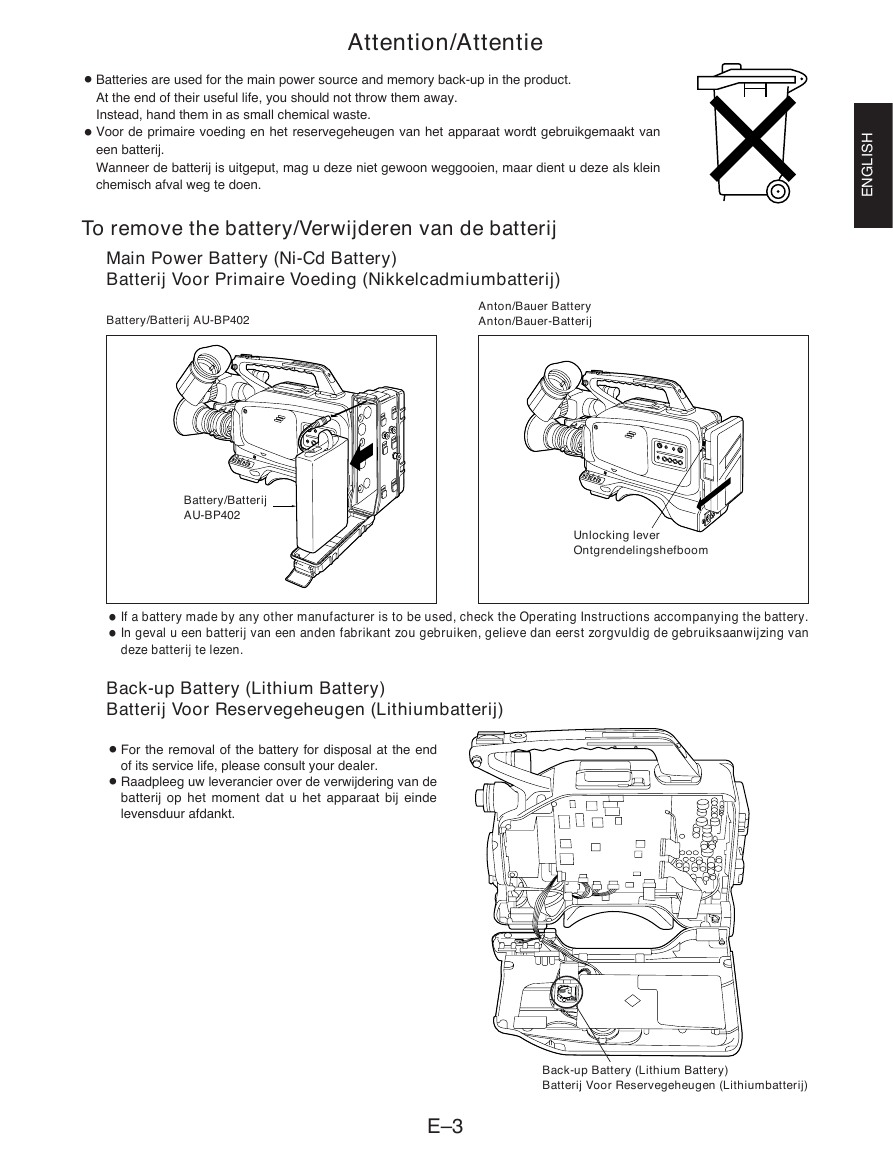
To remove the battery/Verwijderen van de batterij
Main Power Battery (Ni-Cd Battery)
Batterij Voor Primaire Voeding (Nikkelcadmiumbatterij)
Battery/Batterij AU-BP402
Anton/Bauer Battery
Anton/Bauer-Batterij
I
H
S
L
G
N
E
Battery/Batterij
AU-BP402
Unlocking lever
Ontgrendelingshefboom
O If a battery made by any other manufacturer is to be used, check the Operating Instructions accompanying the battery.
O In geval u een batterij van een anden fabrikant zou gebruiken, gelieve dan eerst zorgvuldig de gebruiksaanwijzing van
deze batterij te lezen.
Back-up Battery (Lithium Battery)
Batterij Voor Reservegeheugen (Lithiumbatterij)
OFor the removal of the battery for disposal at the end
of its service life, please consult your dealer.
ORaadpleeg uw leverancier over de verwijdering van de
batterij op het moment dat u het apparaat bij einde
levensduur afdankt.
Back-up Battery (Lithium Battery)
Batterij Voor Reservegeheugen (Lithiumbatterij)
E–3
�
Table of Contents
Precautions for Use .....................................................................E–6
Features ........................................................................................E–6
System chart.................................................................................E–7
Parts and their functions.............................................................E–8
14aa power zoom lens (option)..................................................E–14
Viewfinder displays....................................................................E–16
LED displays.............................................................................E–16
Character displays ....................................................................E–16
Error message displays ............................................................E–17
Preparations ...............................................................................E–19
OAttaching the peripheral units................................................E–19
Attaching the lens ..............................................................E–19
Mounting the viewfinder .....................................................E–20
Removing the eye cup .......................................................E–21
Adjusting the eyepiece position .........................................E–21
Adjusting the eye cup position ...........................................E–21
When using a battery pack made by Anton Bauer.............E–22
When using the AU-BP402 battery pack ...........................E–23
When using the NP-1B battery made by Sony ..................E–24
When using an AC power source
(when using the AU-B110/AJ-B75 AC adaptor)...............E–28
Attaching the microphone holder (option) ..........................E–29
Mounting the unit onto a tripod ..........................................E–30
Fastening the shoulder belt (option) ..................................E–31
Adjusting the shoulder pad position ...................................E–32
OSetting the date and time ......................................................E–33
OAdjusting the viewfinder ........................................................E–35
OAdjusting the lens flange .......................................................E–36
Adjustments during shooting ...................................................E–37
Camera posture ........................................................................E–37
Camera movements .................................................................E–37
Exposure adjustment ................................................................E–38
Zooming....................................................................................E–39
How to take close-ups ..............................................................E–40
Light sources and colour temperatures ....................................E–41
White balance adjustment.........................................................E–42
E–4
�
I
H
S
L
G
N
E
Normal recording .......................................................................E–44
Zebra pattern display ................................................................E–45
Gain settings.............................................................................E–45
High-speed shutter ...................................................................E–46
Audio recording .........................................................................E–47
Rec review ..................................................................................E–48
Retake ........................................................................................E–48
Still-picture playback .................................................................E–48
Menu items .................................................................................E–49
Setting procedure .....................................................................E–49
MAIN FUNCTION menu ...........................................................E–51
AUDIO menu ............................................................................E–52
VF DISPLAY menu ...................................................................E–53
CAMERA SETTING menu........................................................E–54
TIME/DATE menu.....................................................................E–55
MAINTENANCE menu..............................................................E–56
SCENE data (news gathering data recording)..........................E–57
Replacing the back-up battery..................................................E–59
Selecting the audio input ..........................................................E–60
Tips on lighting ..........................................................................E–61
Studio lighting ...........................................................................E–61
Tips on outdoor shooting ..........................................................E–62
Phenomena inherent to CCD cameras.....................................E–62
Smear .......................................................................................E–62
Flicker .......................................................................................E–62
Moiré ........................................................................................E–62
White streaks ............................................................................E–62
Picture roughness.....................................................................E–62
AV signal digital transfer ...........................................................E–63
Troubleshooting .........................................................................E–65
Condensation .............................................................................E–66
Emergency eject.........................................................................E–66
Maintenance ...............................................................................E–67
Cleaning the heads...................................................................E–67
Cleaning the lens ......................................................................E–67
Cleaning the viewfinder ............................................................E–67
Specifications.............................................................................E–68
E–5
�
Precautions for Use
1. Vibration
Avoid using this product in any location where it will be subjected to a great deal of vibration.
2. Ambient operating temperature
This product is designed to operate across a temperature range of 0°C to +40°C. Adequate care should be taken when
the product is operated outside this range since it may develop differences in interchangeability or it may not function
properly, and its active service life will be shortened.
3. Rain, humidity and dust
Minimize operation in the rain or when the humidity level is high since condensation will form inside the product, thereby
causing failures. Take care when using the product in very dusty locations since dust will find its way inside the product
which, in particular, will cause a deterioration in its characteristics.
4. Sunlight
Do not point the lens in the camera section at the sun with the iris open. Neither should the viewfinder’s eyepiece be
pointed at the sun. Failure to heed this warning may cause malfunctioning inside the product.
5. Handling
Do not drop the product or subject it to impact. Failure to heed this warning will cause malfunctioning. Also, do not poke
objects inside the product while the cassette cover is in the raised position.
6. Strong electrical and magnetic fields
Bear in mind that using this product in an extremely strong electrical or magnetic field may result in interference with the
picture on the screen or with the sound.
Features
Compact and lightweight integrated camera/VTR unit with low power consumption
Camera with high picture quality
ODigital processing ensures that the high picture quality remains stable during prolonged use.
OA time code reader/generator is built into the unit.
O1/3-inch interchangeable lenses are featured to enable top-quality operation.
OUse of the built-in ND filter makes it possible to obtain the proper aperture even when shooting in outdoor
locations.
Other features
OThe on-screen menu setting facility makes it easy to set a large number of functions.
ODigital transfer (complies with IEEE1394-1995 standard) of AV signals is possible.
OLong-time recording possible up to a full 184 minutes. (using AJ-5P92LP )
For AJ-5P92LP cassette tapes, use a VTR supporting DVCPRO (25 Mbps) 184 minute tapes.
ODolby noise reduction manufactured under license from Dolby Laboratories Licensing Corporation.
O“DOLBY” and the double-D symbol º are trademarks of Dolby Laboratories Licensing Corporation.
CAUTION
This camera/VTR product supports “L” size DVC PRO tapes only.
Do not use consumer DV tapes or tapes of any other size.
E–6
�
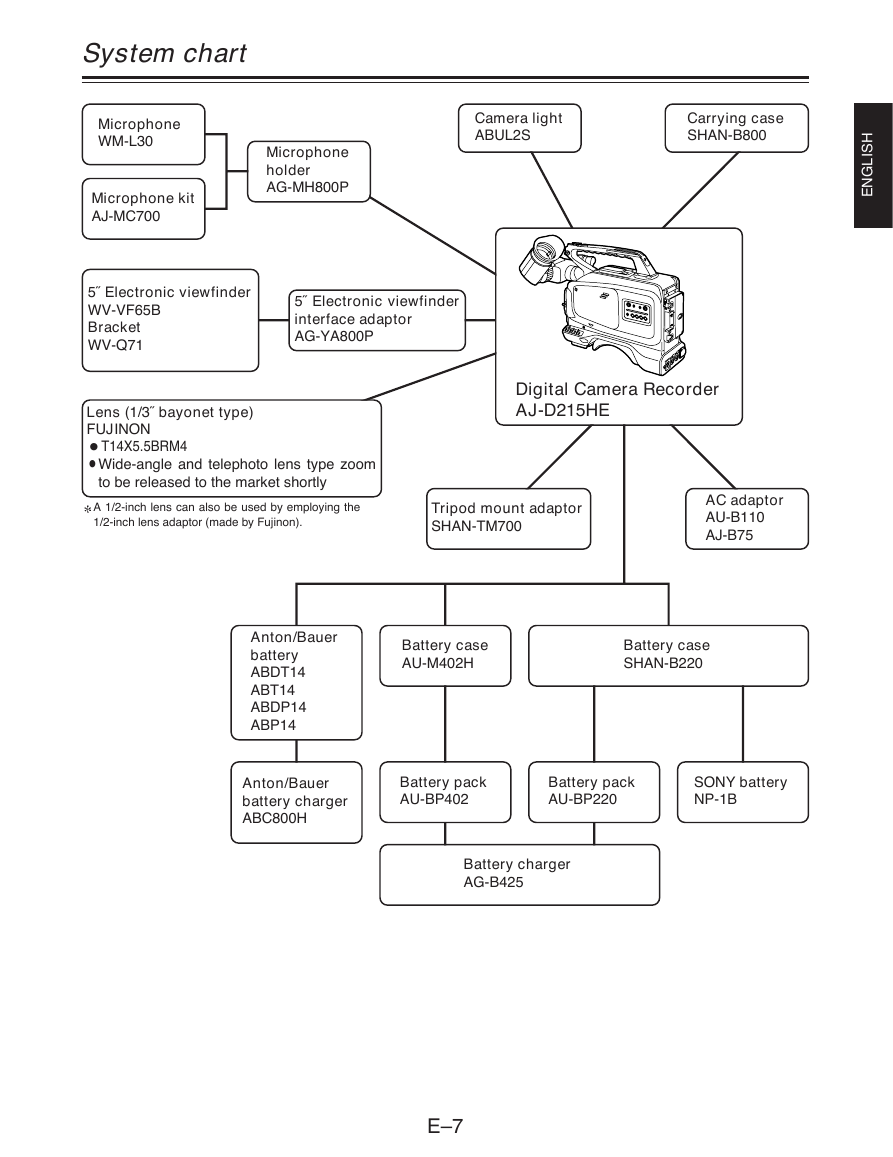
System chart
Microphone
WM-L30
Microphone kit
AJ-MC700
Microphone
holder
AG-MH800P
Camera light
ABUL2S
Carrying case
SHAN-B800
I
H
S
L
G
N
E
5˝ Electronic viewfinder
WV-VF65B
Bracket
WV-Q71
5˝ Electronic viewfinder
interface adaptor
AG-YA800P
Lens (1/3˝ bayonet type)
FUJINON
OT14X5.5BRM4
OWide-angle and telephoto lens type zoom
to be released to the market shortly
A 1/2-inch lens can also be used by employing the
1/2-inch lens adaptor (made by Fujinon).
Digital Camera Recorder
AJ-D215HE
Tripod mount adaptor
SHAN-TM700
AC adaptor
AU-B110
AJ-B75
Anton/Bauer
battery
ABDT14
ABT14
ABDP14
ABP14
Anton/Bauer
battery charger
ABC800H
Battery case
AU-M402H
Battery case
SHAN-B220
Battery pack
AU-BP402
Battery pack
AU-BP220
SONY battery
NP-1B
Battery charger
AG-B425
E–7
�
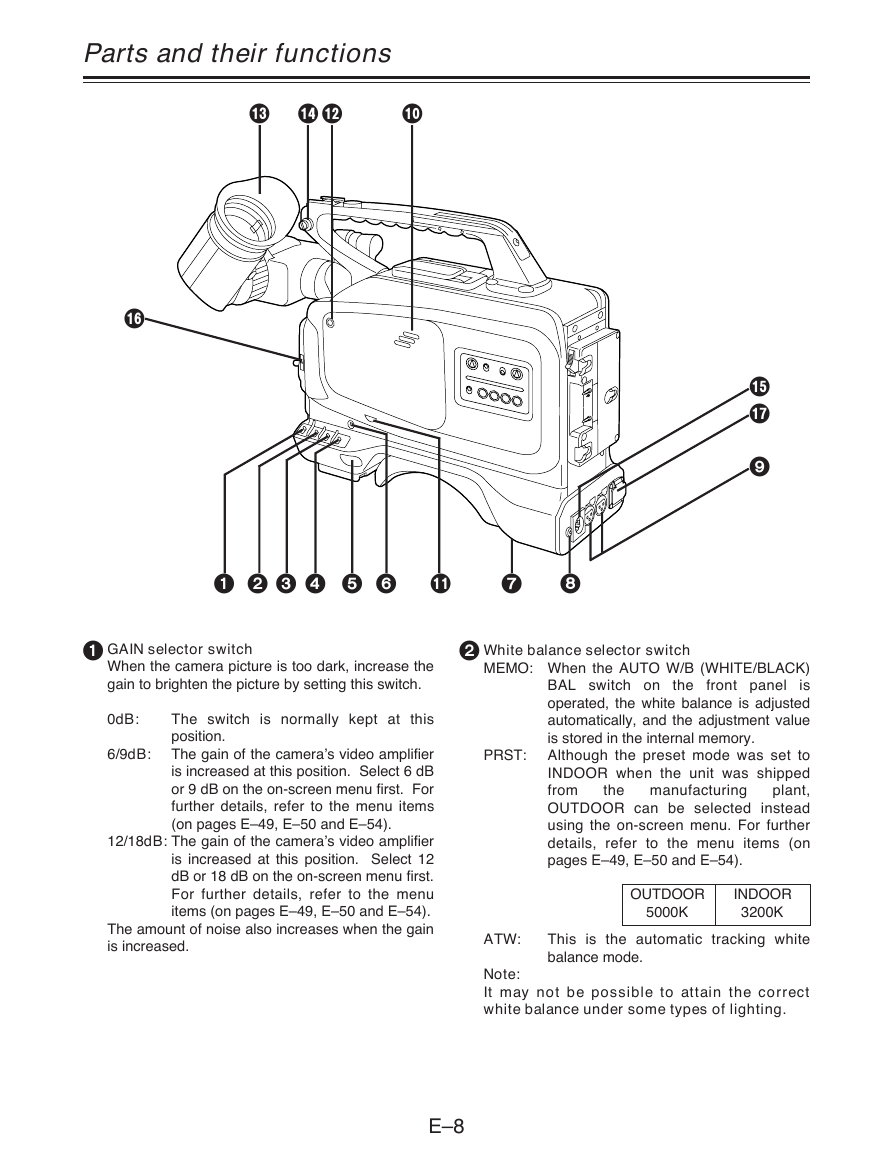
Parts and their functions
= > <
:
@
?
A
9
1 2 3 4 5 6
;
7 8
1 GAIN selector switch
When the camera picture is too dark, increase the
gain to brighten the picture by setting this switch.
0dB:
6/9dB:
The switch is normally kept at this
position.
The gain of the camera’s video amplifier
is increased at this position. Select 6 dB
or 9 dB on the on-screen menu first. For
further details, refer to the menu items
(on pages E–49, E–50 and E–54).
12/18dB: The gain of the camera’s video amplifier
is increased at this position. Select 12
dB or 18 dB on the on-screen menu first.
For further details, refer to the menu
items (on pages E–49, E–50 and E–54).
The amount of noise also increases when the gain
is increased.
2 White balance selector switch
PRST:
MEMO: When the AUTO W/B (WHITE/BLACK)
BAL switch on the front panel is
operated, the white balance is adjusted
automatically, and the adjustment value
is stored in the internal memory.
Although the preset mode was set to
INDOOR when the unit was shipped
from
plant,
OUTDOOR can be selected instead
using the on-screen menu. For further
details, refer to the menu items (on
pages E–49, E–50 and E–54).
the manufacturing
OUTDOOR
5000K
INDOOR
3200K
ATW:
This is the automatic tracking white
balance mode.
Note:
It may not be possible to attain the correct
white balance under some types of lighting.
E–8
�




 2023年江西萍乡中考道德与法治真题及答案.doc
 2012年重庆南川中考生物真题及答案.doc
 2013年江西师范大学地理学综合及文艺理论基础考研真题.doc
 2020年四川甘孜小升初语文真题及答案I卷.doc
 2020年注册岩土工程师专业基础考试真题及答案.doc
 2023-2024学年福建省厦门市九年级上学期数学月考试题及答案.doc
 2021-2022学年辽宁省沈阳市大东区九年级上学期语文期末试题及答案.doc
 2022-2023学年北京东城区初三第一学期物理期末试卷及答案.doc
 2018上半年江西教师资格初中地理学科知识与教学能力真题及答案.doc
 2012年河北国家公务员申论考试真题及答案-省级.doc
 2020-2021学年江苏省扬州市江都区邵樊片九年级上学期数学第一次质量检测试题及答案.doc
 2022下半年黑龙江教师资格证中学综合素质真题及答案.doc