4
11
22
11
4
22
5
m
ft
英 語
Printed in Japan
320200-HG-01E
Instructions
�
Preface
Congratulations on your purchase of the Mamiya 645 AFD III
Camera.
1
2
3
4
5
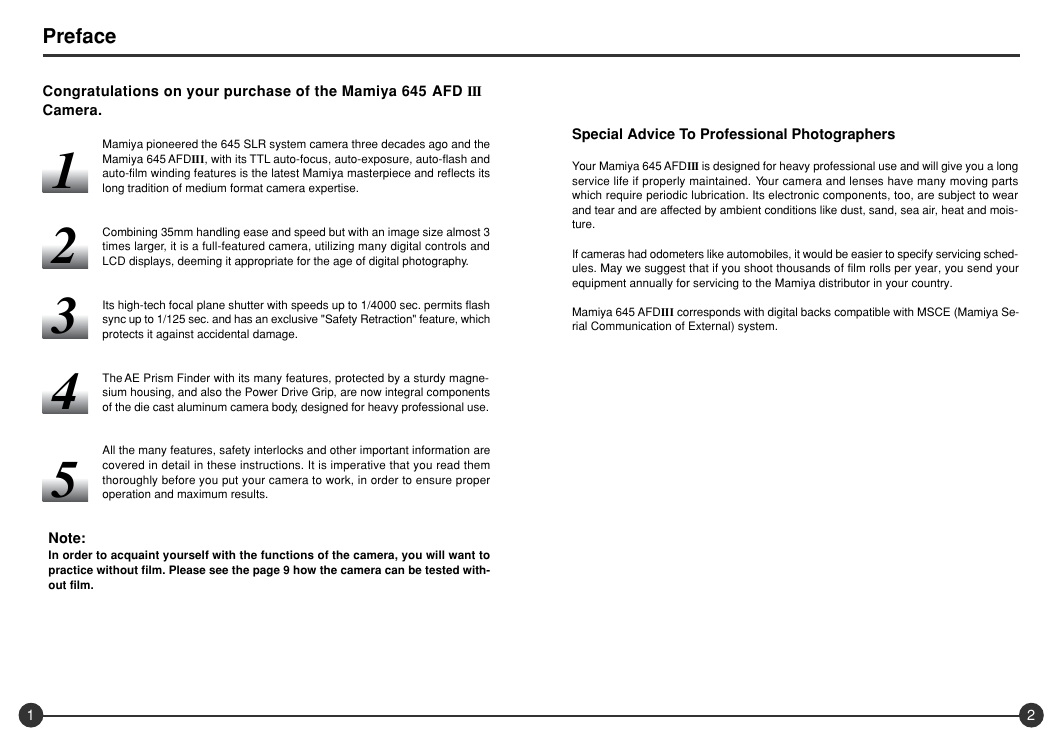
Mamiya pioneered the 645 SLR system camera three decades ago and the
Mamiya 645 AFDIII, with its TTL auto-focus, auto-exposure, auto-flash and
auto-film winding features is the latest Mamiya masterpiece and reflects its
long tradition of medium format camera expertise.
Combining 35mm handling ease and speed but with an image size almost 3
times larger, it is a full-featured camera, utilizing many digital controls and
LCD displays, deeming it appropriate for the age of digital photography.
Its high-tech focal plane shutter with speeds up to 1/4000 sec. permits flash
sync up to 1/125 sec. and has an exclusive "Safety Retraction" feature, which
protects it against accidental damage.
The AE Prism Finder with its many features, protected by a sturdy magne-
sium housing, and also the Power Drive Grip, are now integral components
of the die cast aluminum camera body, designed for heavy professional use.
All the many features, safety interlocks and other important information are
covered in detail in these instructions. It is imperative that you read them
thoroughly before you put your camera to work, in order to ensure proper
operation and maximum results.
Note:
In order to acquaint yourself with the functions of the camera, you will want to
practice without film. Please see the page 9 how the camera can be tested with-
out film.
Special Advice To Professional Photographers
Your Mamiya 645 AFDIII is designed for heavy professional use and will give you a long
service life if properly maintained. Your camera and lenses have many moving parts
which require periodic lubrication. Its electronic components, too, are subject to wear
and tear and are affected by ambient conditions like dust, sand, sea air, heat and mois-
ture.
If cameras had odometers like automobiles, it would be easier to specify servicing sched-
ules. May we suggest that if you shoot thousands of film rolls per year, you send your
equipment annually for servicing to the Mamiya distributor in your country.
Mamiya 645 AFDIII corresponds with digital backs compatible with MSCE (Mamiya Se-
rial Communication of External) system.
1
2
�
Names of Parts and Functions
Hot shoe (page 82)
Exposure mode dial lock release button
(page 53 to 60)
Exposure mode dial
(page 53 to 60)
Auto focus assist infrared light
emission window (page 50)
Self timer lamp (page 77)
Mirror*
Do not touch the mirror with
your hand
Electronic contacts
Lens mount alignment mark(page 16)
Depth of field preview button
(page 80)
Rubber eye piece
Magazine LCD panel (page 5)
Diopter adjustment dial (page 19)
Down button
(page 28, 34 & 76)
Magazine release button
(page 18)
Magazine cover release button
(page 29)
Magazine cover lock button
(page 29)
Magazine lock button (page 18)
Synchro terminal (page 87)
Electronic shutter release contact
(page 75)
Up button
(page 28, 34 & 76)
Emergency film wind
button (page 34, 40 & 74)
Film advance button
(page 28)
Auto exposure lock button
(page 65 & 66)
AEL Exposure metering button
(page 59)
Diopter adjustment lens (standard accessory) (page 20)
Dark slide storage pocket (page 32)
Memo clip (page 103)
Screw cap for battery compartment for magazine LCD
(page 13)
External power socket (page 102)
Battery case lock lever (page 11)
Battery case (page 11)
Tripod socket (page 103)
Self timer button (page 52, 71 & 72)
Main LCD backlight button
(page 78)
Multiple exposure button
(page 61)
Focus point selector button
(page 44)
Set button (page 6, 21 to 23,
61, 70 & 71)
Flash auto adjustment select
button
(page 85 & 86)
Auto bracketing button
(page 67& 68)
Multiple exposure mode button
(page 71)
4
Eyepiece shutter lever (page 75)
Main LCD (page 5)
Rear dial (page 6)
Strap mount (page 24)
Front dial (page 6)
Shutter release button (page 38)
Drive dial (page 51)
AF lock button (page 49)
Strap mount (page 24)
Dark slide (page 17 & 18)
Focus mode selector lever (page 43 & 45)
Lens release button (page 15 & 16)
3
�
Liquid Crystal Displays (LCD)
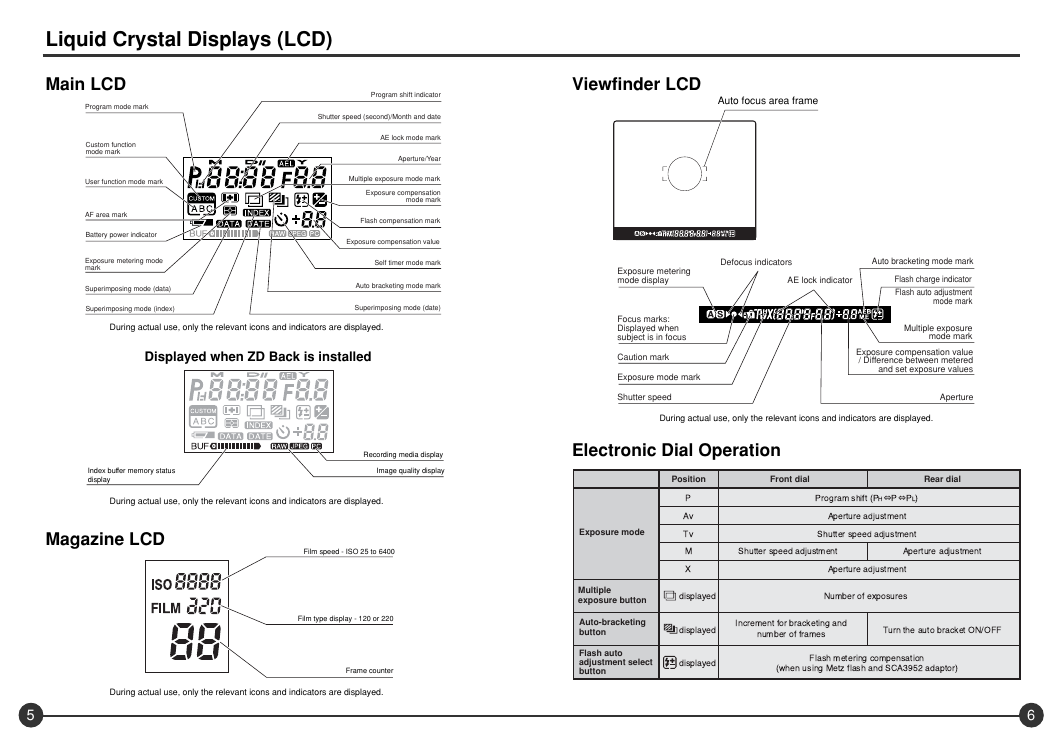
Main LCD
Program mode mark
Custom function
mode mark
User function mode mark
AF area mark
Battery power indicator
Exposure metering mode
mark
Superimposing mode (data)
Superimposing mode (index)
Program shift indicator
Shutter speed (second)/Month and date
AE lock mode mark
Aperture/Year
Multiple exposure mode mark
Exposure compensation
mode mark
Flash compensation mark
Exposure compensation value
Self timer mode mark
Auto bracketing mode mark
Superimposing mode (date)
During actual use, only the relevant icons and indicators are displayed.
Displayed when ZD Back is installed
Index buffer memory status
display
Recording media display
Image quality display
During actual use, only the relevant icons and indicators are displayed.
Magazine LCD
Film speed - ISO 25 to 6400
Film type display - 120 or 220
Frame counter
Viewfinder LCD
Auto focus area frame
Exposure metering
mode display
Focus marks:
Displayed when
subject is in focus
Caution mark
Exposure mode mark
Shutter speed
Defocus indicators
Auto bracketing mode mark
AE lock indicator
Flash charge indicator
Flash auto adjustment
mode mark
Multiple exposure
mode mark
Exposure compensation value
/ Difference between metered
and set exposure values
Aperture
During actual use, only the relevant icons and indicators are displayed.
Electronic Dial Operation
Position
Front dial
Rear dial
2
)L
6L
�
:
2H�CH=� IDEBJ �20⇔2⇔2��
)FAHJKHA =@�KIJ�A�J
5DKJJAH IFAA@ =@�KIJ�A�J
5DKJJAH IFAA@ =@�KIJ�A�J
)FAHJKHA =@�KIJ�A�J
)FAHJKHA =@�KIJ�A�J
@EIF�=OA@
�K�>AH �B ANF�IKHAI
@EIF�=OA@
1�?HA�A�J B�H >H=?�AJE�C =�@
�K�>AH �B BH=�AI
6KH� JDA =KJ� >H=?�AJ ����..
@EIF�=OA@
.�=ID �AJAHE�C ?��FA�I=JE��
�MDA� KIE�C �AJ� B�=ID =�@ 5+)!'# =@=FJ�H�
Exposure mode
Multiple
exposure button
Auto-bracketing
button
Flash auto
adjustment select
button
During actual use, only the relevant icons and indicators are displayed.
5
6
�
Content
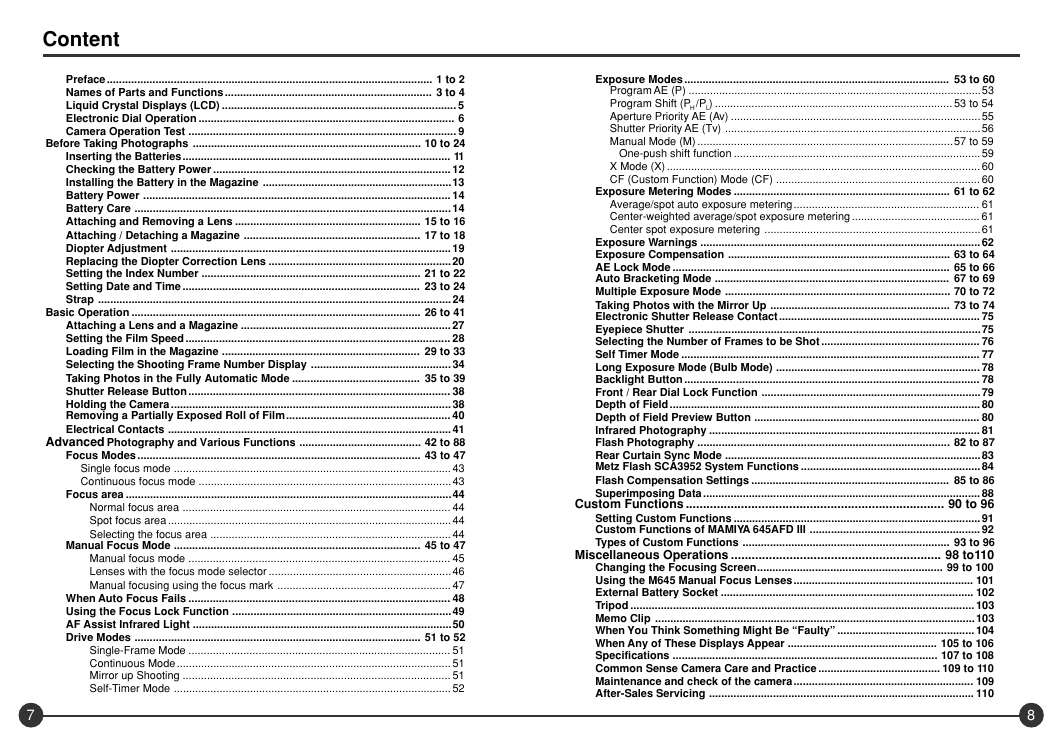
Preface........................................................................................................... 1 to 2
Names of Parts and Functions .................................................................... 3 to 4
Liquid Crystal Displays (LCD) ............................................................................. 5
Electronic Dial Operation .................................................................................... 6
Camera Operation Test ........................................................................................ 9
Before Taking Photographs ........................................................................... 10 to 24
Inserting the Batteries........................................................................................ 11
Checking the Battery Power .............................................................................. 12
Installing the Battery in the Magazine ..............................................................13
Battery Power ..................................................................................................... 14
Battery Care ........................................................................................................ 14
Attaching and Removing a Lens ............................................................. 15 to 16
Attaching / Detaching a Magazine .......................................................... 17 to 18
Diopter Adjustment ............................................................................................ 19
Replacing the Diopter Correction Lens ............................................................20
Setting the Index Number ........................................................................ 21 to 22
Setting Date and Time .............................................................................. 23 to 24
Strap .................................................................................................................... 24
Basic Operation ............................................................................................... 26 to 41
Attaching a Lens and a Magazine ..................................................................... 27
Setting the Film Speed ....................................................................................... 28
Loading Film in the Magazine ................................................................. 29 to 33
Selecting the Shooting Frame Number Display .............................................. 34
Taking Photos in the Fully Automatic Mode .......................................... 35 to 39
Shutter Release Button ...................................................................................... 38
Holding the Camera ............................................................................................ 38
Removing a Partially Exposed Roll of Film...................................................... 40
Electrical Contacts ............................................................................................. 41
Advanced Photography and Various Functions ........................................ 42 to 88
Focus Modes ............................................................................................. 43 to 47
Single focus mode ........................................................................................... 43
Continuous focus mode ...................................................................................43
Focus area ...........................................................................................................44
Normal focus area ........................................................................................ 44
Spot focus area ............................................................................................. 44
Selecting the focus area ............................................................................... 44
Manual Focus Mode ................................................................................. 45 to 47
Manual focus mode ...................................................................................... 45
Lenses with the focus mode selector ............................................................46
Manual focusing using the focus mark ......................................................... 47
When Auto Focus Fails ...................................................................................... 48
Using the Focus Lock Function ........................................................................49
AF Assist Infrared Light .....................................................................................50
Drive Modes .............................................................................................. 51 to 52
Single-Frame Mode ...................................................................................... 51
Continuous Mode .......................................................................................... 51
Mirror up Shooting ........................................................................................ 51
Self-Timer Mode ........................................................................................... 52
Exposure Modes ....................................................................................... 53 to 60
Program AE (P) ................................................................................................53
Program Shift (PH/PL) .............................................................................. 53 to 54
Aperture Priority AE (Av) ..................................................................................55
Shutter Priority AE (Tv) ....................................................................................56
Manual Mode (M) ....................................................................................57 to 59
One-push shift function ................................................................................. 59
X Mode (X) ....................................................................................................... 60
CF (Custom Function) Mode (CF) ................................................................... 60
Exposure Metering Modes ....................................................................... 61 to 62
Average/spot auto exposure metering............................................................. 61
Center-weighted average/spot exposure metering .......................................... 61
Center spot exposure metering .......................................................................61
Exposure Warnings ............................................................................................ 62
Exposure Compensation ......................................................................... 63 to 64
AE Lock Mode ........................................................................................... 65 to 66
Auto Bracketing Mode ............................................................................. 67 to 69
Multiple Exposure Mode .......................................................................... 70 to 72
Taking Photos with the Mirror Up ........................................................... 73 to 74
Electronic Shutter Release Contact.................................................................. 75
Eyepiece Shutter ................................................................................................75
Selecting the Number of Frames to be Shot .................................................... 76
Self Timer Mode .................................................................................................. 77
Long Exposure Mode (Bulb Mode) ................................................................... 78
Backlight Button ................................................................................................. 78
Front / Rear Dial Lock Function ........................................................................79
Depth of Field ...................................................................................................... 80
Depth of Field Preview Button .......................................................................... 80
Infrared Photography ......................................................................................... 81
Flash Photography ................................................................................... 82 to 87
Rear Curtain Sync Mode ....................................................................................83
Metz Flash SCA3952 System Functions ...........................................................84
Flash Compensation Settings ................................................................. 85 to 86
Superimposing Data ........................................................................................... 88
Custom Functions ........................................................................... 90 to 96
Setting Custom Functions ................................................................................. 91
Custom Functions of MAMIYA 645AFD III ........................................................ 92
Types of Custom Functions .................................................................... 93 to 96
Miscellaneous Operations ............................................................. 98 to110
Changing the Focusing Screen............................................................. 99 to 100
Using the M645 Manual Focus Lenses........................................................... 101
External Battery Socket ................................................................................... 102
Tripod ................................................................................................................. 103
Memo Clip .........................................................................................................103
When You Think Something Might Be “Faulty” ............................................. 104
When Any of These Displays Appear ................................................. 105 to 106
Specifications ....................................................................................... 107 to 108
Common Sense Camera Care and Practice ........................................ 109 to 110
Maintenance and check of the camera........................................................... 109
After-Sales Servicing ....................................................................................... 110
7
8
�
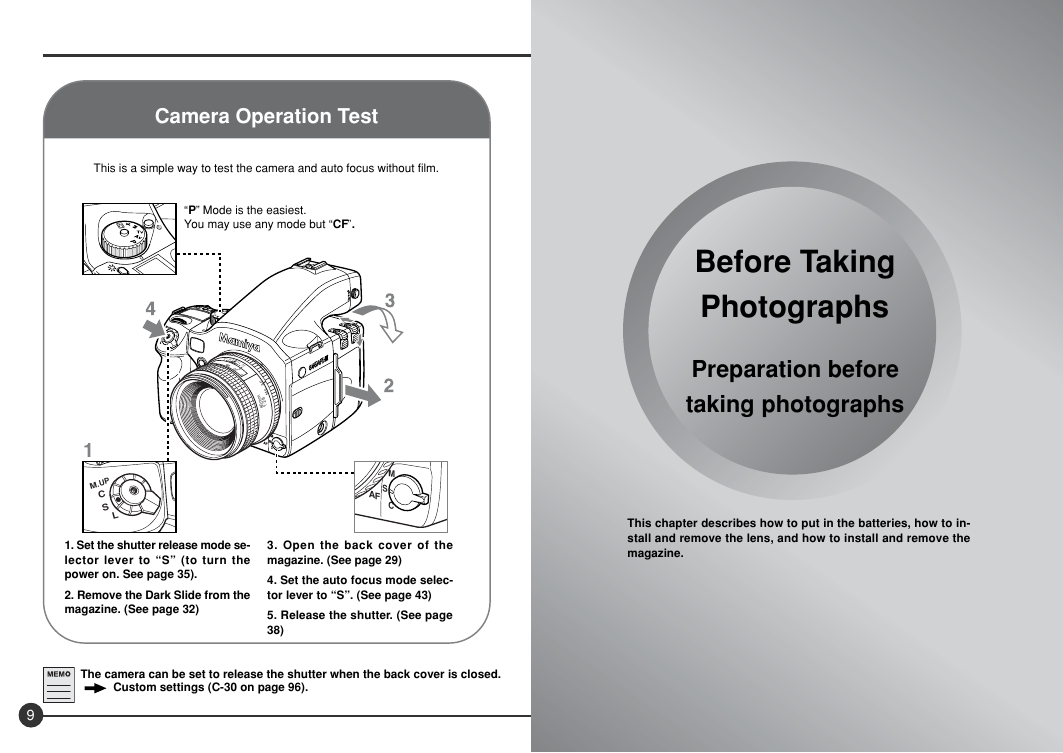
Camera Operation Test
This is a simple way to test the camera and auto focus without film.
“P” Mode is the easiest.
You may use any mode but “CF”.
22
11
4
4
1
1
2
2
0
5
2
0
F
A
F
M
m
8
m
2
:
0
1
8
M . U P
C
S
L
S
AF
M
C
1. Set the shutter release mode se-
lector lever to “S” (to turn the
power on. See page 35).
2. Remove the Dark Slide from the
magazine. (See page 32)
3. Open the back cover of the
magazine. (See page 29)
4. Set the auto focus mode selec-
tor lever to “S”. (See page 43)
5. Release the shutter. (See page
38)
The camera can be set to release the shutter when the back cover is closed.
Custom settings (C-30 on page 96).
9
Before Taking
Photographs
Preparation before
taking photographs
This chapter describes how to put in the batteries, how to in-
stall and remove the lens, and how to install and remove the
magazine.
�
Inserting the Batteries ( )
The camera will not operate
without batteries
Checking the Battery Power
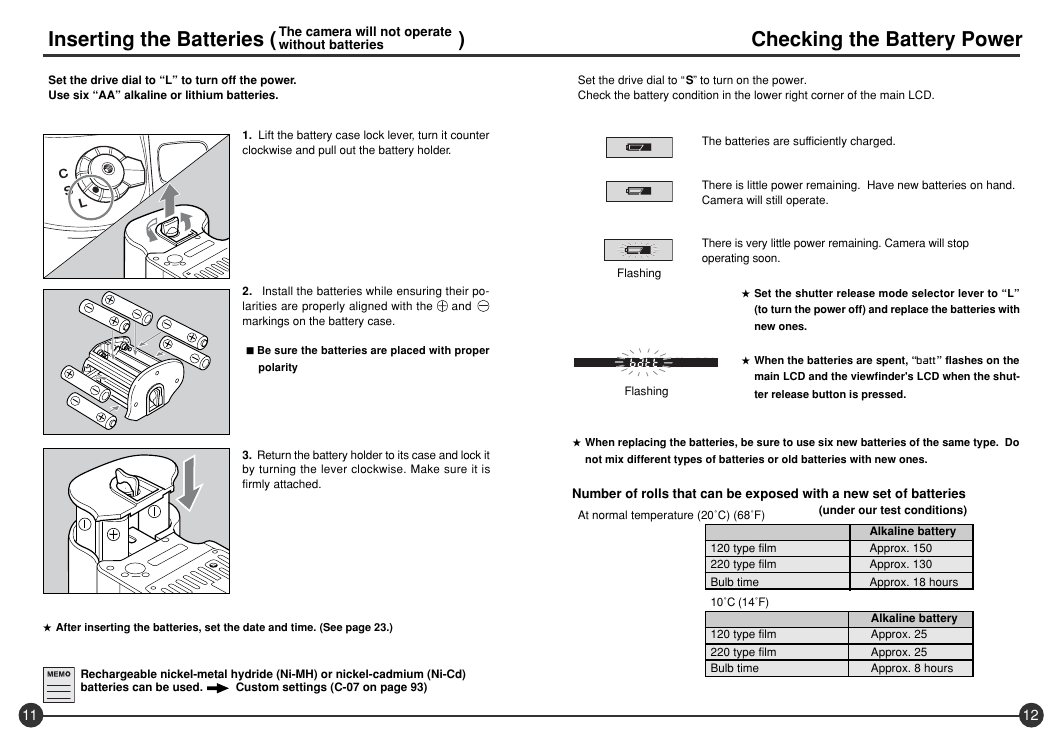
Set the drive dial to “L” to turn off the power.
Use six “AA” alkaline or lithium batteries.
Set the drive dial to “S” to turn on the power.
Check the battery condition in the lower right corner of the main LCD.
1. Lift the battery case lock lever, turn it counter
clockwise and pull out the battery holder.
The batteries are sufficiently charged.
C
S
L
2. Install the batteries while ensuring their po-
larities are properly aligned with the
markings on the battery case.
and
■ Be sure the batteries are placed with proper
polarity
There is little power remaining. Have new batteries on hand.
Camera will still operate.
There is very little power remaining. Camera will stop
operating soon.
Flashing
★ Set the shutter release mode selector lever to “L”
(to turn the power off) and replace the batteries with
new ones.
Flashing
★ When the batteries are spent, “batt” flashes on the
main LCD and the viewfinder's LCD when the shut-
ter release button is pressed.
3. Return the battery holder to its case and lock it
by turning the lever clockwise. Make sure it is
firmly attached.
★ When replacing the batteries, be sure to use six new batteries of the same type. Do
not mix different types of batteries or old batteries with new ones.
Number of rolls that can be exposed with a new set of batteries
(under our test conditions)
At normal temperature (20˚C) (68˚F)
★ After inserting the batteries, set the date and time. (See page 23.)
Rechargeable nickel-metal hydride (Ni-MH) or nickel-cadmium (Ni-Cd)
batteries can be used.
Custom settings (C-07 on page 93)
11
120 type film
220 type film
Bulb time
10˚C (14˚F)
120 type film
220 type film
Bulb time
Alkaline battery
Approx. 150
Approx. 130
Approx. 18 hours
Alkaline battery
Approx. 25
Approx. 25
Approx. 8 hours
12
�
Installing the Battery in the Magazine
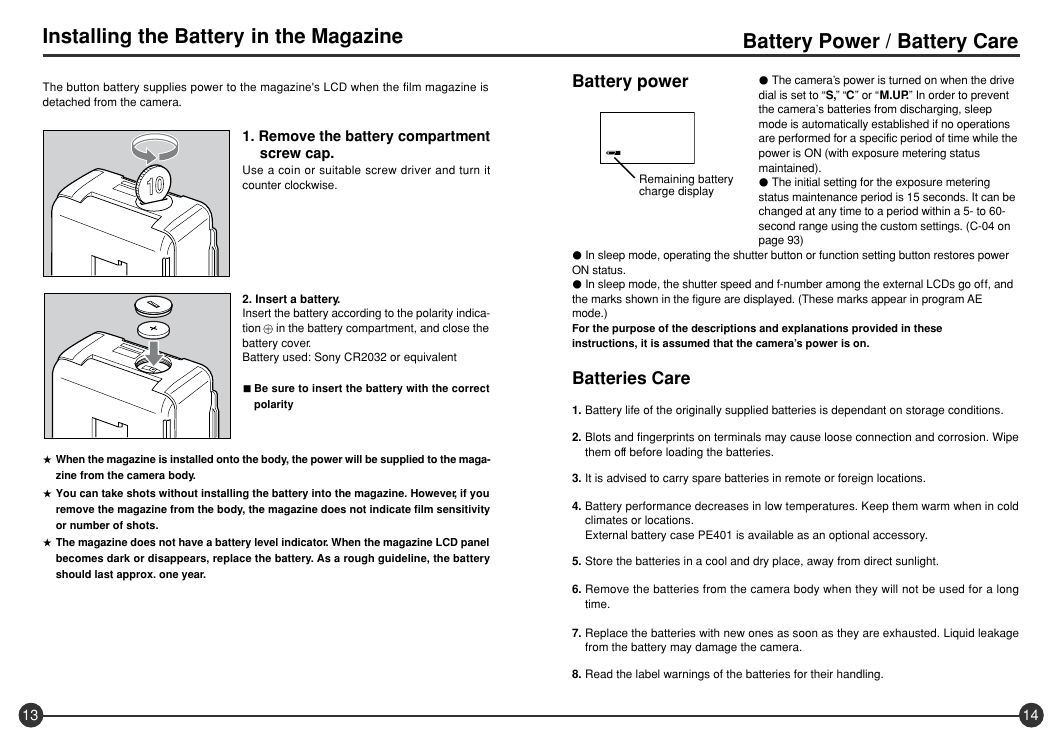
The button battery supplies power to the magazine's LCD when the film magazine is
detached from the camera.
Battery power
1. Remove the battery compartment
screw cap.
Use a coin or suitable screw driver and turn it
counter clockwise.
Remaining battery
charge display
Battery Power / Battery Care
● The camera’s power is turned on when the drive
dial is set to “S,” “C” or “M.UP.” In order to prevent
the camera’s batteries from discharging, sleep
mode is automatically established if no operations
are performed for a specific period of time while the
power is ON (with exposure metering status
maintained).
● The initial setting for the exposure metering
status maintenance period is 15 seconds. It can be
changed at any time to a period within a 5- to 60-
second range using the custom settings. (C-04 on
page 93)
2. Insert a battery.
Insert the battery according to the polarity indica-
tion
in the battery compartment, and close the
battery cover.
Battery used: Sony CR2032 or equivalent
■ Be sure to insert the battery with the correct
polarity
★ When the magazine is installed onto the body, the power will be supplied to the maga-
zine from the camera body.
★ You can take shots without installing the battery into the magazine. However, if you
remove the magazine from the body, the magazine does not indicate film sensitivity
or number of shots.
★ The magazine does not have a battery level indicator. When the magazine LCD panel
becomes dark or disappears, replace the battery. As a rough guideline, the battery
should last approx. one year.
● In sleep mode, operating the shutter button or function setting button restores power
ON status.
● In sleep mode, the shutter speed and f-number among the external LCDs go off, and
the marks shown in the figure are displayed. (These marks appear in program AE
mode.)
For the purpose of the descriptions and explanations provided in these
instructions, it is assumed that the camera’s power is on.
Batteries Care
1. Battery life of the originally supplied batteries is dependant on storage conditions.
2. Blots and fingerprints on terminals may cause loose connection and corrosion. Wipe
them off before loading the batteries.
3. It is advised to carry spare batteries in remote or foreign locations.
4. Battery performance decreases in low temperatures. Keep them warm when in cold
climates or locations.
External battery case PE401 is available as an optional accessory.
5. Store the batteries in a cool and dry place, away from direct sunlight.
6. Remove the batteries from the camera body when they will not be used for a long
time.
7. Replace the batteries with new ones as soon as they are exhausted. Liquid leakage
from the battery may damage the camera.
8. Read the label warnings of the batteries for their handling.
13
14
�



 2023年江西萍乡中考道德与法治真题及答案.doc
 2012年重庆南川中考生物真题及答案.doc
 2013年江西师范大学地理学综合及文艺理论基础考研真题.doc
 2020年四川甘孜小升初语文真题及答案I卷.doc
 2020年注册岩土工程师专业基础考试真题及答案.doc
 2023-2024学年福建省厦门市九年级上学期数学月考试题及答案.doc
 2021-2022学年辽宁省沈阳市大东区九年级上学期语文期末试题及答案.doc
 2022-2023学年北京东城区初三第一学期物理期末试卷及答案.doc
 2018上半年江西教师资格初中地理学科知识与教学能力真题及答案.doc
 2012年河北国家公务员申论考试真题及答案-省级.doc
 2020-2021学年江苏省扬州市江都区邵樊片九年级上学期数学第一次质量检测试题及答案.doc
 2022下半年黑龙江教师资格证中学综合素质真题及答案.doc